Layers#
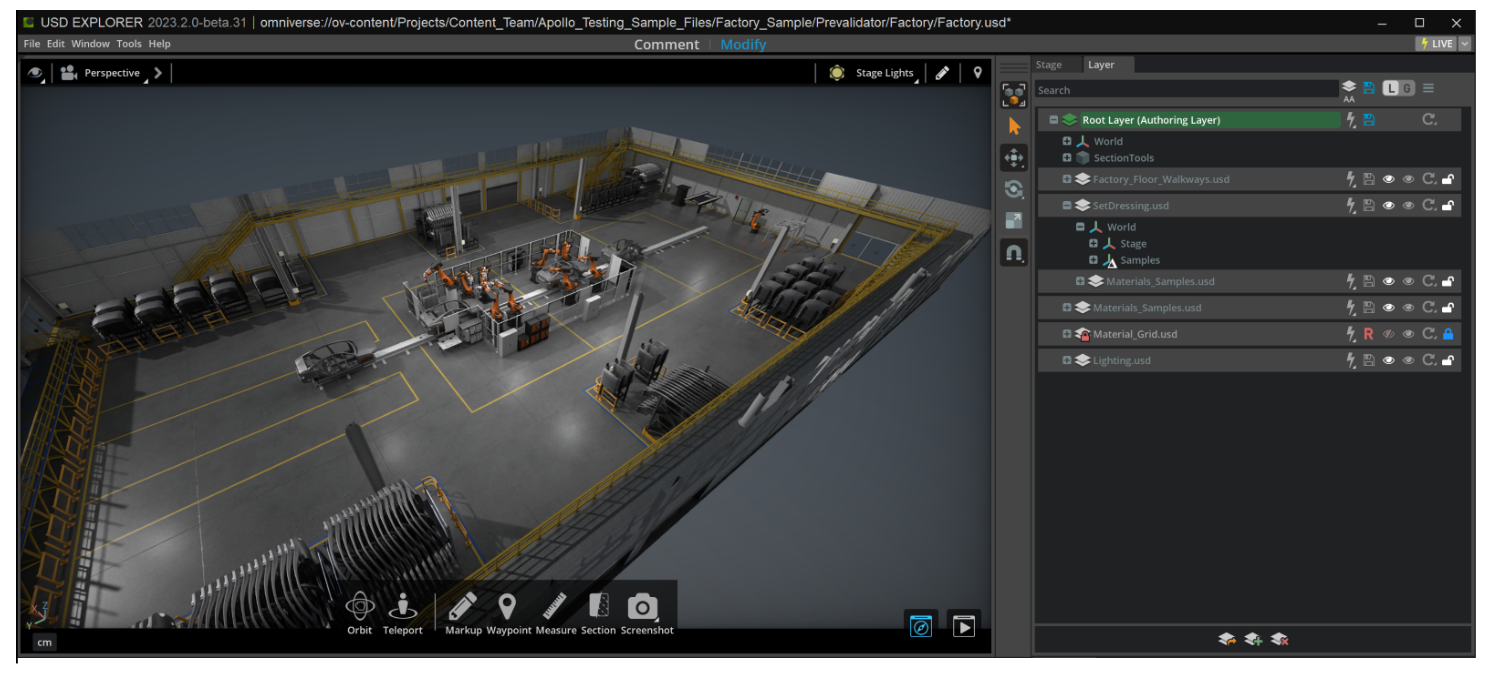
The Layers Extension provides a convenient way to organize and manage your scene while also providing a comprehensive live workflow. Layers are stacked USD files. Added on top of this however is a live workflow allowing users to set each nested layer to be edited and viewed live. For example, lighting, content, and the environment can each exist on separate Layers (stacked USDs).
As things are edited within the Layers, deltas (aka: overrides) are stored allowing you to manipulate anything in the scene non-destructively. Additionally, those Layers can be set to active on an individual layer basis which will show updates in real-time of other users working on either the layer directly or within the same root layer.
Layers - Working Sample#
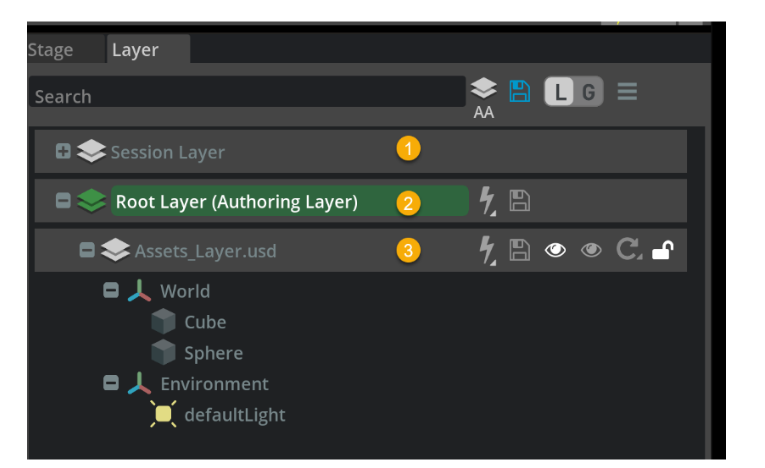
Session Layer is where session (i.e., non-persistent) content resides when editing live.
ROOT is empty
Assets_Layer is where all the assets such as imported content reside.
Note
During a Live Session, a new “Live Session” layer will be automatically created within the “Session Layer” and will temporarily include all the delta changes until the session ends. This includes xforms, waypoints, markups, etc..
The “Live Session” will have the FIRST STRONGEST opinion, even over ROOT.
Understanding Layers#
Layer Ordering#
The effect of Layers (deltas, models, and otherwise) are considered in a bottom-up fashion. The (stronger) layer above overrides the (weaker) layer below on any alterations (“opinions”). You can move Layers up and down freely to alter their opinion strength ordering.
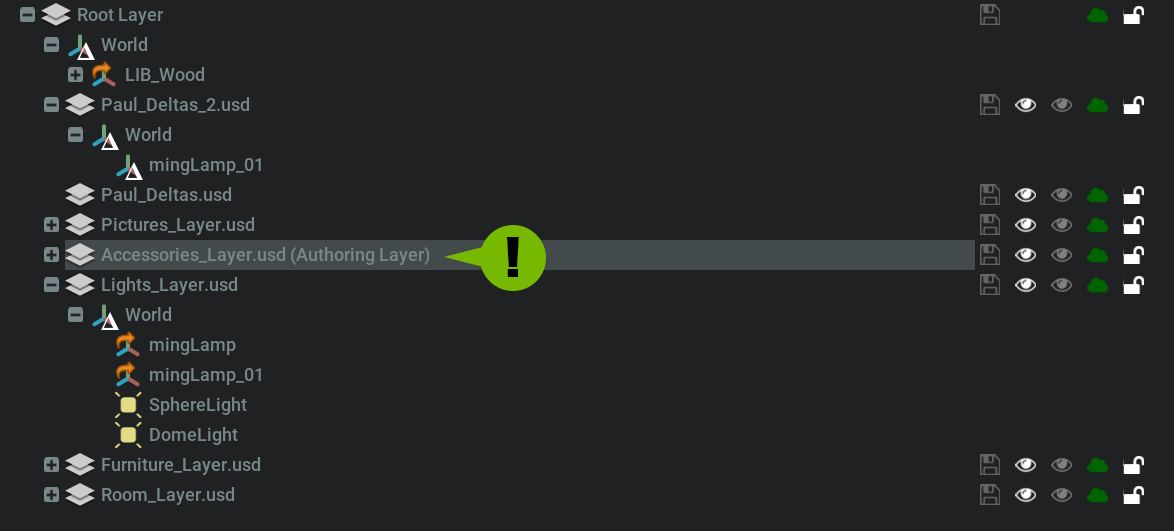
Authoring Layer#
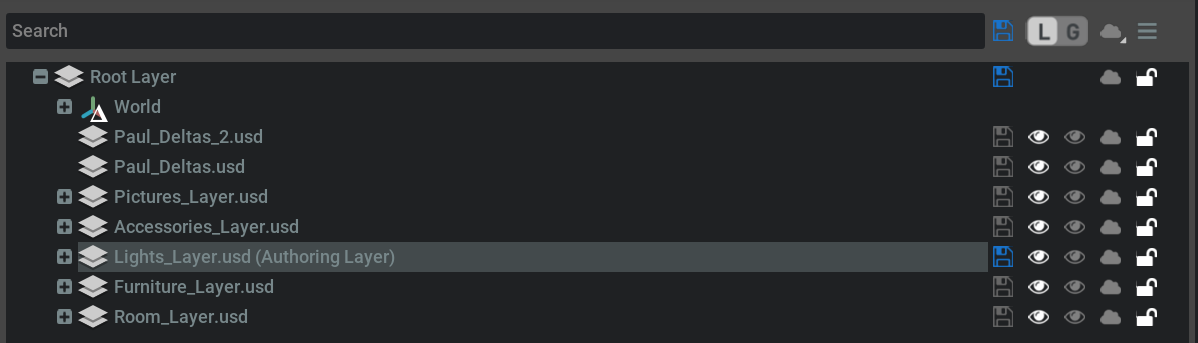
When authoring in Layers, it is imperative to set the layer you wish to affect with your edits. When set, the layer chosen is called the authoring layer and is denoted in the Layers panel next to the current authoring layer. By default, this will be set to the root layer (highest priority) but can be changed by double clicking the layer you wish to author.
Layer Panel#
The layer panel controls all Layers interactions and should not be confused with the stage panel though there is some visual overlap. The layer panel not only shows the items in the scene but also shows where meshes were created, changed, or referenced. The Stage on the other hand only shows objects in the scene.
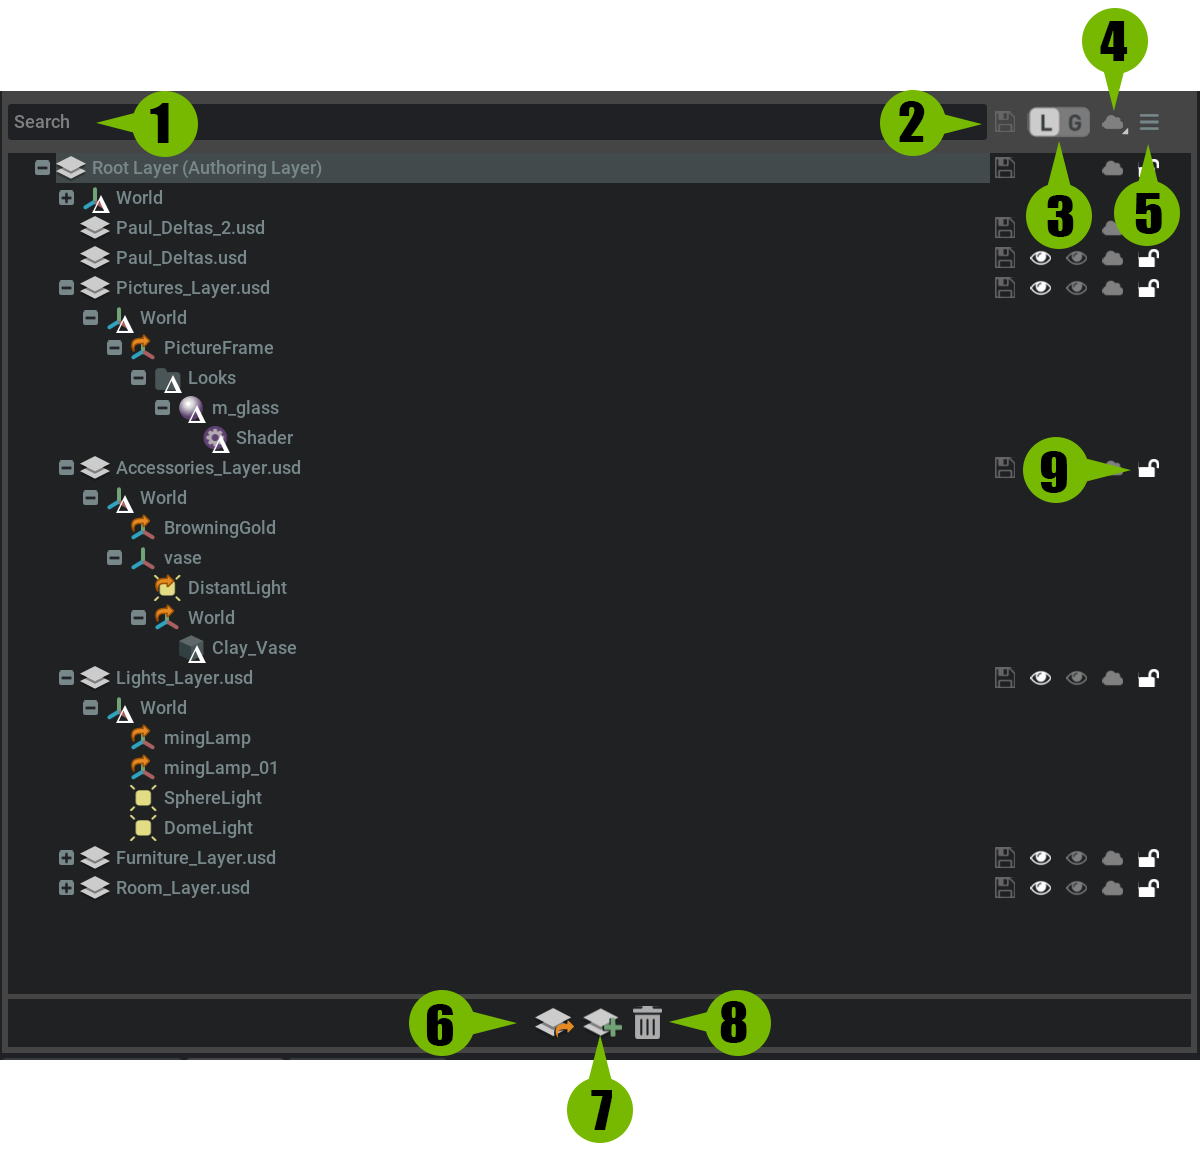
1. Contextual Search#
Used to search for entities in the stage hierarchy.
Note
This search can be very useful in locating all changes on all Layers for a specified mesh, light, etc
2. Save Layers#
The save column allows users to save layers individually while the header icon allows users to save all layers in a single click. Whenever a change is made in a layer and it has not yet been saved, the icon will change colors to blue. If the save icon is grey, this means that the layer(s) are already saved.
3. Local/Global Visibility#
Local and global views are specifically useful to multi-user workflows. As a file can have many people working on it simultaneously, these views allow you to hide a Layer independently from what the rest of the users will see. When visibility is changed under Local, visibility only changes for the user. When visibility of a Layer is changed under Global, all users in the file will see the change.
To change from Local and Global View, press the L or G buttons respectively. To change a specific layers visibility globally or locally, enable or disable using the Eye icon of the layer in the respective column.
Option |
Effect |
|---|---|
Global Visibility |
Hides and un-hides the specified Layers from all users. |
Local Visibility |
Hides and un-hides that Layers from the current computer/user. |
4. Live#
The live controls are managed in the live column. Each layer can be set to live individually while the header icon allows the user to toggle all on, toggle all off, or all always on.
Option |
Effect |
|---|---|
All Always On |
Enabling “All Always On” will result in all layers being live at all times until disabled. |
Toggle On |
Toggles all layers to be live. Individual Layers can then be toggled off by selecting the live icon for that layer. |
Toggle Off |
Toggles all live off for all layers. Individual Layers can then be toggled on by selecting the live icon for that layer. |
5. Layer Options#
The layer options give access to optional features for layers.
Option |
Effect |
|---|---|
Show Layer Contents |
Toggles the display of all content generated within layers (deltas, native assets, and references). |
Show Session Layer |
Toggles the display of the Session Layer. |
6. Import SubLayer#
Imports any USD files as a SubLayer in the current USD file.
Important
When a USD is imported as a SubLayer, actions done are committed directly to the SubLayers File. This can be very dangerous in practice and should be used cautiously. For example, if a mesh is native to the SubLayer and it is deleted, the mesh is deleted from the USD SubLayer file and is permanent. This can result in lost work. As a best practice, it would be wise to instead create a new SubLayer then reference the usd by dragging it in from the file browser. This method will result in changes being considered as deltas on the Layers USD leaving the referenced USD file untouched.
7. Create SubLayer#
Creates a new layer in the stage. When clicked will request a location for saving the layer. Once complete a new layer will be appended to the layer list.
8. Delete SubLayer#
Removes the current Layer.
Note
If removed, a layer can be brought back by using “Import SubLayer” and selecting the removed layer from its saved location.
9. Lock Layers#
Layers can be individually locked by selecting the lock icon for the respective layer. This will restrict the selected Layer from being edited by any other users but is still editable by the current user.
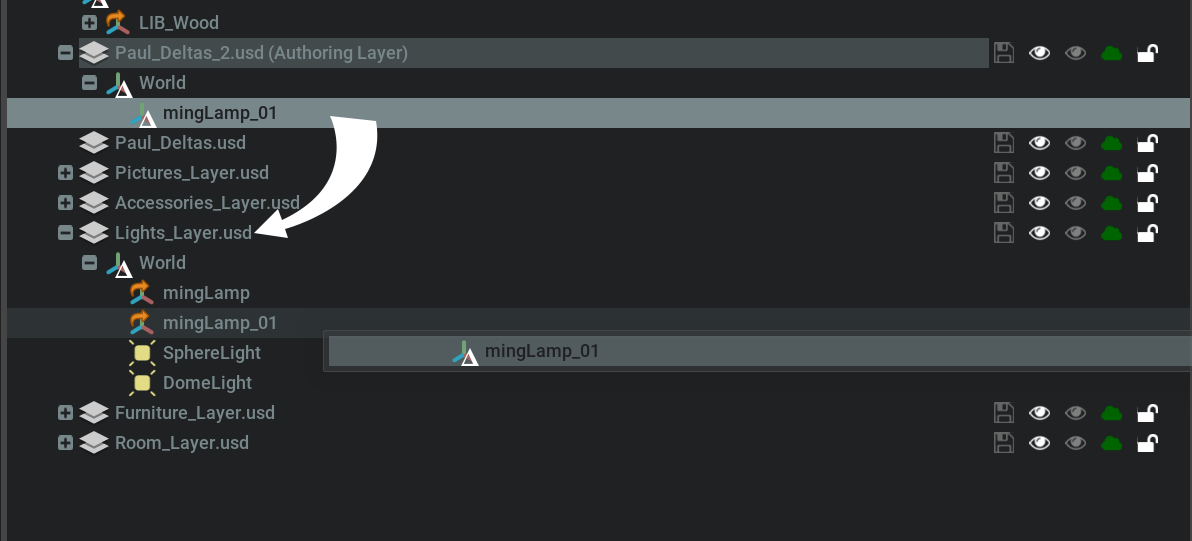
Merging Deltas#
If deltas exist on a layer and you would like to commit those changes permanently, the delta can be merged by dragging it to a layer where deltas already exist for that entity or to the layer where it was originally created.
Additional Layers for Explorer#
Layer |
Description |
|---|---|
Session Layer |
(Auto created) The Session Layer is usually hidden and contains non-persistent content, including the necessary content for a live session. When a Live Session is executed, the Live Session Layer will reside inside the Session Layer where it will temporarily store all the live session deltas until the session ends and merges. Ideally, it is best to merge to a NEW layer rather than the Root Layer. These deltas can include xforms, waypoints, markups, etc.. |
ROOT Layer |
(Default Layer) We recommend keeping this empty to avoid unintentionally overriding weaker layers. This is where the merge sessions get saved but ideally we want to save a merge to a NEW layer |
Locked Layer |
(Optional) Here is where you can store the waypoints, markups and assets you do not wish to get affected by other opinions. |
Markup Layer |
This is where all the review data for annotations, comments and markups will be stored. Sublayers will be titled by date for reference back to previous review sessions. |
Waypoint Layer |
The waypoints will be saved in sublayers where they can easily be accessed based on review dates. |
Animation Layer |
This is where you override the Layout opinions by animating your assets, cameras or lights. Creating subLayers for these asset groups is best for organization purposes |
Layout Layer |
Once assets are imported into the Asset Layer, they can then be positioned and oriented within the Layout Layer. |
Material Layer |
Assigning materials will override the opinions from the Asset Layer. Having this Layer before Layout ensures that any mistaken changes to position and orientation of assets are not stomped on. |
Lighting Layer |
The default environment lights and light rigs reside here. |
Camera Layer |
The stage cameras are created here but should be animated within the Animation Layer. |
Simulation Layer |
Assets from Process Simulate and Visual Components should be imported as sub layers. |
Assets Layer |
The asset layer should contain subfolders from all the imported data including CAD and connectors. This is the repository of all the static assets for this stage. The Layout Layer will take care of positioning and orienting data, while Animation Layer will control animation opinions of asset data. |
This structure will allow:
Prevent overriding opinions if all assets are in Root, especially when merging a live session.
After a live session is merged, you now have the option to update the changes to their respective layers.
I.e. Xform change on an asset position can be moved to the Xform asset layer, and overwrite the Xforms in that layer.
When lighting and adding materials, it is possible to mistakenly move assets that are already approved. By making sure the Lighting and Material Layers are before the Xform Layer, the opinions on the Xform will prevent any moving in the Lighting and Material Layers.
Live Session Layer Workflow#
When participants make changes inside a Live session, the data is saved temporarily into the Live Session Layer. Once the session ends, the deltas are merged into your stage under the Root layer. Ideally, we want them to save to a New Layer so that we have a file from that session that can be recalled.
The deltas within the merged layer can then be relocated to their respective Layers. For example, moving an assets position can be moved to the Layout Layer as a sublayer. This makes sure that all approved changes are added to their Layers.
There are various workflows we can use. In our example, we will go over three steps:
Conductors assembly of assets (Modify Mode)
Planner review, edits and notes (Present & Comment Mode)
Stakeholders review (Present Mode)
Conductors Asset Assembly#
Conductors will import asset data, whether through converters or connectors into a subfolder under the Assets Layer. Here all the asset data will reside. Once the data is imported, the conductor can collaboratively position these assets into place using the Layout layer, or add materials via the Materials layer. Keeping this workflow in mind prevents opinions from stomping on each other and allows for best USD practices.
Once the assets are imported, positioned, assigned materials and even animated, they can be locked to prevent modification during reviews via the Locked Layer. This will not prevent them from being altered in the Session Layers, but useful when working in the asset assembly to prevent unintentional asset position or orientation changes.