Clash Detection UI#
This section documents the Clash Query Management and Clash Detection Results windows.
To initiate clash detection, you must first create a clash detection query using the Clash Query Management window. You can define as many queries as necessary.
Important
Clash detection works with meshes and point clouds, but not with USD physics shapes.
Point cloud detection requires enabling Enable Point Clouds in the Scope section of the Clash Query window.
Clash Detection Basic Concepts#
The system can identify two main kinds of clashes:
Hard clashes
Soft clashes
Hard Clashes#
Hard clashes, also known as geometric clashes, occur when two components physically intersect or pass through each other.
Hard clashes can be further categorized into two subsets:
Contact case
Occurs when two components just touch each other by design (e.g., a crate resting on the ground naturally touches it).
In this case, there is no significant overlap or intersection between geometries.
The max local depth, which is an approximate measure of the local overlap around the clash location, can be used to identify contact cases.
For contact cases, this value should be close to zero.
Overlap case
Occurs when two components clearly intersect each other by accident.
This is unexpected: these are the mistakes we are looking for, and what is usually understood as a hard clash.
For overlap cases, the max local depth will be an arbitrarily large positive value.
The user-defined contact epsilon value is the limit below which a hard clash is classified as a contact case.
Soft Clashes#
Soft clashes, also known as clearance clashes or proximity clashes, occur when two components are located too close to each other, specifically closer than the user-defined tolerance value.
The tolerance value is the distance limit below which a clash is registered. In other words, if the distance between two components is less than this value, a clash is detected.
Use a tolerance value of 0 to detect only hard clashes (hard clash query).
Use a positive value to detect both hard and soft clashes (soft clash query).
When the system finds two objects physically overlapping during a soft clash query, these objects are still reported as a hard clash.
Important
The max local depth is not applicable to soft clashes, because there is no actual geometric overlap and therefore no depth to compute.
Max Local Depth and Penetration Depth (Hard Clashes)#
The max local depth and the penetration depth are related (they are both a measure of the overlap between two objects) but they are not the same value.
The difference is best explained with a “peg in a hole” case. Imagine a red object and a blue object. The red object is lodged inside the blue object. The red object slightly overlaps the blue one. This small overlap can be seen for example inside the orange circle in the picture.
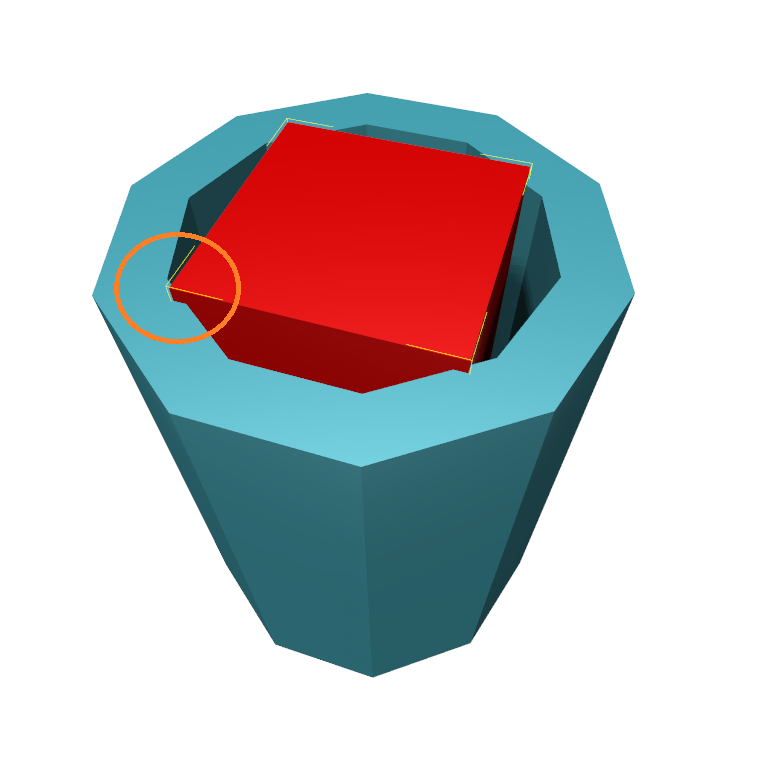
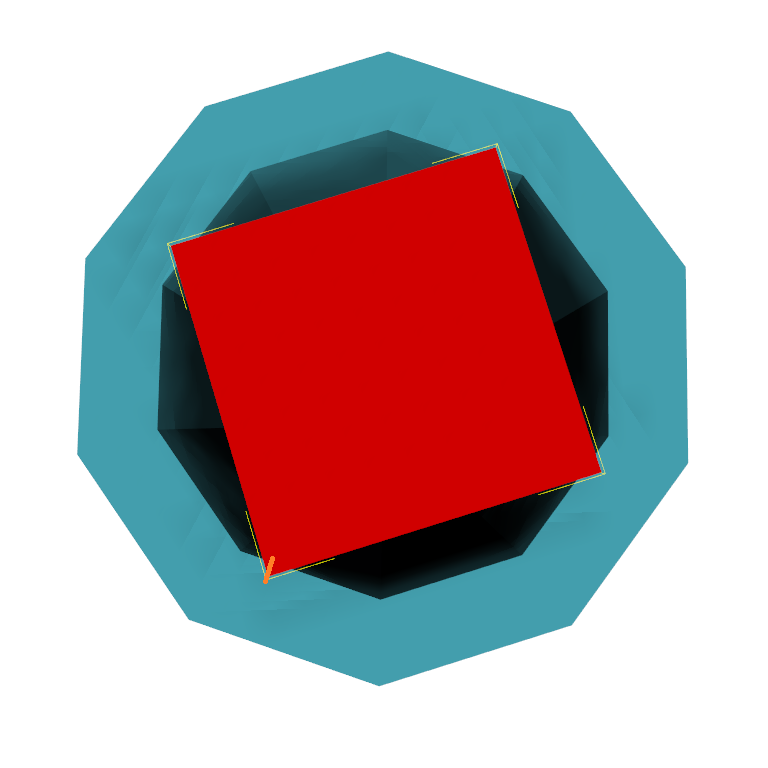
As we can clearly see here, there could be multiple local overlaps (one at each corner of the red cube in this example). This is why it is “local”: the system will compute the overlap at each of these locations, and reports the largest overlap. Visually, this could be for example the orange segment in the following picture. The magnitude of that segment is the max local depth.
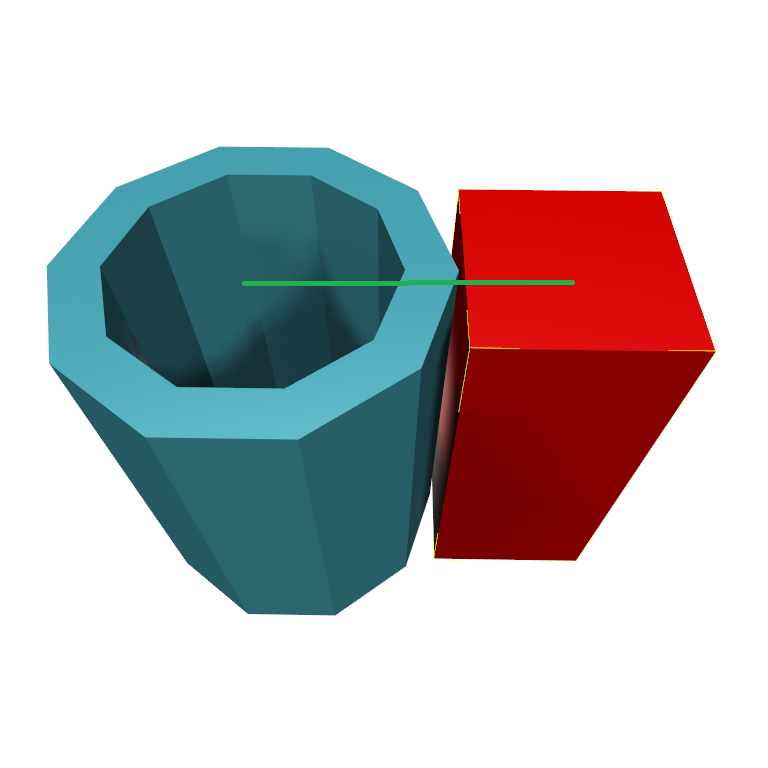
If you depenetrate the red object in that direction though, you only increase the penetration on the other side. There is actually no direction vector that would both resolve the overlap and keep the red object inside the blue one.
The Minimal Translation Distance (MTD) is the length of the shortest relative translation that results in two objects being in contact or, if intersecting, determines the depth of penetration. This is how we define the penetration depth, i.e. a value that would actually separate the objects and resolve their overlap.
For this case it would be e.g. the green vector in the following picture. The penetration depth would be the magnitude of this vector, a bigger value than the one from the orange vector. This penetration depth is now a global value, as opposed to the previously discussed max local depth, because it takes the entire object into account. Translating the red object by that value would move it entirely out of the blue object.
The system provides both a measure of the max local depth, and a measure of the penetration depths in a number of fixed directions. These two values can be used for different purposes:
The max local depth can be used as a pruning mechanism to e.g. filter out “contact cases”.
The penetration depth can be used to actually resolve clashes, by moving objects by the reported value.
Opening the Clash Detection Window#
The Clash Detection window can be opened in several ways:
From the main menu: Window → Physics → Clash Detection.
By setting the
/physics/showClashDetectionWindowcarb setting toTrueprogrammatically.Using the keyboard shortcut Ctrl+Shift+Alt+C.
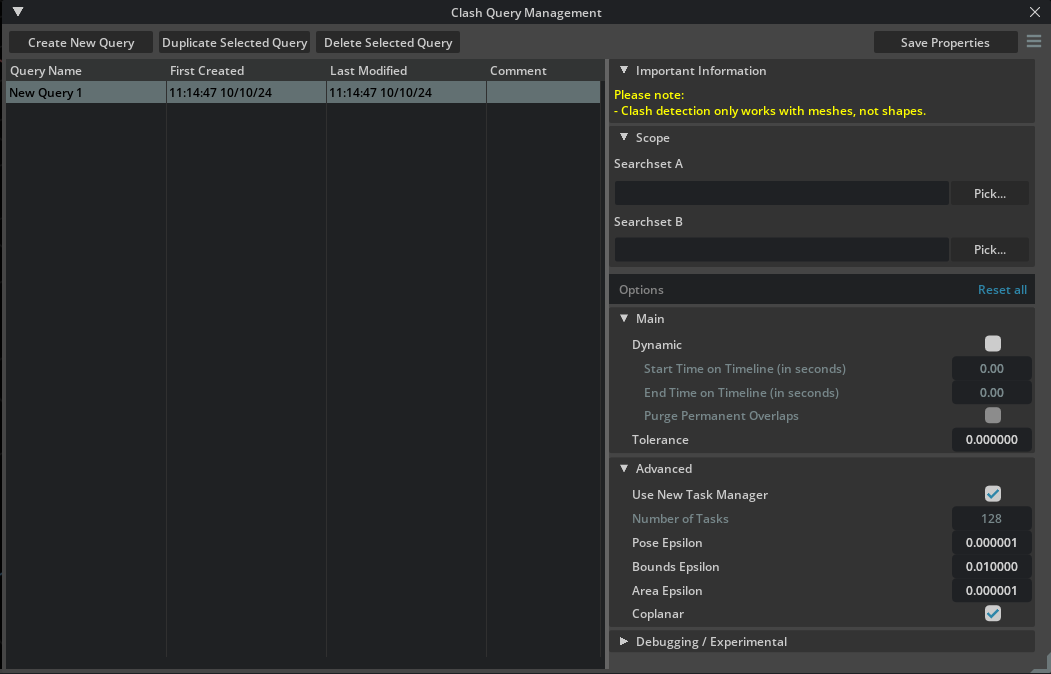
Clash Query Management Window#
This window allows you to manage your clash detection queries.
Below you can find all actions you can perform on your queries in the top toolbar and in the query list as well.
Action |
Description |
|---|---|
Create new |
Create a new clash query by clicking the Create New Query button.
The new query will be created with a default name of “New Query ###”.
|
Rename |
Double-click the Query Name to rename the query.
You can also change the query name in the right side pane under the “Base” section.
|
Duplicate |
Click the Duplicate button to duplicate the selected clash queries.
|
Comment |
Double-click the empty space in the Comment column to enter your own comment to further clarify a query’s purpose.
You can also change the query comment in the right side pane under the “Base” section.
|
Delete |
Click the Delete… button to delete the selected clash queries.
|
Statistics |
Click the Statistics button to open the Query Statistics Window. |
Export |
Click the Export Queries… button to export selected queries to a JSON file. |
Import |
Click the Import Queries… button to import queries from a JSON file. |
Save Properties |
Click the Save Properties button to save the current query properties. |
Query Timestamps#
The First Created column shows the timestamp when the query was first created. The Last Modified column shows the timestamp when the query was last modified.
Many commands can also be accessed through the context menu.
Keyboard Shortcuts#
Here are some useful keyboard shortcuts for the Clash Detection Query Management Window:
Keyboard Shortcut |
Description |
|---|---|
CTRL+A |
Select all queries. |
ESCAPE |
Deselect all queries and remove the clash visualization overlay from the main viewport. |
DELETE |
Delete selected queries. |
On the right side pane, you can see various options that help you customize the clash detection query to your needs:
You can set the name of the query and a comment to further clarify its purpose.
Limit the clash detection processing scope by defining search sets.
If both Searchset A and Searchset B are empty, the whole scene is processed.
If only Searchset A contains items, processing is limited to Searchset A items.
If both Searchset A and B contain items, process Searchset A against Searchset B.
- Enable Point Clouds vs Meshes Clash Detection Mode:
Activate this mode by selecting the
Enable Point Cloudscheckbox.When enabled, Searchset A is renamed to “Point Cloud(s)” and allows the specification of one or more point cloud prim paths of type
NVSealedUsdArchive.You may optionally specify an inclusion Region of Interest (ROI) path to restrict the point cloud extraction to a specific area. Currently, only a single ROI is supported, which must be a
Cubeprimitive. Only the axis-aligned bounding box (AABB) of the cube is utilized. If unspecified, no point cloud extraction limit is applied -> all points.Searchset B (meshes) defines the mesh geometry that is checked against the extracted points. Leave empty to use the full scene.
When point cloud mode is enabled, Dynamic and Duplicates and some other clash detection options are automatically disabled, as they are not supported for point cloud queries.
Point cloud extraction settings such as destination path, LOD level, and session-layer behavior are configured per-point cloud in the Point Cloud Extraction Settings window. Open it from the Settings menu (hamburger icon) in the rightmost side of the Clash Detection Results window.
Note
To comfortably edit ROI, it is recommended to use
Selection Box Widgetaccessible via menu “Tools > Selection Box”.Also note that a new pane called “Selection Box” will appear on the right side of the screen.
You need to enable
omni.pointcloud.streaming.bundleextension to gain access to it.
The Pick… button allows you to add several prims to the searchset edit box-each time you pick, the selected prims are added (not replaced), so you can accumulate multiple targets in the list. Tip: you can drag and drop multiple prims into the searchset edit box to add them all at once.
Option |
Description |
|---|---|
Dynamic |
Tells the clash detection engine to run dynamic clash detection, inspecting time-sampled animations. |
Start Time on Timeline |
Start time on timeline in seconds. Works only when dynamic clash detection is enabled.
0 = timeline start time (auto-detected).
|
End Time on Timeline |
End time on timeline in seconds. Works only when dynamic clash detection is enabled.
0 = timeline end time (auto-detected).
|
Purge Permanent Overlaps |
Tells the system to discard pairs of dynamic objects that always overlap over the tested time interval. Works only when dynamic clash detection is enabled. |
Tolerance |
Tolerance distance for overlap queries.
Use zero to detect only hard clashes.
Use non-zero to detect both hard and soft clashes.
|
Static Time on Timeline |
Time on the timeline in seconds for executing static clash detection. The value is clamped into timeline range if necessary. Taken into account only when performing static clash detection! |
Report Duplicate Meshes Only |
Instructs the clash detection engine to only report meshes that completely overlap with other identical meshes. Dynamic detection is not supported; only static clashes at the current time on the timeline are. This option is exclusive-no other clashes are reported when this option is enabled! |
Ignore Redundant Overlaps |
Instructs the clash detection engine to ignore redundant overlaps. |
Option |
Description |
|---|---|
Pose Epsilon |
Epsilon value used when comparing mesh poses. This is used when detecting “duplicate meshes,” i.e., meshes with the same vertex/triangle data in the same place. |
Area Epsilon |
Epsilon value used to cull small triangles or slivers. Triangles whose area is lower than this value are ignored. Use 0 to keep all triangles. |
Bounds Epsilon |
Epsilon value used to enlarge mesh bounds slightly. This ensures that flat bounds or bounds that are just touching are properly processed. |
Tight Bounds |
Use tight bounds for meshes. |
Coplanar |
Detect collisions between coplanar triangles. |
Any hit |
If any hit is checked, the clash engine stops after locating the first pair of overlapping triangles; otherwise, it continues to detect all overlaps. This can improve performance if only a quick overview of what’s clashing is wanted. |
Quantized |
Enable quantized trees. Quantized trees use less memory but usually give slower performance. |
Tris per leaf |
Number of triangles per leaf. Tweak this for a memory vs. performance trade-off. |
Triangle Limit |
Abort narrow-phase query after this number of triangle pairs has been found. Use 0 for unlimited.
The results fetching process at the end of clash detection retrieves only up to the predefined limit of triangle information, optimizing performance for cases where clash identification is needed without or with limited visualization (e.g. finding duplicates). Particularly beneficial for scenarios involving dense geometry.
|
Purge Permanent Static Overlaps |
Tells the system to discard pairs of static objects that always overlap over the tested time interval. Works only when dynamic clash detection is enabled. |
Use USDRT |
When enabled, provides faster initial-stage traversal for full-scene queries only. |
Ignore Invisible Prims |
Instructs the clash detection engine to ignore invisible primitives. |
Point Size (Point Clouds only) |
Set custom point size override for Point Clouds. The point size is the same as the point width, i.e. twice the point radius. The clash detection engine will treat all point cloud points as spheres of this size. If set to zero, the system will automatically compute a point size for each point cloud. |
Option |
Description |
|---|---|
Compute Max Local Depth |
Enable max local depth computation. Helps with identification of contact cases between objects. |
Depth Epsilon |
Epsilon value used to classify hard clashes vs. contact cases. Clashes whose max local depth is below the epsilon are ignored. Use a negative value to keep all (hard) clashes. This setting does not apply to soft clashes. |
Contact Cutoff |
Cutoff value used to compute the max local depth. Use a negative value to disable it. The cutoff value should be larger than the contact epsilon. The code aborts computation of the max local depth as soon as it is found to be larger than the cutoff value. |
Discard Touching Contacts |
Instructs the clash detection engine not to report found touching contacts. The Depth Epsilon must be set to a positive number and any values between 0 and that epsilon are considered as touching contacts. |
Max Local Depth Mode |
|
Option |
Description |
|---|---|
Single Threaded |
Run in single-threaded or multi-threaded mode. Mainly for testing. |
Use New Task Manager |
Use new task manager implementation. It automatically manages the number of spawned tasks, so the ‘Number of Tasks’ setting is ignored. |
Number of Tasks |
Number of tasks used when running in multi-threaded mode. Generally, the more, the better. |
Option |
Description |
|---|---|
Log info in Console |
Log info and performance results to console. |
Overlap Code |
Use alternative triangle-triangle overlap code. |
Note
Display and Edit Timecodes as Frames is a setting that allows you to display and edit timecodes as frames instead of seconds.
Remember to click the Save Properties button to save your changes! By default, changes are automatically saved when you select a different query. This can be disabled in settings by unchecking Save Edited Query on Selection Change.

Query Statistics Window#
This window displays statistics for the selected clash query.
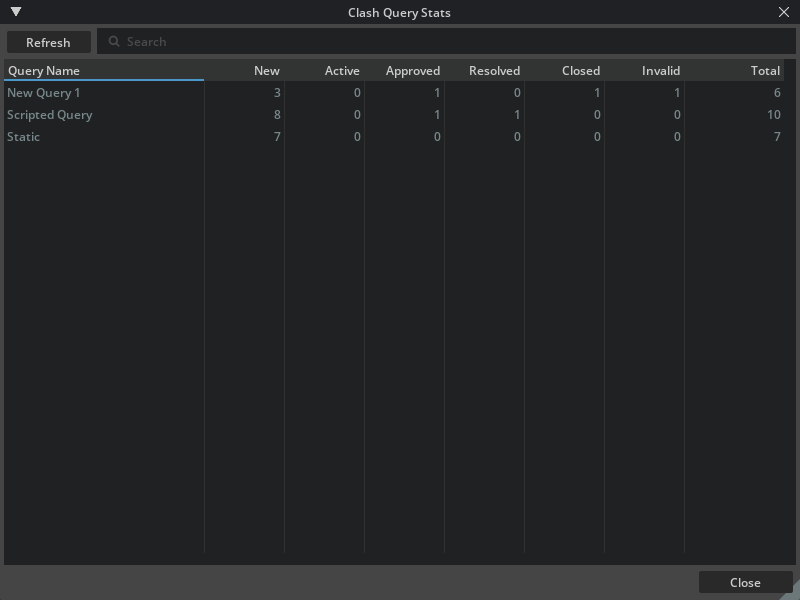
Overview Table: Displays a list of all clash queries, along with the number of clashes in each state (New, Approved, Resolved, Closed, Invalid, Active, and Total clashes).
Search: Use the search box to filter queries by name or summary. Enter your search term and the table will update as you type.
Refresh: Click the “Refresh” button to reload and update clash statistics.
Copy to Clipboard: Right-click a row to access the context menu, then select “Copy to Clipboard (CSV)” to export selected rows as a table for use in spreadsheets or reporting.
Clash Detection Results Window#
This window displays results for each selected clash query.
There is a row limit that restricts the number of rows displayed. The current limit is set to one million rows. Users receive a notification if the number of rows is reduced because of this limit.
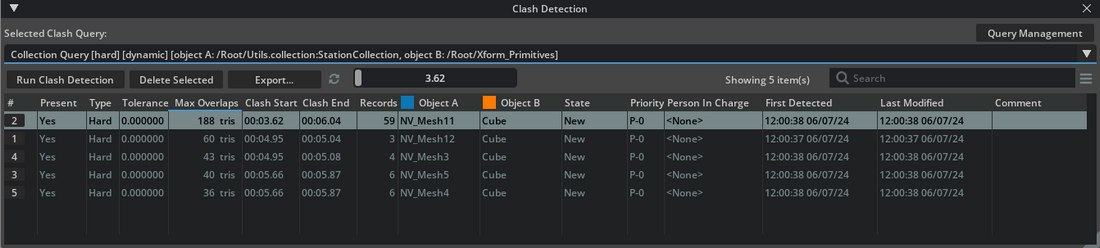
First, choose a clash query to work with from the Selected Clash Query dropdown list. You can edit clash queries in the Clash Query Management window, described in the previous section. Click the Query Management button to open the Clash Query Management window.
Review descriptions of each results list column.
Column
Description
#
Clash number. Each clash is assigned a unique number by the system. This number typically remains unique even after updating or deleting clashes across different sessions, with one exception: if you delete clashes and then reload the clash data, the clash numbers will change.
If the background color of the number turns red, it indicates that the clash is no longer present in the stage.
Present
Indicates whether the clash is present in the stage. Note that even resolved clashes are never deleted; if you are no longer interested in a clash, simply delete it yourself.
Type
Type of clash: Duplicate, Hard, or Soft.
Min distance
Minimum distance between clashing objects. 0=Hard clash, otherwise soft clash.
Tolerance
Tolerance that was set at the time when clash detection was run. For hard clashes, the tolerance is always zero. For soft clashes it is non-zero.
Max Depth
[EXPERIMENTAL] Estimated maximum local depth. It is always a positive value.
Depth Epsilon
Maximum Local Depth Epsilon value that was set at the time when clash detection was run. The epsilon value is used to classify hard clashes vs. contact cases.
PX +X
Maximum penetration depth along the +X axis.
PX -X
Maximum penetration depth along the -X axis.
PY +Y
Maximum penetration depth along the +Y axis.
PY -Y
Maximum penetration depth along the -Y axis.
PZ +Z
Maximum penetration depth along the +Z axis.
PZ -Z
Maximum penetration depth along the -Z axis.
Elements
The highest count of overlapping triangles (or points, for point cloud clashes) found among all clashing frames for each clashing pair. It shows overlapping triangle counts for mesh–mesh clashes suffixed tr (triangles) and overlapping point counts for point cloud clashes suffixed pt (points).
Clash Start
Starting timestamp of the clash.
Clash End
Ending timestamp of the clash.
Records
Total number of clashing frames for each clashing pair.
Object A
Name of the first clashing object.
Object B
Name of the second clashing object.
State
Management flag. Shows the current status of the clash. Possible values are: New, Approved, Active, Resolved, Closed, or Invalid.
New: The clash is newly detected in the latest clash detection run.
Approved: The clash has been reviewed and approved for further investigation or action.
Active: The clash continues to appear in updated data.
Resolved: The clash has been addressed, and a solution has been implemented.
Closed: The clash has been closed and is no longer considered.
Invalid: The clash is invalid and is no longer considered.
If a clash is newly detected in the latest clash detection run, it is marked as New. The state will automatically change from New to Resolved if the clash is no longer found in the stage. If the clash continues to appear in updated data, its state automatically changes from New to Active.
Priority
Management flag: Indicates the importance of the clash. This value ranges from 0 (lowest priority) to 5 (highest priority) and is used to help manage and sort clashes.
Person in Charge
Management field: Specifies the individual responsible for resolving this clash.
First Detected
Displays the date and time when this clash was initially found.
Last Modified
Displays the most recent date and time when this clash was updated.
Comment
User-defined notes or remarks about the clash.
Note
For point cloud clashes, the following columns display N/A because the values are not meaningful for point-vs-mesh detection: Min Distance, Tolerance, Depth Epsilon, Max Depth, and all six penetration depth columns (PX +X through PZ -Z). Hovering over an N/A cell shows a tooltip explaining why.
Click the Run Clash Detection button to initiate the clash detection process on the currently open stage, using the parameters from the selected clash query in the Selected Clash Query dropdown list. Once clicked, the button transforms into a progress bar. If necessary, you can click the progress bar or press the Escape key to cancel the process. When the process is complete, the results view will display all detected clashes.
Note
Different colors on the progress bar now represent various stages of clash detection:
Teal is used for loading of clash detection results into the window.
Green indicates the conversion of curve animations to time samples. For more information about the curve animations conversion process, please refer to the Clash Detection Anim documentation page.
Purple indicates the extraction of point clouds. For more information about the point cloud extraction process, please refer to the Point Cloud Clash Detection documentation page.
Orange signifies the clash detection engine’s pipeline processing.
Blue represents the stage where all clashing pairs, their respective clashing frames, matrices, faces, and overlap outlines are being retrieved.
To delete selected clashes, click the Delete Selected button.
Keyboard Shortcuts#
Here are some useful shortcuts for the Clash Detection Results Window:
Keyboard Shortcut |
Description |
|---|---|
CTRL+A |
Select all clashes. |
ESCAPE |
Deselect the currently selected clashes and remove the clash visualization overlay from the main viewport. |
DELETE |
Delete selected clashes. This functionality only works when the window is focused. |
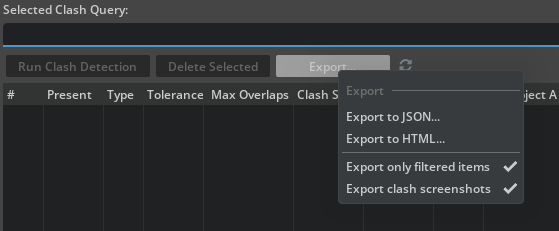
Export#
To save the results report as an HTML or JSON file, select Export. Once clicked, the following options are displayed:
Option |
Description |
|---|---|
Export only filtered items |
If checked, only visible clashes will be exported. If not, all clashes that belong to the selected clash query will be exported. |
Export clash screenshots |
If checked, clash images for each clash will be captured and saved to the target location’s |
Grouped View#
Clicking the Grouped View button opens the Clash Groups Window. This window displays detected clashes organized into groups, making it easier to work with large numbers of clashes. Grouping is done automatically based on scene hierarchy-USD prim path and kind.
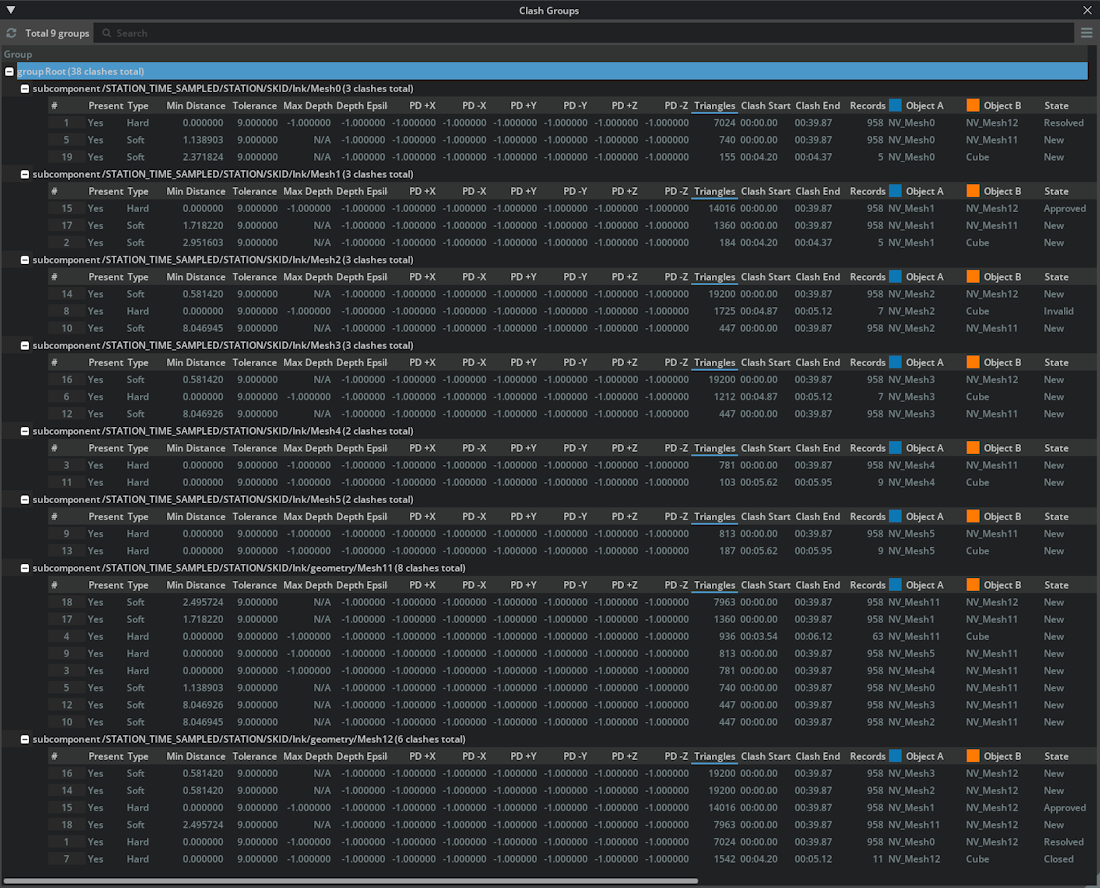
You can use the Groups window and the Clash Results tree at the same time-selections you make in one will be synchronized in the other.
Tip: By default, groups that do not contain any clashes (empty groups) are hidden. If you want to see all groups, including those without clashes, turn on “Show Also Empty Groups” from the settings menu (this setting persists across sessions).
The Clash Groups Window is divided into several interactive areas, each offering specific features for managing large numbers of clashes.
Top Toolbar
Refresh Button - Click the “Refresh” (circle arrow) to regroup and reload all clash data.
Search Field - Instantly filter groups by typing any part of a path. The list updates as you type; clearing the field restores all groups.
Settings (Hamburger Icon) - Toggle “Show Also Empty Groups” to include or exclude groups with no clashes.
Groups Count Label - Shows how many groups are currently visible versus the total number.
Tree/Table Display Area
Groups appear in a hierarchical tree view.
- Each group node can be:
Expanded/collapsed (double-click or (+)/(–) icon) to show/hide its subgroups and clash data.
Leaf nodes display tables listing that group’s clash pairs.
Context Menu (Right-click anywhere in the window)
Select in Stage: Highlights the selected group’s objects in the USD stage.
Expand/Collapse All Children: Expands or collapses all subgroup nodes at once for easier navigation.
- Expand/Collapse:
Click the (+)/(–) icons next to any node, or use right-click context menu entries for bulk actions.
- Group Selection:
Click a group to select.
Use Ctrl+A for “Select All” (all groups).
Use ESC to clear selection.
Right-click and choose “Select in Stage” to select corresponding prims in the stage.
Viewing and Synchronizing Clashes - Leaf group nodes contain tables of all clash pairs for that group. - Selections stay in sync-highlighting a group or clash in either the Groups Window or the main Clash Results tree highlights it in both (if both are open).
Reload#
The Reload button will fully reload the clash results list, remove all filters, deselect all currently selected clashes, and remove the clash visualization overlay from the main viewport.
Note
Does not trigger any clash detection computations.
Basic Filtering#
You can instantly filter the resulting list by typing a string into the Search field. Filtering is case-insensitive.
Note
Encapsulate the search string with back quotes for exact whole word matches. E.g. `mesh1`.
Custom Advanced Filtering#
Note
Column rename (v110.1): The Triangles column was renamed to Elements.
If you have saved filter expressions that reference [Triangles], update them to use [Elements].
The Elements column shows overlapping triangle counts for mesh–mesh clashes (suffixed tr) and
overlapping point counts for point cloud clashes (suffixed pt).
Click the Filter button to open the Custom Filter Window.
The Filter Window allows users to input and evaluate filter expressions to filter clash results. This enables users to write flexible expressions to select which data rows (“clashes”) to display in the Clash Results Window.
Main Features
Enter and edit a custom filter expression using the Filter Expression Syntax documented below.
Toggle filtering on/off via a checkbox.
Preview and validate the current filter expression by clicking the Apply button.
Access an in-dialog help section describing filter syntax and examples.
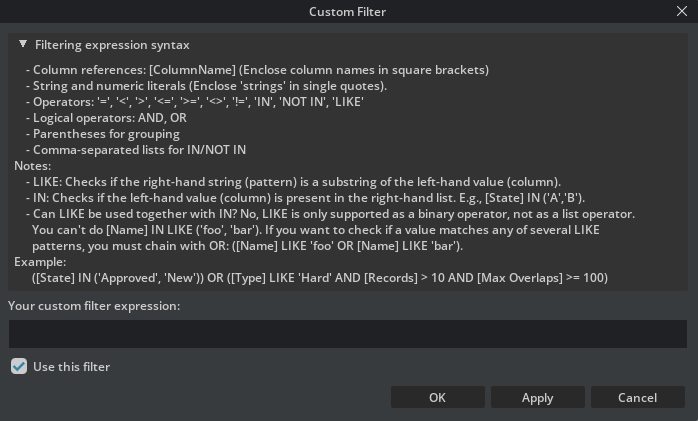
Filter Expression Syntax
Column references (e.g.,
[Column Name])String/number literals (e.g.,
'foo',3.14)Operators:
=,<,>,<=,>=,<>,!=,IN,NOT IN,LIKE,NOT LIKELogical operators:
AND,ORParentheses for grouping sub-expressions
Comma-separated lists for
IN/NOT IN
Notes:
LIKEchecks if the pattern appears as a substring in the column value.
INrequires a value to be in a list (e.g.,[Status] IN ('A','B')).
LIKEandINcannot be combined (i.e., no[Name] IN LIKE (...)).Combine multiple
LIKEpatterns withOR:[Name] LIKE 'foo' OR [Name] LIKE 'bar'The parser is case-insensitive by default.
Column-to-column comparisons are supported (e.g.,
[Clash Start] = [Clash End]).Negative numbers are valid numeric literals (e.g.,
[Max Depth] > -1).
- Example:
[State] IN ('Approved','New') OR ([Type] LIKE 'Hard' AND [Records] > 10)
Troubleshooting & Tips
If there are syntax errors, type mismatches, or unsupported expressions in your filter, they will be reported in the console. Please check the console for details.
Carefully check for unmatched parentheses or quotes in your filter expression.
Only use columns that exist in the current dataset.
When using
LIKE, remember it only performs substring matching, not regular expressions.Use parentheses to control the order of logical operations.
Examples
To display only “Hard” type clashes that have more than 10 records, use:
[Type] LIKE 'Hard' AND [Records] > 10
To display either newly approved states or those with many overlapping elements:
[State] IN ('Approved', 'New') OR [Elements] >= 100
Point Cloud Extraction Settings Window#
Open this window from the menu: Settings → Point Clouds → Configure Point Cloud Settings…
The Point Cloud Extraction Settings Window lets you organize and manage per point clouds settings to use in your clash detection workflow.
This window manages per-prim settings that control how point cloud data is extracted from source prims before clash detection runs. Open it from the Settings menu in the Clash Detection Results window.
The list of point cloud settings is saved so your selections are preserved when you restart your session.
You can export your entries to a JSON file for backup or sharing. Importing a JSON file will add new entries (duplicates are skipped automatically).
If a point cloud’s original object is missing from your scene, its entry will appear highlighted in red, so you know to update or remove it.
Please note that the point cloud extraction settings are ingested before running clash detection.
So if you change the point cloud extraction settings, you need to re-run the clash detection to see the changes.
Missing settings will be automatically created with default values for you after running clash detection.
The window is divided into two panels:
Left panel - Point cloud list
Lists all configured point cloud source prims. You can:
Search: Type in the search field to filter entries by prim path.
Add: Click Add… to open the stage prim picker and add new point cloud prims to the list. You can also drag prim paths directly from the stage onto the list.
Remove: Select one or more entries and click Remove (or press Delete) to remove them.
Select all: Press Ctrl+A to select all visible entries.
Import / Export: Use Import… and Export… to load or save point cloud settings from or to a JSON file. Importing skips duplicate prim paths.
Context menu: Right-click anywhere in the list for additional options (Add, Remove, Export, Import).
Note
Entries whose prim path is not found in the current stage are highlighted in red.
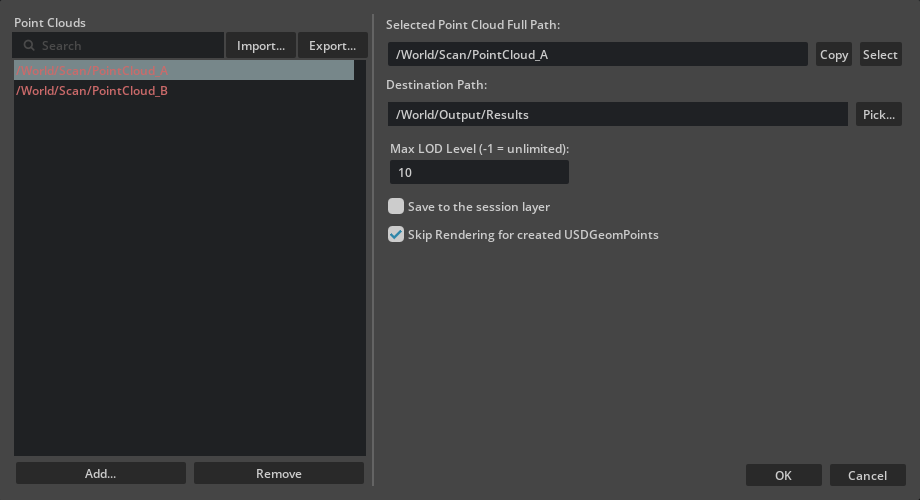
Right panel - Properties
Shows the editable settings for the selected prim(s). When multiple entries are selected, edits apply to all of them; fields whose values differ across the selection are shown blank.
Property |
Description |
|---|---|
Selected Point Cloud Full Path |
Read-only display of the prim path. Use Copy to copy it to the clipboard or Select to select the prim in the stage. |
Destination Path |
USD prim path where the extracted |
Max LOD Level |
Maximum level-of-detail to include during extraction. Use |
Save to the session layer |
When checked, the extracted |
Skip Rendering for created UsdGeomPoints |
When checked, the extracted point cloud prim has rendering disabled, so it does not appear in the viewport. |
Click OK to commit all changes to the clash data. Click Cancel or press Escape to discard changes and close the window.
Context Menu#
Right-click on an item in the list to open a contextual menu. This menu provides options such as selecting clashing objects, inspecting clashing frames, computing depth, copying information to the clipboard, and more.
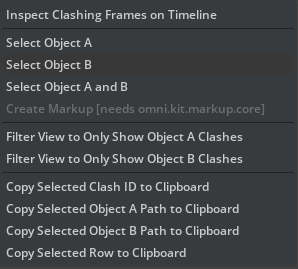
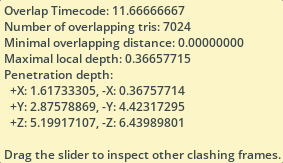
Inspect Clashing Frames on Timeline: Displays a timeline with a slider (next to the Refresh button) to inspect the range of clashing frames. You can also double-click on a clash row to reveal the timeline. This feature is unavailable if more than one clash is selected.

Tip: Hover to see the tooltip with detailed information about the current clashing frame.
Generate Clash Meshes: Bakes persistent clash visualization for the selected clashes (via the viewport extension’s bake pipeline). The result is shown in the main viewport and survives selection changes; it can be saved and reloaded with the current query.
Clear Clash Meshes: Clears the persistent baked visualization for the selected clashes from the bake layer. Transient (temporary) visualization from simply selecting a clash is cleared when you deselect or use Clear on the bake layer.
Note
Clash visualization is provided by the Clash Detection Viewport extension, which uses the Clash Detection Bake extension for both transient (temporary) and persistent (baked) meshes and outlines.
Compute Max Local Depth for current frame: Calculates the maximum local depth for just the currently selected frame.
Compute Max Local Depth for all clashing frames: Computes the maximum local depth for all clashing frames.
The max local depth is mainly used to identify and filter out “contact cases,” where objects are just touching (e.g., resting on top of each other, without clear clashes). It is computed from the clashing triangles and from their immediate neighbors. Entire objects are not taken into account here.
Note
In the Results View, you will only see the highest max local depth across all frames. To see the max local depth for each individual frame, use the Inspect Clashing Frames on Timeline option.
Compute Penetration Depths for current frame: Computes penetration depths in all six directions for the current frame.
Compute Penetration Depths for all clashing frames: Computes penetration depths in all six directions for all clashing frames.
Penetration depths take into account the entire objects.
Note
In the Results View, you will only see the highest penetration depths for each of the six directions across all frames. To see the penetration depth for each individual frame, use the Inspect Clashing Frames on Timeline option.
Create Markup: If the Markup extension is active, creates a markup (annotation in the 3D scene with a 2D whiteboard overlay) for all selected clashes. For more information about Markups, please refer to the Markup documentation page.
Filter View to Only Show Object A Clashes and Filter View to Only Show Object B Clashes: Limits the results view to only show clashes of object A or B. This filter can be removed by clearing the Search field. It is not available if more than one row is selected!
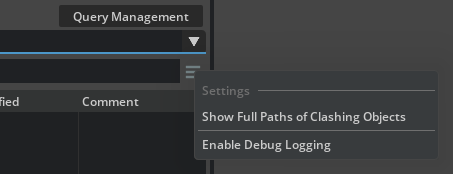
When you click the menu icon, you can see several options:
Configure Point Cloud Settings…: Opens the Point Cloud Settings window.
Display and Edit Timecodes as Frames is a setting that allows you to display and edit timecodes in query settings and view clash results as frames instead of seconds.
Show Full Paths of Clashing Objects: Check this to show full paths of clashing objects in the list.
Immediate Update When Dragging Timeline Slider: Check this to immediately update the clashing prims visualization in the main viewport during timeline slider drag. If not checked, this update will be delayed until the timeline slider is released.
Use Asynchronous Clash Pipeline: Check this to use the asynchronous clash pipeline. This will not block the application’s responsiveness.
Enable Debug Logging: Check this to turn on debug logging and diagnostic messages.
See also
- Clash Detection UI - Developer Reference
Settings paths, custom persons-in-charge configuration, and the filtering API.