Clash Detection#
Overview#
The goal of clash detection is to prevent costly and time-consuming conflicts during the construction phase of a project. By identifying and resolving clashes early in the design process, project stakeholders can minimize rework, avoid delays, and improve overall project efficiency. It is an essential aspect of modern construction and design processes, especially in complex projects with numerous interconnected systems and components.
Resolving clashes often involves adjusting the positions of clashing components, modifying the design, or reconfiguring the layout.
Note
Clash detection works with meshes and point clouds, but not with shapes (e.g. USD physics shapes).
Enable the omni.physx.clashdetection.pointcloud extension (included in the bundle) to use point cloud detection.
Learn about the types of clashes.
Hard
Hard clashes occur when physical components occupy the same space within a project. Examples include walls intersecting with doors or windows, structural elements conflicting with plumbing or electrical systems, or equipment interfering with pathways.
Soft
Soft clashes are clearance clashes. Such clashes occur when there is insufficient space between components, potentially leading to operational or safety issues. For instance, a piece of machinery might not have enough overhead clearance, or pipes might be too close to walls.
Static
A static clash refers to a clash between two or more building components or systems that are in fixed positions. For example, a wall intersecting with a pipe.
Dynamic
A dynamic clash involves clashes that might occur during the operational phase of a project when components are in motion or change position. An example of a dynamic clash could be a situation where two robots are programmed to move along certain paths but would collide with each other if their paths cross at a certain point.
Clash Detection Video Tutorial#
Using Clash Detection Extensions#
There are multiple extensions that work together to deliver flexible clash detection functionality. Extensions also expose APIs that allow customization of the process.
Using Clash Detection begins with enabling the Clash Detection Bundle extension, which bundles all clash detection extensions together in a single easy-to-enable dependency.
Here is a list of extensions that work together to deliver flexible clash detection functionality:
omni.physx.clashdetection.bundle:Bundles all extensions together in a single easy-to-enable dependency.
omni.physx.clashdetection:Contains the clash detection C++ engine and low-level API to start the process and access results.
omni.physx.clashdetection.core:The primary Python-based clash detection extension that leverages the clash detection engine by introducing essential data structures for holding clash information and queries. It also incorporates support for serialization and deserialization.
omni.physx.clashdetection.ui:Responsible for user interface and workflow elements. It defines all UI components (except for the specialized clash detection viewport) and the user interaction flow.
omni.physx.clashdetection.viewport:Implements 3D visualization in the main viewport and in a dedicated Clash Detection Viewport.
omni.physx.clashdetection.anim:Adds support for curve animations by converting curve animations into time samples.
omni.physx.clashdetection.bake:Adds support for baking clash meshes to USD layers (including dynamic clashes).
omni.physx.clashdetection.pointcloud:Provides point cloud extraction utilities. Streams Potree-format point cloud data and writes it as
UsdGeom.Pointsprims in the stage so that the clash detection engine can test point clouds against mesh geometry.omni.physx.clashdetection.examples:Clash Detection Examples provides headless building blocks for running clash detection from Python scripts. It also includes a panel displaying ready-made examples. The extension must be enabled manually, as it is not activated automatically by the bundle extension.
omni.physx.clashdetection.telemetry:Provides telemetry facilities for performance and usage measurements to improve the product.
omni.usd.schema.physx.clashdetection:Allows saving the clash detection database as a USD layer. Note: Enabling or upgrading this extension requires a reboot of the kit application.
omni.usd.schema.physx.clashdetection.viewport:Allows highlighting clash objects in the viewport.
Note
Enabling Clash Detection Bundle omni.physx.clashdetection.bundle is sufficient to enable all needed extensions.
Step 1: Enable the Clash Detection Bundle from Omniverse Extension Registry#
Regardless of whether your Omniverse application was built using the Omniverse Kit Application Template or another method, the process for enabling the Clash Detection Bundle remains the same.
To learn how to build an Omniverse app using the Kit App Template, refer to the instructions provided in the official documentation.
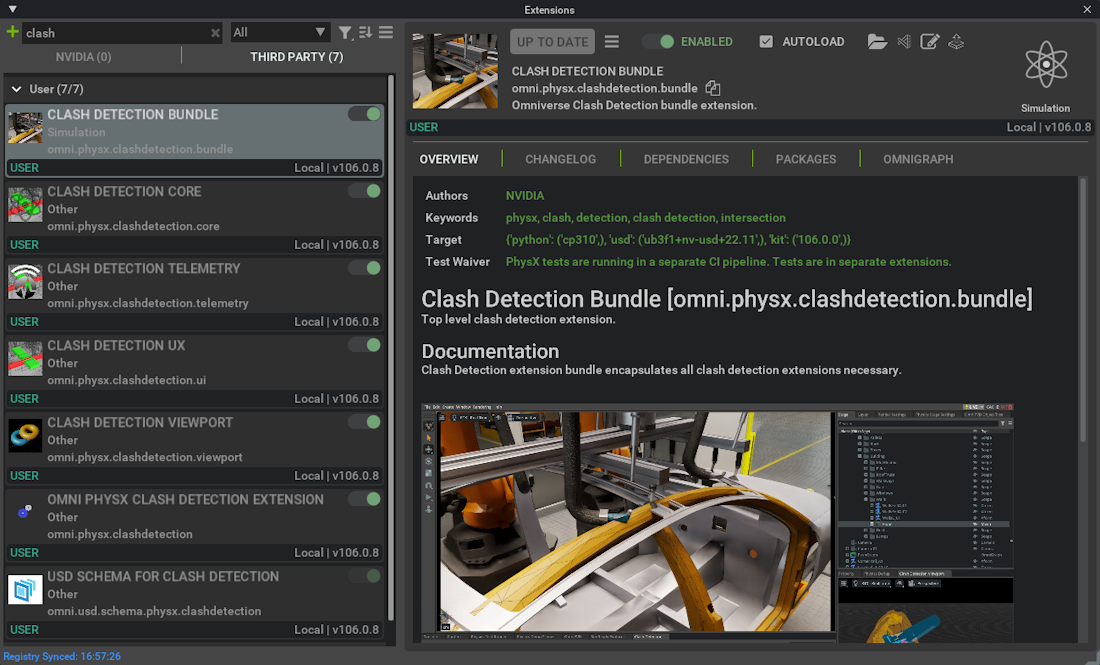
To enable the extensions:
Navigate to
Window > Extensionsor sometimes toDeveloper > Extensions.In the search bar, enter
Clash.Locate the
Clash Detection Bundleextension and select it.Select the
Enabledtoggle to enable the extension.Select the
Check Marknext to AUTOLOAD to load all required extensions automatically on application start, if desired.Close the Extensions Panel.
Note
Upgrade Instructions:
If you previously activated an older version of the Clash Detection Bundle, begin by individually disabling all Clash Detection extensions.
Then, enable only the USD Schema For Clash Detection extension (omni.usd.schema.physx.clashdetection) and make sure the AUTOLOAD option is selected.
After restarting the application, you can re-enable the other extensions by turning on the Clash Detection Bundle (omni.physx.clashdetection.bundle).
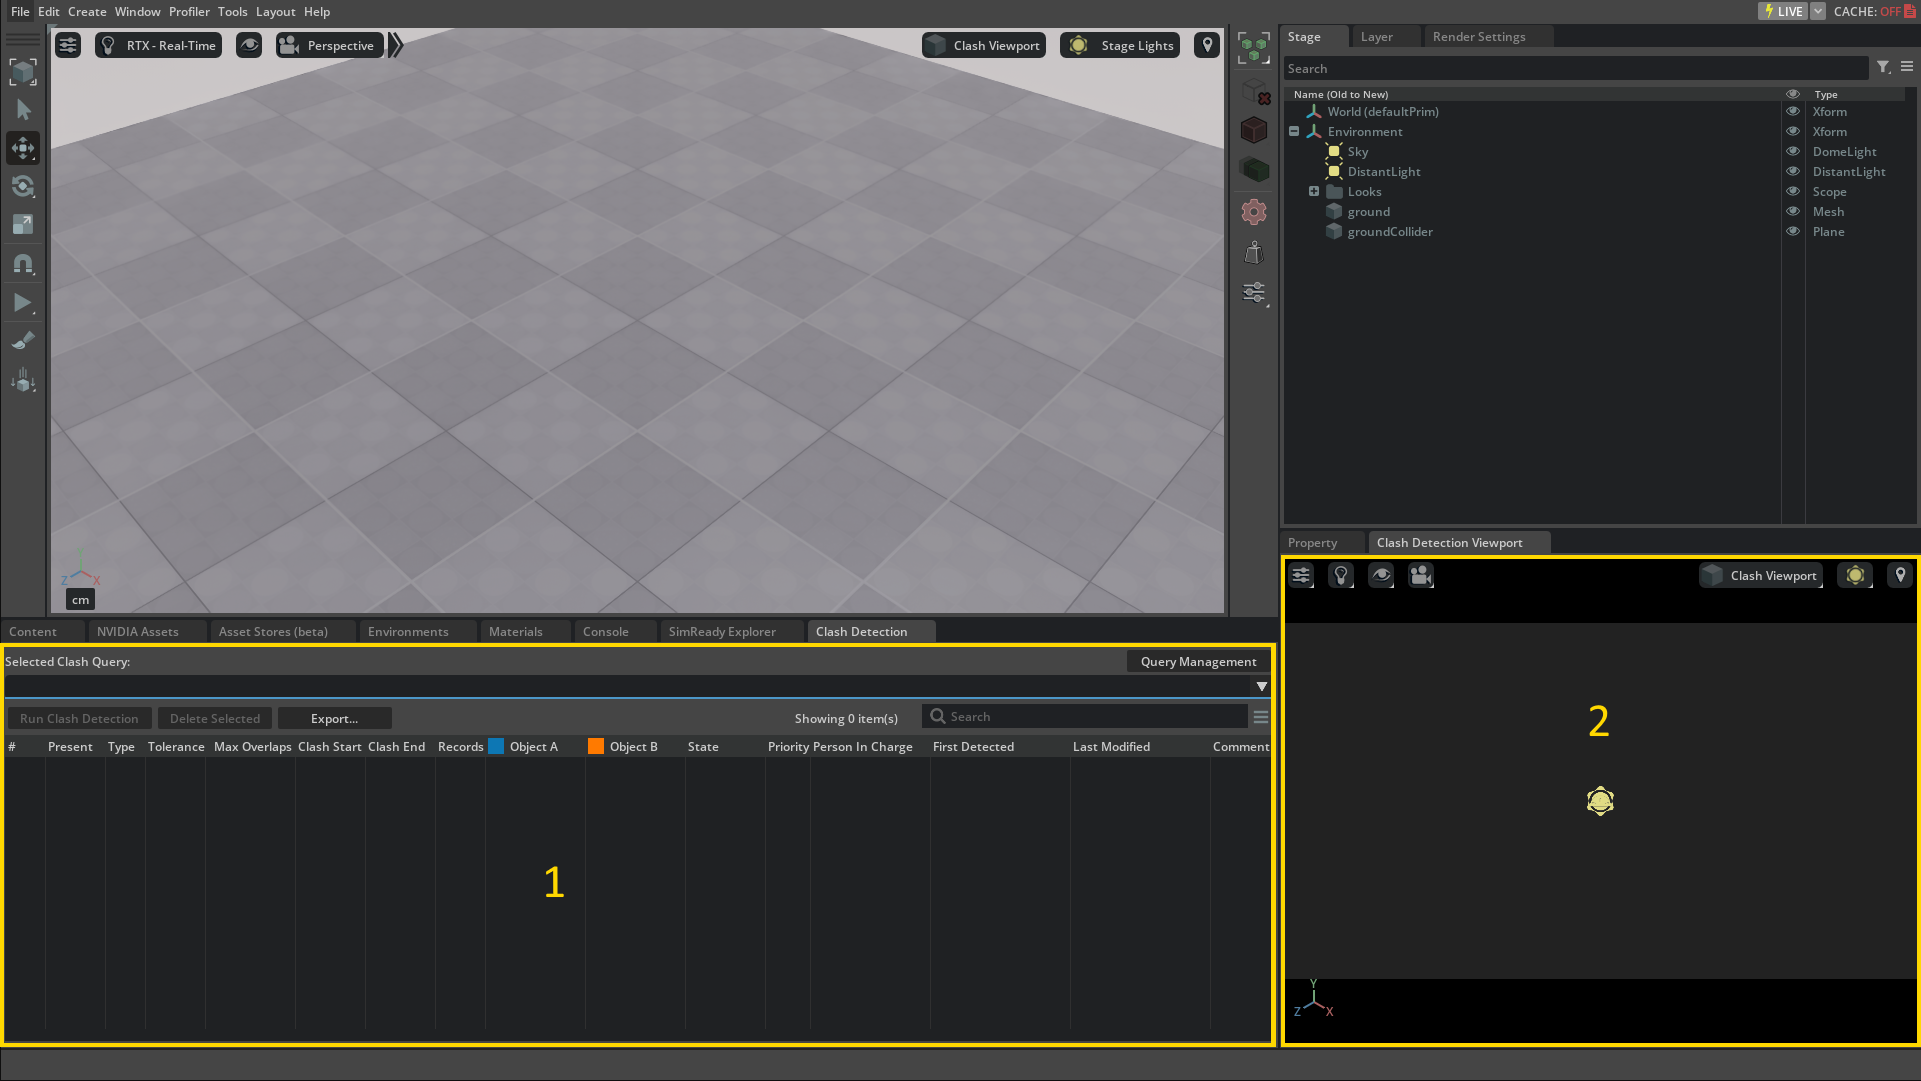
Step 2: Verify the Extension Is Active#
You can see if the extension is loaded by checking if the Clash Detection and Clash Detection Viewport menu items exist.
Click Window -> Physics -> Clash Detection and Window -> Physics -> Clash Detection Viewport menu items and you should now see the Clash Detection window (1) docked below and the Clash Detection Viewport window (2) docked to the right of the property panel.