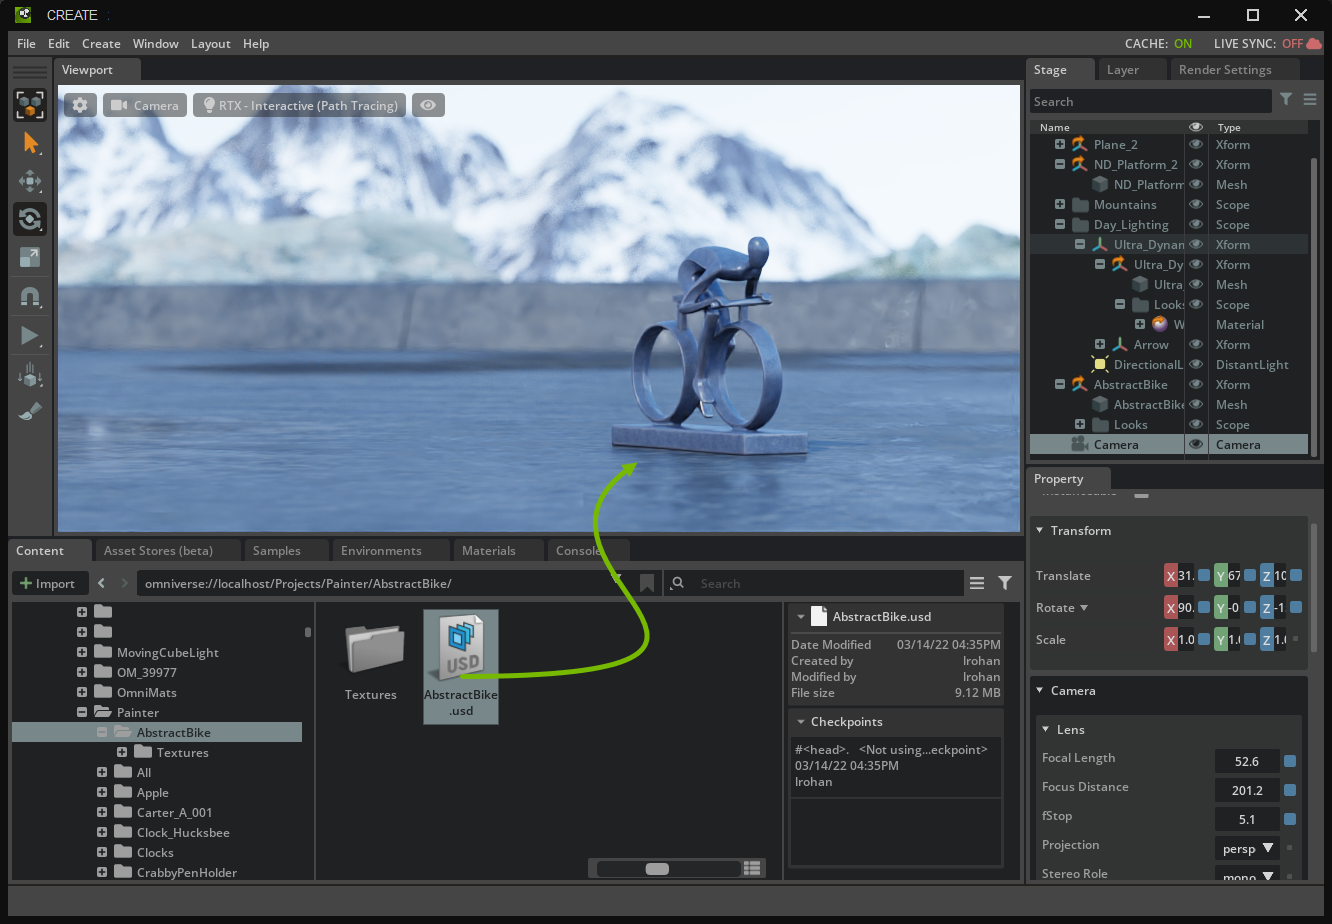
User Manual#
Installation#
Adobe Substance Painter has native OpenUSD support. Learn more here.
Note
Before installing the Omniverse Connector, make sure you have a compatible version of Adobe Substance Painter installed.
Note
Connectors are hosted on the NVIDIA NGC Catalog for download and installation.
There are two components to install: the Painter Connector and the USD Composer Painter Link extension.
Painter Connector#
The Substance 3D Painter Connector works in tandem with the RTX Kit application Live Link extension to provide real time visualization of painted meshes in Omniverse RTX Kit application.
Warning
As of version 203.0, this connector is only compatible with Adobe Substance 3D Painter version 8.3 - 9.1. The connector is NOT compatible with versions 10.0 and newer.
For Adobe Substance 3D Painter 10.x support, we recommend you use the native USD support built-in with Adobe Substance Painter 10.
Painter Link Kit Extension#
Warning
Live sync support with the Live Link Kit extension functionality is deprecated and will be removed in future versions of the connector.
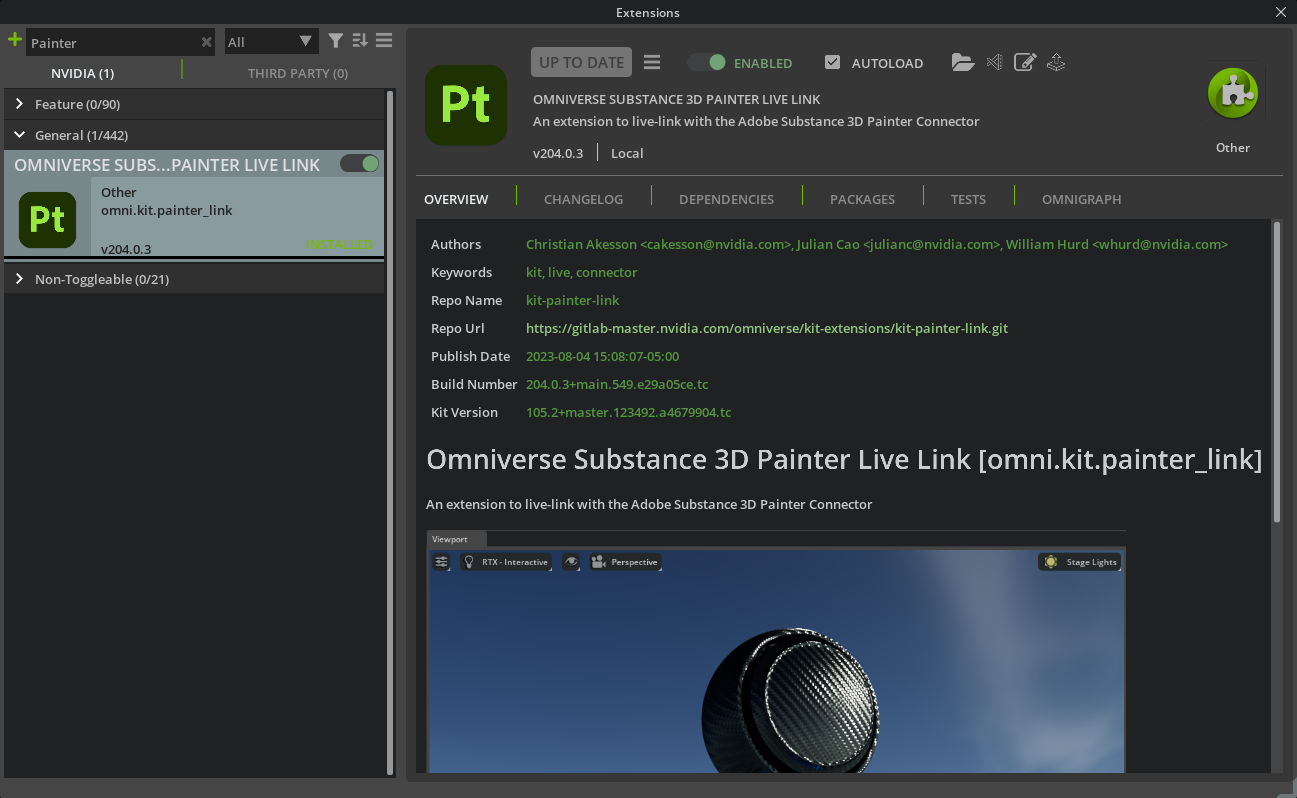
The Painter Link Kit Extension for Kit 105 is available from the extension manager inside the Omniverse USD Composer 2023.2.0 release. Search for “Painter” in the top-left search box and the omni.kit.painter_link extension should appear. Both enable it and check the AUTOLOAD box.
Warning
For compatibility between the Painter Connector and Painter Link Extension, ensure that you have matching major and minor versions installed. For example, if you have the 204.0 version of the Painter Connector installed, ensure that your Painter Link extension is also version 204.0.
Settings and Actions#
Painter Connector#
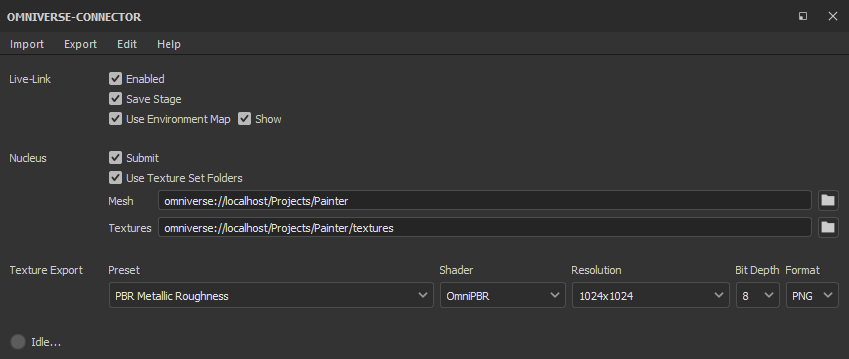
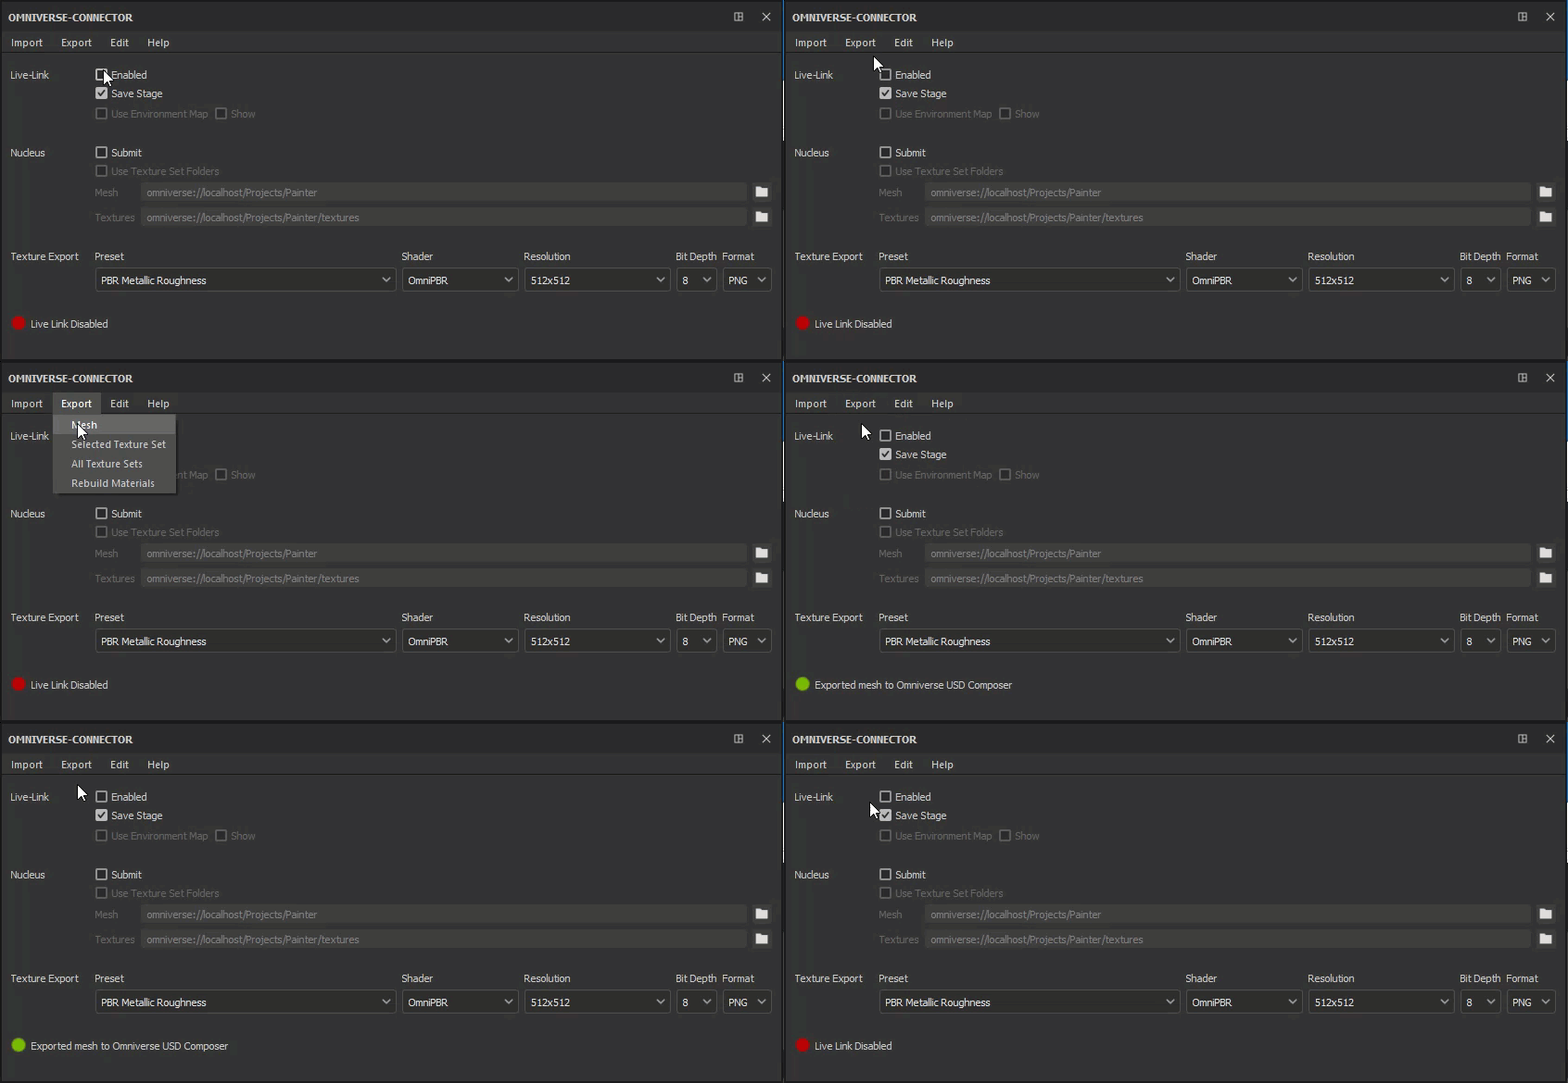
The Omniverse Connector is a plugin that automatically exports texture maps whenever a user paints or changes any properties in the texture set. There is a settings panel that allows the user to configure the Connector, export, and import meshes.
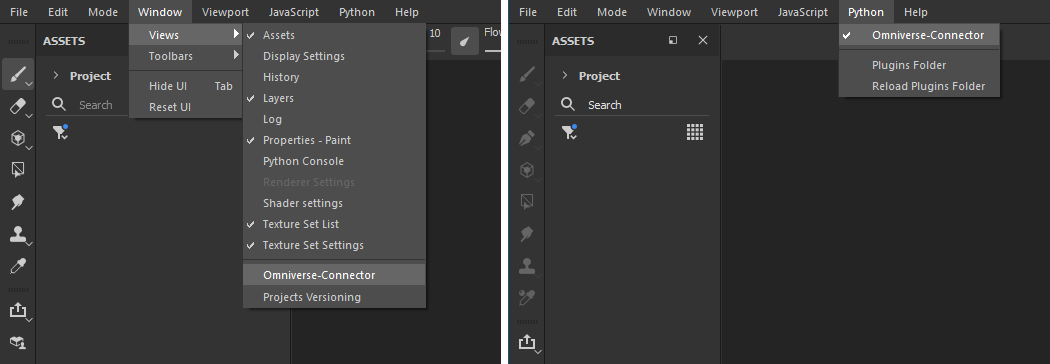
If the settings panel is completely hidden, open it by selecting Window > Views > Omniverse-Connector or Python > Omniverse-Connector.
Note
In versions 203.0 or older, the settings panel can be toggled in the JavaScript menu. In versions 204.0 or higher, it is located in the Python menu.
The Settings pane:
Connection Settings Dialog#

Menu Item |
Description |
|---|---|
Port |
The port on which the USD Composer extension is listening for texture update, mesh import, and mesh export notifications. The default is 8111, but this will change if you’re running more than one instance of USD Composer (or you’re using USD Presenter/Code/etc).
|
Export Folder |
This folder is where the plugin exports USD and texture files, as well as where Omniverse USD Composer will store the new USD stage.
Note: Textures are exported to a subdirectory named using the convention
<substanceProjectName>_textures. |
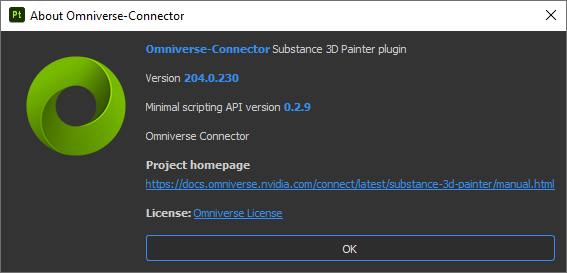
About Dialog#
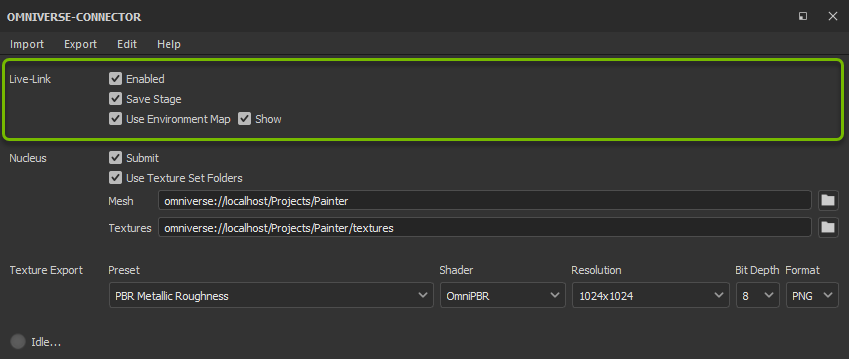
Live-Link Options#
Menu Item |
Description |
|---|---|
Enabled |
If checked, textures and USD files are re-exported and sent to USD Composer when paint strokes are made on the mesh.
|
Save Stage |
If checked, the stage in USD Composer will be saved with every texture update.
|
Use Environment Map |
If checked, a Dome Light is created in USD Composer using Painter’s environment map.
|
Show |
If checked, the environment map will be visible in USD Composer. This option is only enabled while the Use Environment Map option is enabled.
|
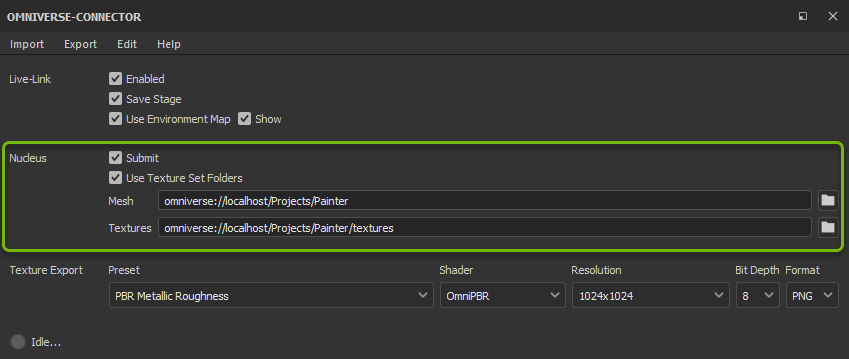
Nucleus Options#
Menu Item |
Description |
|---|---|
Submit |
If checked, meshes and textures from Painter are created and copied to the Mesh and Textures folders with every update. For testing purposes, this can be changed to a local disk folder instead of a Nucleus folder.
Note: if “Submit” is not checked, then the root layer edits will point to the local texture exports on disk instead of Nucleus.
|
Use Texture Set Folders |
If checked, the textures uploaded to Nucleus will be placed in subdirectories named after their texture set.
|
Mesh |
The path in Nucleus where USD files will be uploaded.
|
Textures |
The path in Nucleus where exported textures will be uploaded.
|

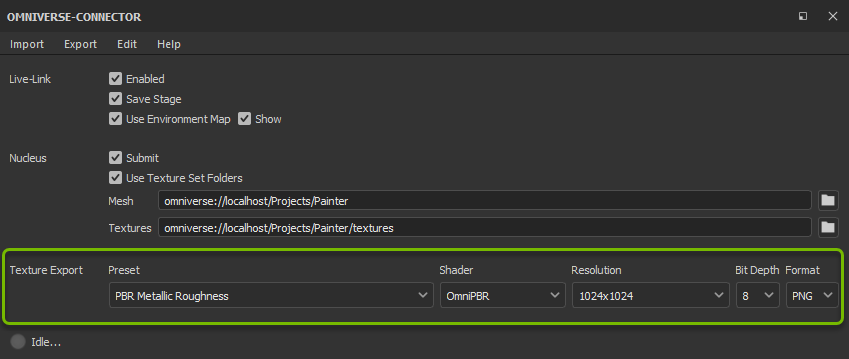
Texture Export Options#
Menu Item |
Description |
|---|---|
Preset |
The texture preset to use for texture exports.
Note: All built-in and user-defined texture presets are supported for export, but some channels used by a given texture preset may not be available in the currently supported shader types.
|
Shader |
The type of shader that will be created in Omniverse USD Composer.
Note: Only OmniPBR and USDPreviewSurface shaders are currently supported.
|
Resolution |
The size of exported textures.
|
Bit Depth |
The bit depth of the exported textures. Note that not all bit depths are supported by some formats.
|
Format |
The texture file format (PNG, TGA, etc.).
|
Status Indicator#
The status indicator is located on the lower left-hand section of the window and displays information about what is currently occurring, such as mesh or texture exports, connection attempts to Omniverse USD Composer, or errors if they occur. If Live-Link is enabled and no actions are currently executing, the indicator will read Idle..., indicating that the connector is awaiting an action. If Live-Link is disabled, the indicator will read Live-Link disabled.
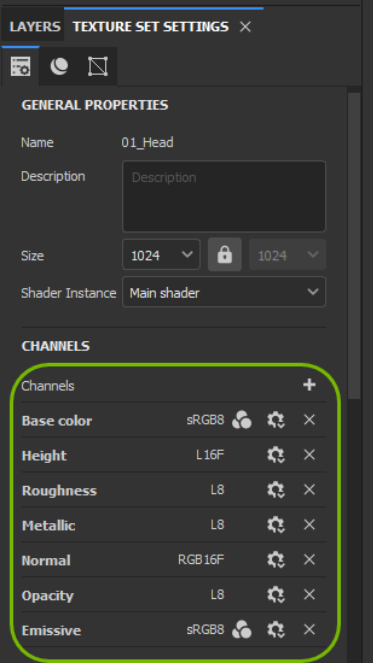
Texture Set Settings#
Only the channels specified in the Channels list are initialized in the OmniPBR material that Omniverse USD Composer updates. This can be used to make a material more efficient. For example, if there’s no opacity required, the Opacity channel can be deleted and that parameter will be unchecked in the generated OmniPBR material.
USD Composer Painter Link Extension#
To bring up the Painter Link settings, go to Window > Substance 3D Painter Link
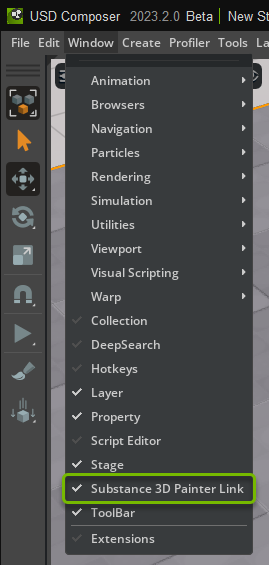
This will show the Painter Link settings:

Setting |
Description |
|---|---|
Link Port |
This shows the current port on which the Painter Link extension is listening. It can be configured in the Painter Connector settings.
|
Idle/Working Indicator |
Shows the user when the extension is busy uploading textures (larger textures take time to upload and the delay can be noticeable).
|

Exporting to Omniverse USD Composer and Painting#
The Connector and extension allow a user to export a Painter mesh into Omniverse USD Composer for live painting.
Open or create a project in Painter.
To link Painter with USD Composer, find the Omniverse Connector dock widget (it might be in the bottom right corner). It might be better to dock it under the viewport so it’s slightly wider.
In the Settings pane, select Edit > Connection Settings… and in the Connection Settings dialog, ensure that the Port field matches the number shown in the USD Composer Painter Link window. This number can change if you have multiple instances of USD Composer running or if you are running Omniverse Code instead of USD Composer.

Select Export > Mesh to send the current mesh and texture sets to Omniverse USD Composer.
If you want to match the environment, you can create a matching dome light in Omniverse USD Composer by clicking the Use Environment Map checkbox, and clicking Show if you want to make it visible.
Start painting.
UV Tile (UDIM) Support#
The Connector supports exporting Painter projects with the UV Tile workflow enabled. All of the tiles are exported when a change is made to any individual tile, so take note that every brush stroke can generate a lot of work exporting textures.
Importing a Mesh from Omniverse#
With the Connector and Painter Link extension, it is possible to open a USD stage in USD Composer and import it into Substance Painter.
The Import Process Explained#
Open a USD prop in USD Composer that you intend to import into Painter.
Existing materials that are OmniPBR-based will be edited.
We suggest that if you want to keep the original OmniPBR-based materials to duplicate them before importing.
Existing material that are not OmniPBR-based will be renamed and new OmniPBR-based materials will be created and assigned to the USD mesh.
Select Import > Mesh…
If your project has unsaved changes, a dialog will ask if you want to save your changes. If your file has not yet been saved, another dialog will allow you to specify where to save your Painter project.
A dialog will give you the following options prior to importing the mesh:

Import Selected: If checked, the new project will get created using only the prim that is currently selected in Omniverse USD Composer. You can only have one prim selected, but that prim can have any number of children; if multiple meshes are required, they must be children of the selected prim.

Note
The Import Selected option is only available in Adobe Substance 3D Painter versions 9.0.0 or higher
Use UV Tile Workflow: If checked, the following options are enabled - Default: UV Tiles (UDIMs) are imported and grouped per material assignation on the mesh. Legacy: UV Tiles are separated into individual Texture Sets.
The current USD stage is saved to the Export Folder location from the Painter Connector’s Connection Settings dialog.
A new project is created in Painter based on the contents of the stage, or the selected prim if the Import Selected option is checked.
The Texture Sets in Painter are all sent back to USD Composer and it will generate and assign materials to the mesh.
If the USD contained OmniPBR materials, they can be recreated because the textures should have been imported to the project.
Note
The current solution does not preserve the USD’s materials and textures initially, so it will appear that all of the textures and materials are wiped and replaced with white.
Recreating OmniPBR Materials in Painter#
If the USD contained OmniPBR materials, the import process should have imported textures into the Painter project. They can be applied with these steps:
Find the imported textures from the Project Assets (select the Texture filter to isolate them in the panel).
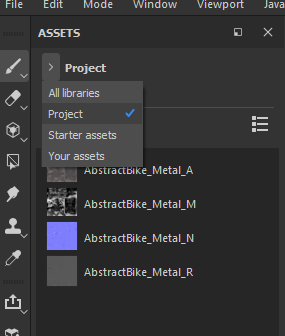
For each texture set, add a fill layer
Drag the imported textures from the Project panel onto the fill layer’s channels.
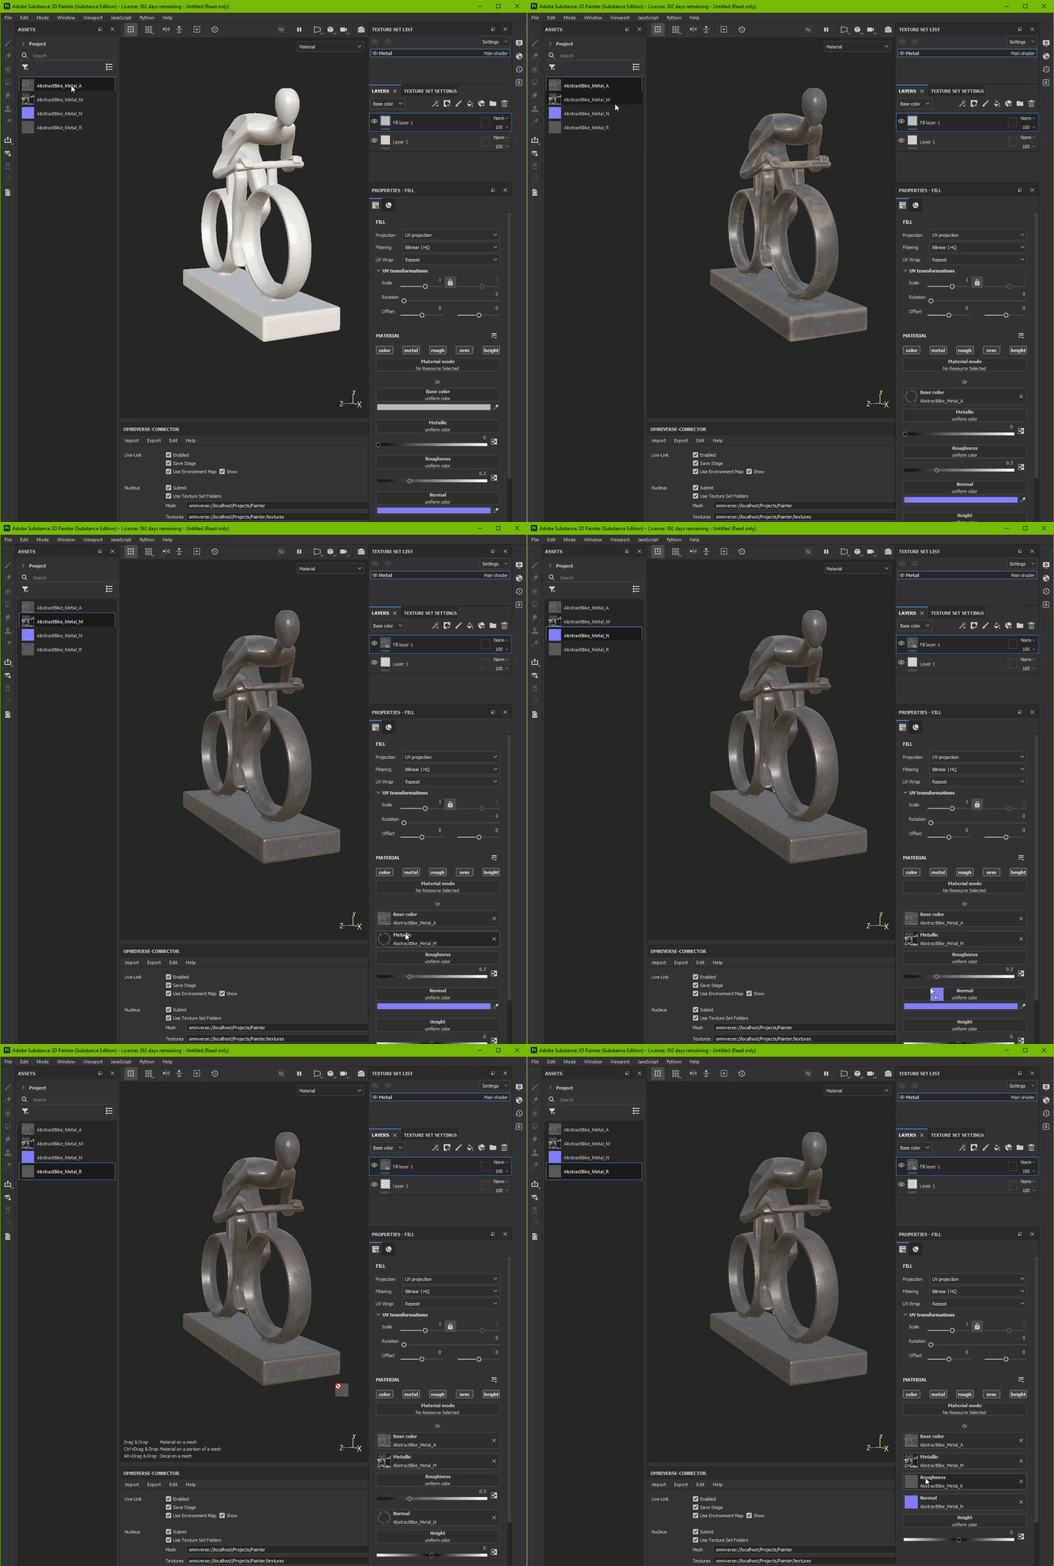
At this point the original material exists in Painter for further editing.
Operating on a USD Mesh Within a Stage#
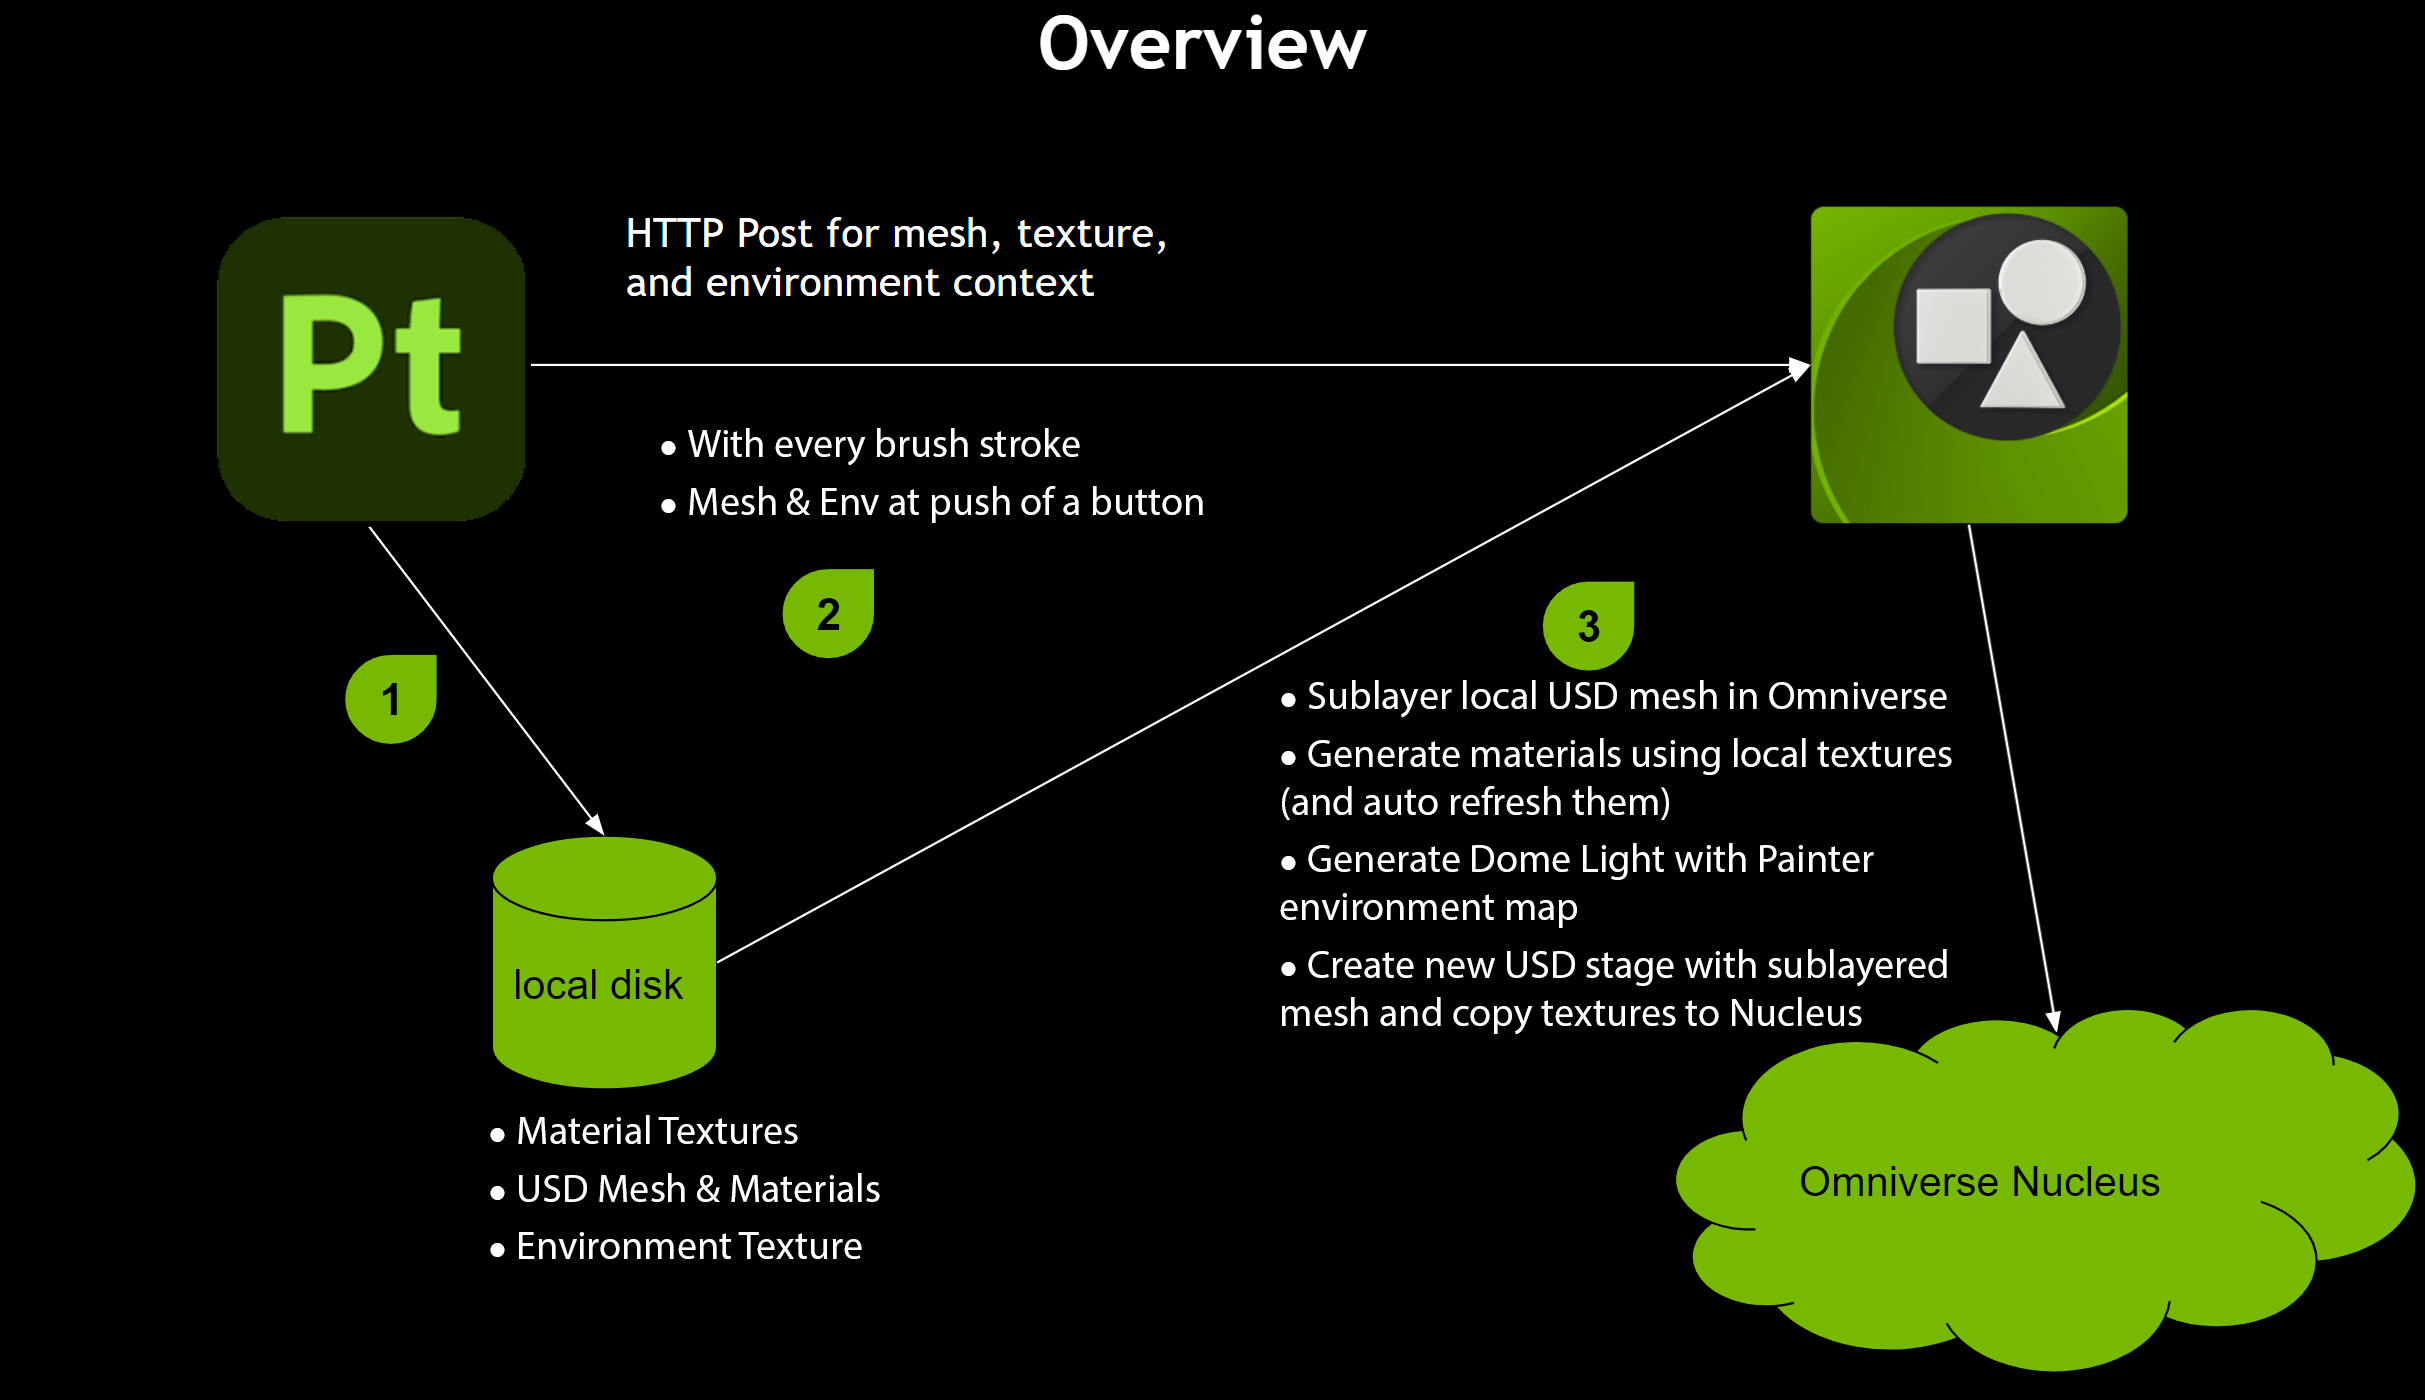
The real power of being able to visualize an exported mesh from Painter comes when you include it in a composed stage in USD Composer. The Connector will update textures for any material found in the stage that uses them. It is possible to export a mesh prop to Omniverse, setup the materials a bit, then actually drag that prop into another stage and continue editing it. The Painter Link extension should find the mesh and update it as painting continues in Painter.
Implementation Details#
The Substance 3D Painter Connector and Painter Link Extension work in tandem to handle texture, material, mesh, and lighting synchronization between Painter and USD Composer.
Mesh#
Painter Export#
Painter exports three USD files:
<projectName>.usd,<projectName>.geo.usdand<projectName>.material.usda, whereprojectNameis the name of the currently opened Substance Painter project. These are placed in the Export Folder (located in Edit > Connection Settings…).A copy of the
<projectName>.geo.usdis made to preserve the geometry of the entire project, as paint strokes will re-export the<projectName>.geo.usdfile with only the geometry for the painted texture set.If the Painter project was created using a USD file, and that USD file still exists on disk, a flatted copy of that file will be used in lieu of the
<projectName>.geo.usdfile.Painter exports textures to a subdirectory named
<projectName>_textures. This directory is located at the root of the Export Folder.The Painter Connector notifies the Painter Link extension through HTTP post message to create a new stage and to sublayer the copied
<projectName>.geo.usdfile. The stage is located at the root of the Export Folder, but is also saved to the root of the Mesh folder (under the Nucleus header) if Nucleus is used. The Painter Link extension is also notified that the texture set maps are available and the Painter Link extension updates the materials in the USD stage with the Painter maps and parameters, based on the contents of the<projectName>.material.usdafile.
Painter Import#
A USD prop stage is open in USD Composer (preferably located in the Export folder).
Painter requests to “Import a Mesh from Omniverse” with an HTTP post message to the Painter Link extension.
The Painter Link Extension exports the current open stage as USD. Textures are exported in a folder next to the mesh (under
textures).When the export is complete, Painter is notified and creates a new project with the normal map convention set to DirectX and adds all textures from the
texturessub-directory.
Textures#
Textures are exported using the Painter plugin API when brush strokes are performed, if the Live-Link Enabled checkbox is checked. The Painter Link extension is notified of these new textures and updates the materials to reference them. The textures are copied to the Nucleus Textures folder if the Submit setting is checked.
Materials#
When the Painter Connector exports textures, it notifies the Painter Link extension to update materials with all of the correct meshes and texture preset channels. Materials are created or updated at the path /<defaultPrim>/Looks/<materialType>/<materialName>, where <materialType> is the chosen material type (i.e. OmniPBR, USDPreviewSurface), and <materialName> is the name of the updated texture set in Substance Painter.
Note
Currently the only material types that the Painter Link extension generates or updates in USD Composer are OmniPBR and USDPreviewSurface.
Environment Lighting#
The Painter plugin API provides the current environment map path. When the environment map is exported, a messages is sent to the Painter Link extension with the environment map path on local disk. A Dome Light is created in the stage under the /Preview/DomeLight prim path. Note that this is outside the defaultPrim so that there are no lighting collisions when referencing the USD prop in another stage. The environment map is also copied to the Nucleus Folder if the Submit setting is checked.

Session Layers and Local vs Nucleus Textures and USD#
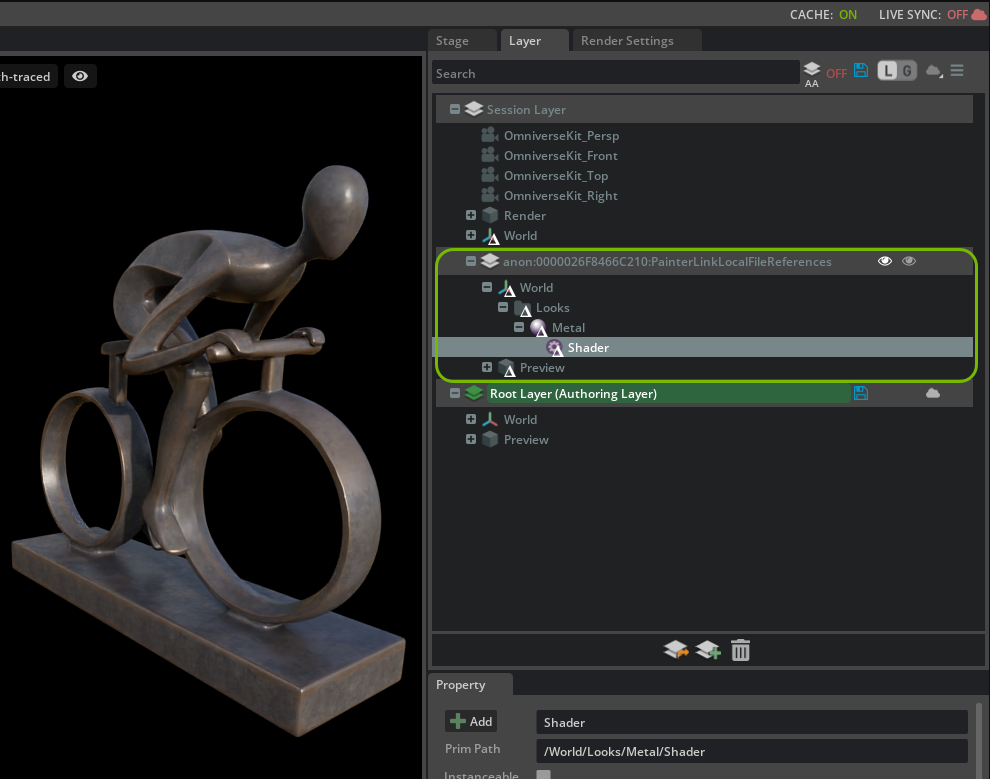
In an effort to make local Painter changes appear very quickly and still make the updates replicate through Omniverse, the Painter Link extension uses the Session Layer. The Session Layer is “scratch space” to configure, override, and experiment with the data contained in files backing the stage. An anonymous layer is a layer that cannot be saved to disk and will only reside in memory.
The Painter Link extension uses an anonymous sublayer within the Session Layer to store local textures and to sublayer the USD geometry file. While working in the live session with Painter, these local paths are what a user sees, and they update very quickly because all access is local. The Nucleus Paths to the textures and USD geometry file are stored in the Root Layer so that the file-backed version of the stage contains the Nucleus-resident files. If the stage is opened from another client on another computer, the textures and USD geometry are referenced from Nucleus. They will update automatically, but not as quickly as the local updates.
To show the Session Layer in the Layer tab, select Show Session Layer in the hamburger button (menu or collapsed menu button).
This is the Layer tab from USD Composer. The Session Layer is on top because it is the strongest layer in the stage. The Painter Link extension creates the anon:####:PainterLinkLocalFileReferences sublayer and sets that to the authoring layer whenever textures and USD geometry are updated.
Known Issues#
Here is a collection of issues that we are working on resolving:
In Adobe Substance 3D Painter, if the OMNIVERSE-CONNECTOR Settings pane is missing, open it by selecting Window > Views > Omniverse-Connector.
If your Adobe Substance 3D Painter project was created using an FBX file, and a texture set is renamed, the material will need to be applied manually in Omniverse USD Composer.
If the Omniverse Nucleus server you’re using is remote and texture copies are less than immediate, USD Composer may freeze when the textures are uploading to Nucleus.
When exporting textures, you may see
[gpu.foundation.plugin] Failed to read texture fileor[carb.imaging.plugin] Failed to load imageerrors in Omniverse USD Composer’s console. These errors are not a cause for concern as the textures should be successfully read once the export process has completed. If parts of the texture render incorrectly, re-exporting them will fix this issue.If your Substance Painter file was created using USD, and the original USD file exists on disk but it contains references to other USD files that no longer exist on disk, the geometry from those references will not be included in the mesh export.z
