Variant Helper#
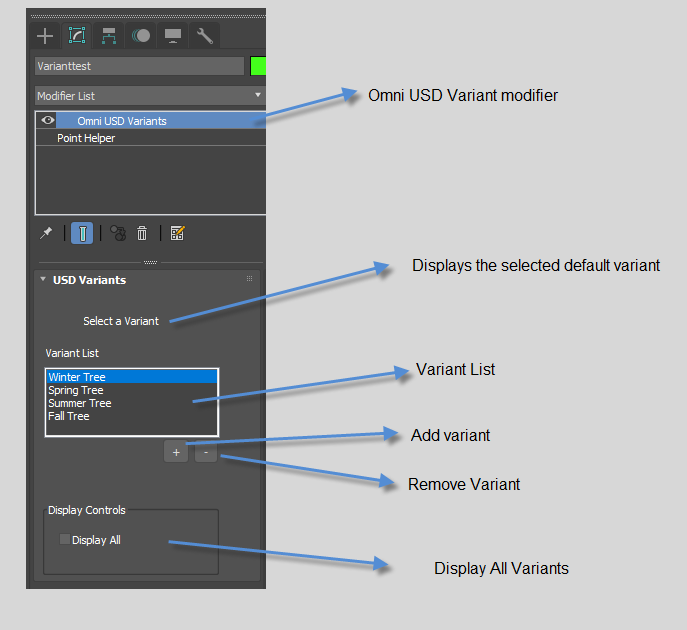
The Variant Helper is a scripted point helper that helps create simple geometry variants. The Variant Helper is supported by Live mode - which will synchronize the current active variant.
The Variant Helper is available in the Create Panel: Create Panel > Helpers > NVIDIA Omniverse
Note
The Variant Helper is expected to be at scene root level. Nested Variant Helpers are not supported.
Using Variants#

Variant Options |
Utility |
|---|---|
Picked Variant |
The top control is a label that provides the user the current variant marked as the selected variant.
|
Variant List |
|
|
Lists all variants that are to be exported with the USD.
|
|
The selected variant and its children are made visible.
|
|
Makes that selection your current picked variant and adjusts the label as such.
|
Add |
Adds selected object to the variants list.
|
Remove |
Removes the selected item from the variants list. The item below replaces the removed variant as your selection.
|
Display Controls |
|
|
Displays all variants for the Max user.
|
Creating Variants#
To create a USD Variant in 3ds Max, use the Omniverse USD Variants Helper.
Setup#
In a new scene, create 3 objects (Sphere, Cube, Cone).
Center them on the world origin (0,0,0)
Creating Omniverse Variant Helpers#
Select the OmniVariants helper.
Create Panel > Helpers (tab) > |omni| (Drop Down Menu)Click and drag in the viewport to create an OmniVariants helper.
Adding Variants to the Helper#
With the Variant Helper selected, switch over to the Modify Tab.
In the modifier stack, you should see
OmniVariants. Select it.When selected, the Modifier should display the USD Variants Panel below the Modifier List.
In the USD Variants panel, select the
+below the list.In the Hierarchy/Layer panel, select the Sphere you created in Setup.
In the USD Variants panel, select the
+again.In the Hierarchy/Layer panel, select the Cube you created in Setup.
In the USD Variants panel, select the
+again.In the Hierarchy/Layer panel, select the Cone you created in Setup.
Your Variants List should now contain all 3 objects.
Displaying Variants#
In the USD Variants Panel, select and de-select the
Show allcheck box.Select a variant in the list to display just the variant of your choosing.
Export Behavior#
When exporting a Prop with variants, the items listed by variants and their children should not be considered as objects themselves because they are part of an object with variants.