User Manual#
Install the Connector#
Warning
The Omniverse Archicad connector will be deprecated on October 1, 2025. Visit here for more details. We recommend using the Omniverse CAD Converter to convert CAD data into OpenUSD and import into the Omniverse Platform.
Follow our Connector installation instructions to install this connector.
Note
Before installing the Omniverse Connector from your Workstation Launcher, make sure you have a compatible version of Graphisoft Archicad installed.
Tip
Export from Archicad as FBX, or CAD file format and Import into Kit applications. Supported file formats. We recommend using the Omniverse CAD Converter ingesting CAD data to OpenUSD and Omniverse workflows.
User Interface#
When the plugin is installed, Archicad should display an Omniverse Menu now visible in the top menu.
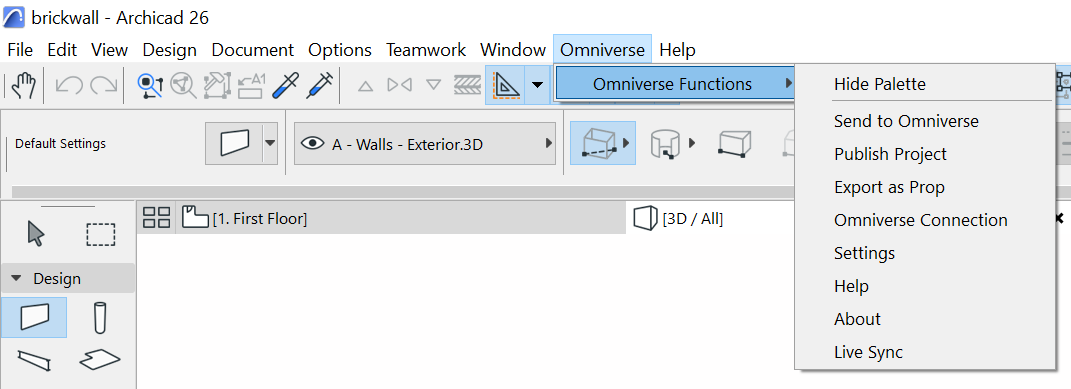
Clicking this menu will reveal the ribbon panel for Omniverse Interactions.
Option |
Description |
|---|---|
Send to Omniverse |
Sends to Kit application. Deprecated functionality |
Publish Project |
Exports as a USD scene within a project container. |
Export as Prop |
Exports scene as a prop (no project container) to be used within a project. |
Omniverse Connection |
Sign in to an Omniverse Server. |
Settings |
Adjust connections and settings of the Archicad Omniverse Connector. |
Help |
Directs users to this page. |
About |
Displays version and other useful information regarding the Archicad Omniverse Connector. |
Live Sync |
Establishes a Live Connection to an Omniverse Server. Alpha functionality |
Open/Close Control Palette#

Toggles launch and closure of the Omniverse Archicad Control Palette.
Hide Palette#
Minimizes the Control Palette
Export as Prop#
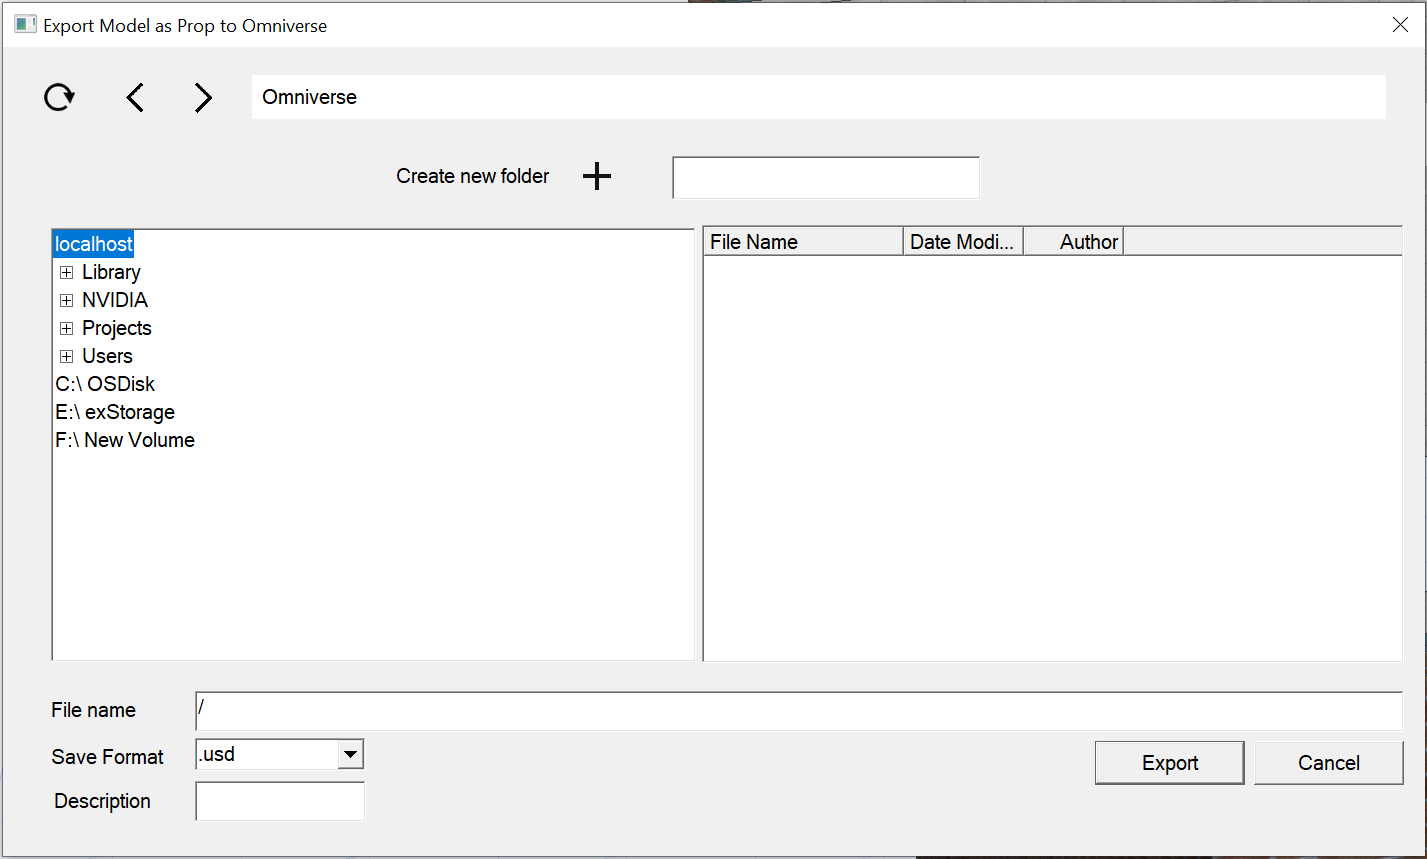
Exports scene as a prop (no project container) to be used within a project. This is helpful when exporting items like signs, streetlamps, and other accessories to a scene.
Element |
Result |
|---|---|
Refresh |
Updates the Window with Latest Data
|
Left/Right |
Moves Through the Current Directory Structure in a Step By Step Fashion
|
Create New Folder |
Creates a New Directory at Current File Path
|
Left Pane |
Lists NVIDIA Omniverse™ Nucleus Directories (If Logged-In) and Local Drives / Directories
|
Right Pane |
Lists Files in Currently Selected Directory
|
Project Folder |
The location and name of the project to create
|
Save format |
Allows Selection of File Export Type
|
Description |
Text to be used as the text on the file checkpoint
|
Show Publish Options |
Display the Settings dialog so that user can select Publish/Export options
|
Export |
Exports the Rhino file as a Prop file
|
Cancel |
Stops the Export Process and Closes Export Dialogue
|
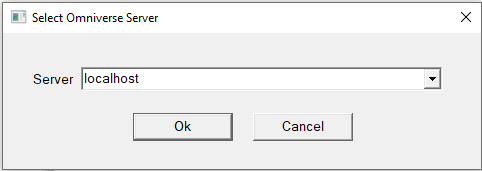
Omniverse Connection#
Allows users to log into a specified Omniverse Server
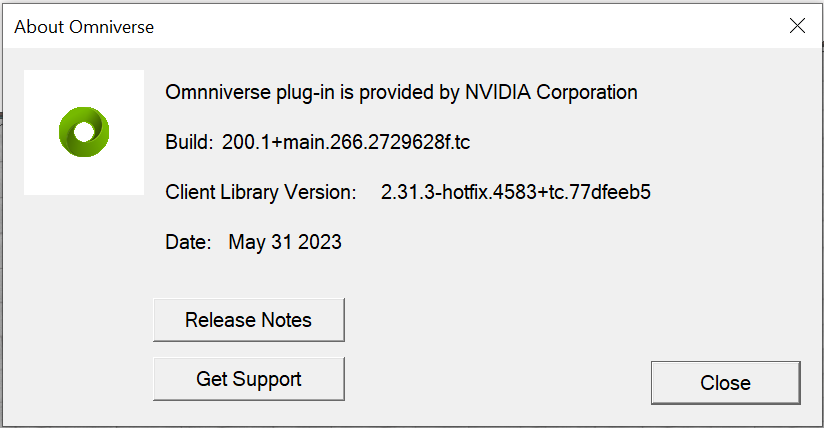
About#
Simple informational dialogue displaying relevant Omniverse Archicad Connector version information.
Settings#
The settings menu allows you to select a preferred Kit application install as your viewer.
Note
You will need to have Omniverse USD Presenter or Omniverse USD Composer installed and selected to use Send to Omniverse.
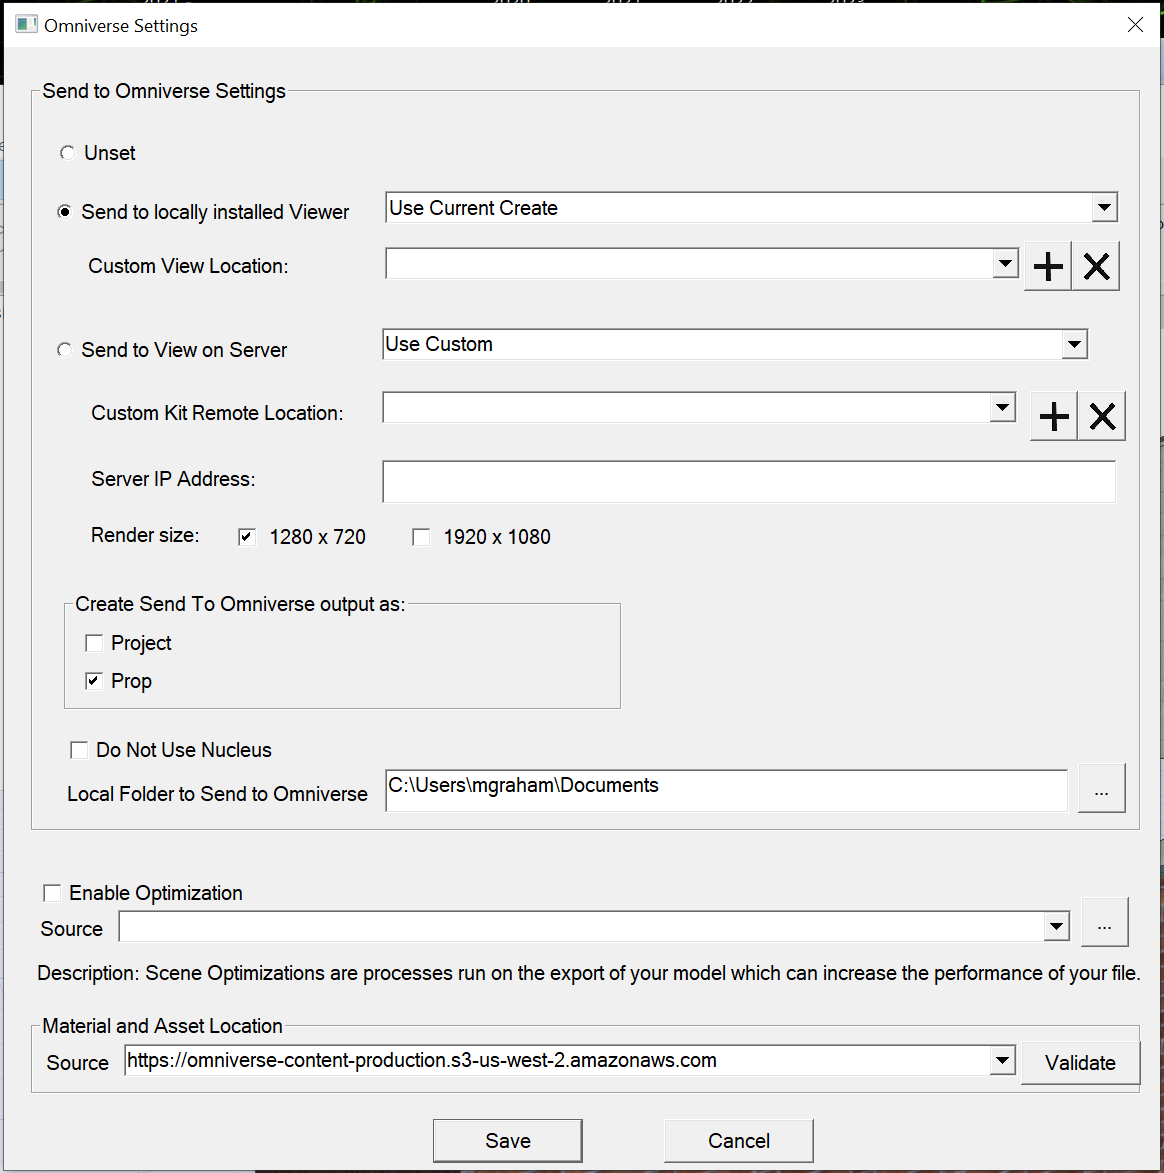
Setting |
Description |
|---|---|
Unset |
No Viewer Settings (This setting disables Send to Omniverse) Deprecated functionality |
Send to Locally Installed Viewer |
Kit application Launch Path Deprecated functionality |
Custom Viewer Location |
Allows Selection of Viewer Installs not found automatically Deprecated functionality |
Send to Viewer on Server |
Kit application Launch Path on a Remote Server Deprecated functionality |
Custom Kit Remote Location |
Allows for Selection of a Specified Remote Kit Location Deprecated functionality |
Server IP Address |
Allows manual entry of a remote IP Address Deprecated functionality |
Render Size |
Render Quality to Use in View when Launching Remotely Deprecated functionality |
Project/Prop toggle |
Determines the output type when using Send To Omniverse. See Publish Project and Export As Prop for details |
Do Not Use Nucleus |
Send to Omniverse will bypass Nucleus and save to the specified folder, OFF by default, must be OFF to use Live Workflow |
Local Folder Path |
Path to save files to when Do Not Use Nucleus is enabled |
Enable Optimization |
When enabled, runs USD optimizations on scene data for USD export or sending to Omniverse. |
Source |
Select the scene optimization JSON file to use when optimizing |
Save |
Commits the Changes and Closes the Window |
Cancel |
Closes the Window and Discarding the Changes |
Please see the Scene Optimizer user manual for information on the optimization operations and how to create custom configuration files.
Live Sync#
Live sync send updates of your models to Kit applications to see your changes in real-time.
Warning
Live sync for Archicad is an Alpha feature and may not work as expected in different workflows.
Note
Live Sync is uni-directional, updates are sent from Archicad to Kit applications but the Archicad model is not updated from external changes in Kit applications.
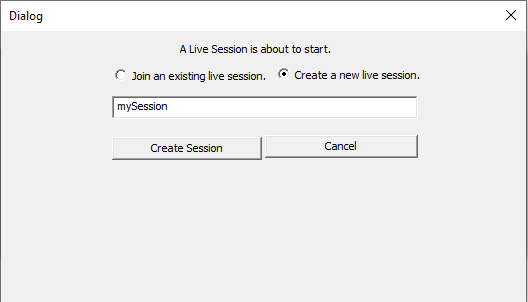
Setting |
Description |
|---|---|
Join or Create Session Toggle |
Switch between dialog for joining or creating a live session |
Text Box |
Field to input the name of the live session to be created |
Create Session |
Creates a live session with the name provided in the text box |
Cancel |
Cancels live session creation |
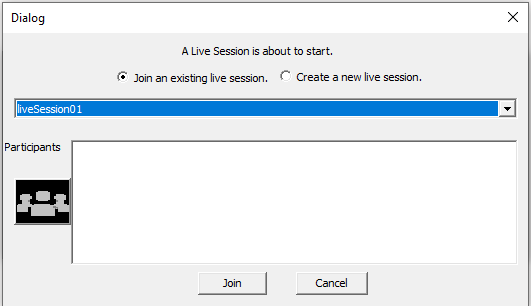
Setting |
Description |
|---|---|
Join or Create Session Toggle |
Switch between dialog for joining or creating a live session |
Session Drop Down |
Drop down selector for live sessions associated with the connected .usd file |
Participants |
Lists participants in selected live session |
Join Session |
Joins a live session with the name provided in the text box |
Cancel |
Cancels live session join |
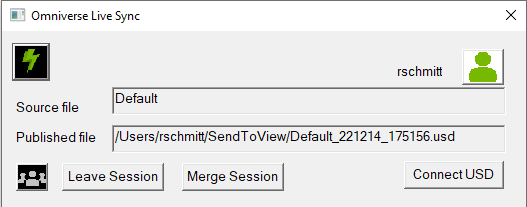
Setting |
Description |
|---|---|
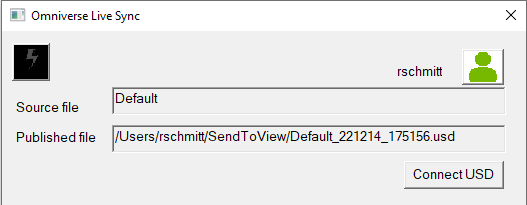
Live Sync (Lightning Bolt) |
Live Sync ON when checked |
Source file |
Name of the Rhino file being synced |
Published file |
Name of the .usd file being synced with |
Connect USD |
Opens a browser, allowing the user to select the .usd file to sync with |
User Icon |
Opens the Sign In dialog |
Participants |
Shows participants in current live session |
Leave Session |
Leave the current live session |
Merge Session |
Merge live session edits into connected .usd file, ends live session |
Warning
The Live Sync Window must remain open to use Live Sync. Closing this window will terminate a live sync connection.
Warning
2D Views will NOT Live Sync while in a 2D viewport. Please Return to the 3D Viewport to update changes.
Send to Omniverse#
Warning
Send to Omniverse is a deprecated functionality and may not work as expected.
Sends your file directly to Kit applications. Simply click “Send to Omniverse” and Kit applications will launch with your model loaded and ready to go.
Important
Be sure to have the 3D viewport active when sending.
Publish Project#
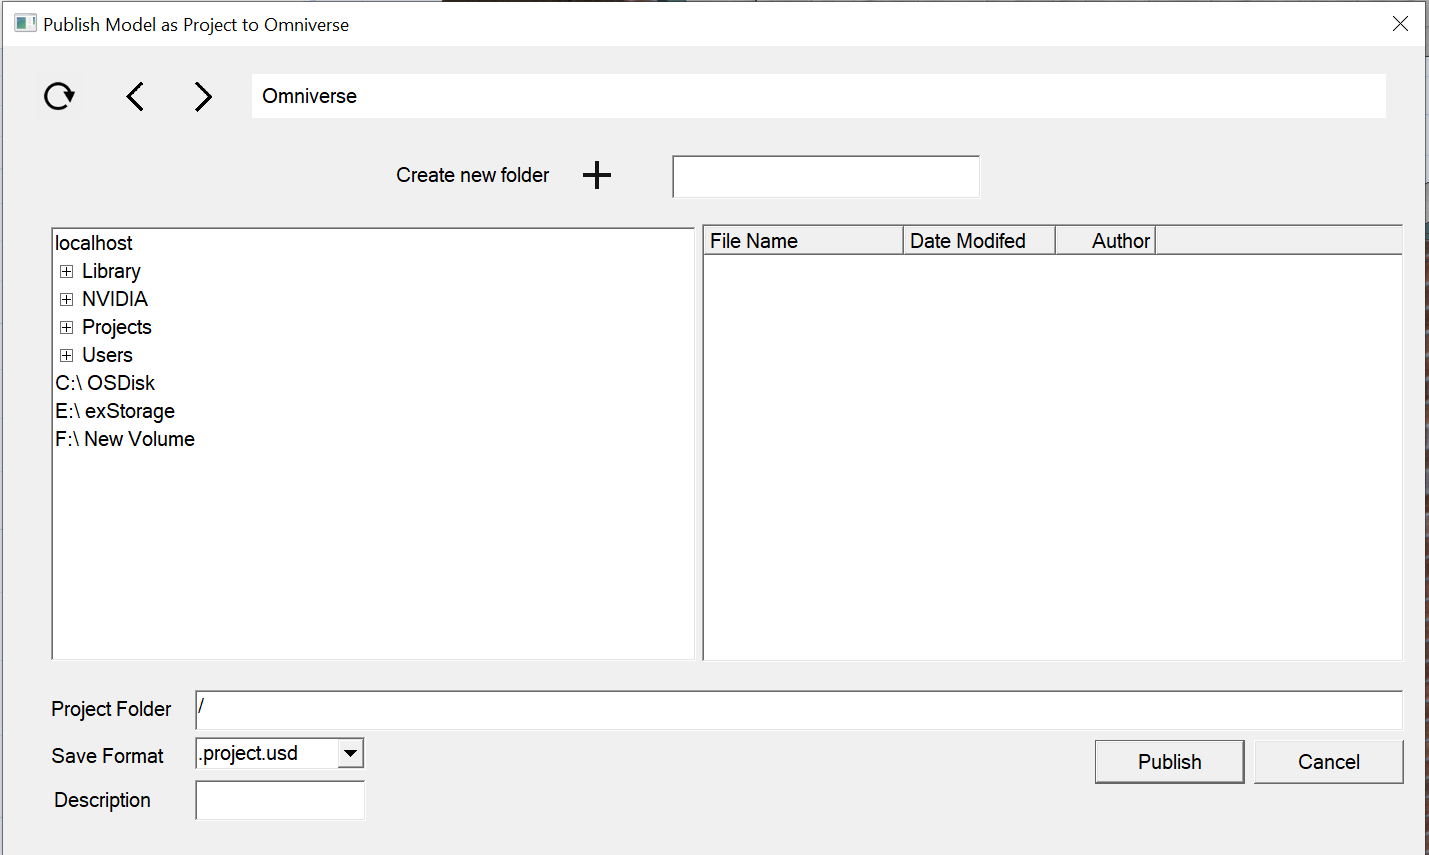
Exports the current scene to a selected Location using the AEC Project Workflow.
Element |
Result |
|---|---|
Refresh |
Updates the Window with Latest Data
|
Left/Right |
Moves Through the Current Directory Structure in a Step By Step Fashion
|
Create New Folder |
Creates a New Directory at Current File Path
|
Left Pane |
Lists NVIDIA Omniverse™ Nucleus Directories (If Logged-In) and Local Drives / Directories
|
Right Pane |
Lists Files in Currently Selected Directory
|
Project Folder |
The location and name of the project to create
|
Save format |
Allows Selection of File Export Type
|
Description |
Text to be used as the text on the file checkpoint
|
Show Publish Options |
Display the Settings dialog so that user can select Publish/Export options
|
Publish |
Publishes the Rhino file using the Project Workflow.
|
Cancel |
Stops the Export Process and Closes Publish Dialogue
|