Customization#
Overview#
Omni.Replicator.Agent (ORA) supports custom environment assets, custom character assets, and custom character animations.
Custom Environment Assets#
You are welcome to use your custom scene assets. To use custom environment assets, they must be in .usd format and have the correct root layer attributes. This guide helps
you determine environment assets, convert scene assets to .usd format, configure and light the scene, and create the Navigation Mesh
for the scene.
Find Environment Assets#
We recommend browsing the Omniverse USD Composer’s Assets Store for high quality assets that are ready-to-use for Omniverse.
You can also browse 3D asset stores like Turbosquid and Sketchfab. You can filter asset search on these sites by “USD” to find Omniverse-ready assets.
Any non-USD environment asset you want to use must be converted to USD.
Converting Non-USD Assets to USD#
The best way to convert a non-USD asset file is to determine what tools it is created with and use the corresponding Omniverse connector to convert it.
Isaac Sim has an extension that you can use to convert .fbx, .obj, .gltf formats to .usd. Refer to extensions:ext_asset-converter to convert these formats.
You can also try to import assets from other formats using Omniverse connect:3rd-party-connectors.
The following steps are used to find the tools used created the asset and the corresponding connector. These steps use a .max file as an example.
Find the Tool of Creation#
When you find an asset on a store, it usually lists the software used to create it. For example Turbosquid contains the FORMATS section. In the example below, the asset was made with 3ds Max 2013 and V-Ray 3.2.
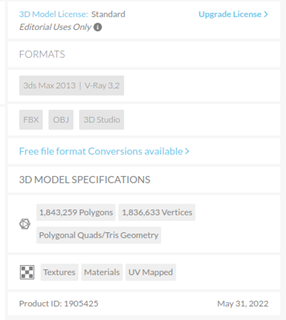
Some assets are created using multiple software packages, with one being used for modeling and the other being used for texture and materials. This asset used 3ds Max for modeling and V-Ray for adding materials.
Note
When multiple tools were used to create a sample, you must use the tool that makes the texture/material to perform the conversion. For example, if you tried to convert this asset with 3ds Max, the texture/material won’t be exported correctly and the asset will look grey when imported to Omniverse.
Using Omniverse Connector#
After confirming what software is used, use that software to convert the asset.
Research the software to determine if it already has a built-in USD converter. If so, follow the official documentation for the software to convert it to USD.
Typically, Omniverse has a Connector that can be used to convert your asset, even if your software doesn’t have one. Following these steps to use a Connector:
Go to Omniverse Launcher app, select the EXCHANGE tab, and search for the app. For example, search for “3ds Max”.
Install the Connector
Re-open the app, in this example, 3ds Max.
An Omniverse tab appears in your app. Click Export All or USD and follow the prompts to finish the conversion.
All of the Connector installation pages have a Tutorials page. If you are feeling stuck, follow the tutorials.
If the software doesn’t have a built-in USD converter and Omniverse doesn’t have a Connector for this app yet, you can always convert the environment asset to an OBJ or FBX file and then follow the steps to perform the conversion in Isaac Sim.
Note
Some exported USD files may not open in Isaac Sim. You can try opening them in Omniverse USD Composer instead. Right-click on the asset USD file and click Collect Assets button. After the process is complete, open the collected asset USD in Isaac Sim.
Config the Environment Asset#
With your environment asset in USD format, you might want to adjust scale or lighting before importing it into Isaac Sim.
You can adjust scale to make sure that you are using a consistent coordinate system (y-up or z-up) across your assets. Similarly, you might want to define a constant for lighting.
To use a custom environment asset with ORA, you must create a NavMesh for it. This section aims to help you set up your new environment asset so it’s ready for the extension.
Unit and Coordinates System#
Isaac Sim is using meter as the unit and Z-up as the world coordinate system.
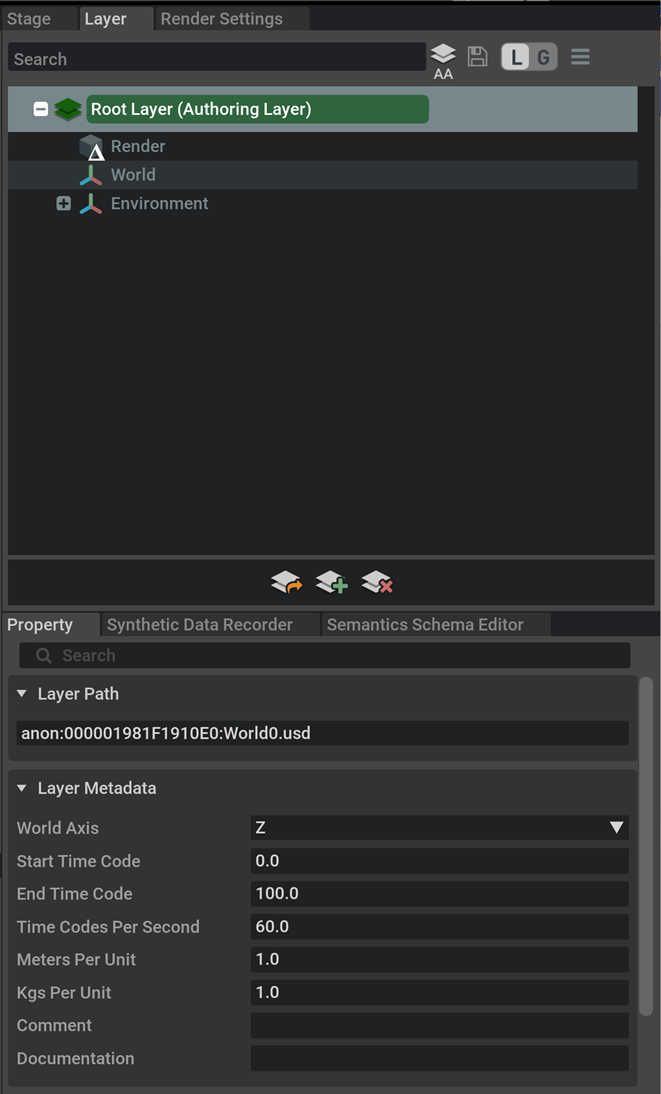
With the environment asset open in Isaac Sim, go to the right panel and select the Layer tab. Click the “Root Layer”, and the properties of the “World” are shown in the bottom right Property panel.
Typically, using Isaac Sim to convert the unit and system is the easiest way to get consistent coordinates:
Open the Isaac Sim default empty stage.
Drag your asset into the Stage panel on the left side.
Isaac Sim automatically creates a new Xform for it and converts it to the right config.
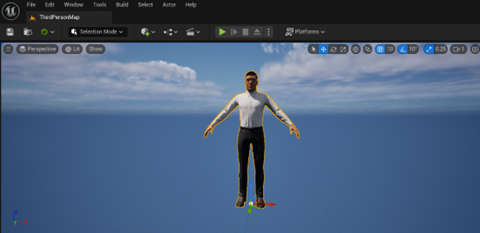
Alternatively, you can change the World Axis to Z and Meters Per Unit to 1 from the Layer Metadata attribute under the Root Layer Property, which can be found as the above default empty stage screenshot shows. After changing the numbers, the scene is rotated in the wrong direction and in the wrong scale. You need to manually rotate and scale it to the right direction and size. To verify that the scene is in the right configuration, drag a character into the stage and see if it matches the size and direction of the environment.
Note
Some scenes might be created without having real-world-scale in mind. For these assets, it is recommended to drag a character into the stage and scale the root xform of the environment asset according to how big it is compared to the scene.
Lighting the Environment#
Typically, the original lighting of an asset isn’t compatible with Isaac Sim after the conversion, or there might be no lighting at all. This section guides you through adding basic lighting to your scene.
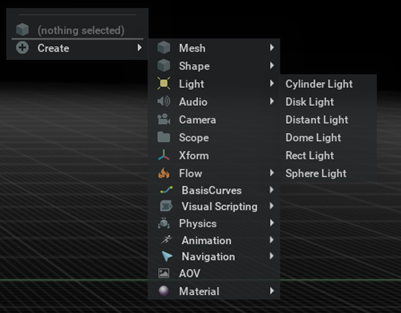
Follow these steps to add a light source:
Open the viewport.
Place your mouse on the location where you want the light source.
Right click.
Select Create > Light.
At the prompt, select the type of light source.
The most important attribute of a light prim is its intensity. It determines how bright the light source is, and it can be adjusted by clicking the light prim on “Stage” and going to its Property tab on the right panel. The effects of these attributes are reflected in realtime. So, it is best to keep tuning the numbers until you like how it looks.
- Dome Light
A Dome Light, typically, lights the whole scene up. It is one of the most essential light types, because it is also the skysphere (background). A Dome Light can be applied with a texture file to give it a more natural background look. To do this, go to the Property tab for the light prim, find a texture file, and select it. The texture file must be in HDRI format. With an HDRI texture applied, it looks like a real sky.
To learn more about lighting, see the official Omniverse ligting documentation.
Building the NavMesh#
NavMesh defines the area that the characters can stand on and navigate to. It is essential for the random spawning function and command generation to work. The Omni.Anim.Navigation extension has greatly simplified this process and is continuing to evolve.
This section guides you through building a basic navigation mesh and teaches you some tricks for making modifications to the NavMesh. The steps to build a NavMesh are as follows:
Add NavMesh Volume.
Adjust settings.
Add NavMesh obstables and exclude meshes.
- NavMesh Volume
Any polygons that intersect with the NavMesh Volume are considered walkable area. If you have a giant polygon as the ground, and the navmesh volume only encloses a small part of the ground, it still generates navmesh on the whole ground because it’s determined by intersecting polygons instead of enclosing ones.
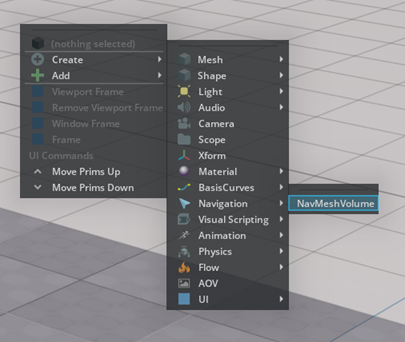
Follow these steps to create a Navmesh Volume:
Right-click the viewport.
Select Create > Navigation > NavMeshVolume. The NavMeshVolume appears in the viewport as a box wireframe.
Change its scale in the regular way.
Typically it is best to scale the NavMeshVolume to include the whole floor area, including props on the floor (tables and chairs) and exclude the ceiling. You want to include the props so that they can be treated as obstacles, and you want to exclude the ceiling so it won’t be counted as a walkable area.
Below is an example. The green box is the NavMeshVolume and the yellow line is the floor. After the NavMeshVolume is ready, go to the NavMesh tab on the bottom right, use the following settings, and click Bake to bake the NavMesh.
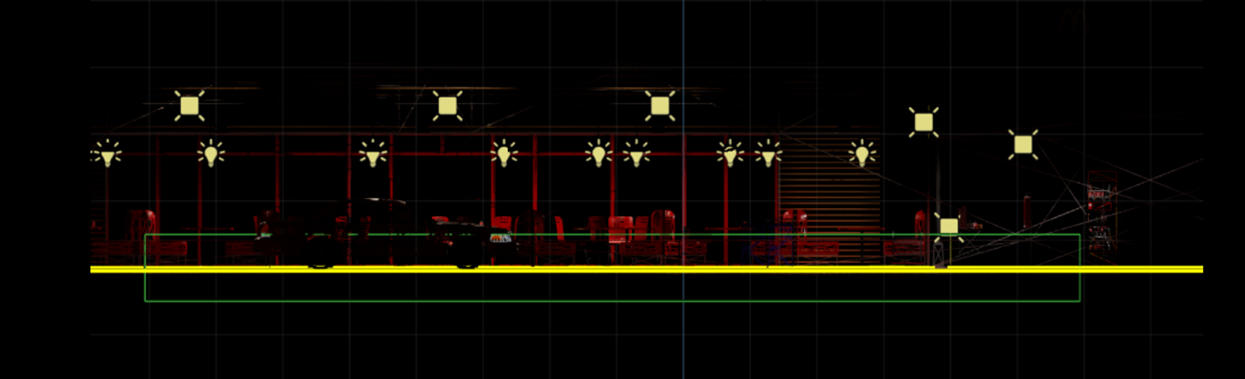
The numbers here just serve as a guideline. Move your mouse to the labels for each setting to view the explanation for what each setting is. You can keep tuning the numbers and baking the NavMesh until you find the optimal result.
- NavMesh Obstacle
NavMesh obstacle blocks the enclosed area and makes that area not part of the NavMesh. Follow these steps to create a NavMesh obstacle:
Move your mouse in the viewport to where you want the NavMesh Obstacle to be created.
Right click and select Create > Xform. Give it a name like “NavMeshObs” so it’s easier to distinguish.
Find this Xform in the Stage panel, right click it, and select Add > Navigation > NavMesh Obstacle.
A box appears in the viewport. Scale this box to change the size of the obstacle to block the navmesh area.
Custom Character Assets#
ORA supports using your own USD character assets. Custom characters must be retargeted to the Nvidia biped character before animations can be correctly applied. See extensions:ext_animation-retargeting for how to retarget a character. In addition, make sure the characters are in the same measurement (in meter) and have the same orientation (Z as up axis, -Y as forward axis).
ORA also expects the character folder to contain a list of sub-folders, where each sub-folder has only 1 USD inside (the character USD). Organize your custom character assets in this manner. Now you can set the character asset folder in the config file to your custom character assets folder and spawn custom characters.
Import Unreal Characters#
The Unreal Engine Marketplace offers high-quality content that can potentially be used in ORA. In this section, we demonstrate how to enable Unreal characters for use in Isaac Sim.
Export characters from Unreal as USD. Refer to UE4 Connect for details.
Import USD Unreal characters into Isaac Sim. Because Unreal characters are in centimeters and have a different skeleton hierarchy than the Nvidia biped character, the following steps are required:
Run the following script in the script editor to scale characters from centimeters to meters.
Scale a character prim
 1from pxr import Gf, Usd
 2import omni.usd
 3
 4def convert_mesh(mesh_prim, scaleMatrix):
 5        # convert points
 6        points_attr = mesh_prim.GetAttribute("points")
 7        if points_attr != None:
 8                points = points_attr.Get()
 9        for i in range(len(points)):
10                p = points[i]
11                p = scaleMatrix.Transform(p)  # change unit
12                points[i] = p
13        points_attr.Set(points)
14        # convert extent
15        extent_attr = mesh_prim.GetAttribute("extent")
16        if extent_attr != None:
17                extents = extent_attr.Get()
18        else:
19                extents = None
20        if extents != None:
21                for i in range(len(extents)):
22                        extent = extents[i]
23                        extent = scaleMatrix.Transform(extent)  # change unit
24                        extents[i] = extent
25                extent_attr.Set(extents)
26
27def convert_transform(transform, scaleMatrix):
28        trans = transform.ExtractTranslation()
29        rot = transform.ExtractRotation()
30        trans = scaleMatrix.Transform(trans)  # unit conversion
31        transform.SetTranslateOnly(trans)
32        transform.SetRotateOnly(rot)
33        return transform
34
35def convert_skeleton(skeleton_prim, scaleMatrix):
36        # Convert bind pose
37        bind_transforms_attr = skeleton_prim.GetAttribute("bindTransforms")
38        if bind_transforms_attr != None:
39                bind_transforms = bind_transforms_attr.Get()
40                if bind_transforms != None:
41                        for i in range(0, len(bind_transforms)):
42                                bind_transforms[i] = convert_transform(bind_transforms[i], scaleMatrix)
43                        bind_transforms_attr.Set(bind_transforms)
44        # Convert rest pose
45        rest_transforms_attr = skeleton_prim.GetAttribute("restTransforms")
46        if rest_transforms_attr != None:
47                rest_transforms = rest_transforms_attr.Get()
48                if rest_transforms != None:
49                        for i in range(0, len(rest_transforms)):
50                                rest_transforms[i] = convert_transform(rest_transforms[i], scaleMatrix)
51                        rest_transforms_attr.Set(rest_transforms)
52        # Convert retarget pose
53        retarget_transforms_attr = skeleton_prim.GetAttribute("controlRig:retargetTransforms")
54        if retarget_transforms_attr != None:
55                retarget_transforms = retarget_transforms_attr.Get()
56                if retarget_transforms != None:
57                        for i in range(len(retarget_transforms)):
58                                if i == 0:
59                                        retarget_transforms[i] = convert_transform(retarget_transforms[i], scaleMatrix)
60                                else:
61                                        retarget_transforms[i] = convert_transform(retarget_transforms[i], scaleMatrix)
62                        retarget_transforms_attr.Set(retarget_transforms)
63        # Convert default animation source
64        animation_source_attr = skeleton_prim.GetRelationship("skel:animationSource")
65        if animation_source_attr != None:
66                skeleton_prim.CreateRelationship("skel:animationSource")
67
68# From centimeter to meter
69scale_factor = 0.01
70character_root_prim_path = "[your character prim root]"
71
72scaleMatrix = Gf.Matrix4d(1.0)
73scaleMatrix.SetScale(scale_factor)
74
75character_root_prim = omni.usd.get_context().get_stage().GetPrimAtPath(character_root_prim_path)
76for prim in Usd.PrimRange(character_root_prim):
77        if prim.GetTypeName() == "Mesh":
78                convert_mesh(prim, scaleMatrix)
79        elif prim.GetTypeName() == "Skeleton":
80                convert_skeleton(prim, scaleMatrix)
Retarget the characters to Nvidia biped character by following extensions:ext_animation-retargeting.
If the characters are correctly setup, they can replicate the movement of an Nvidia biped character by running its Animation Graph.

Custom Animation Assets#
ORA supports custom animations by allowing you to import new animations as commands. Custom commands can be then randomized by setting up the ORA transition matrix.
Prerequisite#
You can create custom commands by providing animation USDs with the required attributes to our extension. When animation USDs are setup with the following attributes, they are identified as new command types and an animation graph node is created accordingly.
List of attributes to define an animation USD as custom command:
CustomCommandName: The name of the custom command. Data type is string.
CustomCommandTemplate: The command template used to register this animation. Data type is string.
CustomCommandAnimStartTime: The animation start time. Data type is float.
CustomCommandAnimEndTime: The animation end time. Data type is float.
There are three types of custom command templates:
Timing: Plays the animation for a given time. The command stcuture is the same as Idle command.
TimingToObject: Walks the character to an object and plays animation. The command stcuture is the same as Sit command.
GoToBlend: Blends the animation into current walking animations. The command strcuture is the same as GoTo command.
Refer to the :doc:` this guide <dev-guide:programmer_ref/usd/properties/set-attribute>` for how to add and set USD attributes in Omniverse.
Add a Custom Command#
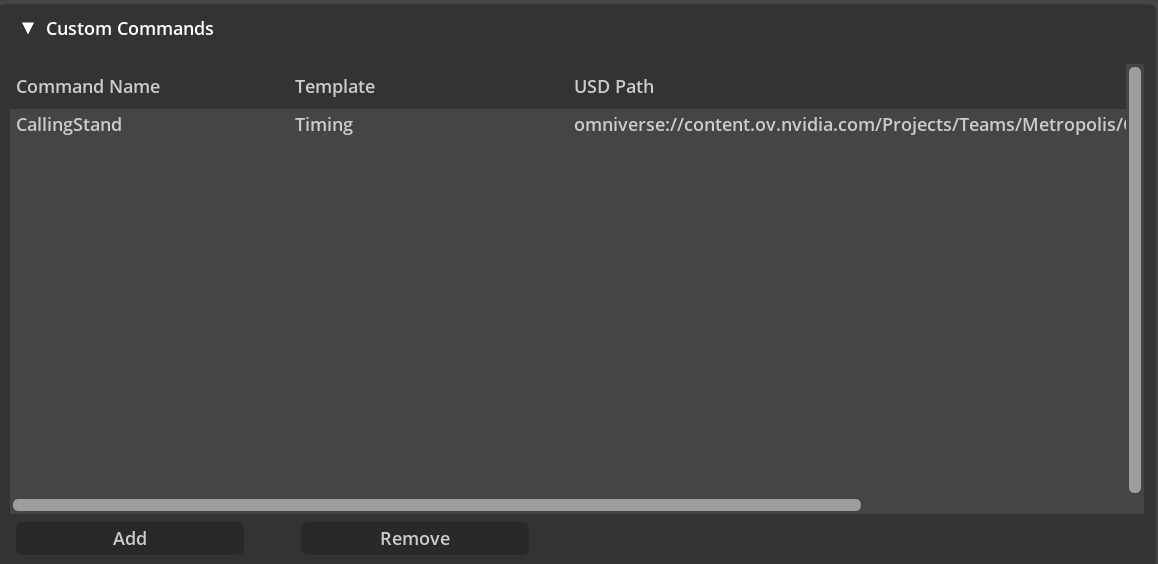
Open an animation USD, add all the attributes listed above to the root prim. In this example, “CustomCommandName” is set to “CallingStand” and “CustomCommandTemplate” is set to “Timing”.

In PeopleSimulation window, under CustomCommand widget, click Add and select the animation USD in the last step. The extension is now able to recognize the new command.
After the Custom Command is added, click Set Up Simulation(* from the ORA UI and you can use the **Command textbox from the Character Settings panel to test the new command.
Randomize the Custom Commands#
After a Custom Command is added, it is automatically added to the command randomization transition matrix, which can be edited under the Character Settings panel. Refer to Command Randomization Control on how to customize the randomization of the commands.