Synthetic Data Recorder#
This tutorial introduces the Synthetic Data Recorder for Isaac Sim, which is a GUI extension for recording synthetic data with the possibility of using custom Replicator writers to record the data in any custom format.
Getting Started#
This tutorial uses the following stage as an example:
omniverse://<nucleus_path>/Isaac/Samples/Replicator/Stage/full_warehouse_worker_and_anim_cameras.usd
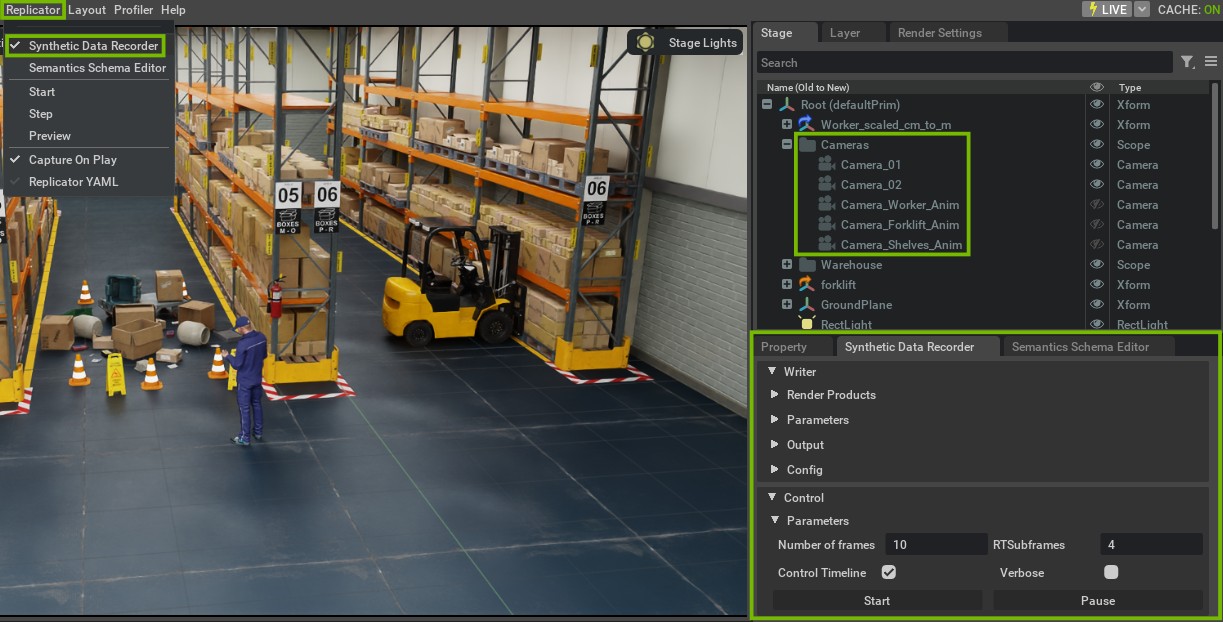
The example stage comes preloaded with semantic annotations and multiple cameras. Some of the included cameras are animated to move around the scene when running the simulation. To create custom camera movement animations, review the Camera Animation Tutorial.
Note
When using other scenes, make sure to add semantic annotations to the scene otherwise most annotators (semantic_segmentation, 3d_bounding_box, etc.) are not able to produce data.
Basic Usage#
The recorder is split into two main parts:
the
Writerframe - containing sensor, data, and output parametersthe
Controlframe - containing the recording functionalities such as start, stop, pause, and parameters such as the number of frames to execute
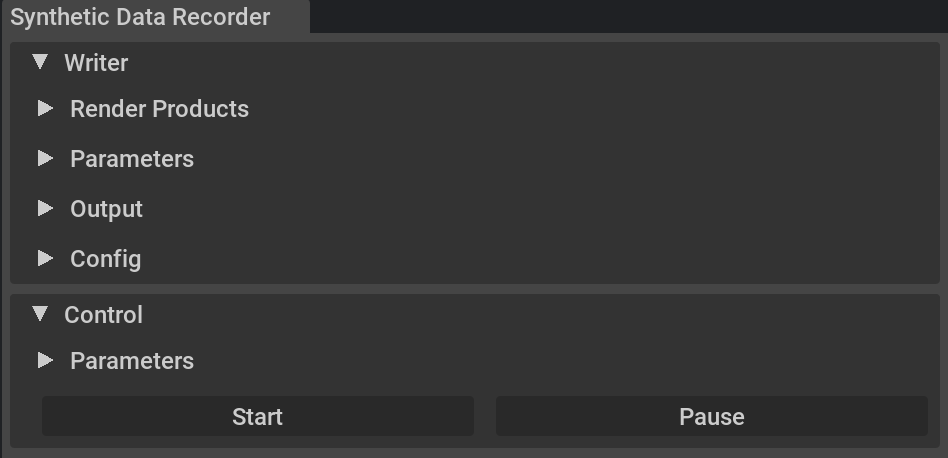
Writer Frame#
The Writer frame gives you access to Render Products, Parameters, Output, and Config options.
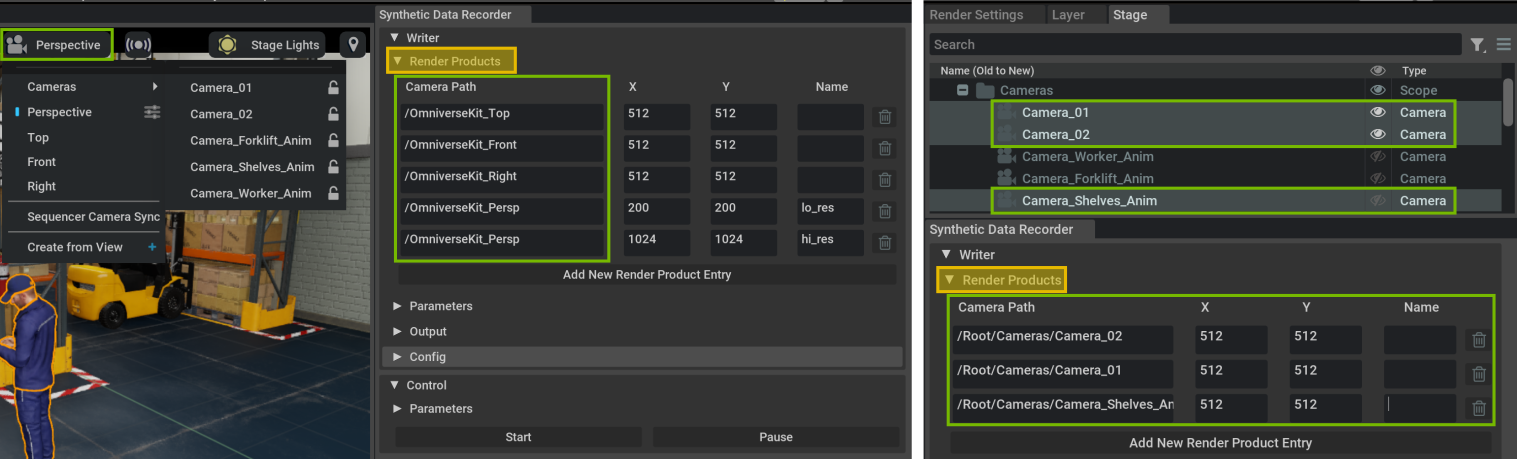
The Render Products frame creates a list of render product entries using the Add New Render Product button. By default a new entry is added to the list using the active viewport camera as its camera path (see left figure). If, however, cameras are selected in the stage viewer, these are added to the render products list (see right figure).
The render products list can contain the same camera path multiple times, however each time with a different resolution. All the entry values (camera path or resolution) can also be manually edited in the input fields.
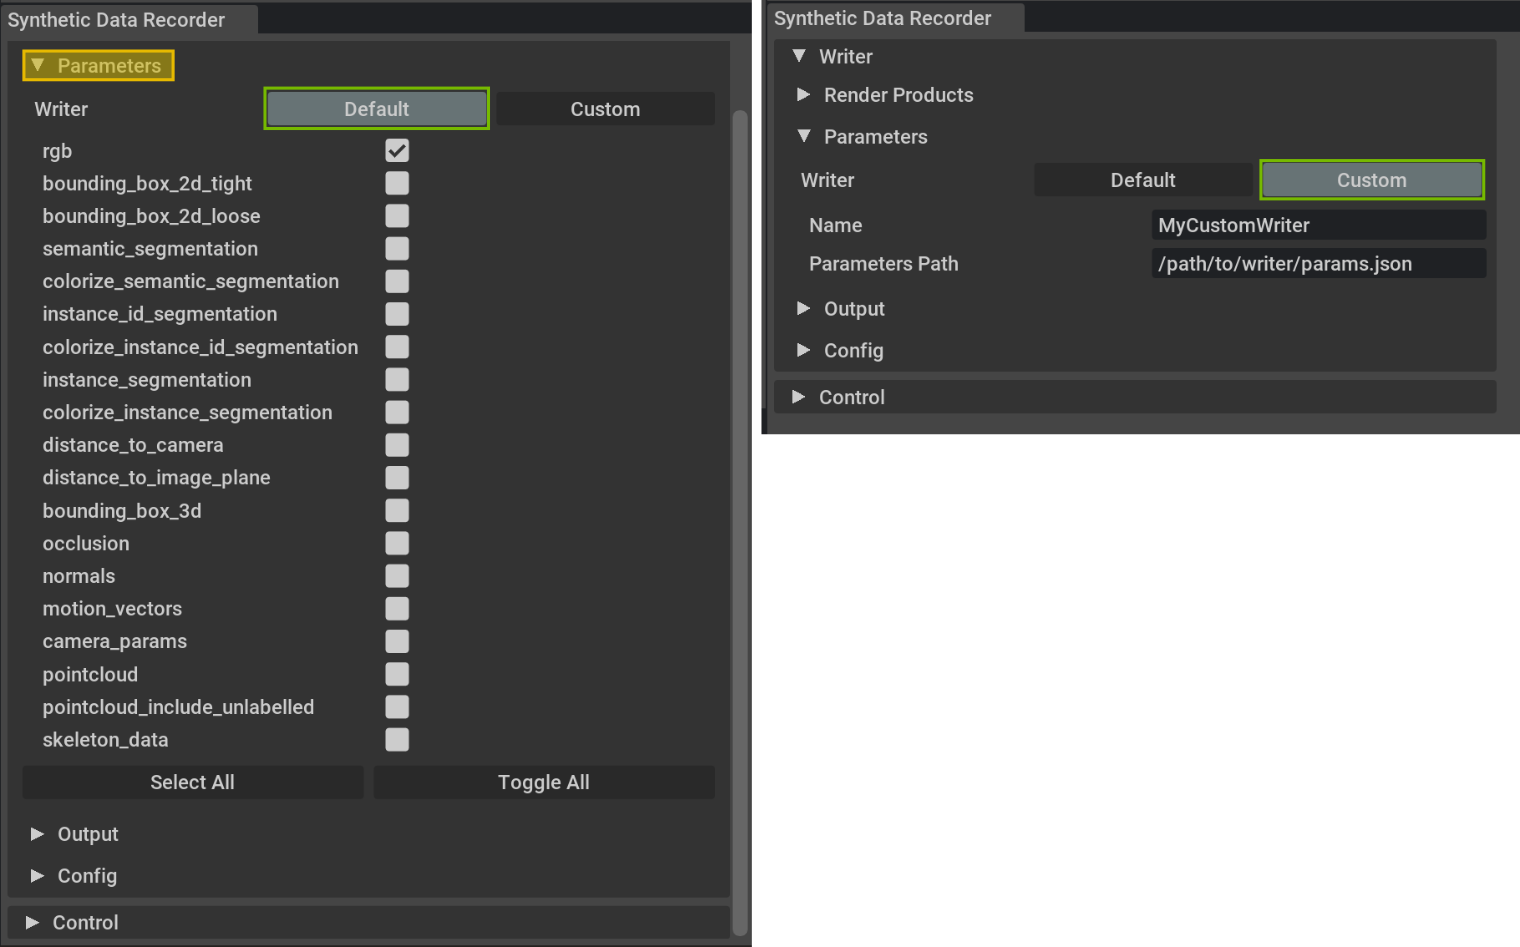
The Parameters frame allows you to to choose between the default built-in Replicator writer (BasicWriter) or the custom writer. The default writer parameters (mostly annotators) can be selected from the checkbox list. As custom writers have unknown parameters, these must be provided by you in form of a JSON file containing all the required parameters. The path to the JSON file can be added in the Parameters Path input field.
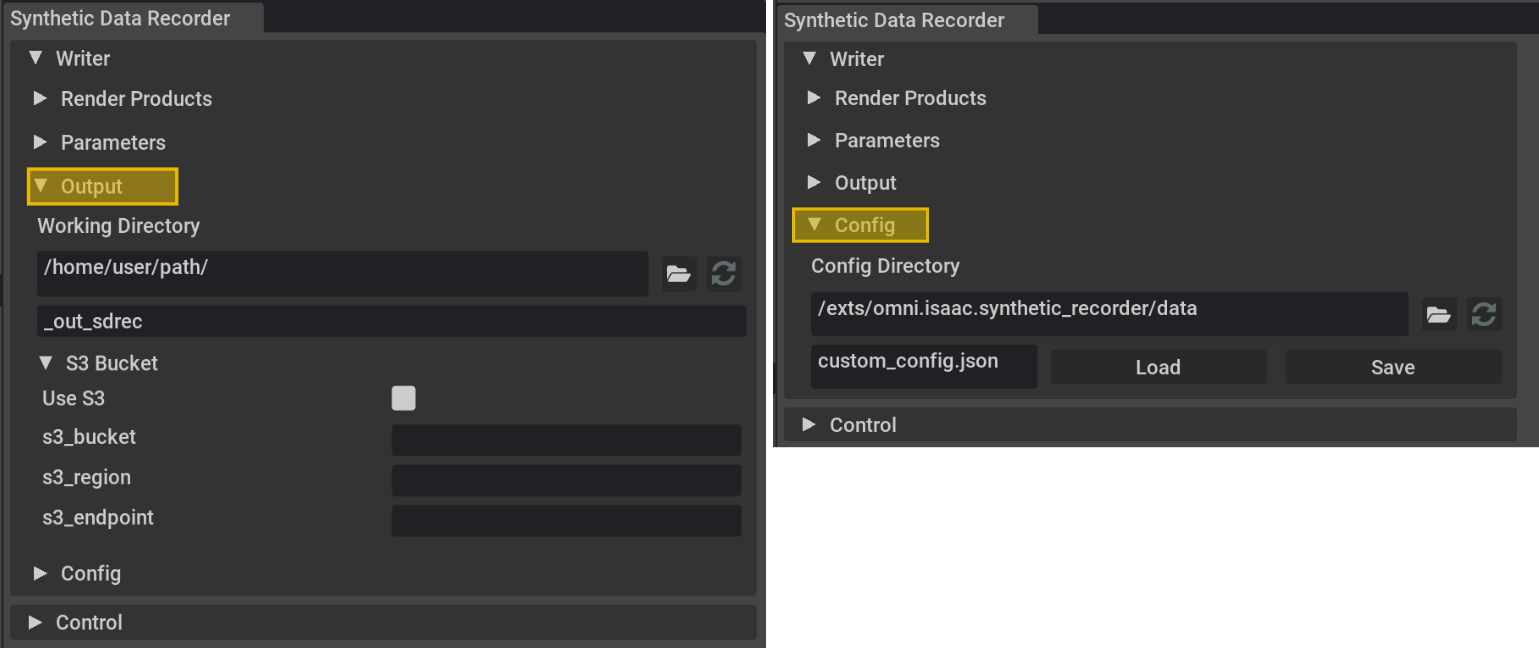
The Output frame (left figure) contains the working directory path where the data is saved together with the folder name that is used for the current recording. The output folder name is incremented in case of conflicts. The recorder can also write to S3 buckets by checking Use S3, providing the required fields, and having the AWS credentials set up.
Note
When writing to S3 the Increment folder, naming is not supported and defaults to Timestamp.
The Config frame (right figure) can load and save the GUI writer state as a JSON config file. By default, the extension loads the previously used configuration state.
Control Frame#
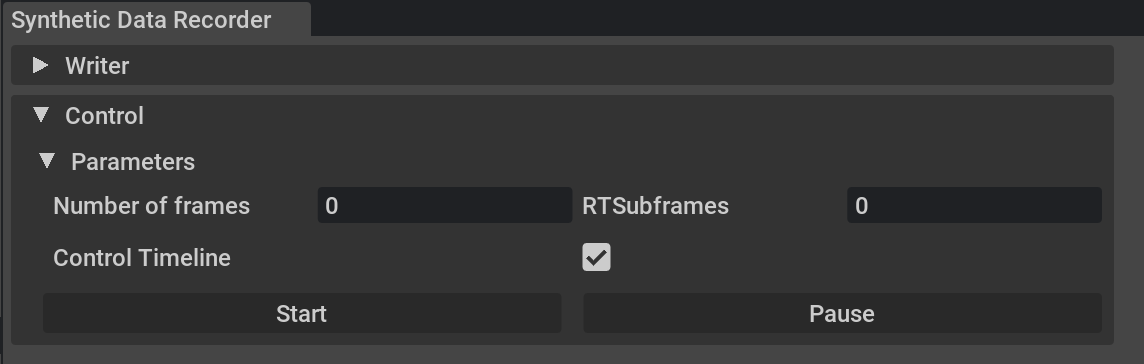
The Control frame contains the recording functionalities such as Start/Stop and Pause/Resume, and parameters such as the number of frames to record or the number of subframes to render for each recorded frame.
The
Startbutton creates a writer, given the selected parameters, and starts the recording.The
Stopbutton stops the recording and clears the writer.The
Pausebutton pauses the recording without clearing the writer.The
Resumebutton resumes the recording.The
Number of framesinput field sets the number of frames to record, after which the recorder is stopped and the writer cleared. If the value is set to 0, the recording runs indefinitely or until theStopbutton is pressed.The
RTSubframesfield sets the number of additional subframes to render for each per frame. This can be used if randomized materials are not loaded in time or if temporal rendering artifacts (such as ghosting) are present due to objects being teleported.The
Control Timelinecheckbox starts/stops/pauses/resumes the timeline together with the recorder.The
Verbosecheckbox enables verbose logging for the recorder (events such as start, stop, pause, resume, and the number of frames recorded).
Note
To improve the rendering quality, or avoid any rendering artifacts caused by low lighting conditions or fast-moving objects, increase the RTSubframes parameter. This renders multiple subframes for each frame, thereby improving the quality of recorded data at the expense of longer rendering times per frame. For more details, see the subframes documentation.
Custom Writer Example#
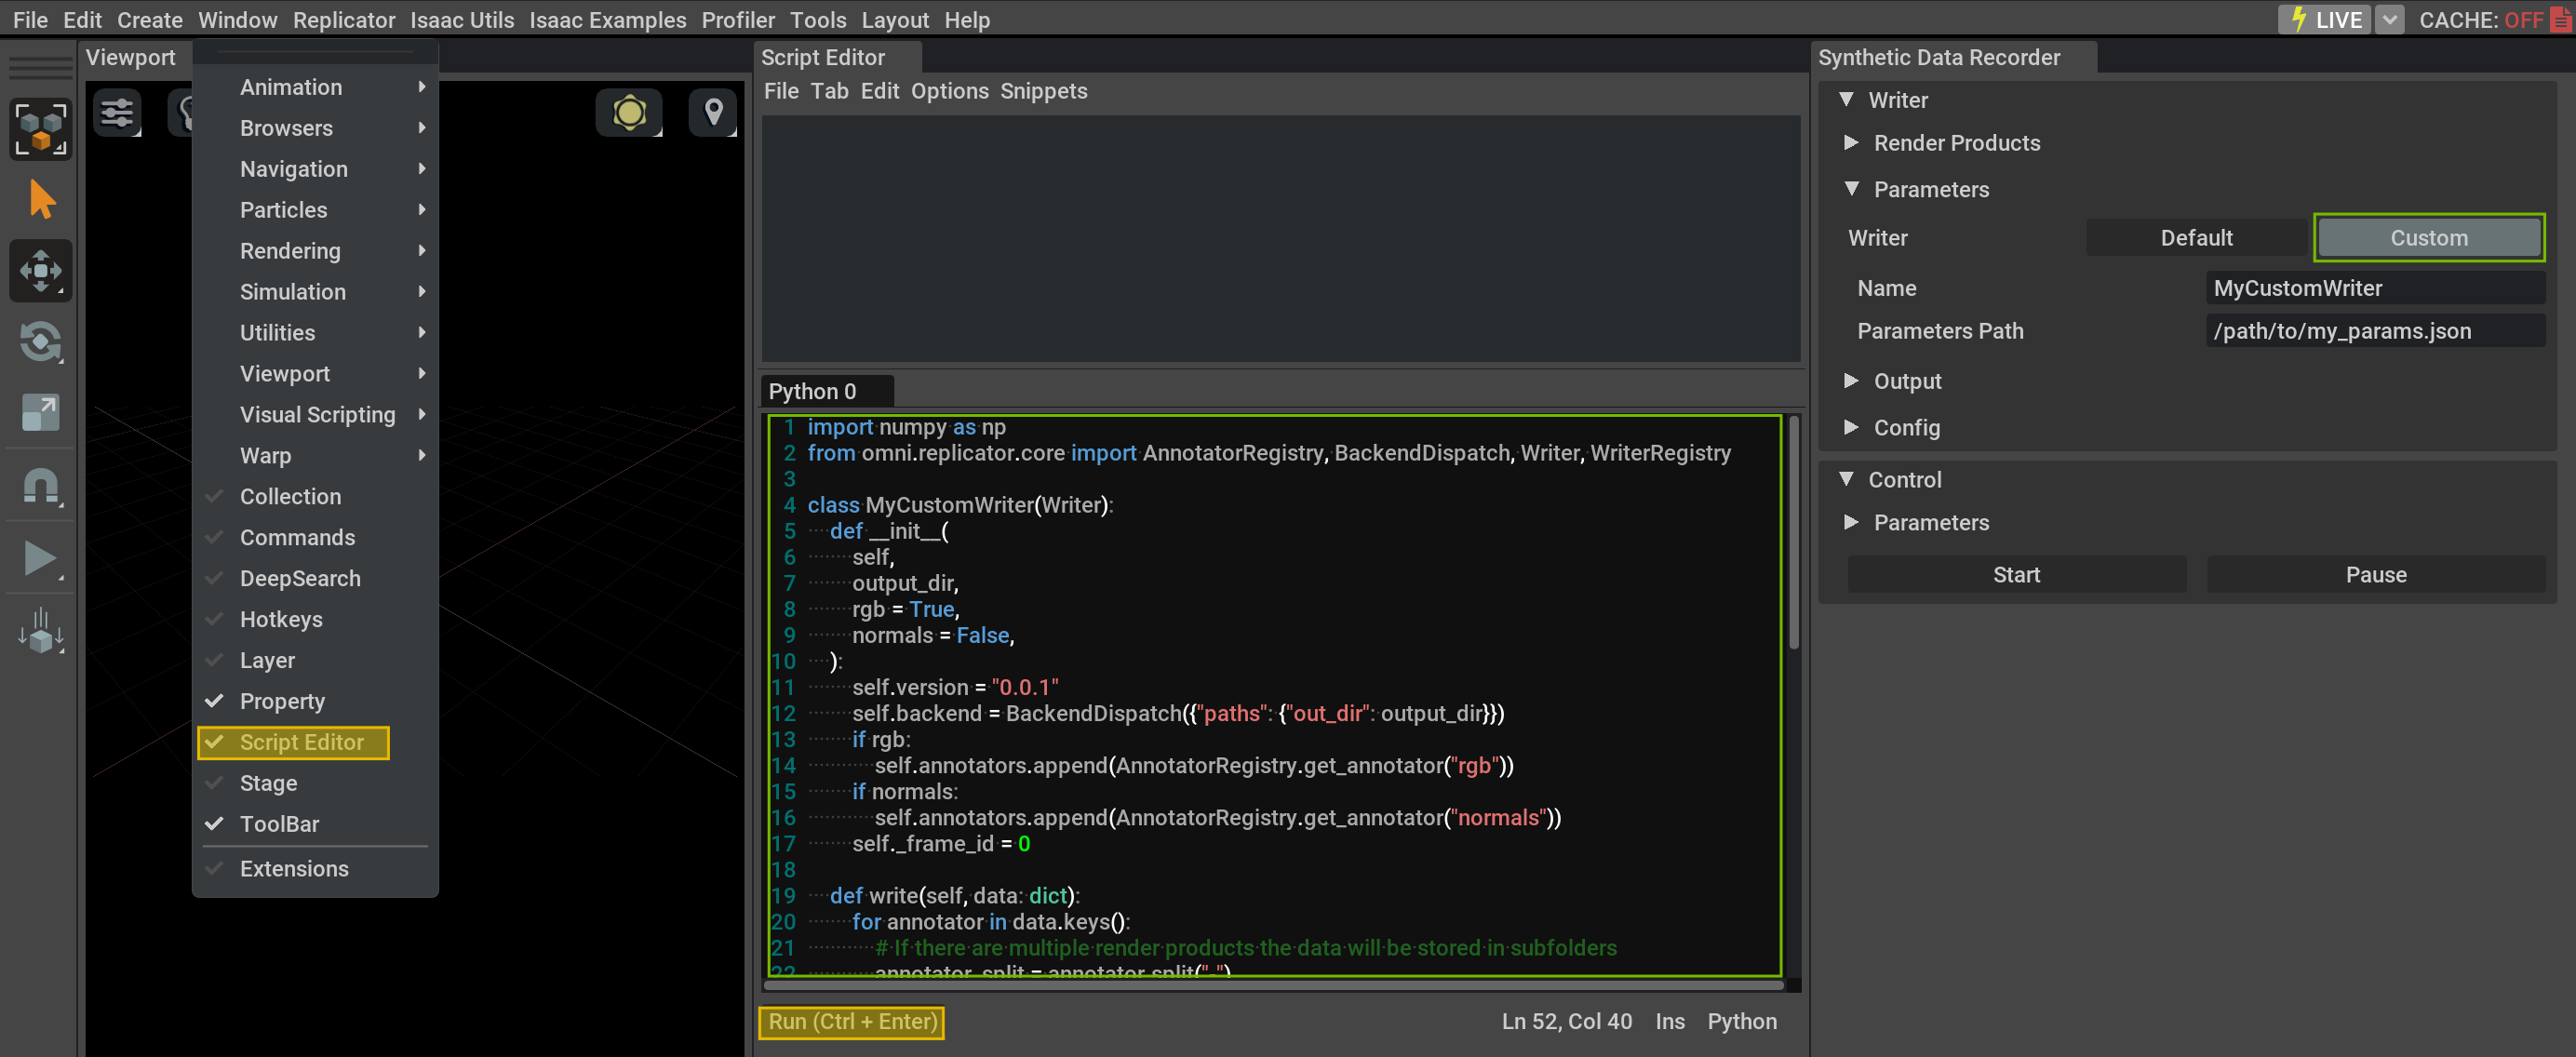
To support custom data formats, the custom writer can be registered and loaded from the GUI. In this example, a custom writer called MyCustomWriter is registered using the Script Editor for use with the recorder.
MyCustomWriter
 1import numpy as np
 2from omni.replicator.core import AnnotatorRegistry, BackendDispatch, Writer, WriterRegistry
 3
 4class MyCustomWriter(Writer):
 5    def __init__(
 6        self,
 7        output_dir,
 8        rgb = True,
 9        normals = False,
10    ):
11        self.version = "0.0.1"
12        self.backend = BackendDispatch({"paths": {"out_dir": output_dir}})
13        if rgb:
14            self.annotators.append(AnnotatorRegistry.get_annotator("rgb"))
15        if normals:
16            self.annotators.append(AnnotatorRegistry.get_annotator("normals"))
17        self._frame_id = 0
18
19    def write(self, data: dict):
20        for annotator in data.keys():
21            # If there are multiple render products the data will be stored in subfolders
22            annotator_split = annotator.split("-")
23            render_product_path = ""
24            multi_render_prod = 0
25            if len(annotator_split) > 1:
26                multi_render_prod = 1
27                render_product_name = annotator_split[-1]
28                render_product_path = f"{render_product_name}/"
29
30            # rgb
31            if annotator.startswith("rgb"):
32                if multi_render_prod:
33                    render_product_path += "rgb/"
34                filename = f"{render_product_path}rgb_{self._frame_id}.png"
35                print(f"[{self._frame_id}] Writing {self.backend.output_dir}/{filename} ..")
36                self.backend.write_image(filename, data[annotator])
37
38            # semantic_segmentation
39            if annotator.startswith("normals"):
40                if multi_render_prod:
41                    render_product_path += "normals/"
42                filename = f"{render_product_path}normals_{self._frame_id}.png"
43                print(f"[{self._frame_id}] Writing {self.backend.output_dir}/{filename} ..")
44                colored_data = ((data[annotator] * 0.5 + 0.5) * 255).astype(np.uint8)
45                self.backend.write_image(filename, colored_data)
46
47        self._frame_id += 1
48
49    def on_final_frame(self):
50        self._frame_id = 0
51
52WriterRegistry.register(MyCustomWriter)
my_params.json
1{
2    "rgb": true,
3    "normals": true
4}
Data Visualization Writer#
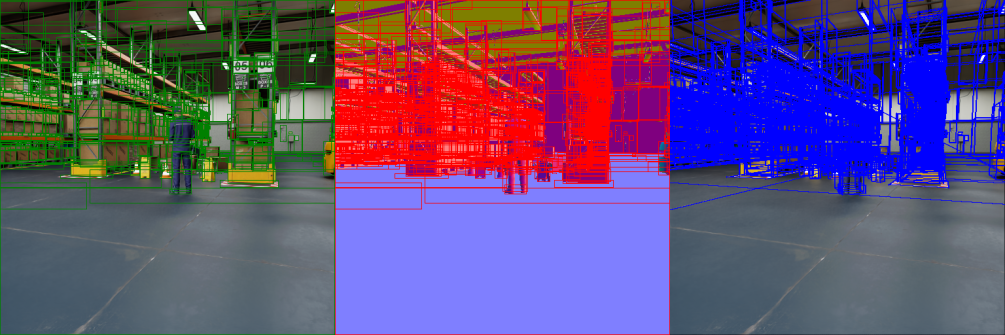
The Data Visualization writer is a custom writer that can be used to visualize the annotation data on top of rendered images. The writer and its implementation details can be found in /omni.replicator.isaac/python/scripts/writers/data_visualization_writer.py, and can be imported using from omni.replicator.isaac.scripts.writers import DataVisualizationWriter. The custom writer can be selected from the Parameters frame and its parameters can be loaded from a JSON file using the Parameters Path input field. Here is an example JSON file that can be used to parameterize the writer:
my_data_visualization_params.json
 1{
 2    "bounding_box_2d_tight": true,
 3    "bounding_box_2d_tight_params": {
 4        "background": "rgb",
 5        "outline": "green",
 6        "fill": null
 7    },
 8    "bounding_box_2d_loose": true,
 9    "bounding_box_2d_loose_params": {
10        "background": "normals",
11        "outline": "red",
12        "fill": null
13    },
14    "bounding_box_3d": true,
15    "bounding_box_3d_params": {
16        "background": "rgb",
17        "fill": "blue",
18        "width": 2
19    }
20}
And the resulting data:
For more information on the supported parameters, see the class docstring:
DataVisualizationWriter class docstring
 1"""Data Visualization Writer
 2
 3This writer can be used to visualize various annotator data.
 4
 5Supported annotators:
 6- bounding_box_2d_tight
 7- bounding_box_2d_loose
 8- bounding_box_3d
 9
10Supported backgrounds:
11- rgb
12- normals
13
14Args:
15    output_dir (str):
16        Output directory for the data visualization files forwarded to the backend writer.
17    bounding_box_2d_tight (bool, optional):
18        If True, 2D tight bounding boxes will be drawn on the selected background (transparent by default).
19        Defaults to False.
20    bounding_box_2d_tight_params (dict, optional):
21        Parameters for the 2D tight bounding box annotator. Defaults to None.
22    bounding_box_2d_loose (bool, optional):
23        If True, 2D loose bounding boxes will be drawn on the selected background (transparent by default).
24        Defaults to False.
25    bounding_box_2d_loose_params (dict, optional):
26        Parameters for the 2D loose bounding box annotator. Defaults to None.
27    bounding_box_3d (bool, optional):
28        If True, 3D bounding boxes will be drawn on the selected background (transparent by default). Defaults to False.
29    bounding_box_3d_params (dict, optional):
30        Parameters for the 3D bounding box annotator. Defaults to None.
31    frame_padding (int, optional):
32        Number of digits used for the frame number in the file name. Defaults to 4.
33
34"""
Replicator Randomized Cameras#
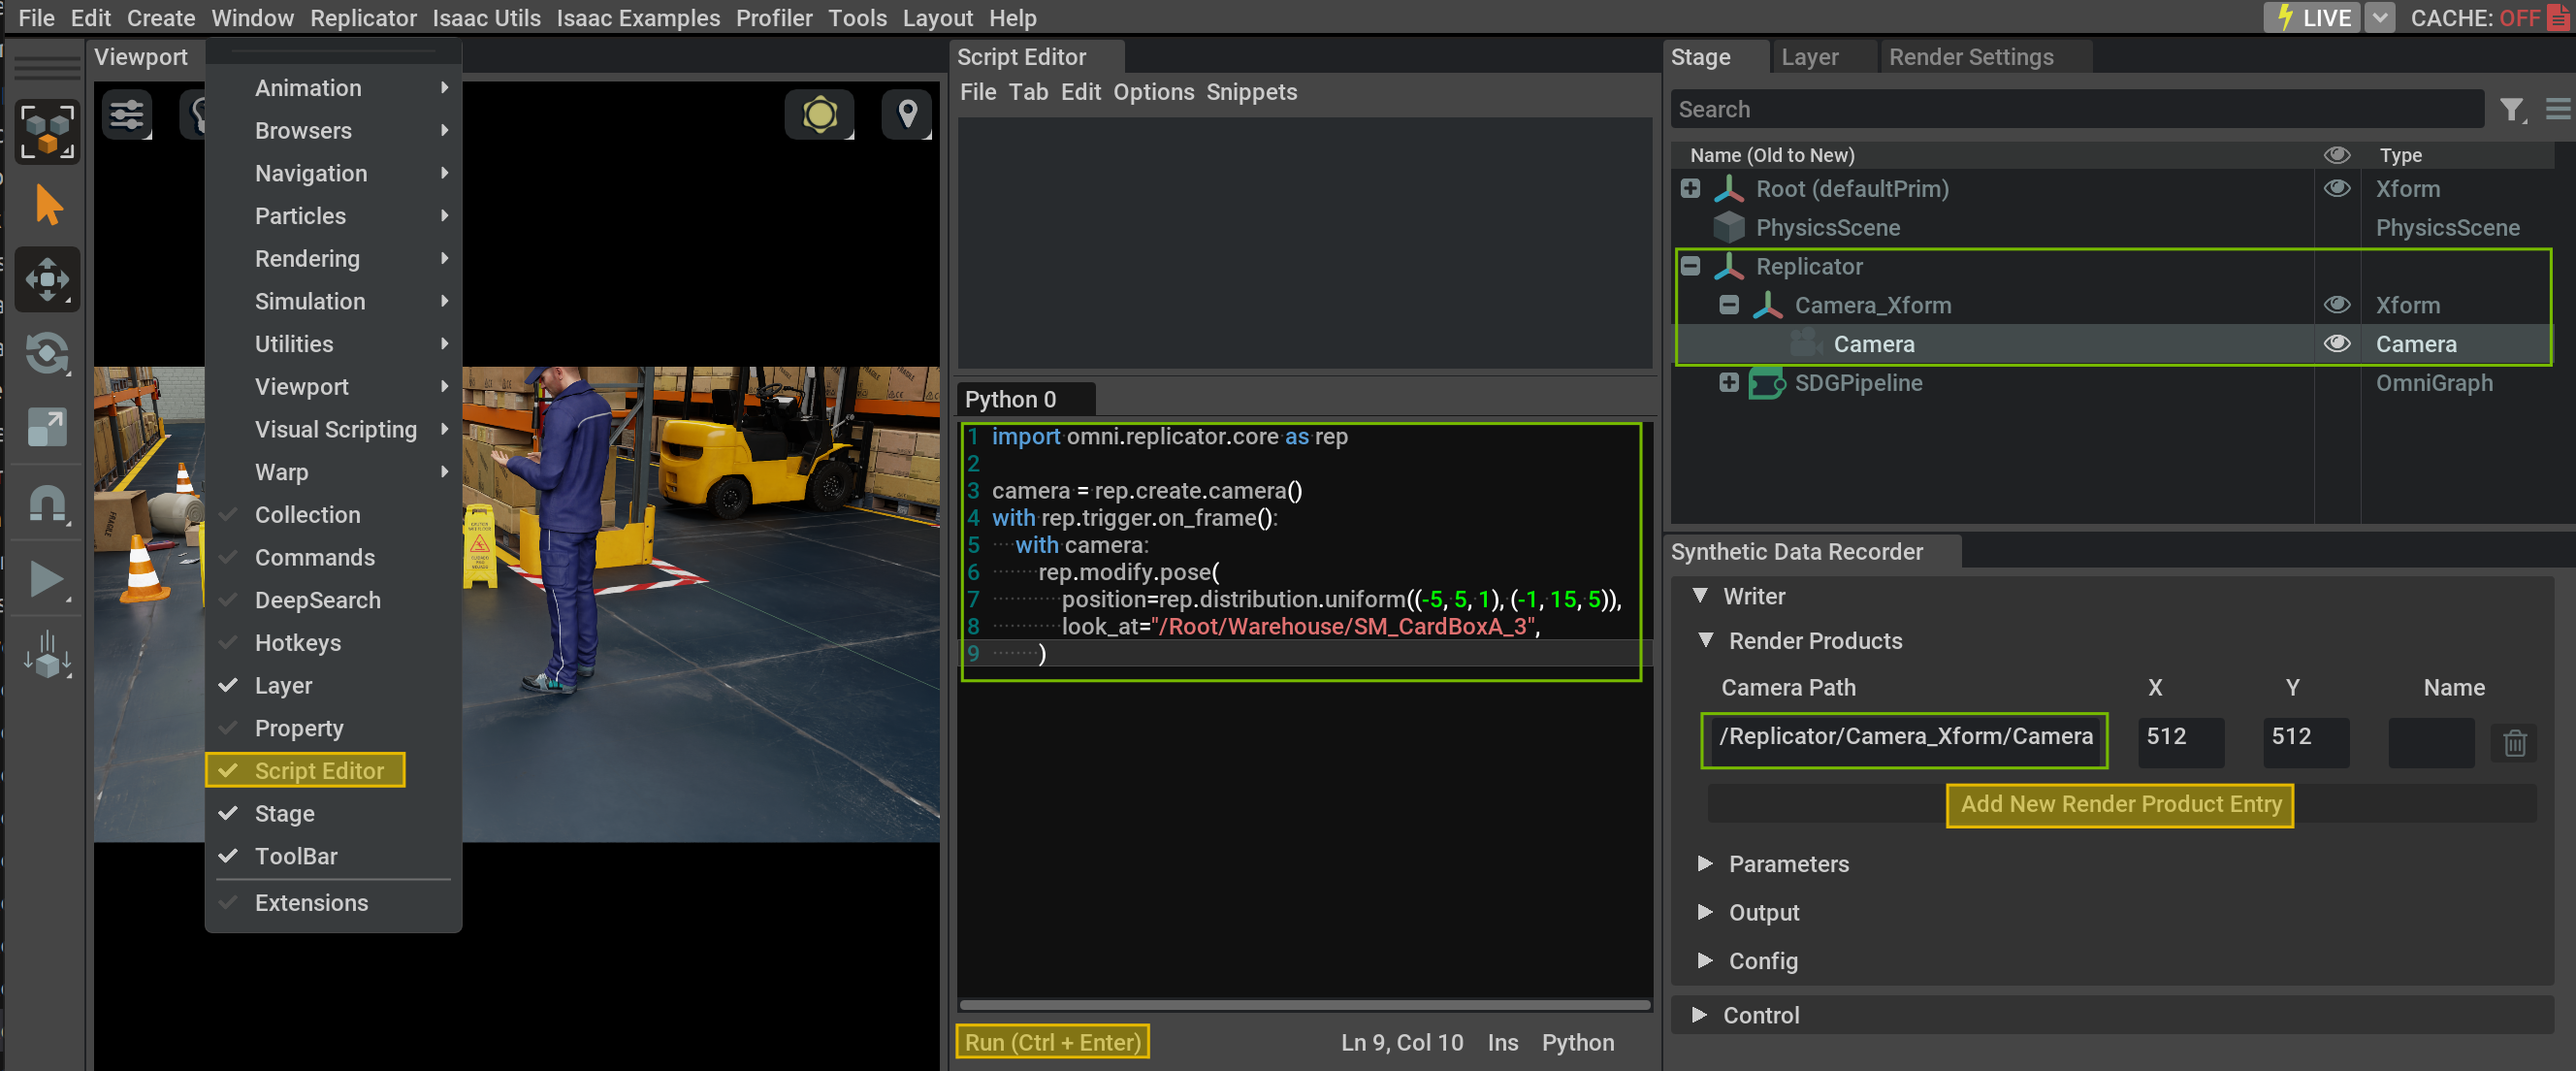
To take advantage of Replicator randomization techniques, randomized cameras can be loaded using the Script Editor before starting the recorder to run scene randomizations during recording. In this example a randomized camera is created using the Replicator API. This can be attached as a render product to the recorder and for each frame the camera is randomized with the given parameters.
Randomized Camera
1import omni.replicator.core as rep
2
3camera = rep.create.camera()
4with rep.trigger.on_frame():
5    with camera:
6        rep.modify.pose(
7            position=rep.distribution.uniform((-5, 5, 1), (-1, 15, 5)),
8            look_at="/Root/Warehouse/SM_CardBoxA_3",
9        )