Commonly Used Omnigraph Shortcuts#
Isaac Sim has shortcuts for populating some of the most commonly used Omnigraphs. They can be found under Isaac Utils -> Common Omnigraphs. After selecting the graph you want to create, you are prompted to provide a minimal set of parameters to populate the graph.
The shortcuts are:
Articulation Position Controller
Articulation Velocity Controller
Differential Controller
Gripper Controller
ROS2 Clock
ROS2 Camera
ROS2 RTX Lidar
ROS2 Joint State Publisher and subscriber
ROS2 TF Publisher
ROS2 Odometry Publisher
ROS2 Generic Publisher
Note
No validation is done to detect a graph with the same tasks or that controls the same robot. You must ensure that your graphs are unique in the scene.
These are just shortcuts to create the graph. You can always modify the graph after it’s created to suit your needs.
* indicates the parameter is REQUIRED.
To use Python scripting to create these graphs:
Click on the icon next to Python Script for Graph Generation on the bottom of the popup window. It takes you to the Python script used to generate the graphs for the given shortcut.
make_graph()is where the creation occurs. The relevant commands may or may not all be in one continuous block depending on how the shortcut is setup.
Controller Graphs#
The controller shortcuts for moving the robots are:
Articulation (Joint Position and Velocity) Controller
Differential Drive Controller
Gripper Controller
Articulation Controllers#
Both Articulation Position and Velocity Controllers are issuing commands directly to each joint in the articulation.
Robot Prim: The parent prim of the robot.
Graph Path*: The path to the graph generated. It is default to be under an independent tree called “/Graph/{type}_controller”. If a graph already exist in the path given, it’ll find the next available path by appending a number to the end of that path.
Add to Existing Graph: Default to False. If checked, it’ll add the nodes to an existing graph and use an existing tick node if there exist one, but will add new controller nodes regardless of existing ones.
Use the Articulation Controller#
To use the controller to move the robot:
Highlight the JointCommandArray node under the newly created graph.
Press play to start the simulation.
Move the robot by changing the values in the JointCommandArray node in the Property Tab.
If you had initial targets for position or velocity saved as part of the USD, it immediately moves towards those targets when you press play.
Differential Controller#
The Differential Controller takes in linear and angular velocities and converts them to individual wheel velocities.
Robot Prim*: The Robot Prim.
Graph Path*: The path to the graph generated. By default, it is under an independent tree called “/Graph/{type}_controller”. If a graph already exist in the path given, it finds the next available path by appending a number to the end of that path.
Wheel Radius*: The radius of the wheel in meters.
Distance between wheels*: The distance between the two wheels in meters.
Right/Left Joint Names: Names of the joints that control the right and left wheels.
Right/Left Joint Index: The index of the joints that control the right and left wheels in the articulation chain.
Use Keyboard Control: Default to none. If checked, it also populates the graph that receives WASD as keyboard inputs to move the robot forward, backward, spin left, and spin right.
Add to Existing Graph: Defaults to False. If checked, it adds the nodes to an existing graph and uses an existing tick node if there is one, but will add new controller nodes regardless of existing ones.
Use the Differential Controller#
In some robots, there are only two controllable joints, so you do not have to specify joint names or indices. For robots with multiple actuated joints in an articulation chain, you must specify either the names or the indices of the joints that control the right and left wheels.
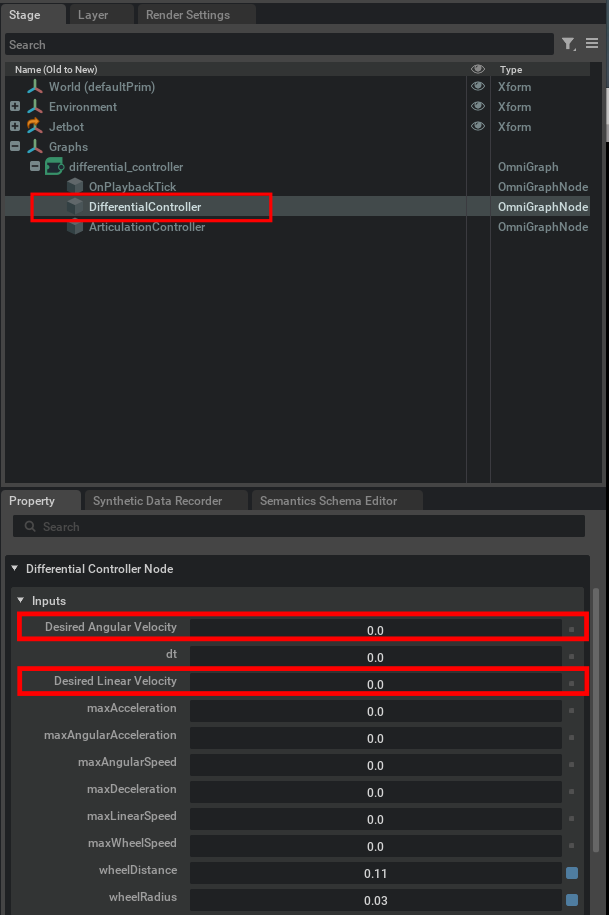
If you did not include the WASD keyboard control in the graph, you can always test the controller by manually changing the “Desired Angular Velocity” and “Desired Linear Velocity” in the DifferentialController node under the newly created graph.
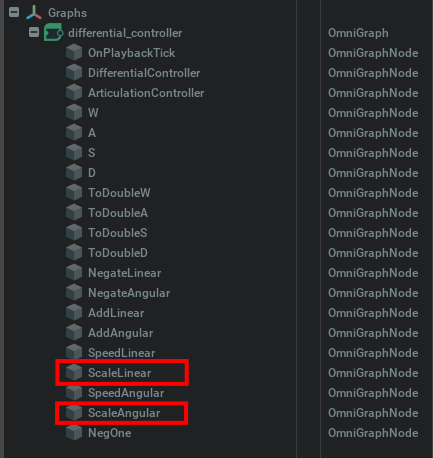
If you are using the WASD Keyboard control, there are two scaling values used to scale the binary input from the keyboard to a linear velocity and an angular velocity that make sense for the vehicle’s size. The values are inside the nodes “ScaleLinear” and “ScaleAngular” respectively. You can print the output of the “DifferentialController” node to see relative affects of the scaling values. You want to tune them so that the rotating commands results in similar magnitude changes in the wheels’ velocities as the forward and backward commands.
If you are using Isaac Sim Assets, the default values of the wheel radius and distance between wheels can be found on the bottom of the page for Wheeled Robots in Robot Assets
Gripper Controller#
The Gripper Controller works for any end-effector that has only one-degree of actuation per finger. This includes all parallel jaw grippers, as well as any multi-finger, multi-DOF-per-finger hands where each finger has only one degree of actuation.
Parent Robot*: The robot that contains the gripper. This could be the gripper itself, or if the gripper is part of an arm, this could be the prim for the entire manipulator.
Graph Path*: The path to the graph generated. It is default to be under an independent tree called “/Graph/{type}_controller”. If a graph already exists in the path given, it finds the next available path by appending a number to the end of that path.
Gripper Root*: The prim that contains all the gripper joints.
Gripper Speed*: The speed at which the gripper closes or opens in meters (or radian) per second.
Gripper Joint Names*: The names of the joints that control the gripper fingers. List them all out separated by commas.
Open/Close Position Limit: The joint position that’s considered fully open. Unit: meter (prismatic) or radian (revolute). If left blank, it defaults to the joint limits inside the asset’s USD file.
Use Keyboard Control: Default to none. If checked, it populates the graph that receives “O”,”C”, and “N” as keyboard inputs to open, close, and stop the gripper.
Add to Existing Graph: Defaults to False. If checked, it adds the nodes to an existing graph and uses an existing tick node if one exists, but will add new controller nodes regardless of existing ones.
Use the Gripper Controller#
If no joint limits are given, the gripper defaults to the joint limits inside the asset’s USD file. If the Open Position Limit and Close Position Limit are flipped, the gripper controller automatically corrects for it. The controller makes the assumption that the joint limits for opened position is greater than closed position. So if it is the opposite for your gripper, you would have to either adjust your definition of open and close or modify the Python script accordingly.
Only uniform speed and same joint limits are supported using the shortcut. If you want variable speed or different joint limits for each of the fingers, you can modify the graph by adding arrays for the speed and joint limit inputs.
If the articulation chain you are working with contains both an arm and a gripper and you wish to control the arm using the Articulation Position Controller and the Gripper Controller for the gripper separately:
Remove the joints that control the gripper from the arm controller graph.
Validate that there is no conflict between the two graphs.
ROS Graphs#
For information on how to use ROS Graphs, go to each of the relevant ROS 2 Tutorials (Linux & Windows).