OmniGraph#
OmniGraph is Omniverse’s visual programming framework. It provides a graph framework that connects functions from multiple systems inside Omniverse. It is also a compute framework that allows for highly customized nodes so that you can integrate your own functionality into Omniverse and automatically harness the efficient computation backend.
Inside Omniverse Isaac Sim, OmniGraph is the main engine for the Replicators, ROS and ROS2 bridges, sensor access, controllers, external input/output devices, UI, and much more.
This tutorial introduces you to the world of visual programming via OmniGraph. We highly recommend that you also read OmniGraph, because it is a key component in Omniverse Kit.
Learning Objectives#
This tutorial aims to
introduce you to the basic concepts of OmniGraph
walk you through building an action graph to control a robot in Isaac Sim, specifically, the Jetbot.
show you how to use the Omnigraph shortcuts to generate a differential controller graph for the Jetbot.
Getting Started#
Prerequisites
Complete Isaac Sim Interface prior to beginning this tutorial.
Complete Assemble a Simple Robot to setup your own robot.
Graph Editors
There are two graph editors, the Action Graph and the Generic Graph. They can both be found under ‘Window > Visual Scripting’. For majority of cases in Isaac Sim, you will be using the Action Graph.
Node Search
There are ample nodes available in OmniGraph for your use. Once your graph editor is open, there is panel on the left hand side listing all the categories of the nodes. You can search for individual nodes by typing into the search bar on the top of the panel.
Fundamental Concepts#
Action Graph vs Push Graph
An Action graph, or sometimes called an “Execution Graph”, is executed whenever an execution node gets triggered. In many Isaac Sim cases, the trigger is a “tick” node that is set to be triggered every simulation frame tick, so that the graph doesn’t do anything when simulation isn’t running, and ticks at every rendering frame once simulation starts. If you remove the tick node from an action graph, the graph will not run upon pressing “play”.
Action Graphs can have other triggers, such as a keyboard/mouse input, or a stage event. You can find the relevant nodes under the “Event” nodes category.
A Push graph, or sometimes “Generic Graph”, will execute automatically on every rendering frame, without needing an “execution” node. Since the default viewport is always running and therefore rendering, any nodes you drag into a Push Graph editor will immediately start executing, even if the simulation isn’t “playing”. You can test this by dragging a “Print Text” node into a Push Graph editor, open your console tab and allow it to publish Informational level logs. Then the moment you finish typing something in the “Text” section of the print node, the text will get printed.
If there is a procedural order to your graph based on the connections, then a Push graph will compute the nodes in that procedural order. Otherwise, it’ll execute all of the nodes in no guaranteed order.
Try It Out#
Let’s build an action graph to control a robot in Isaac Sim the Jetbot.
Setting Up the Stage#
On a new stage, start by right clicking and selecting create > Physics > Ground Plane.
Use the content browser to navigate to
/Isaac/Robots/JetBot.Click and drag
jetbot.usdonto the stage.Position the JetBot just above the ground plane.
When completed, verify that the JetBot is under
/World/jetbotin the context tree and that the stage looks similar to:
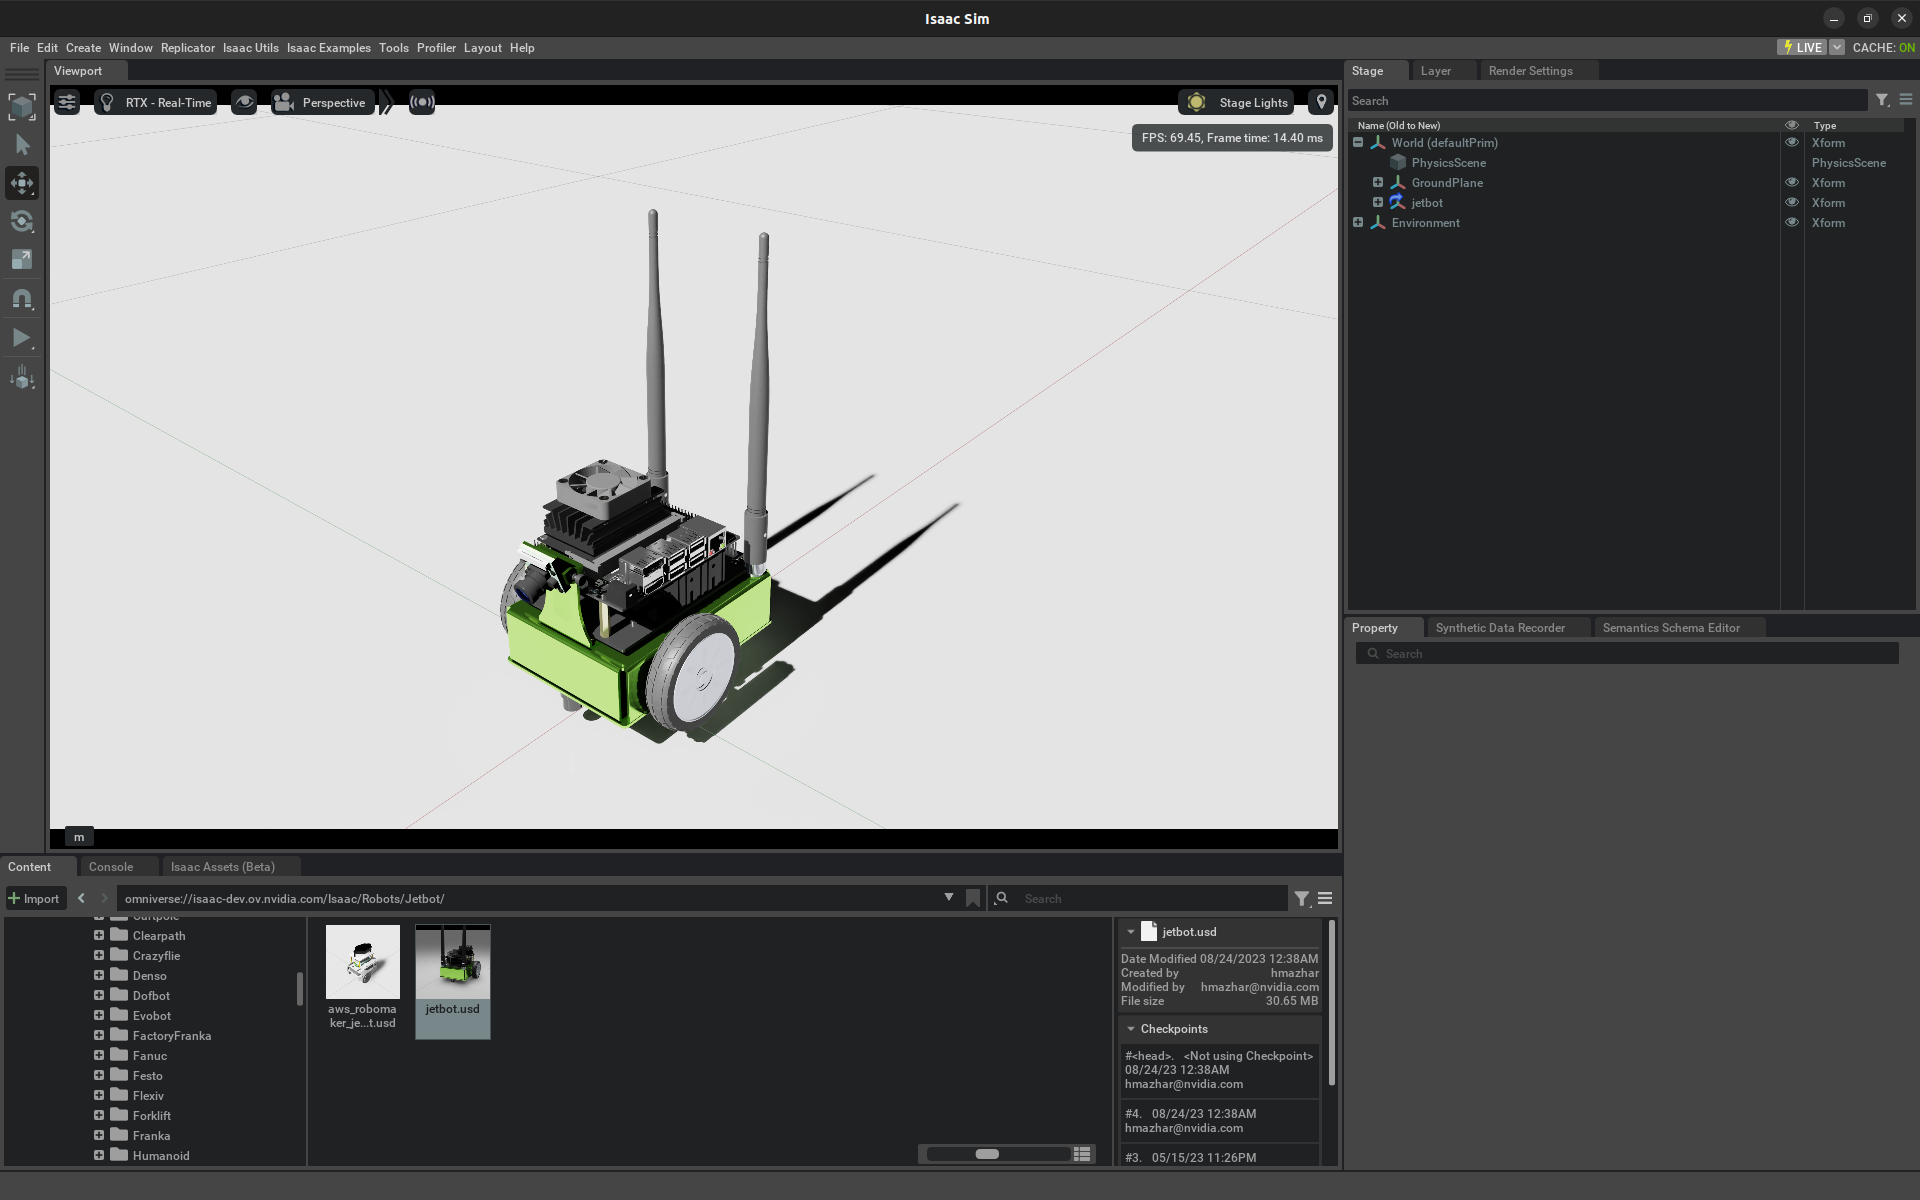
Jetbot on the stage#
Note
Click play! Validate that the JetBot falls and lands on the stage. Click stop before continuing.
Depending on your default render settings, the camera of the JetBot may have a placeholder mesh (it looks like a gray television camera).
To hide these meshes, click on the 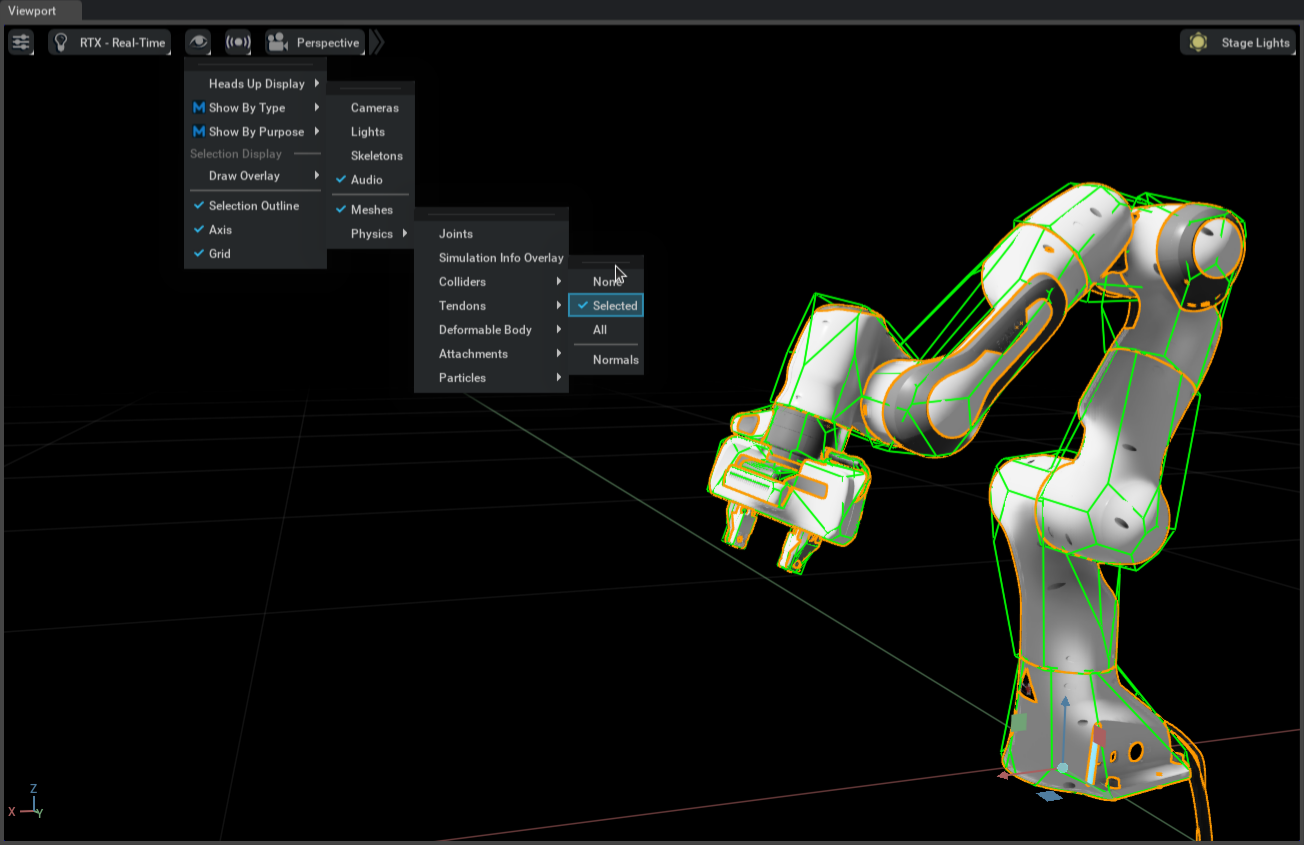 icon in the viewports and select Show By Type –> Cameras.
Building the Graph#
Select Window -> Visual Scripting -> Action Graph from the dropdown menu at the top of the editor. The Graph Editor appears in the same pane as the Content browser.
Click New Action Graph to open an empty graph.
Type
controllerin the search bar of the graph editor.Drag an
Articulation Controllerand aDifferential Controlleronto the graph.
The Articulation Controller applies driver commands (in the form of force, position, or velocity) to the specified joints
of any prim with an articulation root.
To tell the controller which robot it’s going to control:
Select the
Articulation Controllernode in the graph and open up the property pane.You can either:
Click usePath and Type in the path to the robot /World/jetbot in robotPath, OR
Click Add Targets near the top of the pane for
input:targetPrimand select JetBot in the pop up window.
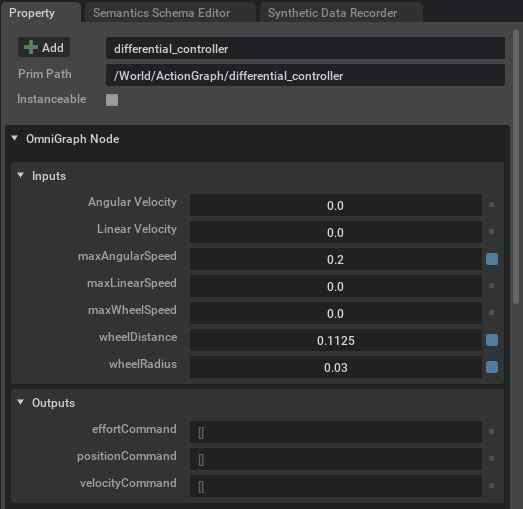
The Differential Controller computes drive commands for a two wheeled robot given some target linear and angular velocity. Like the
Articulation Controller, it also needs to be configured.
Select the
Differential Controllernode in the graph.In the properties pane, set the
wheelDistanceto 0.1125, thewheelRadiusto 0.03, andmaxAngularSpeedto 0.2.Validate that the properties of the controllers look like the following:

Specifying either target prim or robot path. Not both!#
Differential Node#
The Articulation Controller also needs to know which joints to articulate. It expects this information in the form of a list of tokens or index values. Each joint in a robot has a name and the JetBot has exactly two. Verify this by examining the JetBot in the stage context tree. Within /World/jetbot/chassis
are two revolute physics joints named left_wheel_joint and right_wheel_joint.
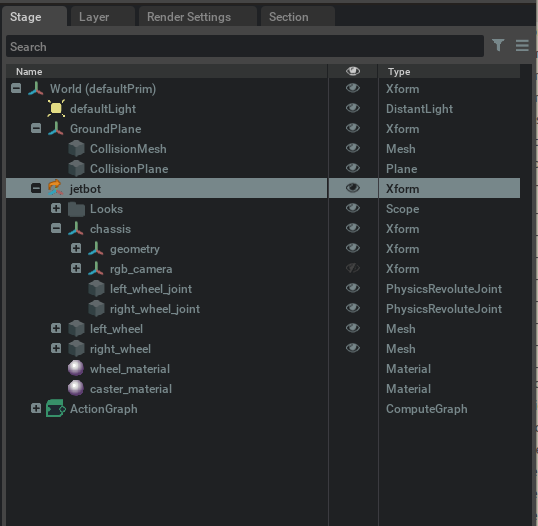
Stage Tree#
Type
tokeninto the search bar of the graph editor.Add two
Constant Tokennodes to the graph.Select one and set it’s value to
left_wheel_jointin the properties pane.Repeat this for the other constant token node, but set the value to
right_wheel_joint.Type
make arrayinto the search bar of the graph editor.Add a
Make Arraynode to the graph.Select the
Make Arraynode and click on the+icon in theinputssection of the property pane menu to add a second input.Set the
arraySizeto 2 and set the input type totoken[]from the dropdown menu in the same pane.Connect the constant token nodes to
input0andinput1of theMake Arraynode, and then the output of that node to theJoint Namesinput of theArticulation Controllernode.
The last node is the event node.
Search for
playbackin the search bar of the graph editor.Add an
On Playback Ticknode to the graph. This node emits an execution event for every frame, but only while the simulation is playing.Connect the
Tickoutput of theOn Playback Ticknode to theExec Ininput of both controller nodes.Connect the
Velocity Commandoutput of the differential controller to theVelocity Commandinput of the articulation controller.Validate that the graph looks similar to:
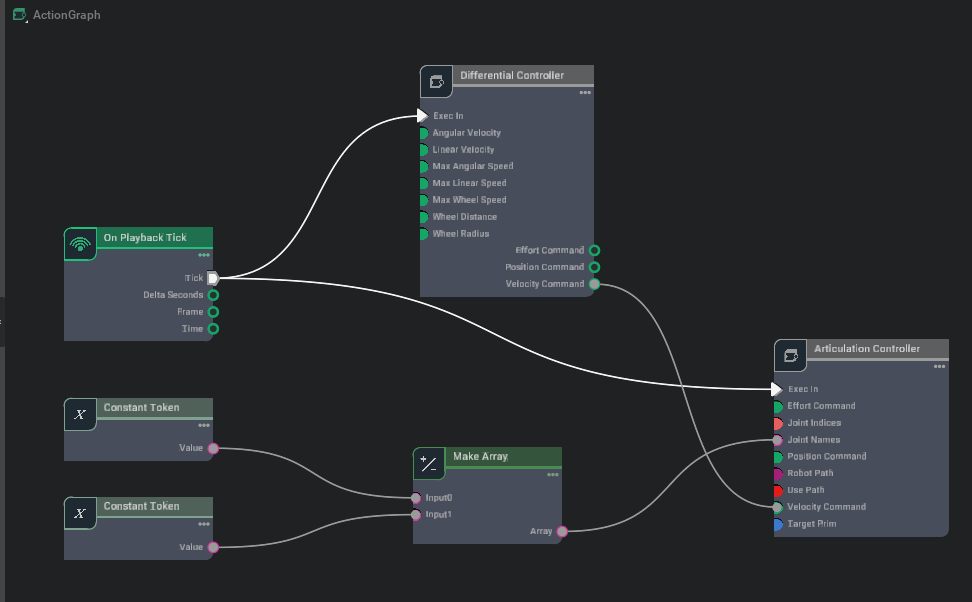
Simple differential control for the JetBot#
Press the play button.
Select the
Differential Controllernode in the graph.Click and drag on either the angular or linear velocity values in the properties pane to change it’s value (or just click and type in the desired value).
Note
Explore the available OmniGraph nodes and try to setup a graph to control the JetBot with the keyboard. The graph below is an example graph for controlling the JetBot with a keyboard.
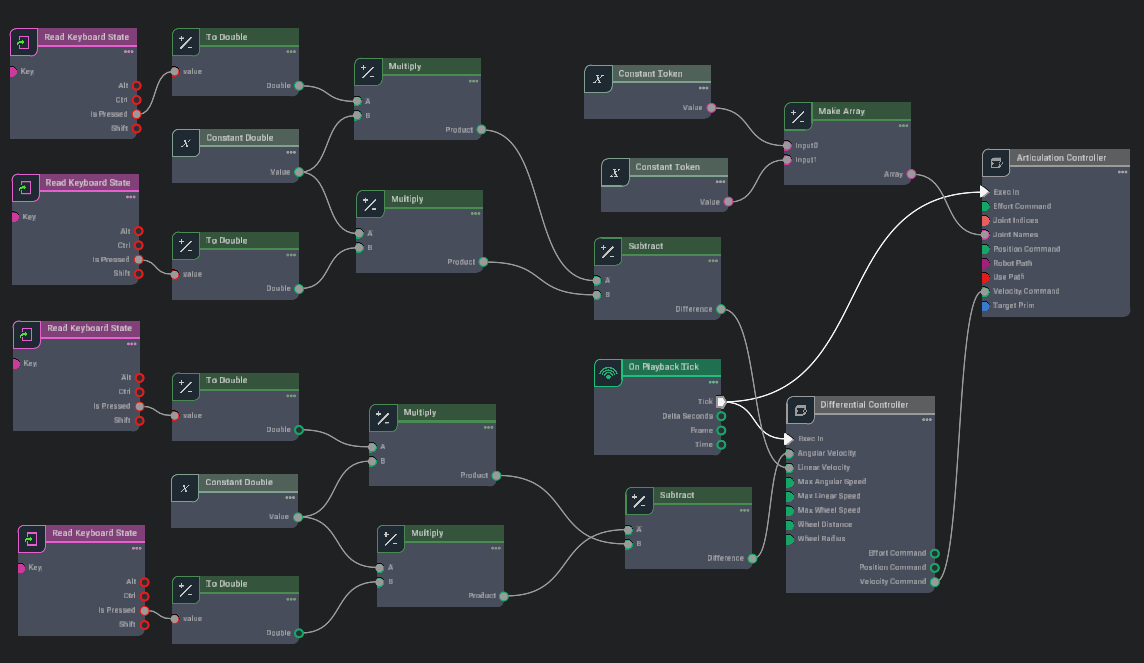
Keyboard control Action graph for the JetBot#
Omnigraph Shortcuts#
Putting the graph from scratch can be tedious, especially when you have to iterate. We made some shortcuts for frequently used graphs, so that within a couple clicks, you can generate a complex graph with multiple nodes and connections. They can be found under Isaac Utils -> Common Omnigraphs, and the instructions for them are in Commonly Used Omnigraph Shortcuts.
To use the Differential Controller graph from the menu shortcut:
Delete (or Disable if that is an option) any previous Omnigraphs that controls the Jetbot.
Go to the Menu bar and click on Isaac Utils -> Common Omnigraphs -> Differential Controller.
You are prompted for the necessary parameters.
Add “/World/jetbot” to
Articulation Root, set the distance between wheels to 0.1125, and the wheel radius to 0.03.Given JetBot only has two controllable joints, you can leave the rest of the fields empty.
Turn Use Keyboard Control (WASD) on.
Click OK to generate the graph. You can open the generated graph under
/Graph/differential_controller.Press Play to start simulation.
Verify that you can move the JetBot using the WASD keys on the keyboard.
Summary#
This tutorial covered:
Basic concepts of OmniGraph
Setting up a stage with a robot
Using OmniGraph to construct interfaces to a robot
Using the Omnigraph shortcuts to generate differential controller graph
Further Learning#
More in-depth concepts in OmniGraph
More details about all the OmniGraph shortcuts Commonly Used Omnigraph Shortcuts
Examples for using OmniGraph to connect input devices: OmniGraph: Input Devices
Examples for composing OmniGraph via Python scripting: OmniGraph: Python Scripting
Examples for writing custom Python nodes: Omnigraph: Custom Python Nodes