ROS2 Joint Control: Extension Python Scripting#
Warning
ROS 2 Foxy is no longer tested or supported. This may result in potential issues when ROS 2 Foxy is used in conjunction with Isaac Sim 4.2 or later.
Learning Objectives#
In this tutorial, we will interact with a manipulator, the Franka Emika Panda Robot. We will
Add a ROS2 Joint State publisher and subscriber in Omnigraph
Add a ROS2 Joint State publisher and subscriber using menu shortcut
Add a ROS2 Joint State publisher and subscriber using the OmniGraph python API using the script editor.
Getting Started#
Important
Make sure to source your ROS 2 installation from the terminal before running Isaac Sim. If sourcing ROS 2 is a part of your bashrc then Isaac Sim can be run directly.
Prerequisite
Completed Isaac Sim Workflows to understand the Extension Workflow.
Appropriate
ros2_wsis sourced (foxy_wsorhumble_ws) was sourced in the terminal that will be running python scripts.FASTRTPS_DEFAULT_PROFILES_FILEenvironmental variable is set prior to launching sim, and ROS2 bridge is enabled.
Add Joint States in UI#
Go to Content tab below the viewport, and open
/Isaac/Robots/Franka/franka_alt_fingers.usd.Go to Create -> Visual Scripting -> Action Graph to create an Action graph.
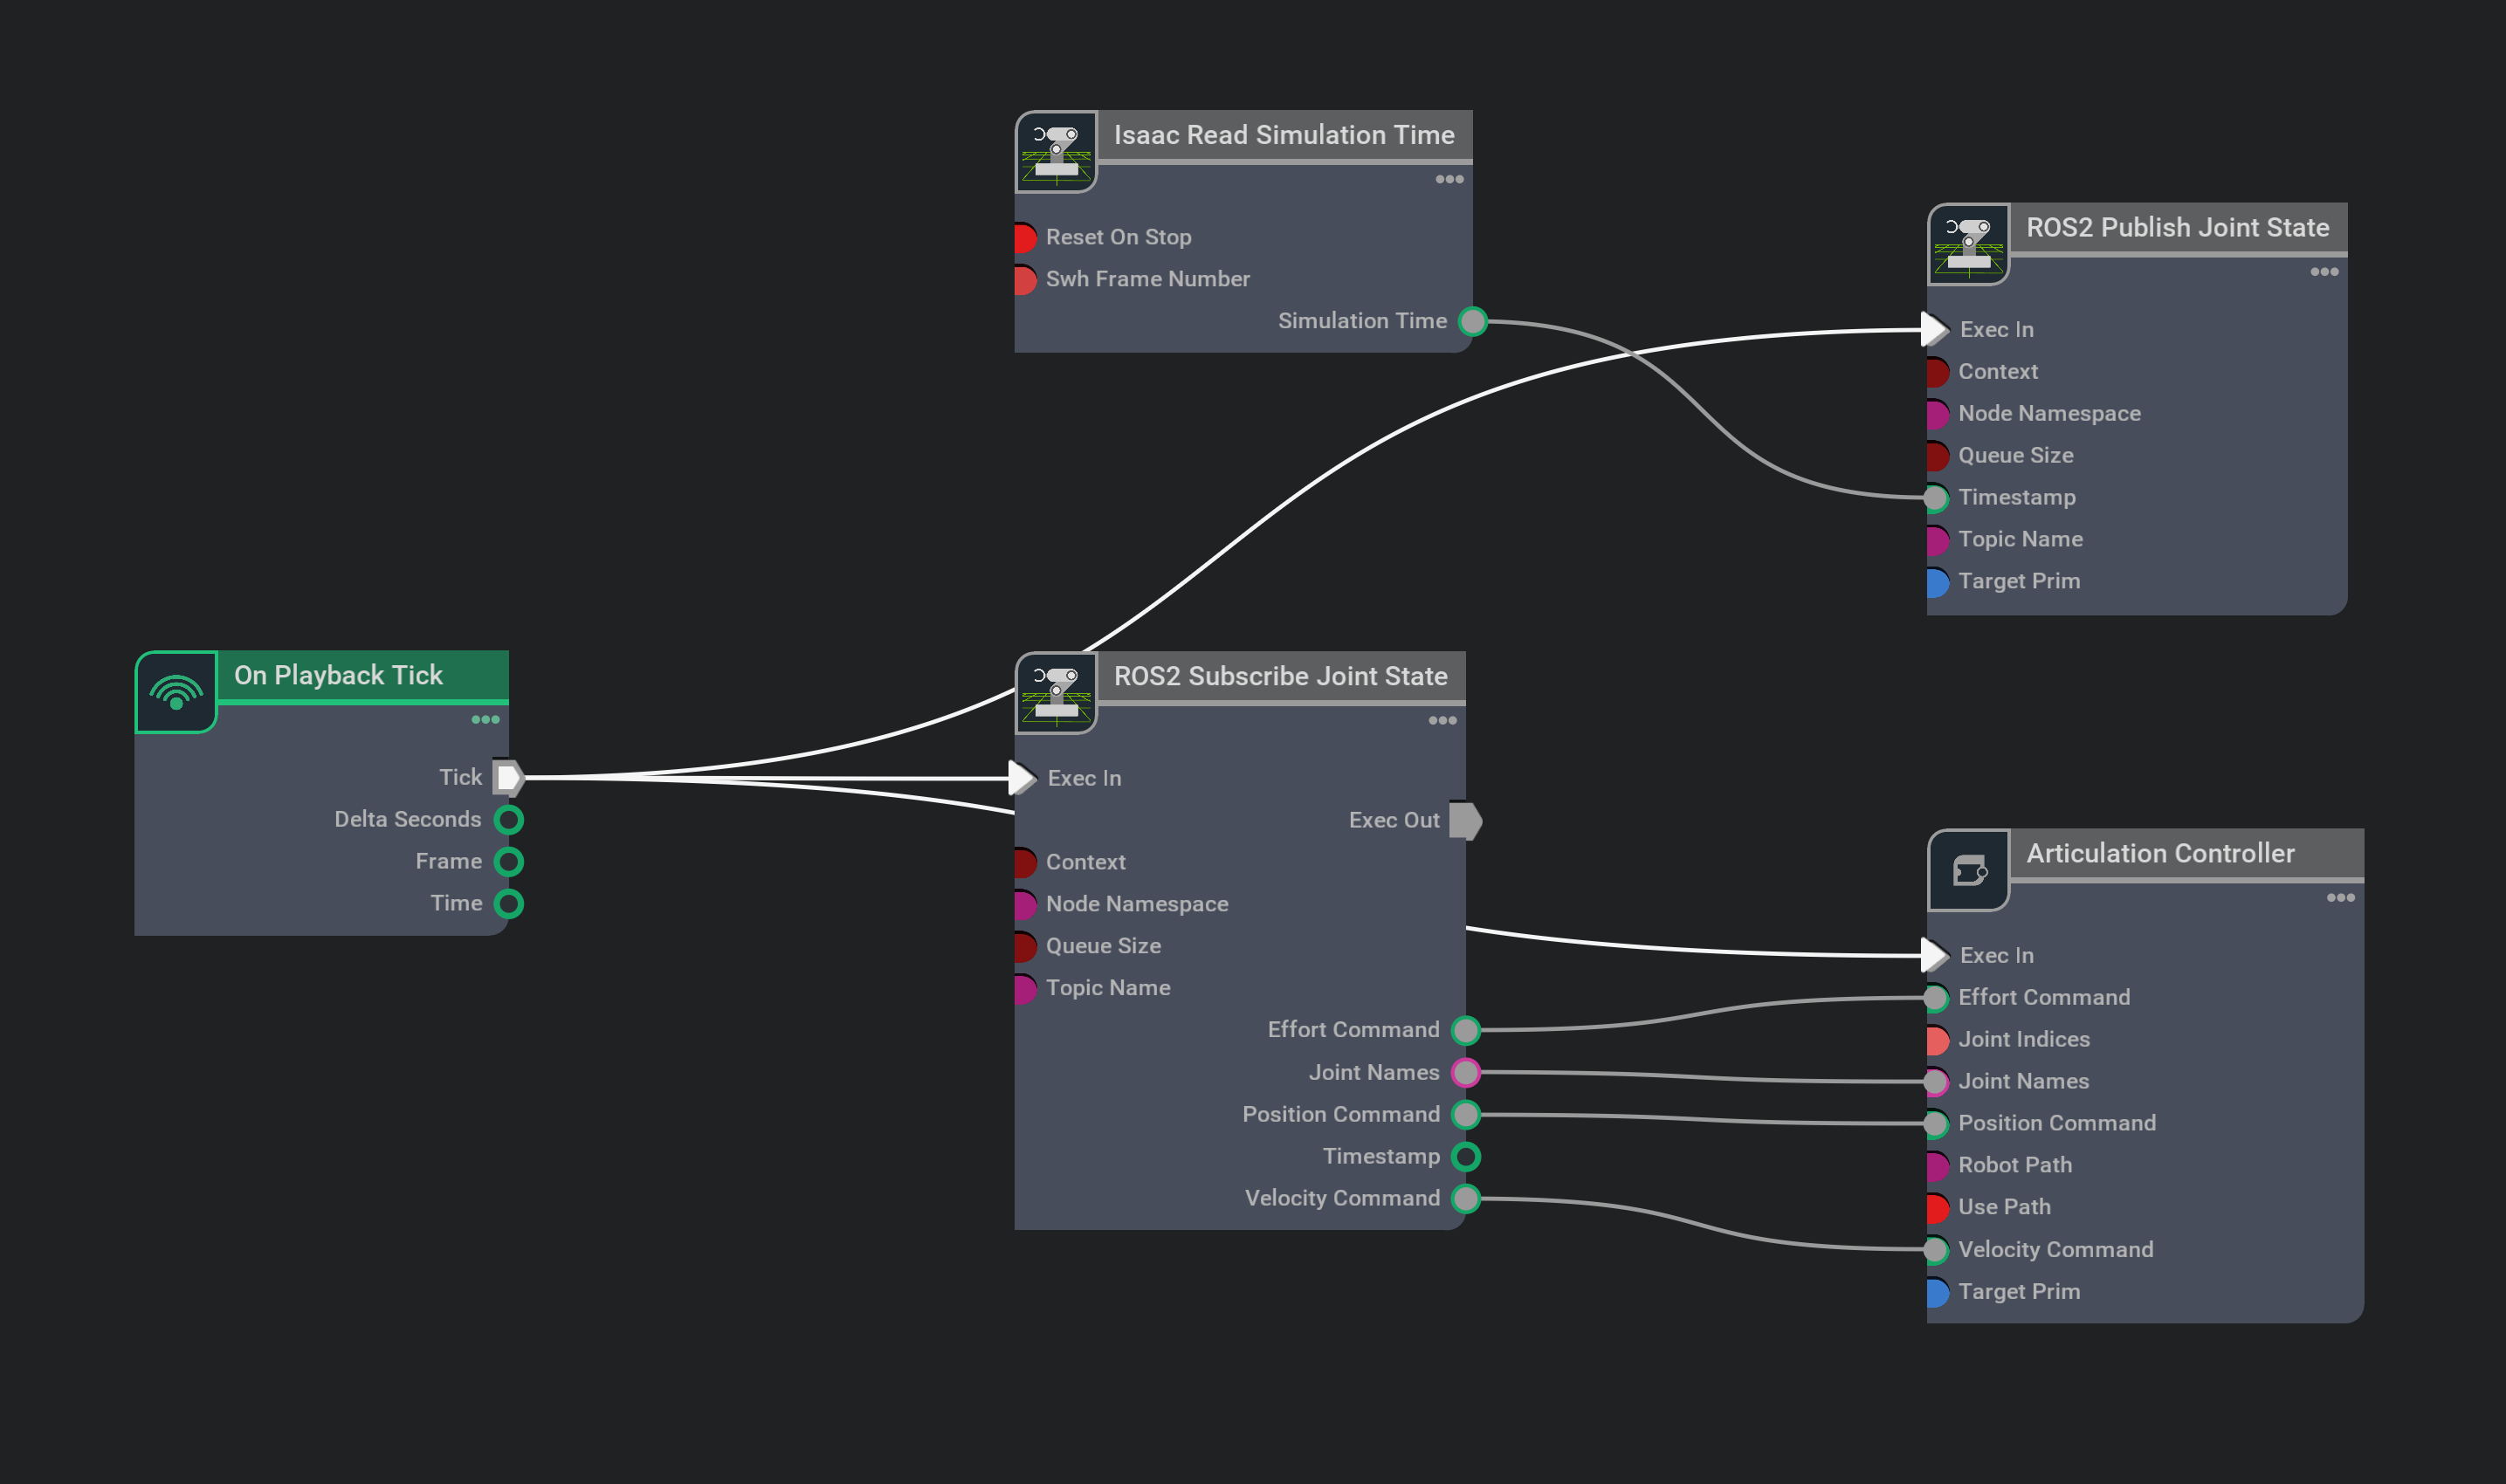
Add the following OmniGraph nodes into the Action graph:
On Playback Tick node to execute other graph nodes every simulation frame.
Isaac Read Simulation Time node to retrieve current simulation time.
ROS2 Publish Joint State node to publish ROS2 Joint States to the
/joint_statestopic.ROS2 Subscribe Joint State node to subscribe to ROS2 Joint States from the
/joint_commandtopic.Articulation Controller node to move the robot articulation according to commands received from the subscriber node.
Select ROS2 Publish Joint State node and add the /panda robot articulation to the targetPrim.
Select Articulation Controller node, indicate the robot articulation you want to move by either add /panda to the targetPrim, or type /panda in the robotPath field.
Connect the Tick output of the On Playback Tick node to the Execution input of the ROS2 Publish Joint State, ROS2 Subscribe JointState and Articulation Controller nodes.
Connect the Simulation Time output of the Isaac Read Simulation Time node to the Timestamp input of the ROS2 Publish Joint State node. Setup other connections between nodes as shown in the image below:
Press Play to start publishing joint states to the
/joint_statestopic and subscribing commands on the/joint_commandtopic.To test out the ROS2 bridge, use the provided python script to publish joint commands to the robot. In a ROS2-sourced terminal:
ros2 run isaac_tutorials ros2_publisher.py
While the robot is moving, open a ROS2-sourced terminal and check the joint state rostopic by running:
Graph Shortcut#
We provide a menu shortcut to build Joint State Publisher and Subscriber graphs with just a few clicks. Go to Isaac Utils > Common Omnigraphs > ROS2 JointStates. (If you don’t see any ROS2 graphs listed, you need to first enable the ROS2 bridge). A popup box will appear asking for the parameters needed to populate the graphs. You must provide the Graph Path, Node Namespace if there is one needed, and the prim that contains the Articulation Root API. If you are using the subscriber, you also have the option to add the Articulation Controller node needed to move the robot.
Add Joint States in Extension#
The same action done via UI can also be done using python script. More details regarding the different workflow of using Omniverse Isaac Sim can be found Isaac Sim Workflows.
Go to Content tab below the viewport, and open
/Isaac/Robots/Franka/franka_alt_fingers.usd.Open Script Editor in Window -> Script Editor and copy paste the following code into it. This is the equivalent to Steps 2-7 of the previous section. If the robot appears other than /panda on the stage tree, make sure to match the Articulation Controller and Publish Joint State nodes’ targets to the robot’s prim path (line 29 and 30).
 1import omni.graph.core as og
 2
 3og.Controller.edit(
 4    {"graph_path": "/ActionGraph", "evaluator_name": "execution"},
 5    {
 6        og.Controller.Keys.CREATE_NODES: [
 7            ("OnPlaybackTick", "omni.graph.action.OnPlaybackTick"),
 8            ("PublishJointState", "omni.isaac.ros2_bridge.ROS2PublishJointState"),
 9            ("SubscribeJointState", "omni.isaac.ros2_bridge.ROS2SubscribeJointState"),
10            ("ArticulationController", "omni.isaac.core_nodes.IsaacArticulationController"),
11            ("ReadSimTime", "omni.isaac.core_nodes.IsaacReadSimulationTime"),
12        ],
13        og.Controller.Keys.CONNECT: [
14            ("OnPlaybackTick.outputs:tick", "PublishJointState.inputs:execIn"),
15            ("OnPlaybackTick.outputs:tick", "SubscribeJointState.inputs:execIn"),
16            ("OnPlaybackTick.outputs:tick", "ArticulationController.inputs:execIn"),
17
18            ("ReadSimTime.outputs:simulationTime", "PublishJointState.inputs:timeStamp"),
19
20            ("SubscribeJointState.outputs:jointNames", "ArticulationController.inputs:jointNames"),
21            ("SubscribeJointState.outputs:positionCommand", "ArticulationController.inputs:positionCommand"),
22            ("SubscribeJointState.outputs:velocityCommand", "ArticulationController.inputs:velocityCommand"),
23            ("SubscribeJointState.outputs:effortCommand", "ArticulationController.inputs:effortCommand"),
24        ],
25        og.Controller.Keys.SET_VALUES: [
26            # Providing path to /panda robot to Articulation Controller node
27            # Providing the robot path is equivalent to setting the targetPrim in Articulation Controller node
28            # ("ArticulationController.inputs:usePath", True),      # if you are using an older version of Isaac Sim, you may need to uncomment this line
29            ("ArticulationController.inputs:robotPath", "/panda"),
30            ("PublishJointState.inputs:targetPrim", "/panda")
31        ],
32    },
33)
Press Run in the Script Editor and the Action Graph with all required nodes should be added. You can find the corresponding ActionGraph in the Stage Tree.
Note
This script should only be run once. It is assuming there is no ActionGraph that already exist on stage. You may need to start a new stage if you wish to run it again.
Same as the previous section, test out the ROS2 bridge using the provide ROS2 python node to publish joint commands to the robot. In a ROS2-sourced terminal run the following command:
ros2 run isaac_tutorials ros2_publisher.py
Check the joint state with ros2 topic echo while it’s moving:
ros2 topic echo /joint_states
Position and Velocity Control Modes#
The joint state subscriber currently supports position and velocity control. Each joint can only be controlled by a single mode at a time, but different joints on the same articulation tree can be controlled by different modes. Make sure each joint’s stiffness and damping parameters are setup appropriately for the desired control mode (position control: stiffness >> damping, velocity control: stiffness = 0).
The snippet is an example of how to command a robot using both position and velocity controls by grouping joints that use the same mode into one message, and create two different messages for position control joints and velocity controlled joints. Separating them is for organization and potentially sending them at different rates.
import threading

import rclpy
from sensor_msgs.msg import JointState

rclpy.init()
node = rclpy.create_node('position_velocity_publisher')
pub = node.create_publisher(JointState, 'joint_command', 10)

# Spin in a separate thread
thread = threading.Thread(target=rclpy.spin, args=(node, ), daemon=True)
thread.start()

joint_state_position = JointState()
joint_state_velocity = JointState()

joint_state_position.name = ["joint1", "joint2","joint3"]
joint_state_velocity.name = ["wheel_left_joint", "wheel_right_joint"]
joint_state_position.position = [0.2,0.2,0.2]
joint_state_velocity.velocity = [20.0, -20.0]

rate = node.create_rate(10)
try:
    while rclpy.ok():
        pub.publish(joint_state_position)
        pub.publish(joint_state_velocity)
        rate.sleep()
except KeyboardInterrupt:
    pass
rclpy.shutdown()
thread.join()
They can be combined into a single message if desired. Use ‘nan’ for joints that are not being controlled by that control mode.
joint_state = JointState()
joint_state.name = ["joint1", "joint2","joint3", "wheel_left_joint", "wheel_right_joint"]
joint_state.position = [0.2,0.2,0.2, float('nan'), float('nan')]
joint_state.velocity = [float('nan'), float('nan'), float('nan'), 20.0, -20.0]
Summary#
This tutorial covered adding a ROS2 Joint State publisher and subscriber via both UI and Extension scripting.
Next Steps#
Continue on to the next tutorial in our ROS2 Tutorials series, MoveIt 2 to learn how to connect the manipulator up with MoveIt 2.