ROS and ROS 2 Installation#
Omniverse Isaac Sim provides a ROS and ROS 2 bridge for ROS system integration. The same set of common components are used to define the types of data being published and received by the simulator.
Warning
ROS 1 support is deprecated and will be removed in a future release
ROS 2 Foxy is no longer tested or supported. This may result in potential issues when ROS 2 Foxy is used in conjunction with Isaac Sim 4.2 or later
Platform |
ROS (Deprecated) |
ROS 2 |
|---|---|---|
Ubuntu 20.04 |
Noetic |
Foxy (Deprecated) |
Ubuntu 22.04 |
NA |
Humble (recommended) |
Windows 10 |
NA |
Humble |
Windows 11 |
NA |
Humble |
For the ROS bridge, Isaac Sim runs a custom roscpp build of ROS Noetic internally
so that it works properly with the Omniverse framework and Python 3.
For the ROS 2 bridge, Isaac Sim is compatible with ROS 2 Foxy and ROS 2 Humble.
Getting Started#
This is a guide identifying different ways the Isaac Sim ROS Bridge can be run to match your ROS configuration.
ROS Installation:
Linux:
Installing ROS locally: The recommended method is to install ROS locally on the system.
ROS 2 Humble or Foxy: The ROS 2 installation can be sourced before Isaac Sim is run, which allows the Isaac Sim ROS2 Bridge to load the ROS2 libraries of you system. Here is how to have ROS 2 installed natively.
ROS Noetic: Isaac Sim will automatically use the ROS 1 libraries that are packaged as part of Isaac Sim (referred to as ROS 1 internal libraries). When you have ROS Noetic installed on your system, you need to run roscore before running a ROS scene in Isaac Sim. Follow the ROS tab to install ROS Noetic natively.
ROS not installed locally: If you are unable to install ROS on your system, you can still run the ROS Bridge on Isaac Sim.
ROS 2 Humble or Foxy: Your environment would need to be configured (which can be done manually in the terminal or automatically through the App Selector) to let Isaac Sim ROS Bridge know to load the ROS 2 libraries that are packaged with Isaac Sim (referred to as ROS 2 internal libraries). Isaac Sim contains all ROS 2 libraries required to run all of the publisher and subscriber nodes contained within the ROS2 Bridge. Follow the instructions to run Isaac Sim without a ROS system level install. Since ROS is not available on the system, you can either run a ROS 2 docker or connect a different machine with ROS 2 installed to the same network.
ROS Noetic: Isaac Sim will automatically use the ROS 1 libraries that are packaged as part of Isaac Sim (referred to as ROS 1 internal libraries). Follow the instructions to run Isaac Sim without a ROS system level install.
Windows:
ROS 2 Humble: In Windows,there are 2 parts to running the ROS Bridge in Isaac Sim.
WSL2 (Windows Subsystem for Linux) using the Ubuntu 22.04 Linux distro is used for installing ROS libraries and running ROS. Here is how to install ROS 2 with WSL2 on Windows.
You would also need to configure your environment (which can be done manually in the terminal or automatically through the App Selector) to let Isaac Sim ROS Bridge know to load the ROS 2 libraries that are packaged with Isaac Sim (referred to as ROS 2 internal libraries). Isaac Sim contains all ROS 2 libraries required to run all of the publisher and subscriber nodes contained within the ROS2 Bridge. Follow the instructions to run |isaac-sim_short| with ROS2 internal libraries.
In summary, Isaac Sim operates the ROS Bridge using its own internal libraries and communicates with ROS nodes installed in Ubuntu 22.04 on WSL2. Moving forward, follow steps for Ubuntu 22.04 unless there are specific steps for Windows.
Now that you have determined the appropriate ROS libraries to run the Isaac Sim ROS Bridge with, next step is to enable the ROS Bridge extension. Optionally, you can also follow the steps to run Isaac Sim with Cyclone DDS.
After enabling the ROS Bridge, you can start publishing and subscribing to ROS topics. It is recommended to go through the ROS tutorials. In order to complete them, be sure to setup the Isaac Sim ROS Workspaces first.
ROS installed locally:
In Ubuntu 22.04 you can follow the instructions to setup the Isaac Sim ROS Workspaces.
In Ubuntu 20.04 you would need to build the Isaac Sim ROS Workspaces with Python3.10.
ROS not installed locally:
In Linux follow the instructions to run and build the Isaac Sim ROS Workspaces in a container.
In Windows 10 and 11 this option is currently not supported as all ROS 2 installations should be run natively via Ubuntu 22.04 on WSL2. Follow the Ubuntu 22.04 steps for locally installed ROS in the section above within WSL2.
Running Native ROS#
Warning
ROS 2 Foxy is no longer tested or supported. This may result in potential issues when ROS 2 Foxy is used in conjunction with Isaac Sim 4.2 or later.
The method of ROS 2 installation determines the features of ROS 2 that can be used.
Isaac Sim comes with Python3.10, if you have installed ROS 2 with a different version of Python, a fallback rclpy is used. The fallback comes pre-packaged with Isaac Sim and compiled with Python3.10.
In the table below, rclpy refers to using ROS 2 functionality with Python in Isaac Sim.
The ROS_DISTRO env variable is used to determine if ROS 2 is sourced and which distro to use. If this variable is not set, an internal ROS 2 distro build is used. Message definitions can be different between ROS 2 versions. Because of this, the appropriate ROS 2 backend is dynamically loaded depending on the sourced ROS Distro.
Install Method
Platform
Python Version
rclpy
Debian Packages
Ubuntu 20 (Foxy)
Ubuntu 22 (Humble)
Python3.7
Python3.10
No
Yes
From Source
Ubuntu 20 (Foxy)
Ubuntu 22 (Humble)
Windows 10 (Humble)
Windows 11 (Humble)
Python3.7
Python3.10
Python3.10
Python3.10
No
Yes
Yes
Yes
Important
When using the ROS 2 bridge, source your ROS 2 installation from the terminal before running Isaac Sim.
If sourcing ROS 2 is a part of your bashrc, then Isaac Sim can be run directly.
Download ROS 2 following the instructions on the official website:
(Optional) Some message types (Detection2DArray and Detection3DArray used for publishing bounding boxes) in the ROS 2 Bridge depend on the vision_msgs_package. Run the command below to install the package on your system. If you don’t need to run the vision_msgs publishers, you can skip this step.
sudo apt install ros-humble-vision-msgs
(Optional) Some message types (AckermannDriveStamped used for publishing and subscribing to Ackermann steering commands) in the ROS 2 Bridge depend on the ackermann_msgs_package. Run the command below to install the package on your system. If you don’t need to run the ackermann_msgs publishers/subscribers, you can skip this step.
sudo apt install ros-humble-ackermann-msgs
Ensure that the ROS environment is sourced in the terminal or in your
~/.bashrcfile. You must perform this step each time and before using any ROS commands or running Isaac Sim.source /opt/ros/humble/setup.bash
Download ROS 2 following the instructions on the official website:
(Optional) Some message types (Detection2DArray and Detection3DArray are used for publishing bounding boxes) in the ROS 2 Bridge depend on the vision_msgs_package. Run the command below to install the package on your system. If you don’t need to run the vision_msgs publishers, you can skip this step.
sudo apt install ros-foxy-vision-msgs
(Optional) Some message types (AckermannDriveStamped which is used for publishing and subscribing to Ackermann steering commands) in the ROS 2 Bridge depend on the ackermann_msgs_package. Run the command below to install the package on your system. If you don’t need to run the ackermann_msgs publishers/subscribers, you can skip this step.
sudo apt install ros-foxy-ackermann-msgs
Ensure that the ROS environment is sourced in the terminal or in your
~/.bashrcfile. You must perform this step each time and before using any ROS commands or running Isaac Sim.source /opt/ros/foxy/setup.bash
On Ubuntu 20.04 you must install Humble from the source:
Optional:
The Detection2DArray and Detection3DArray message types are used for publishing bounding boxes from the ROS 2 Bridge and depend on the vision_msgs_package. If you require running these vision_msgs publishers from the ROS 2 Bridge, ensure that the vision_msgs package is built from the
ros2branch. Make sure the workspace containing this package is sourced before running Isaac Sim from the same terminal.The AckermannDriveStamped message type is used for publishing and subscribing to Ackermann steering commands from the ROS 2 Bridge and depends on the ackermann_msgs_package. If you require running these ackermann_msgs publishers from the ROS 2 Bridge, ensure that the ackermann_msgs package is built from the
ros2branch. Make sure the workspace containing this package is sourced before running Isaac Sim from the same terminal.
Use WSL2 to run ROS2 on Windows, which communicates with the Isaac Sim ROS Bridge run using internal ROS2 libraries.
Install WSL2 on your Windows machine.
Open Powershell with Admin privileges and change the WSL version to 2.
wsl --set-default-version 2
Install Ubuntu 22.04 distro inside WSL.
wsl --install -d Ubuntu-22.04
After the installation is complete, restart the machine and open the Ubuntu 22.04 app in Windows. It takes a few moments to install.
Note
If you encounter errors with enabling virtualization, follow the Windows virtualization enabling instructions.
After Ubuntu 22.04 is installed in WSL2, see the instructions for installing ROS2 Humble natively in Ubuntu 22.04 in the WSL2 terminal.
After ROS2 installation is complete, open WSL2 and run the following command to get the IP address of WSL2.
hostname -I
Open Powershell as Admin and run the following command and retrieve the IPv4 address of the Windows host.
ipconfig /all
Set the variables in Powershell accordingly with the respective IP addresses:
$Windows_IP = "<WINDOWS_IP>"
$WSL2_IP = "<WSL2_IP>"
Setup port forwarding in Powershell for the specific ports used by default DDS (FastDDS) in ROS:
netsh interface portproxy add v4tov4 listenport=7400 listenaddress=$Windows_IP connectport=7400 connectaddress=$WSL2_IP
netsh interface portproxy add v4tov4 listenport=7410 listenaddress=$Windows_IP connectport=7410 connectaddress=$WSL2_IP
netsh interface portproxy add v4tov4 listenport=9387 listenaddress=$Windows_IP connectport=9387 connectaddress=$WSL2_IP
See the steps to open Isaac Sim with internal ROS2 libraries on Windows.
Now that the ROS Bridge is enabled on Isaac Sim and the Windows network settings have been applied, Isaac Sim is able to communicate with ROS2 nodes in WSL2.
Download ROS following the instructions on the official website:
Source the ROS environment in the terminal. You must perform this step each time before using any ROS commands.
source /opt/ros/noetic/setup.bash
Make sure to start
roscorein a ROS-sourced terminal. Isaac Sim does not runroscoreby default, to be more flexible for use cases where Isaac Sim is being integrated with existing ROS workflows.
Return to the next step in the setup guide to learn how to enable the ROS Bridge.
Running ROS without a System Level Install#
If you do not have ROS installed on the system, the internal ROS libraries that are part of Isaac Sim can be enabled.
The simplest way to enable the ROS 2 internal libraries is by configuring the options presented in the Isaac Sim App Selector when launching Isaac Sim from the Omniverse Launcher.
However, to enable the internal ROS 2 libraries from the terminal follow the instructions below:
If you don’t have a system level ROS 2 install, Isaac Sim comes with its own set of minimal ROS 2 libraries to fallback on. To use the Humble ROS 2 libraries, you must set the following environment variables in a new terminal or command prompt before running Isaac Sim. If Isaac Sim is installed in a non-default location replace
isaac_sim_package_pathenvironment variable with the Package Path shown in the Isaac Sim App Selector (see “Open in File Browser” and “Open In Terminal” buttons).export isaac_sim_package_path=$HOME/.local/share/ov/pkg/isaac-sim-4.2.0 export RMW_IMPLEMENTATION=rmw_fastrtps_cpp # Can only be set once per terminal. # Setting this command multiple times will append the internal library path again potentially leading to conflicts export LD_LIBRARY_PATH=$LD_LIBRARY_PATH:$isaac_sim_package_path/exts/omni.isaac.ros2_bridge/humble/lib # Run Isaac Sim $isaac_sim_package_path/isaac-sim.shset isaac_sim_package_path=%userprofile%\AppData\Local\ov\pkg\isaac-sim-4.2.0 set RMW_IMPLEMENTATION=rmw_fastrtps_cpp REM Can only be set once per terminal. REM Setting this command multiple times will append the internal library path again potentially leading to conflicts set PATH=%PATH%;%isaac_sim_package_path%\exts\omni.isaac.ros2_bridge\humble\lib REM Run Isaac Sim with ROS2 Bridge Enabled %isaac_sim_package_path%\isaac-sim.bat --/isaac/startup/ros_bridge_extension=omni.isaac.ros2_bridgeIf you don’t have a system level ROS 2 install, Isaac Sim comes with its own set of minimal ROS 2 libraries to fallback on. To use the Foxy ROS 2 libraries, you must set the following environment variables in a terminal before running Isaac Sim. If Isaac Sim is installed in a non-default location replace
isaac_sim_package_pathenvironment variable with the Package Path shown in the Isaac Sim App Selector (see “Open in File Browser” and “Open In Terminal” buttons). Foxy is only supported on Linux.Warning
ROS 2 Foxy is no longer tested or supported. This may result in potential issues when ROS 2 Foxy is used in conjunction with Isaac Sim 4.2 or later.
export isaac_sim_package_path=$HOME/.local/share/ov/pkg/isaac-sim-4.2.0

export ROS_DISTRO=foxy

export RMW_IMPLEMENTATION=rmw_fastrtps_cpp

# Can only be set once per terminal.
# Setting this command multiple times will append the internal library path again potentially leading to conflicts
export LD_LIBRARY_PATH=$LD_LIBRARY_PATH:$isaac_sim_package_path/exts/omni.isaac.ros2_bridge/foxy/lib

# Run Isaac Sim command
$isaac_sim_package_path/isaac-sim.sh
If you don’t have a system level ROS install, Isaac Sim comes with its own set of minimal ROS Noetic libraries to fallback on. Only supported in Linux.
Return to the next step in the setup guide to learn how to enable the ROS Bridge.
Enabling the ROS Bridge Extension#
Preparation
If you intend to use a ROS 2 bridge, before launching Isaac Sim, you need to set the Fast DDS middleware on all terminals that will be passing ROS 2 messages:
If you are using a Isaac Sim ROS 2 workspace, a
fastdds.xmlfile is located at the root of the <ros2_ws> folder. Set the environment variable by typingexport FASTRTPS_DEFAULT_PROFILES_FILE=<path_to_ros2_ws>/fastdds.xmlin all the terminals that will use ROS 2 functions. You must also set it under “Extra Args” when launching Isaac Sim from the NVIDIA Omniverse™ Launcher.If you are not using a Isaac Sim ROS 2 Workspace, create a file named
fastdds.xmlunder~/.ros/, paste the following snippet link into the file:<?xml version="1.0" encoding="UTF-8" ?> <license>Copyright (c) 2022-2024, NVIDIA CORPORATION. All rights reserved. NVIDIA CORPORATION and its licensors retain all intellectual property and proprietary rights in and to this software, related documentation and any modifications thereto. Any use, reproduction, disclosure or distribution of this software and related documentation without an express license agreement from NVIDIA CORPORATION is strictly prohibited.</license> <profiles xmlns="http://www.eprosima.com/XMLSchemas/fastRTPS_Profiles" > <transport_descriptors> <transport_descriptor> <transport_id>UdpTransport</transport_id> <type>UDPv4</type> </transport_descriptor> </transport_descriptors> <participant profile_name="udp_transport_profile" is_default_profile="true"> <rtps> <userTransports> <transport_id>UdpTransport</transport_id> </userTransports> <useBuiltinTransports>false</useBuiltinTransports> </rtps> </participant> </profiles>
Run
export FASTRTPS_DEFAULT_PROFILES_FILE=~/.ros/fastdds.xmlin the terminals that will use ROS 2 functions. You must also set it under “Extra Args” when launching Isaac Sim from the Nucleus Launcher.(Optional) Run
export ROS_DOMAIN_ID=(id_number)before launching Isaac Sim. You can later to decide whether to use this ROS_DOMAIN_ID inside your environment, or explicitly use a different id number for any given topic.Source your ROS 2 installation and workspace before launching Isaac Sim.
Enable Extension
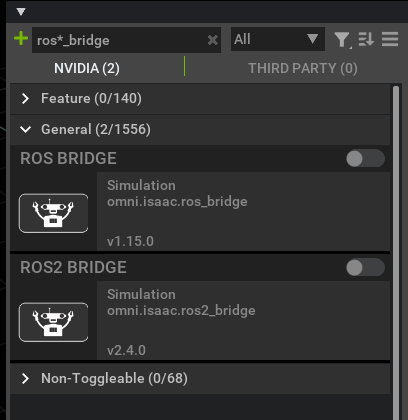
To enable ROS 2 bridge extensions, go to the extension manager menu Window->Extensions and search for ROS 2 bridge. Only one of the ROS Bridge extensions can be enabled at any given time. If you are switching between the two bridges, disable one before enabling the other.
Note
You must source ROS 2 in the terminal before running Isaac Sim, standalone Python scripts, or Isaac Cortex. Isaac Sim uses the libraries from your ROS 2 installation with its ROS 2 bridge. The ROS 2 bridge dynamically handles the version of ROS 2 that must be loaded (Humble or Foxy) from your sourced ROS 2 installation. If you do not source your ROS 2 installation and enable the ROS 2 bridge, Isaac Sim loads the Humble version of the bridge (a set of pre-packaged libraries with ROS 2 Humble are used as the fallback).
To enable ROS bridge extensions, go to the extension manager menu Window->Extensions and search for ROS Bridge. Only one of the ROS Bridge extensions can be enabled at any given time. If switching between the two bridges, disable one before enabling the other.
Return to the next step in the setup guide to learn how to setup ROS workspaces.
Choosing the ROS Bridge Version in isaac-sim.sh#
The ROS 2 Bridge is enabled by default. If you are running isaac-sim.sh and would like to disable both ROS bridges, or switch to an automatically loading ROS Bridge, use the following steps:
Open the file located at
<YOUR_PACKAGE_PATH>/apps/omni.isaac.sim.base.kit. Replace<YOUR_PACKAGE_PATH>with the Package Path shown in the app selector (above “Open in File Browser” and “Open In Terminal” buttons).Find the line
isaac.startup.ros_bridge_extension = "omni.isaac.ros2_bridge"and change it toisaac.startup.ros_bridge_extension = ""to disable both bridges, orisaac.startup.ros_bridge_extension = "omni.isaac.ros_bridge"to automatically load ROS Bridge.Save and close the file.
Return to the next step in the setup guide to learn how to setup ROS workspaces.
Running ROS 2 Bridge using Cyclone DDS#
In ROS 2, Fast DDS is enabled and installed by default. However, Isaac Sim also supports Cyclone DDS middleware for Linux, ROS 2 Humble. Cyclone DDS is currently not supported on Windows (WSL2).
Follow the installation steps to setup Cyclone DDS for your ROS2 installation.
Note
If you are running Running ROS without a System Level Install, you can skip the step above as the Isaac Sim ROS 2 Humble internal libraries include Cyclone DDS.
Before Running Isaac Sim, make sure to set the
RMW_IMPLEMENTATIONenvironment variable as shown below. Moving forward, if any examples show setting the environment variable tormw_fastrtps_cppyou can replace it with the command below:export RMW_IMPLEMENTATION=rmw_cyclonedds_cpp
Return to the next step in the setup guide to learn how to setup ROS workspaces for you workflow.
Setting Up Workspaces#
Note
To build the Isaac Sim ROS workspaces, ensure you have a system install of ROS. You are also able to build the workspaces using a ROS docker container.
Clone the Isaac Sim ROS Workspace Repository from isaac-sim/IsaacSim-ros_workspaces.
A few ROS packages are needed to go through the Isaac Sim ROS and ROS 2 tutorial series. To simplify it, entire ROS and ROS 2 workspaces with the necessary packages are included.
If you have built ROS 2 from source, replace the source /opt/<ros_distro>/setup.bash command with source <path_ros2_ws>/install/setup.bash before building additional workspaces.
To build the ROS 2 workspace, you might need to install additional packages:
# For rosdep install command
sudo apt install python3-rosdep python3-rosinstall python3-rosinstall-generator python3-wstool build-essential
# For colcon build command
sudo apt install python3-colcon-common-extensions
Ensure that your native ROS 2 has been sourced:
source /opt/ros/humble/setup.bash
Resolve any package dependencies from the root of the ROS 2 workspace by running the following command:
cd humble_ws
rosdep install -i --from-path src --rosdistro humble -y
Build the workspace:
colcon buildUnder the root directory, new
build,install, andlogdirectories are created.To start using the ROS 2 packages built within this workspace, open a new terminal and source the workspace with the following commands:
source /opt/ros/humble/setup.bash
cd humble_ws
source install/local_setup.bash
Warning
ROS 2 Foxy is no longer tested or supported. This may result in potential issues when ROS 2 Foxy is used in conjunction with Isaac Sim 4.2 or later. ROS 2 Foxy Isaac Sim tutorial packages will be removed in a future release.
To build the ROS 2 workspace, you may need to install additional packages:
# For rosdep install command
sudo apt install python3-rosdep python3-rosinstall python3-rosinstall-generator python3-wstool build-essential
# For colcon build command
sudo apt install python3-colcon-common-extensions
Ensure that your native ROS 2 has been sourced:
source /opt/ros/foxy/setup.bash
Resolve any package dependencies from the root of the ROS 2 workspace by running the following command:
cd foxy_ws
rosdep install -i --from-path src --rosdistro foxy -y
Note
If you get an error running rosdep install you might have to run the following command to update the rodep keys for Foxy.
rosdep update --include-eol-distros
Build the workspace:
colcon buildUnder the root directory, new
build,install, andlogdirectories are created.To start using the ROS 2 packages built within this workspace, open a new terminal and source the workspace with the following commands:
source /opt/ros/foxy/setup.bash
cd foxy_ws
source install/local_setup.bash
Open the Ubuntu 22.04 app (WSL2) in Windows.
In the WSL2 terminal, run all of the installation commands in the ROS2 -> Ubuntu -> Humble tab of the Setting Up Workspaces section.
if you want to use the provided workspace directly, follow the steps below to build it and source the overlay of this package. You are also welcome to copy and paste the individual packages into your own workspace and built it there, and make sure that workspace is inside
ROS_PACKAGE_PATH.
Ensure that your native ROS has been sourced, if it has not been already:
source /opt/ros/noetic/setup.bash
You can verify the success of the sourcing, by reviewing the
ROS_PACKAGE_PATHenvironment variable.echo $ROS_PACKAGE_PATH /opt/ros/noetic/share
One of the packages included in the Isaac Sim ROS workspace
isaac_moveituses MoveIt on a Franka Emika “Panda” Arm. To ensure this package builds, first install MoveIt from pre-built binaries (Debian):sudo apt install ros-$ROS_DISTRO-moveit
Follow the steps outlined in the MoveIt tutorial to install the
panda_moveit_configpackage in your ROS workspace.Resolve any package dependencies from the root of the ROS workspace by running the following command:
cd noetic_ws
rosdep install -i --from-path src --rosdistro noetic -y
In the ROS-sourced terminal, build the Isaac
noetic_wsfolder, then source the overlay:catkin_make source devel/setup.bash
This puts the Isaac Sim ROS workspace in your
ROS_PACKAGE_PATH. You can useecho $ROS_PACKAGE_PATHagain to verify that the path to the Isaac Sim ROS workspace has been added in front of the original one.Alternatively, you can move the individual ROS packages from the
noetic_ws/srcfolder into your own ROS workspaces and build it.
Go to the ROS website for tutorials on building your own ROS packages.
If you want to give Isaac Sim access to your existing packages, make sure to set the
ROS_PACKAGE_PATH environment variable so that they include the desired ROS workspace in the same
terminal before starting up Omniverse Isaac Sim.
Included ROS Packages#
A list of sample ROS 2 packages created for Omniverse Isaac Sim:
carter_navigation: Contains the required launch file and ROS 2 navigation parameters for the NVIDIA Carter robot.
custom_message: Contains a message file used to demonstrate ROS2 workflows with custom message definitions.
isaac_ros_navigation_goal: Used to automatically set random or user-defined goal poses in ROS 2 Navigation.
isaac_ros2_messages: A custom set of ROS 2 service interfaces for retrieving poses as well as listing prims and manipulate their attributes.
isaacsim: Contains launch files and scripts for running and launching Isaac Sim as a ROS2 node.
isaac_tutorials: Contains launch files, RViz2 config files, and scripts for the tutorial series.
Important
Remember to source your ROS 2 workspace each time a new terminal is opened or whenever a new ROS 2 package is included. Following this, run Isaac Sim from the same terminal.
The following is a list of sample ROS packages created for Omniverse Isaac Sim:
carter_2dnav: Contains the required launch file and ROS navigation parameters for the NVIDIA Carter robot.
carter_description: A description of the NVIDIA Carter robot model.
cortex_control: Tools for establishing communication between Cortex and controllers.
cortex_control_franka: Contains launch files and Python nodes used to control a physical Franka robot with Cortex.
isaac_moveit: Contains the required launch and config files for running ROS MoveIt.
isaac_ros_messages: A custom set of messages for 2D/3D bounding boxes and pose service messages.
isaac_ros_navigation_goal: Used to automatically set random or user-defined goal poses in ROS Navigation.
isaac_tutorials: Contains launch files, RViz config files, and scripts for the tutorial series.
Building ROS 2 Workspaces with Python3.10#
If you want to use rclpy with Isaac Sim, your ROS 2 workspace must be built with Python3.10. Dockerfiles are included with the Isaac Sim ROS Workspaces repository that build minimal dependencies of ROS 2 with Python3.10.
For Ubuntu 22, Python3.10 is the default version. Make sure ROS 2 Humble has been installed Running Native ROS. Packages built can be used directly with rclpy in Isaac Sim.
Clone Isaac Sim ROS Workspace
Source your existing ROS 2 Humble installation:
source /opt/ros/humble/setup.bash
Build the ROS 2 workspace:
cd IsaacSim-ros_workspaces/humble_ws

colcon build
Source the built workspace and run Isaac Sim from the same terminal:
source humble_ws/install/setup.bash
A sample dockerfile is included that builds a ROS 2 workspace with Python3.10.
Warning
ROS 2 Foxy is no longer tested or supported. This may result in potential issues when ROS 2 Foxy is used in conjunction with Isaac Sim 4.2 or later. ROS 2 Foxy Isaac Sim tutorial packages will be removed in a future release.
To use the dockerfile to build the workspace with Python3.10. Ensure that docker is installed on your system (as described in Container Setup refer to #2 Install Docker).
Clone Isaac Sim ROS Workspace
Build the dockerfile:
cd IsaacSim-ros_workspaces

./build_foxy.sh
The minimal
foxy_wsneeded to run Isaac Sim is under build_ws/foxy/foxy_ws. Additional workspaces can also be created and built in this dockerfile.Source the ROS 2 workspace:
source build_ws/foxy/foxy_ws/install/setup.bash
Run Isaac Sim from the same terminal, the sourced workspace contains the minimal ROS 2 Foxy dependencies needed to enable the ROS 2 bridge.
To use the dockerfile to build the workspace with Python3.10:
Clone Isaac Sim ROS Workspace.
Build the dockerfile:
cd IsaacSim-ros_workspaces

./build_humble.sh
The minimal
humble_wsneeded to run Isaac Sim is under build_ws/humble/humble_ws. Additional workspaces can also be created and built in this dockerfile.Source the ROS 2 workspace:
source build_ws/humble/humble_ws/install/setup.bash
Run Isaac Sim from the same terminal. The sourced workspace contains the minimal ROS 2 Humble dependencies needed to enable the ROS 2 bridge.
Running ROS in Docker Containers#
Note
Docker workflow is currently not supported on Windows (WSL2).
Install Rocker to simplify GUI Docker support for ROS.
Start the ROS container using Rocker.
rocker --nvidia --x11 --privileged --network host --name <container name> osrf/ros:humble-desktop-full-jammy
Note
Here
--privilegedand--network hostlet us communicate between the Isaac Sim and ros docker containers, while also allowing us to launch rviz.--name <container name>allows us to refer to the container with a fixed name for this tutorial.Note
VPN might need to be disabled on first run of this command so rocker can properly build the docker container and download/install apt-get dependencies.
Copy Isaac Sim
humble_wsfolder to running ROS container. Assuming you’ve already cloned Isaac Sim ROS Workspace Repository, navigate to the repository:docker cp humble_ws <container name>:/root/humble_ws
To access the ROS functions inside the docker:
From a new local terminal, open the existing docker:
docker exec -it <container name> bash
Once inside the Docker container, set the
FASTRTPS_DEFAULT_PROFILES_FILEenvironment variable per instructions in Enabling the ROS Bridge Extension, and source the Docker’s ROS 2:source /opt/ros/humble/setup.sh
To install additional dependencies or packages, build workspaces, and source the workspace after it’s built:
cd /root/humble_ws
apt-get update
apt-get install <package name humble version>
rosdep install --from-paths src --ignore-src --rosdistro=humble -y
source /opt/ros/humble/setup.sh
colcon build
source install/local_setup.bash
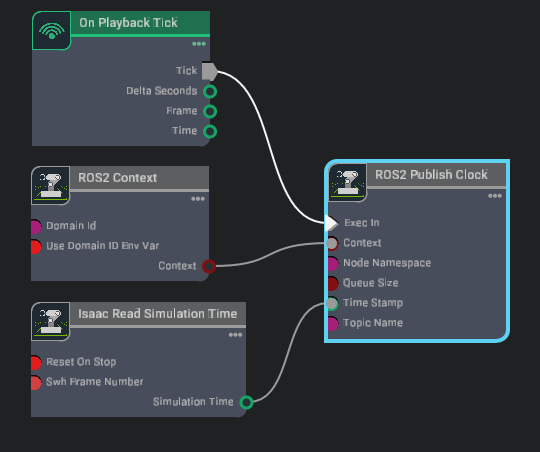
You can setup a simple publisher of clocks inside Isaac Sim using the omnigraph node as shown below. Press play in the simulator. Open a separate terminal, open the docker, set the FASTRTPS_DEFAULT_PROFILES_FILE environment variable, source ROS 2. ros2 topic echo /clock should print the timestamps coming from Isaac Sim.
Install Rocker to simplify GUI Docker support for ROS.
Start the ROS container using Rocker:
rocker --nvidia --x11 --privileged --network host --name <container name> osrf/ros:noetic-desktop-full-focal
Note
Here
--privilegedand--network hostenable communication between the Isaac Sim and ROS Docker containers, while also allowing for launch of rviz.--name <container name>provides a fixed name reference for the container for this tutorial.Note
VPN might need to be disabled during the first run of this command so that Rocker can properly build the Docker container, download, and install apt-get dependencies.
Copy the Isaac Sim
noetic_wsfolder to a running ROS container. Assuming you’ve already cloned Isaac Sim ROS Workspace Repository, navigate to the repository:docker cp noetic_ws <container name>:/root/noetic_ws
To access the ROS functions inside the Docker:
From a new local terminal, open the existing Docker:
docker exec -it <container name> bash
Once inside the Docker container, source the Docker’s ROS:
source /opt/ros/noetic/setup.sh
If you must start the ROS master, after sourcing ROS:
roscore
To install any dependencies, build workspaces, and source the new workspace:
cd /root/noetic_ws
apt-get update
apt-get install <package name noetic version>
rosdep install --from-paths src --ignore-src --rosdistro=noetic -y
source /opt/ros/noetic/setup.sh
catkin_make
source devel/setup.bash
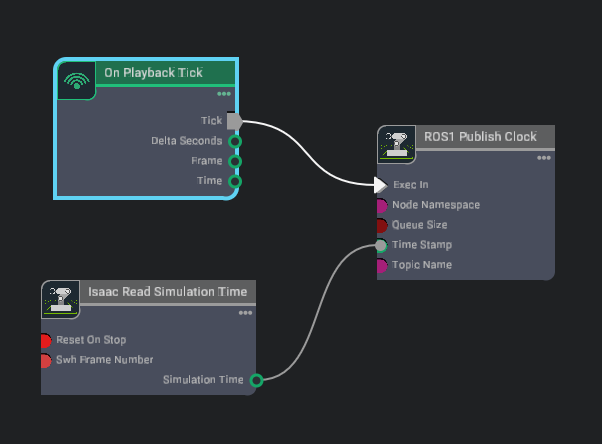
You can setup a simple publisher of clocks inside Isaac Sim using the omnigraph node as shown below. With roscore running inside the Docker, press play in the simulator. Open a separate terminal, open the Docker, source ROS. Verify that rostopic echo /clock prints the timestamps coming from Isaac Sim.
ROS Tutorials#
To start using Omniverse Isaac Sim with ROS 2, complete the ROS 2 Tutorial series starting with URDF Import: Turtlebot.
To start using Omniverse Isaac Sim with ROS, complete the ROS Tutorial series starting with URDF Import: Turtlebot.