Driving TurtleBot via ROS messages#
The ROS bridge comes with a few popular rostopics that are packaged for ease of use. More details are in the ROS & ROS2 Bridge. Here we will focus on the procedures in using them.
The steps to connect Omniverse Isaac Sim to ROS can be done entirely in the UI, scripting inside the extension workflow, or scripting inside the standalone Python workflow. Refer to Isaac Sim Workflows for details of different workflows. To start, we will be demonstrating the UI method using existing Omnigraph nodes. Introductions of other methods are listed in the Further Reading section.
Learning Objectives#
In this example, we will enable a Turtlebot3 to drive around and subscribe to a twist message through the ROS network. We will learn to
Add controllers to Turtlebot3
Introduce the ROS bridge and ROS OmniGraph (OG) nodes
Setup the robot to be driven by a ROS Twist message
Getting Started#
Prerequisite
Having a rigged Turtlebot, or completed URDF Import: Turtlebot.
ROS bridge is enabled.
roscoreis running
Main Concepts#
Driving the Robot#
At the end of URDF Import: Turtlebot, the robot has drivable joints, and when given a target position or velocity, it can move the joints to match the targets. However, in most cases, you want to be controlling the vehicle speed and not the individual wheel speed. Therefore we first want to add the appropriate controllers. In the case of Turtlebot3, a wheeled-robot with two wheels, the nodes needed are Differential Controller and Articulation Controller. The Differential Controller node convert vehicle speed to wheel speed, and Articulation Controller node send the commands to the joint drives.
Detailed instructions on how to connect these nodes can be found in OmniGraph for a similar robot (NVIDIA Jetbot), so we won’t go into details here.
Connecting to ROS#
As part of our ROS bridge, we provide nodes that are subscribers and publisher of specific messages, some utility nodes such as keeping track of simulation time. You will also find “Helper Nodes”, which are gateways to more complex Omnigraphs that we abstract away from users.
To establish a ROS bridge for a specific topic, the steps can be generalized to the following:
open an action graph
add the OG nodes relevant to the desired rostopics
modify any properties as needed
connect the data pipeline
The ROS publisher nodes are where Omniverse Isaac Sim data gets packaged into ROS message and sent out to the ROS network, and subscriber nodes are where ROS messages are received and allocated to the corresponding Omniverse Isaac Sim parameters. So to use them, we simply have to pipe in and out the necessary data, as directed by the properties of each node. If you need to publish or subscribe to messages beyond the ones we provided, checkout Custom Message, Omnigraph: Custom Python Nodes, or Omnigraph: Custom C++ Nodes for ways to integrate custom messages.
Putting it Together#
Building the Graph#
Open Visual Scripting: Window > Visual Scripting > Action Graph. An Action Graph window will appear on the bottom, you can dock it wherever that’s convenient.
Click on the New Action Graph Icon in middle of the Action Graph Window.
Inside the Action Graph window, there is a panel on the left hand side with all the OmniGraph Nodes (or OG nodes). All ROS related OG nodes are listed under Isaac Ros. You can also search for nodes by name. To place node into the graph, simply drag it from the node list into the graph window.
Build a graph that matches the one below. Note for the Make Array node, use the
+/-buttons in the property tab to add additional inputs.
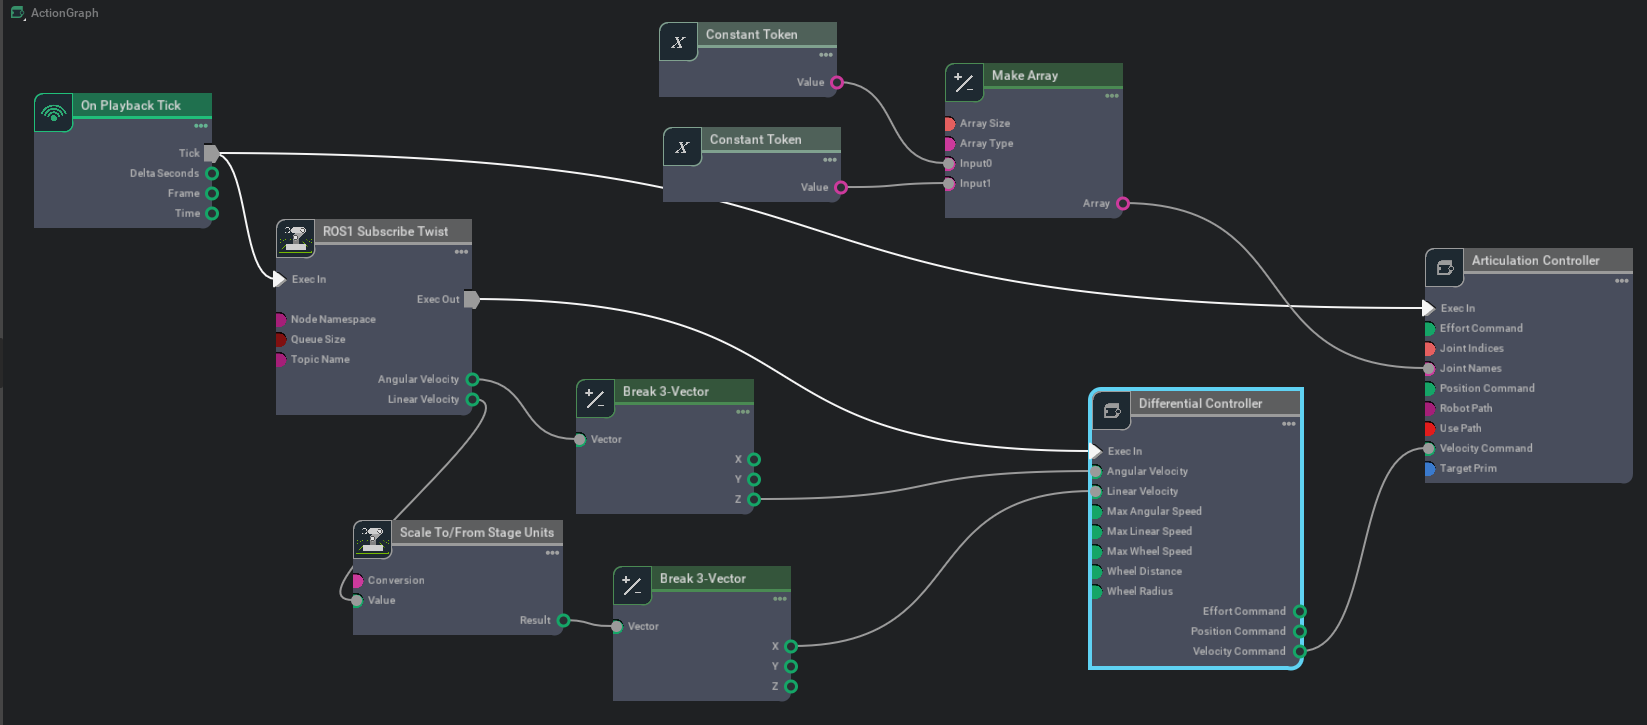

Graph Explained#
On Playback Tick Node: Producing a tick when simulation is “Playing”. Nodes that receives ticks from this node will execute their compute functions every simulation step.
ROS Subscribe Twist Node: Subscribing to a Twist message. Specify the Rostopic’s name
/cmd_velin the topicName field in its Property Tab.Note the subscriber nodes often have a Exec Out field. This act similar to a tick and will send a signal when a message is received by the subscriber. In this case, we want to only calculate the differential commands when a new twist message arrives. Therefore the Differential Node’s Exec In is ticked by the output of the subscriber node and not by On Playback Tick.
Scale To/From Stage Unit Node: Convert assets or inputs to stage unit.
Break 3-Vector Node: The output of the Twist subscriber node is linear and angular velocities, both 3-dimensional vectors. But the input of the differential controller node only takes a forward velocity and rotation velocity in z-axis, therefore we need to decompose the array and extract the corresponding elements before feeding them into the differential controller node.
Differential Controller Node: This node receives desired vehicle speed and calculates the wheel speed of the robot. It needs the wheel radius and distance between the wheels to make that calculation. It can also receive optional speed limit parameters to cap off wheel speed. Type in the property tab the wheel radius, the distance between the wheels, and the maximum linear speed for the vehicle as seen in table below to match the Turtlebot.
Field
Value
Max Linear Speed
0.22
Wheel Distance
0.16
Wheel Radius
0.025
Articulation Controller Node: This node is assigned to a target robot, then takes in the names or the indices of the joints that needs to be moved, and move them by the commands given in either Position Commands, Velocity Commands, or Effort Commands.
Note the Articulation Controller node is ticked by On Playback Tick. So that if no new Twist message arrives, it will continue to execute whatever command it had received before.
To assign the Articulation Controller node’s target to be the Turtlebot. In the property tab, unselect Use Path, and click on Target for the Prim to find Turtlebot prim in the popup box. Make sure the robot prim you select is also where the Articulation Root API is applied. Sometimes it is the robot’s parent prim. But often times for mobile robots, it is the chassis prim instead. If you used the URDF importer following our previous tutorial, the Articulation Root API can be found on
turtlebot3_burger/base_footprint. More about Articulation API can be found in Add Articulation.
To put the names of the wheel joints in an array format, type in the names of the wheel joints inside each of the Constant Token nodes, and feed the array of the names into the Make Array Node. The names of the joints for the Turtlebot are
wheel_left_jointandwheel_right_joint.If you are wondering why not put the names in Constant String node, it’s because OmniGraph does not have string-array data type, therefore if strings needed to be put in an array format to be used by a node, it needs to be token type instead.
Verifying ROS connections#
Press Play to start ticking the graph and the physics simulation.
In a separate ROS-sourced terminal, check that the associated rostopics exist with
rostopic list./cmd_velshould be listed in addition to/rosoutand/rosout_agg.Now that a twist subscriber is setup, a twist message can be published to /cmd_vel topic to control the robot. In a separate ROS-sourced terminal, send drive forward command:
rostopic pub /cmd_vel geometry_msgs/Twist '{linear: {x: 0.2, y: 0.0, z: 0.0}, angular: {x: 0.0,y: 0.0,z: 0.0}}'
To stop the robot, send a zero velocity command:
rostopic pub /cmd_vel geometry_msgs/Twist '{linear: {x: 0.0, y: 0.0, z: 0.0}, angular: {x: 0.0,y: 0.0,z: 0.0}}'
To make it easier for us to move the Turtlebot around, download the ROS keyboard interface teleop-twist-keyboard and enable using the keyboard to publish twist messages.
rosrun teleop_twist_keyboard teleop_twist_keyboard.py
Alternatively, you can also setup keyboard device interface inside OmniGraph. More of that can be found in OmniGraph: Input Devices
Troubleshooting#
If you are using the simple_room environment, make sure your robot is on the ground. The table has a different property therefore making it hard for the robot to move on it. To change properties of either the ground or the wheels, go to Assemble a Simple Robot.
Summary#
This tutorial covered the following topics:
Drive the robot using the Differential Controller and the Articulation Controller
Introduction to ROS Bridge omnigraph nodes
Subscribing to a ROS Twist message
Next Steps#
Continue on to the next tutorial in our ROS Tutorials series, Cameras, to learn how to add cameras and publish ground truth synthetic perception data through rostopics.
Further Reading#
Scripting inside the extension workflow is introduced in Joint Control: Extension Python Scripting.
Scripting using the standalone Python workflow is introduced in ROS Bridge in Standalone Workflow
Scripting OmniGraph nodes is introduced in OmniGraph: Python Scripting.
Building custom Omnigraph Python nodes is introduced in Omnigraph: Custom Python Nodes
Building custom Omnigraph C++ nodes is introduced in Omnigraph: Custom C++ Nodes