ROS2 Setting Publish Rates#
Learning Objectives#
In this example, we will learn to
Set the simulation frame rate in Isaac Sim.
Set different publish rates for various ROS2 publishers simultaneously.
Getting Started#
Important
Make sure to source your ROS 2 installation from the terminal before running Isaac Sim. If sourcing ROS 2 is a part of your bashrc then Isaac Sim can be run directly.
Prerequisite
Completed the URDF Import: Turtlebot, ROS2 Cameras, RTX Lidar Sensors, and ROS2 Transform Trees and Odometry tutorials.
Completed ROS and ROS 2 Installation so that the necessary environment variables are set and sourced before launching Omniverse Isaac Sim, and ROS2 extension is enabled.
Setting Publish Rates with OmniGraph#
Action Graphs are ticked every simulation frame and therefore OmniGraph nodes are bound to the factors of the simulation rate. This tutorial will explain how to configure publishing ROS2 nodes at these factors of simulation.
Isaac Simulation Gate Node#
This section will demonstrate the Isaac Simulation Gate node which can be used to tick OmniGraph every certain frames as defined. An IMU publisher will be manually setup with this OmniGraph node.
Open the turtlebot simple room scene
Isaac/Samples/ROS2/Scenario/turtlebot_tutorial.usd.Select the prim at
/World/turtlebot3_burger/imu_linkand then create an IMU sensor by going to Create -> Isaac -> Sensors -> Imu Sensor. The Imu sensor should now be created under the imu_link prim.Create a new Action Graph inside turtlebot_burger prim and name it ActionGraph_imu. To do this, select the prim at /World/turtlebot3_burger and then create an Action Graph by going to Create -> Visual Scripting -> Action Graph.
Make the graph for IMU including the simulation gate node and attach the graph as shown below.
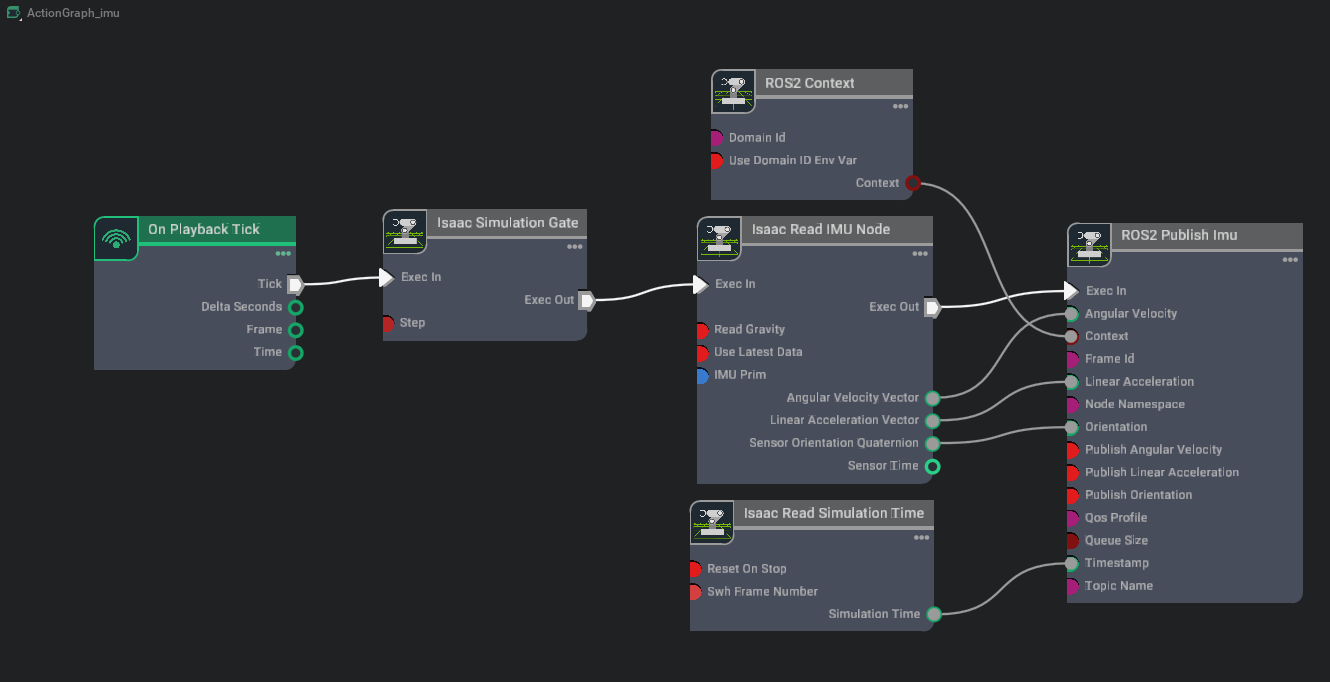
Set the following attributes for each node as such:
In the Property tab for the Isaac Simulation Gate node:
Set the step attribute to 2. Having a step size of 2 means that downstream nodes will be ticked every other frame.
In the Property tab for the Isaac Read IMU Node:
Add the IMU sensor prim
/World/turtlebot3_burger/imu_link/Imu_Sensorto its imuPrim input field.
Setting Publish Rates for Nodes Within SDG Pipeline#
In the previous section, we added in the Isaac Simulation Gate Node in a OmniGraph ROS2 publishing pipeline. For Camera and RTX Lidar sensors, this is configured automatically within the SDG pipeline. To modify the publish rates for each individual publisher, the frameSkipCount parameter inside each ROS2 Helper node can be modified.
Open the Lidar Action Graph /World/ActionGraph_lidar. Select the Ros2RTXLidarHelper node (/World/ActionGraph_lidar/ros2_rtx_lidar_helper) and in the property panel set value for frameSkipCount to 2.
This will skip 2 frames between publishing and automatically set the step attribute of the Isaac Simulation Gate node connected within the SDG Pipeline to a value of 11. (Skipping 11 frames is equivalent to publishing every 12 frames).
Open the camera Action Graph /World/ActionGraph_camera. As we don’t need to render 2 cameras in this tutorial, disable the second camera render product by unchecking enabled attribute in /World/ActionGraph_camera/isaac_create_render_product_01.
In the property panel of the Camera Helper node setup for rgb images, /World/ActionGraph_camera/ros2_camera_helper, set the value for frameSkipCount to 3.
This will skip 3 frames between publishing and automatically set the step attribute of the Isaac Simulation Gate node connected within the SDG Pipeline to a value of 4. (Skipping 3 frames is equivalent to publishing every 4 frames).
We don’t need to publish depth images from Camera1 for this tutorial. Disable the camera helper for depth images by unchecking “enabled” attribute in /World/ActionGraph_camera/ros2_camera_helper_02.
In the property panel of the Camera Info Helper node setup for camera info, /World/ActionGraph_camera/ros2_camera_info_helper, set the value for frameSkipCount to 5.
This will skip 5 frames between publishing and automatically set the step attribute of the Isaac Simulation Gate node connected within the SDG Pipeline to a value of 6. (Skipping 5 frames is equivalent to publishing every 6 frames).
Setting simulation frame rates#
In the above sections, we have configured the ActionGraphs to tick certain nodes at various rates. Since all Action Graphs are capped to the maximum frame rate defined for simulation rate, we can modify this simulation frame rate using the Python interface.
Set the rate of simulation by running python code in the script editor. Open the script editor by going to Window -> Script Editor.
There are 2 way to set simulation rates:
Changing the carb setting. Run the script below after playing the scene.
# Change the carb settings. This is not persistent between when stopping and replaying

import carb
physics_rate = 60 # fps
carb_settings = carb.settings.get_settings()
carb.settings.get_settings().set_bool("/app/runLoops/main/rateLimitEnabled", True)
carb.settings.get_settings().set_int("/app/runLoops/main/rateLimitFrequency", int(physics_rate))
carb.settings.get_settings().set_int("/persistent/simulation/minFrameRate", int(physics_rate))
Changing SetTimeCodesPerSecond and set_target_framerate
Note
The Time Codes Per Second can only be set once before a scene is played. If you would like to change this value, please reload a scene first.
# This must be called after a stage is loaded. Timeline must be stopped when setting SetTimeCodesPerSecond and set_target_framerate. This is persistent between stopping and replaying:
import omni
physics_rate = 60 # fps

timeline = omni.timeline.get_timeline_interface()
stage = omni.usd.get_context().get_stage()
timeline.stop()

stage.SetTimeCodesPerSecond(physics_rate)
timeline.set_target_framerate(physics_rate)

timeline.play()
Run either snippet in script editor and notice its effect on the simulation rate. You can enable the FPS display by going to the viewport show/hide menu (eye) -> Heads Up Display -> FPS.
Try modifying the physics_rate to a different value and check the FPS reading.
Important
Keep in mind that both methods are setting the target frame rate of simulation. Actual frame rate is dependant on your machine’s performance.
Checking ROS 2 Publish Rate#
Hit Play to start simulation and check the publish rate for each ROS topic using the command:
ros2 topic hz /topic_namewhere /topic_name is replaced by each sensor topic listed below. The publish rates are estimated. On a high-performance machine the maximum fps would be closer to physics_rate that was set in the previous section (default of 60Hz). For each topic, their rates should be factors of the maximum simulation FPS (according to the execution steps that we defined earlier)./clock: should publish at same rate as the simulation FPS (~60hz default).
/imu: should publish at rate of sim_fps/2 (~30 hz)
/laser_scan: should publish at rate sim_fps/12 (~5 hz)
/camera_1/rgb/image_raw: should publish at sim_fps/4 (~15 Hz)
/camera_1/rgb/camera_info: should publish at sim_fps/6 (~10 hz)
The file which contains all of the steps in this tutorial can be opened from
Isaac/Samples/ROS2/Scenario/turtlebot_tutorial_multi_sensor_publish_rates.usd. After opening the file, remember to run the steps in Setting simulation frame rates to set the target simulation rate.Note
If you observe that the /camera_1/rgb/image_raw topic is publishing at a slower rate than anticipated, it may be because the large size of each image message is causing bottlenecks in network traffic or DDS queue management. To improve the publish rate, you can try reducing the dimensions of the render product resolution. This can be done by going to the render product node that is attached to the image publisher /World/ActionGraph_camera/isaac_create_render_product and modifying the dimensions before replaying the scene.
Troubleshooting#
If you observe much different publish rates from the target simulation frame rate, try the following:
Try running Isaac Sim with factory settings to clear any persistent simulation frame rate settings:
./isaac-sim.sh --reset-userCheck your computer’s CPU usage to identify bottlenecks. If Isaac Sim exhibiting incredibly high usage try running with Fabric enabled:
./isaac-sim.fabric.sh --reset-userImportant
The above command is experimental and not all functionality of Isaac Sim is supported there. However you might see better overall performance. You only need to use the
--reset-userflag the first time running with Fabric.
Summary#
This tutorial covered:
Two ways to set the simulation frame rate in Isaac Sim using the python interface.
Set different publish rates for various ROS2 publishers in OmniGraph and within the SDG Pipeline.
Next Steps#
Continue on to the next tutorial in our ROS2 Tutorials series, ROS 2 Quality of Service (QoS) to learn about setting QoS Profiles for ROS 2 OmniGraph nodes in Omniverse Isaac Sim.