Scene Generation with SceneBlox#
The goal of this tutorial is to provide an example of generation with SceneBlox. The application is a toy that builds a labyrinth. The labyrinth consists of 4 kind of pieces: intersections, corridors, corners and dead-ends, which need to connect in a consistent way. The tile randomization spawns some obstacles in certain tiles.
The tutorial USD’s are stored in /Isaac/Samples/Scene_Blox/Tutorial/.
Labyrinth Generation#
To see the generation in action without going into the details, try the pre-defined configuration files.
To generate five 9x9 labyrinth variants from the repository root folder, run the following script with the following arguments. This generates USD scenes in the given folder and displays the solving process of the grid.
./python.sh tools/scene_blox/src/scene_blox/generate_scene.py \
    <omniverse://path/to/generation/folder/> \
    --grid_config tools/scene_blox/parameters/labyrinth/rules.yaml \
    --generation_config tools/scene_blox/parameters/labyrinth/generation.yaml \
    --rows 9 --cols 9 --variants 5 \
    --constraints_config tools/scene_blox/parameters/labyrinth/constraints.yaml \
    --collisions
positional arguments for generate_scene.py:
save_path: Folder within which to generate the scenes. For example, omniverse://path/to/generation/folder/.
optional arguments for generate_scene.py:
--variantsNumber of variants of the scenes to be generated--grid_configPath to the YAML containing the combination rules and tile size--generation_configPath to the YAML containing generation configuration (base tile USD and randomization)--constraints_configPath to the YAML with the initial grid constraints--rowsNumber of rows for the generated grids, a value greater than 3 is recommended--colsNumber of cols for the generated grids, a value greater than 3 is recommended--add_outer_boundaryAdd building border (specific for parking scenes)--displayAdd a display showing the grid solving process--collisionsCheck for collisions on objects generated that have both collisions and rigid body physics enabled--units_in_metersSet the scene unit conversion (important for physics scene)
Defining the Tiles#
To define the basics of the tiles, including where they are stored and their size, edit the configuration file:
tools/scene_blox/parameters/labyrinth/generation.yaml
This configuration file lists all tile types with their identifiers, where they are stored and their size.
tile_size: 5.0
fixed_prims:
    - prim_path: /Environment/Sky
        usd: /NVIDIA/Assets/Skies/Dynamic/CumulusHeavy.usd
        semantic: sky
        world_pose:
        position: [0, 0, 0]
        orientation: [90, 0, 0]
cross:
  usd: /Isaac/Samples/Scene_Blox/Tutorial/cross.usd
corridor:
  usd: /Isaac/Samples/Scene_Blox/Tutorial/corridor.usd
corner:
  usd: /Isaac/Samples/Scene_Blox/Tutorial/corner.usd
dead_end:
  usd: /Isaac/Samples/Scene_Blox/Tutorial/dead_end.usd
This code example also adds a fixed sky, for lighting.
Defining the Rules#
You must define the tile combination rules that defines what tiles can be next to each other and tile orientation.
To facilitate rule definition, the following helper scripts are provided:
tools/scene_blox/src/scene_blox/rules_builder.py
 1  usage:
 2    rules_builder.py [-h] [--rules_config RULES_CONFIG] stage save_path tile_size
 3
 4  positional arguments:
 5    stage                 Path to the stage used as an example for rule generation
 6    save_path             Path where the generated YAML is saved
 7    tile_size             Size of a tile (in scene units)
 8
 9  optional arguments:
10    --rules_config       If not empty contains tile equivalence
tools/scene_blox/src/scene_blox/rules_combiner.py
1usage:
2  rules_combiner.py [-h] [--config_files CONFIG_FILES [CONFIG_FILES ...]] save_path
3
4positional arguments:
5  save_path             Path to save the combined rules file.
6
7optional arguments:
8  --config_files CONFIG_FILES [CONFIG_FILES ...] All files to be combined
When defining rules, you can leverage the fact that the rules are given in pairs. For example, start by building an example scene with the rules for the intersection tile, then when building the example scene for corridor there is no need to include intersection and so on.
The scenes for the example, in the order they were built, are:
/Isaac/Samples/Scene_Blox/Tutorial/labyrinth_example_cross.usd
/Isaac/Samples/Scene_Blox/Tutorial/labyrinth_example_corridor.usd
/Isaac/Samples/Scene_Blox/Tutorial/labyrinth_example_corner.usd
/Isaac/Samples/Scene_Blox/Tutorial/labyrinth_example_dead_end.usd
Notice how the number of tile types decreases as we go, until there is only one tile type for the dead-ends.
To build an example scene for a tile type:
Place the compatible tiles at the desired spacing (here 5m). If tiles are further apart than the tile size, they are not considered for building the rules.
Add new tiles as references by using drag and drop.
Note
Do not modify the tile name because it is used to infer the tile types.
Generate the corresponding rules files by running
./python.sh tools/scene_blox/src/scene_blox/rules_builder.py.
All of the generated rules files can be found in
tools/scene_blox/parameters/labyrinth/rules_*.yaml.
After scenes are generated, combine them into one single rules configuration file using
tools/scene_blox/src/scene_blox/rules_combiner.py.
Running rules_combiner.py can take several minutes if there are many tile types, but it is the best way to make sure
that no rules are forgotten.
Now we have a minimum configuration for use to generate labyrinths.
Constraining the Labyrinth#
The generated labyrinths are always consistent, but you might want to add some constraints to
the generated scenes. This section illustrates how these constraints work. You can
use tools/scene_blox/parameters/labyrinth/constraints.yaml for the full result, comment out sections if
you want to see the progressive effect of the constraints.
Let’s start by having two corners of the labyrinth be incoming corridors.
# Force corridor on (0, 0)
- type: restrict_type
  identifiers: ["corridor"]
  area:
    rows: [[0, 0]]
    cols: [[0, 0]]
- type: restrict_rotation
  identifier: ["corridor"]
  rotations: [0]
  area:
    rows: [[0, 0]]
    cols: [[0, 0]]
# Force corridor on (-1, -1)
- type: restrict_type
  identifiers: ["corridor"]
  area:
    rows: [[-1, -1]]
    cols: [[-1, -1]]
- type: restrict_rotation
  identifier: ["corridor"]
  rotations: [0]
  area:
    rows: [[-1, -1]]
    cols: [[-1, -1]]
This restricts the two corners to one possibility. In successful generations the corners are always there.
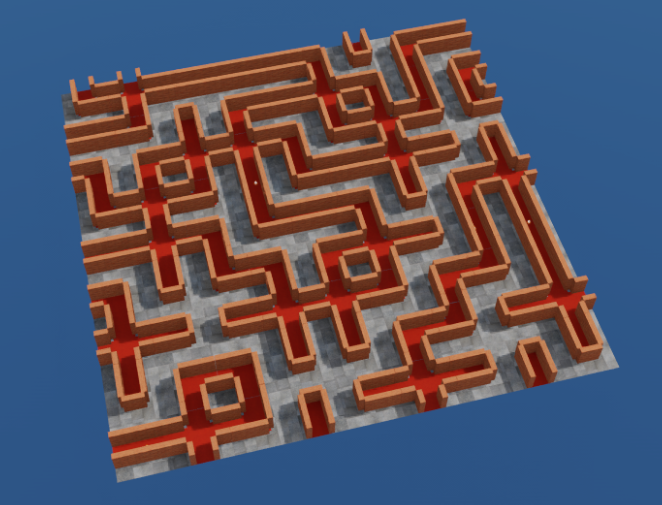
Example of generated scene with top and bottom corner constraints#
To make the labyrinth easy to navigate, we restrict the number of dead ends to 4:
# No more than 4 dead ends
- type: restrict_count
  identifiers: ["dead_end"]
  max_count: [4]
  area:
    rows: [[0, -1]]
    cols: [[0, -1]]
Any generated labyrinth has at most 4 dead ends.
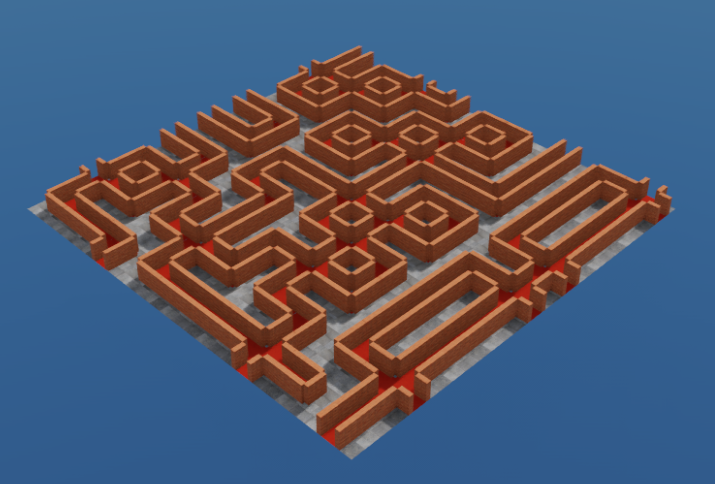
Example of a generated scene with less dead ends#
To make the labyrinth less easy to escape, by making sure no tile on the border, except the corner ones, allow for an exit, constrain the border tile rotation of corners and corridors to prevent outgoing tiles, and exclude intersections and dead ends.
# Prevent dead ends and crosses on the borders
- type: exclude_type
  identifiers: ["dead_end", "cross"]
  area:
    rows: [[0, -1], [0, -1], [0, 0], [-1, -1]]
    cols: [[0, 0], [-1, -1], [0, -1], [0, -1]]
# Prevent outgoing corridors
- type: restrict_rotation
  identifier: ["corridor"]
  rotations: [1, 3]
  area:
    rows: [[0, 0]]
    cols: [[1, -2]]
- type: restrict_rotation
  identifier: ["corridor"]
  rotations: [1, 3]
  area:
    rows: [[-1, -1]]
    cols: [[0, -2]]
- type: restrict_rotation
  identifier: ["corridor"]
  rotations: [0, 2]
  area:
    rows: [[0, -1]]
    cols: [[0, 0]]
- type: restrict_rotation
  identifier: ["corridor"]
  rotations: [0, 2]
  area:
    rows: [[0, -1]]
    cols: [[-1, -1]]
# Prevent outgoing corners
- type: restrict_rotation
  identifier: ["corner"]
  rotations: [2, 3]
  area:
    rows: [[0, -1]]
    cols: [[0, 0]]
- type: restrict_rotation
  identifier: ["corner"]
  rotations: [0, 1]
  area:
    rows: [[0, -1]]
    cols: [[-1, -1]]
- type: restrict_rotation
  identifier: ["corner"]
  rotations: [1, 2]
  area:
    rows: [[0, 0]]
    cols: [[0, -1]]
- type: restrict_rotation
  identifier: ["corner"]
  rotations: [0, 3]
  area:
    rows: [[-1, -1]]
    cols: [[0, -1]]
This results in consistent labyrinths with exits only at the corners. The generation handles only local constraints and consistency, so there is no guarantee that there is a path from one corner to another or that there are no disconnected paths.
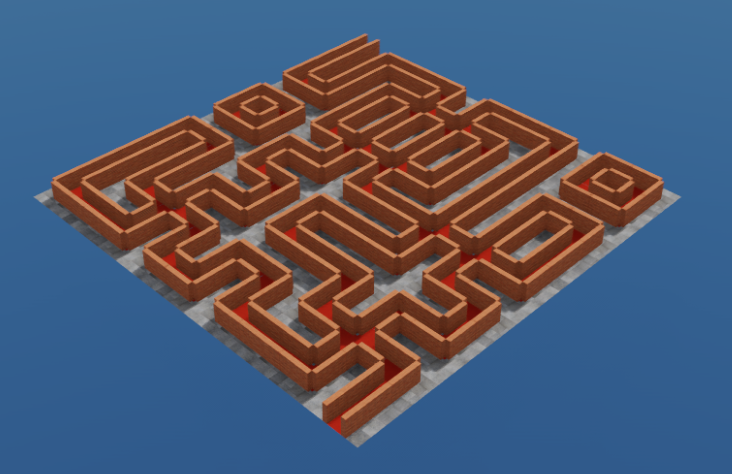
Example of a constrained labyrinth with no exits out of the corners#
Adding Randomization#
Add some randomization to the scene by spawning obstacles on some tiles.
The final configuration files for generation and for randomization are in tools/scene_blox/parameters/labyrinth.
Spawn cones in the corridor tiles. Spawn up to 3 cones, each with
a probability of 0.33 to spawn. The configuration file is the following
(tools/scene_blox/parameters/labyrinth/hazards_corridors.yaml):
root_prim: obstacles
generated:
  - name: cone
    path: cone
    semantic: obstacle
    spawn_proba: 0.33
    spawn_count: 3
    usd_config:
      root: /Isaac/Environments/Simple_Warehouse/Props/
      search_depth: 0
      filter: S_TrafficCone.*
    position:
      base: [0, 0, 0]
      noise:
        type: normal
        params:
          mean: [0, 0, 0]
          stddev: [1.0, 0.25, 0]
    orientation:
      base: [0, 0, 0]
      noise:
        type: uniform
        params:
          low: [0, 0, -180]
          high: [0, 0, 180]
    scale: [0.01, 0.01, 0.01]
    physics:
      collision: convexHull
      rigid_body: true
This example enables physics collision for the cones. It also adjusts the scale of the asset and adds noise to the position and orientation. If collision check is enabled, the cones do not overlap with anything in collision when they are added to the scene, but if not, there is no guarantee.
Add some obstacle piles to the dead ends (relative paths are obstacle_pile_1.yaml and obstacle_pile_2.yaml). Those piles are mutually exclusive, so in the generation file the selection is split between the two.
dead_end:
  usd: /Isaac/Samples/Scene_Blox/Tutorial/dead_end.usd
  generation:
    - config: ["obstacle_pile_1.yaml", "obstacle_pile_2.yaml"]
      weights: [0.5, 0.5]
While spawning the obstacle pile, collision to the different objects is added in the pile, and not the pile itself, by using the apply_children boolean.
root_prim: obstacles
generated:
  - name: pile
    path: pile
    semantic: obstacle
    usd_config:
      root: /Isaac/Samples/Scene_Blox/Tutorial/
      search_depth: 0
      filter: obstacle_pile.usd
    position:
      base: [0, 0, 0]
    orientation:
      base: [0, 0, 0]
    physics:
      apply_children: true
      collision: convexHull
The final generation file is the following:
tile_size: 5.0
fixed_prims:
  - prim_path: /Environment/Sky
    usd: /NVIDIA/Assets/Skies/Dynamic/CumulusHeavy.usd
    semantic: sky
    world_pose:
      position: [0, 0, 0]
      orientation: [90, 0, 0]
cross:
  usd: /Isaac/Samples/Scene_Blox/Tutorial/cross.usd
  generation:
    - config: hazards_corridors.yaml
corridor:
  usd: /Isaac/Samples/Scene_Blox/Tutorial/corridor.usd
  generation:
    - config: hazards_corridors.yaml
corner:
  usd: /Isaac/Samples/Scene_Blox/Tutorial/corner.usd
  generation:
    - config: ["None", "obstacle_pile_2.yaml"]
      weights: [0.7, 0.3]
dead_end:
  usd: /Isaac/Samples/Scene_Blox/Tutorial/dead_end.usd
  generation:
    - config: ["obstacle_pile_1.yaml", "obstacle_pile_2.yaml"]
      weights: [0.5, 0.5]
The generation files are reused from one tile to another. Also, the “None” configuration for the corners, is used so that it is possible to have corners without obstacles while still keeping a spawn probability of 1 for the pile in the configuration file itself.
This creates labyrinths with a consistent setup and with obstacle randomization.
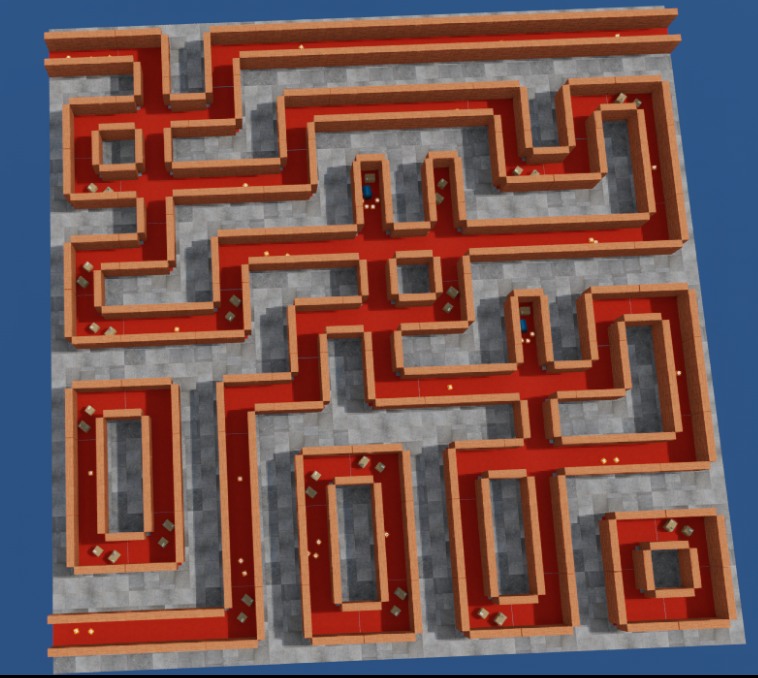
Example of a generated labyrinth with randomization#
Warehouse Generation Example#
The tools/scene_blox/parameters directory also contains a set of parameter files for warehouse generation.
./python.sh tools/scene_blox/src/scene_blox/generate_scene.py \
  <omniverse://path/to/generation/folder/> \
  --grid_config tools/scene_blox/parameters/warehouse/tile_config.yaml \
  --generation_config tools/scene_blox/parameters/warehouse/tile_generation.yaml \
  --cols 15 --rows 11 \
  --constraints_config tools/scene_blox/parameters/warehouse/constraints.yaml \
  --variants 1 --units_in_meters 1.0 --collisions
This sample syntax results in the following grid layout (warehouse walls are not shown):
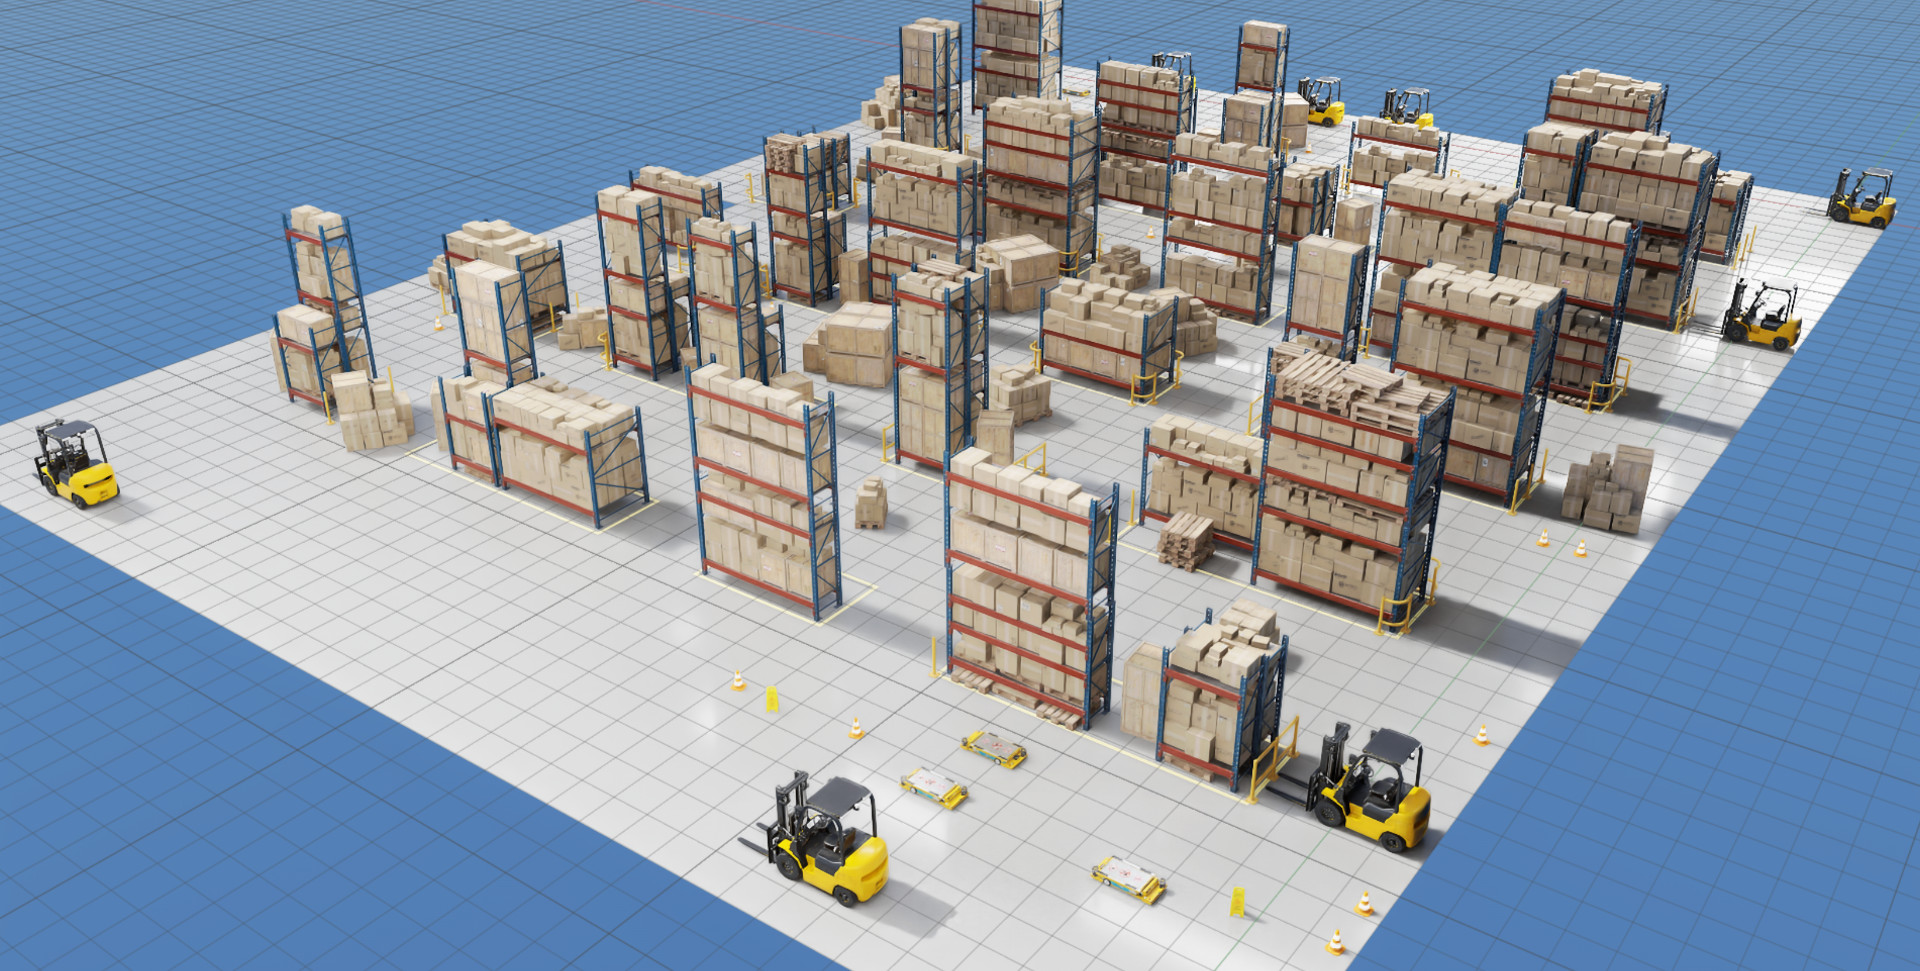
Example of a generated warehouse with randomization#
This generates full warehouses with closed-off extremities, containing a set of pre-defined cameras for observing the scenes, and which is generated using individual warehouse kit assets. The warehouse kit contains props including pallets, shelves, and also full building pieces that can be kitted together. The generation allows you to pick building variants and fill the building with a consistent set of assets: shelves of varying dimensions, pallets, piles of cardboard, cones and signs, guardrails. The constraints ensure that all the shelves are aligned in the same direction (parallel to the longitudinal axis of the warehouse) for a more consistent aspect.
The constraints are tuned for this specific number of rows and columns. The number of columns is constrained by the width of a the warehouse building and must stay at 15 to ensure that the whole width is filled. The number of rows is constrained by the width of the warehouse building kit pieces, which is tailored for two middle pieces and two end pieces. The number of rows must stay at 11 for a successful generation. The constraint file ensures that the middle pieces containing the actual building are spawned in the correct place.
If it is necessary to change the length of the warehouse, take care when updating the constraints file. You must ensure that the constraints file, the middle and end pieces are spawned correctly. One of the end pieces is actually not part of the wave function collapse generation, but rather added at the end so that the generated warehouse can be left with one end open for better visualization.
We highly recommended generating these scenes with collision check enabled, because the scene is busy and could result in overlapping props. In some rare cases, props could overlap and cause unstable physics behavior. To solve this, those props can be removed, modified by hand, or a new scene can be generated.
Replicator SceneBlox Manual#
The goal of SceneBlox is to help easily generate large and consistent simulation scenes. It creates scenes using individual tiles (the blocks) and combining them in a consistent grid with a set of simple rules (the scene). The generation happens in two steps:
the grid is filled with consistent tiles using an implementation of the wavefunction collapse method (Grid generation)
each tile type is randomized according to user input rules (Tile randomization)
SceneBlox makes several simplifying assumptions:
the generated world will be based on a rectangular grid of square tiles
all tiles have the same size
Grid Generation#
In the following section, the example scene to be generated is a rectangular grid of size rows x cols.
A tile corresponds to a position on the grid (i, j). Each tile contains a list of possibilities, called a superposition. A possibility is a combination of a tile type (a string) and orientation, a multiple of 90 degrees rotation counterclockwise. For example, road, orientation at 90 degrees. Each possibility is associated with a weight, which is used to sample when a tile is collapsed. Each tile has an associated entropy corresponding to the current weights.
Each possibility has a list of other compatible possibilities. The convention followed in SceneBlox to describe them is assuming the neighbor tile is situated to the right of the current tile. In summary, the information is the tile type and rotation, and a neighbor tile type and rotation. See Specifying tile combination rules for more details.
Wavefunction Collapse Algorithm#
For a description of the original algorithm, see wavefunction collapse algorithm. The principle is to progressively select possibilities for each tile, and propagate the choice to the rest of the grid by restricting the other tiles with the ones compatible. The process is repeated until a choice has been made for all tiles or a contradiction is reached.
The SceneBlox wavefunction collapse implementation starts with a grid where all tiles contain all possibilities in each tile superposition (respecting constraints, see Constraints). Then:
select a tile T with minimum entropy at random and make a choice in the superposition (collapse). The choice is done with the current weighting of possibilities.
for all direct neighbor tiles of T, restrict the superposition to the possibilities compatible with the collapsed one. For each neighbor, if that restriction resulted in a reduction of the superposition, add it to the list of tiles to be updated L.
Repeat the following steps on L until L is empty. For each tile listed in L, with the current superposition S, select all direct neighbors and:
update their superpositions. Keep only the possibilities that are compatible with at least one possibility of S.
if the update resulted in a reduction of the superposition, add the current tile to L.
Finally, repeat the collapse step until all tiles have a single possibility or a contradiction is reached (a tile has an empty list of possibilities).
If at any point a contradiction is reached, the collapsing backtracks, first by trying other possibilities for the current collapsed tile if possible, then by backtracking the previously collapsed tile until the very first one if necessary.
Specifying Tile Combination Rules#
To ensure consistency in the generated grid, each possibility has a series of compatible tile types and orientation. These rules are specified in a .yaml config that has the following format:
adjacencies:
  - id: example_tile
    neighbors:
    - neighbor_id: another_tile
      neighbor_rotation: 1
      self_rotation: 0
    - etc
  - id: another_tile
    ...
When checking for compatibility between possibilities, we need to go beyond the reference case with the reference tile on the left of the neighbor tile.
To go beyond the reference case, the compatibility between tiles is assumed to be independent of the rotation of the tile pair. When compatibility is independant of rotation, all possible neighbor positions can be reconstructed from a single compatible adjacency by rotating the pair by 90 degrees increment.
The following illustrates this concept by showing the reference pair on the left and rotated pairs on the right. The neighbor tile is respectively on top, left and bottom of the reference one.
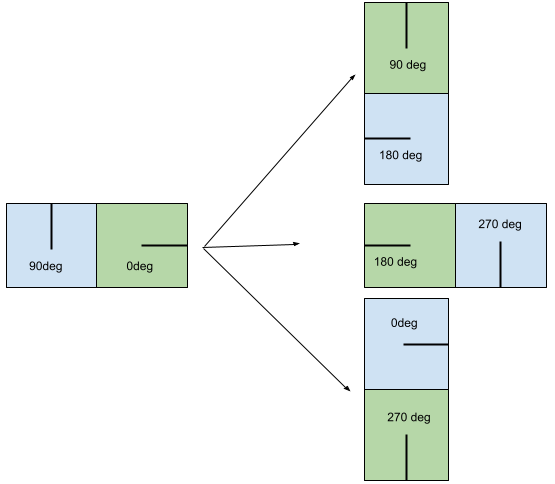
Example of top, left and bottom compatible tiles from a right compatible tile#
Specifying these rules can be tedious and error prone. We recommend that you generate them using an example scene. In this scene, you must provide examples of compatible tiles, not necessarily all connected but locally consistent. A dedicated script then retrieves the possible pairs and builds the rules file.
Constraints#
By default, the grid is initialized with all possibilities on each grid cell. However, there are cases where you might want to restrict the initial possibilities. For example, when generating an environment such as a warehouse, you need to ensure that border tiles are walls so that the final scene is closed off. Adding constraints to the generation is natural, the only change required is to restrict the superpositions before the collapse starts.
Supported restrictions are:
excluding a list of tile types
restructing to a list of tile types (equivalent to the above but might be easier to write)
restricting to a set of rotations for a certain tile type
restricting the total count of a certain tile type in an area
The constraints are applied to a certain zone in the grid that is expressed in row-column ranges. The ranges are inclusive for both start and end, and can be specified in negative from the last row or column for more genericity (eg -1 means the last row or column).
They are stored in a YAML file with the following format. The location format is always the same across restrictions.
- type: restrict_type
  identifiers: ["tile_type_a", "tile_type_b", ...]
  area:
    rows: [[start_row_0, end_row_0], [start_row_1, end_row_1], ...]
    cols: [[start_col_0, end_col_0], [start_col_1, end_col_1], ...]

- type: exclude_type
  identifiers: ["tile_type_a", "tile_type_b", ...]
  area:
    ...

- type: restrict_rotation
  identifier: ["tile_type"]
  rotations: [rotation_0, ...]
  area:
    ...

- type: restrict_count
  identifiers: ["tile_type_a", ...]
  max_count: [N, ...]
  area:
    ...
When constraints are added, the generation takes them into account by restricting the superpositions. The initial changes enforced by the constraints are applied and propagated to the grid, then the solving checks if a constraint is applied to each grid cell.
Omniverse USD Scene Generation#
After the grid is fully solved, the scene itself must be created for Omniverse. The base hierarchy of the scene is always be the same. All tiles are spawned as direct children of the /World/ prim and named after their position in the grid /World/tile_row_col. Tiles are created as Xform placed according to their position in the grid, and oriented as solved by the wavefunction collapse function. Each XForm is a reference to a base USD file, which contains the base tile without any randomization. During the randomization (see Tile randomization), prims might be added as children to the tile prims. A generated scene is created with a physics scene (respecting the given scene units for gravity) and a ground collision plane.
You can add prims independently of the tiles. For example, this can include a sky prim or cameras. Prims added this way might have a fixed world pose and a semantic class.
The base tile USD paths and the tile size are specified in a configuration file, with the following format:
tile_size: T # Size of the prim (in world units)
fixed_prims:
  - prim_path: /Path/To/Prim
    usd: omniverse://full/path/to/added.usd
    semantic: semantic class
    world_pose:
      position: [x, y, z]
      orientation: [rot_x, rot_y, rot_z] # In degrees
  - ...
tile_identifier_0:
  usd: omniverse://full/path/to/tile_0.usd
tile_identifier_1:
  usd: omniverse://full/path/to/tile_1.usd
...
Tile Randomization#
After the grid is fully solved, each tile is randomized according to your configuration. The randomization consists in spawning new assets and making some of their attributes vary. Several randomizations can be applied to a same tile, either in parallel or with a randomly selected choice (with a weighting).
Randomization Configuration#
A single randomization is able to spawn prims as children of a specific root prim. New prims are spawned as Xform references (pointing to another usd file). For each prim to be spawned, the user must configure:
the name under which to spawn the asset (it is automatically indexed by the number of instances of that asset).
the path where the asset is spawned (relative to the root prim).
a pool of USD files to choose from to be added as a reference. This pool specifies a root folder and search depth in an Omniverse server to query USD files. Then a regex filter is applied to the retrieved USD file names to find a match, and you can also specify an exclusion list.
a position and an orientation (in X-Y-Z axis rotations, in degrees), local to the parent prim. Both have a base value and a relative noise can be applied. Noise types are uniform, gaussian, and choice.
Optionally, you can configure:
the scaling to be applied to the prim, assumed to be 1 if not specified.
the probability of spawning that asset (assumed to be 1 if not specified). If the probability is less than 1, then a uniform distribution is sampled to determine if the asset is spawned or not.
the number of assets to be spawned, assumed to be 1 if not specified. If greater than 1, assets are indexed accordingly as they spawn. If the asset has a spawn probability, the test is applied N times, if N is the number of assets to spawn.
a semantic segmentation class.
variants to be chosen for a sub-prim with the possibility to restrict it to a list of variants.
physics. The prim can be spawned with applied collision of the chosen approximation and with rigid body physics enabled. Optionnally, you can chose to apply the settings to direct child prims of the spawned prims, which are also of the type Mesh. If you want rigid body physics, you can enable a collision check at generation. If enabled, after the pose has been sampled, a check is performed to verify that the spawned meshes do not enter into collision with any other mesh (except the ground plane). This ensures that there are no interpenetration or collision that might cause unstable behavior by the physics engine. A known limitation is that the check is performed when the prim is added, so there might be another prim added later with only collisions and not rigid body. The prim added later could cause instability by interpenetrating.
A randomization file can contain any number of prims to be spawned.
This configuration is stored in a YAML configuration file. The file has the following format:
root_prim: root_prim_name
generated:
  - name: some_prim
    path: relative/path/to/prim
    usd_config:
      root: omniverse://server/path/to/a/folder
      search_depth: d
      # Optional
      filter: some_regex
      # Optional
      exclude_list: ["some string", "another string"]
    position:
      base: [relative_x, relative_y, relative_z]
      # Optional
      noise:
        type: uniform # Can be either uniform / normal / choice
        params:
          low: [min_noise_x, min_noise_y, min_noise_z]
          max: [max_noise_x, max_noise_y, max_noise_z]
    orientation:
      base: [rot_x_degrees, rot_y_degrees, rot_z_degrees]
      # Noise parameters are the same as position
      type: normal # Can be either uniform / normal / choice
      params:
        mean: [mean_rot_x, mean_rot_y, mean_rot_z]
        stddev: [stddev_rot_x, stddev_rot_y, stddev_rot_z]
    # All following parameters are optional
    scale: [scale_x, scale_y, scale_z] # Assumed to be 1 if not specified
    spawn_proba: p # float between 0 and 1
    spawn_count: n # integer > 1
    semantic: semantic class
    physics:
      collision: convexDecomposition # Can be "none", "convexHull" or "convexDecomposition"
      rigid_body: true # Can be true or false, false if not specified
      apply_children: true # Can be true or false, false if not specified
  - name: some_other prim
    ...
Applying Multiple Randomizations to the Same Tile#
You can use multiple randomizations on a tile. The randomizations can be applied independently (in the order specified by you) or exclusively. The independent randomizations can help you regroup the spawns by category (for example: vegetation configuration) and potentially reuse them in different tiles if they have a compatible structure. The exclusive randomizations can create variants of a same tile, which are not compatible between themselves. For example, a parking spot tile may have a specific randomization for disabled parking, which would not be compatible with a no-parking zone. In that case, you can specify a list of randomizations to choose from, with associated weights.
You can skip adding randomization, by specifying “None”.
To specify randomizations, add them to the main generation configuration file (see Omniverse usd scene generation). A configuration file with randomizations looks like the following:
tile_size: T # Size of the prim (in world units)
fixed_prims:
  ...
tile_identifier_0:
  usd: omniverse://full/path/to/tile_0.usd
  generation:
    - config: path/to/config/file_0.yaml
    - config: path/to/config/file_1.yaml
    - config: ["path/to/config/file_a.yaml", "path/to/config/file_b.yaml"]
      weights: [0.7, 0.3]
tile_identifier_1:
  usd: omniverse://full/path/to/tile_1.usd
  generation:
    - config: ["path/to/config/file_a.yaml", "None"]
      weights: [0.1, 0.9]
...