Viewport#

Ref |
Option |
Description |
|---|---|---|
1 |
Viewport Settings |
Opens the Viewport Settings Menu |
2 |
Render Mode Settings |
The availability of these options depends on the renderer you’ve selected. |
3 |
Interface Visibility Settings |
Opens the Interface Visibility Settting Menu |
4 |
Camera Settings |
Opens the Camera Settings Menu |
5 |
Stage Lighting |
Opens the Stage Light Panel |
6 |
Select (Q) |
Press Q on the Keyboard |
7 |
Move (W) |
Move selected object |
8 |
Rotate (E) |
To rotate an object with rotate mode, select the object to rotate and either press E or click the Rotate button |
9 |
Scale (R) |
To change the size of an object using scale mode, select the object to scale and either press R or click the Scale button |
10 |
Snap (S) |
The snap tool is an extension that helps the user position objects by allowing them to “snap” to geometry, prims, the grid or specified increments. To enable or disable the snap tool, left click on the magnet icon either in the toolbar. You can also press the S key to toggle it on and off. |
Viewport Navigation#
Navigation Overview#
Navigation |
Description |
Image Reference |
|---|---|---|
Home |
Use the Home control to bring the camera back to where the scene started. |
|
Orbit |
Rotate the camera around a point by using the Orbit control. It’s like circling around an object while keeping it in view. |
|
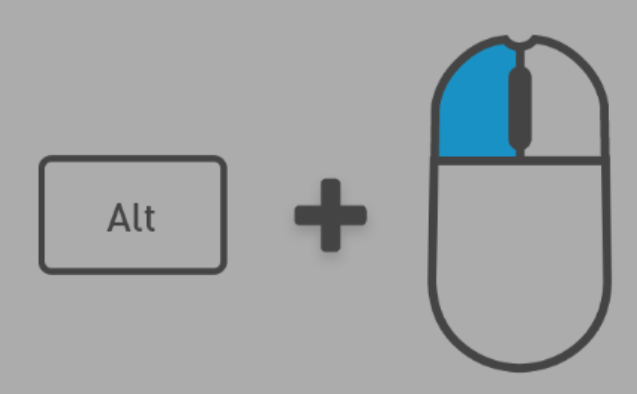
Look |
To Orbit, choose an object with the focus, hold Alt, and left-click while moving the mouse. |
|
Walk |
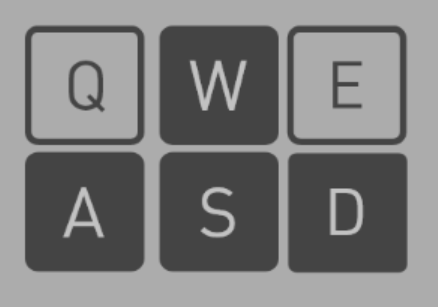
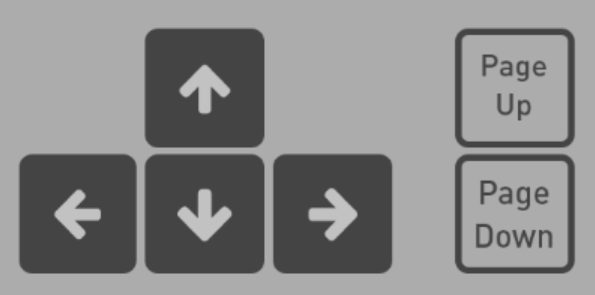
Move the camera in a straight line relative to the current view. Hold the right mouse button to Look, and use the arrow keys (W, A, S, D, Q, E) to Walk. Alternatively, use the arrow keys plus Page Up and Page Down. Adjust walking speed by scrolling while holding the right mouse button. |
|
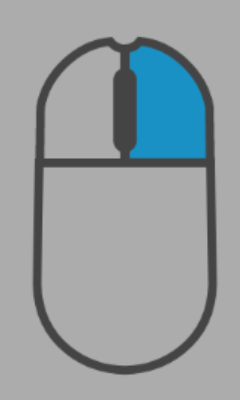
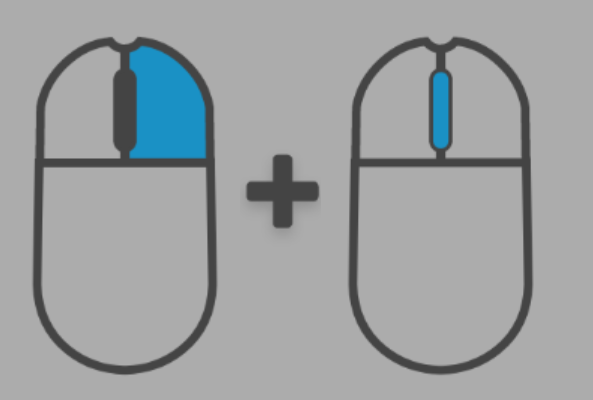
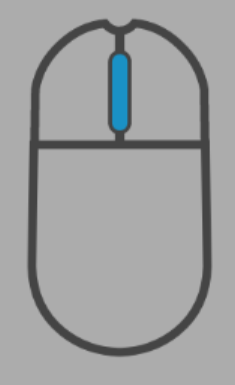
Pan |
Move the camera parallel to the viewpoint by holding the middle mouse button and moving the mouse. |
|
Focus |
Zoom in on an object with the Focus control. Click an object, press F to Focus, and Orbit around it. Press F again to un-focus. |
|
Dolly |
Move the camera forward or backward by scrolling on your mouse. |
|
Teleport |
Instantly move the camera to a specific point and direction. Hold Y and move the mouse to set the target. |
Viewport Settings#
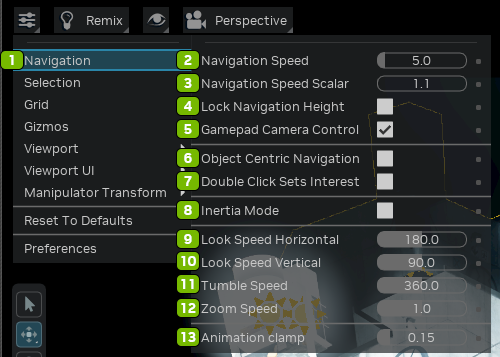
Navigation
Ref |
Option |
Description |
|---|---|---|
1 |
Navigation Menu |
Opens the Navigation Menu |
2 |
Navigation Speed |
Sets the speed of the camera when navigating in the Viewport |
3 |
Navigation Speed Scalar |
Controls navigation speed |
4 |
Lock Navigation Height |
Fixes the observer’s height during navigation, ensuring movements in the viewport maintain a constant vertical perspective. |
5 |
Gamepad Camera Control |
Enables viewport camera control with a connected gamepad. |
6 |
Object Centric Navigation |
Centers navigation around the selected object, simplifying precision movements, orbits, and zooms relative to that specific element. |
7 |
Double Click Sets Interest |
Enables users to swiftly set a focal point by double-clicking any element, recentering the camera for efficient navigation. |
8 |
Inertia Mode |
Toggles natural acceleration and deceleration on all camera movements. Different types of inertial motion can be selected with the Inertia Decay dropdown |
9 |
Lock Speed Horizontal |
Lock the Horizontal navigation speed |
10 |
Lock Speed Vertical |
Lock the Vertical navigation speed |
11 |
Tumble Speed |
Adjusts the rotational speed in the viewport, allowing users to customize responsiveness and control during navigation. |
12 |
Zoom Speed |
Increase or Decrease the camera speed as you zoom in and out |
13 |
Animation Clamp |
Sets the maximum animation time limit in seconds |
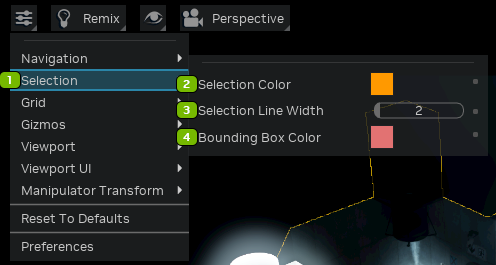
Selection
Ref |
Option |
Description |
|---|---|---|
1 |
Selection Menu |
Opens the Selection Menu |
2 |
Selection Color |
Sets the color for selected entities |
3 |
Selection Line Width |
Sets the size of the selection box |
4 |
Bounding Box Color |
Sets the color of the bounding box |
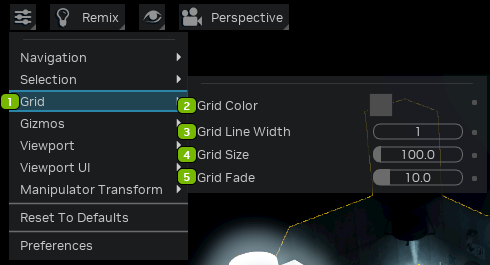
Grid
Ref |
Option |
Description |
|---|---|---|
1 |
Grid Menu |
Opens the Grid Menu |
2 |
Grid Color |
Sets the color of the grid lines |
3 |
Grid Line Width |
Sets the width of the grid lines |
4 |
Grid Size |
Sets the size of the grid cells |
5 |
Grid Fade |
Sets the distance from the camera where the grid lines fade out |
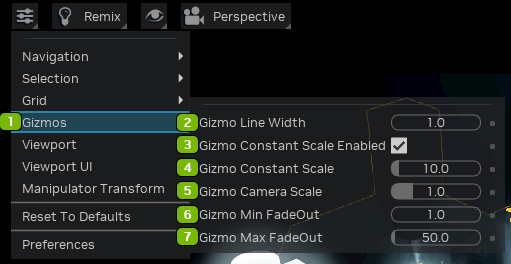
Gizmos
Ref |
Option |
Description |
|---|---|---|
1 |
Gizmos Menu |
Opens the Gizmos Menu |
2 |
Gizmo Line Width |
Adjusts the thickness of the outline around the gizmo. |
3 |
Gizmo Constant Scale Enabled |
Turns on the option for consistent scaling of gizmos. |
4 |
Gizmo Constant Scale |
Scales all gizmos uniformly using a constant value. |
5 |
Gizmo Camera Scale |
Scales gizmos based on the position of the camera. |
6 |
Gizmo Min FadeOut |
Determines the distance from the camera where gizmos appear at their full size. Gizmos farther away gradually scale down until reaching the Gizmo Max FadeOut distance, where they become invisible. |
7 |
Gizmo Max FadeOut |
Specifies the distance from the camera at which gizmos completely disappear. |
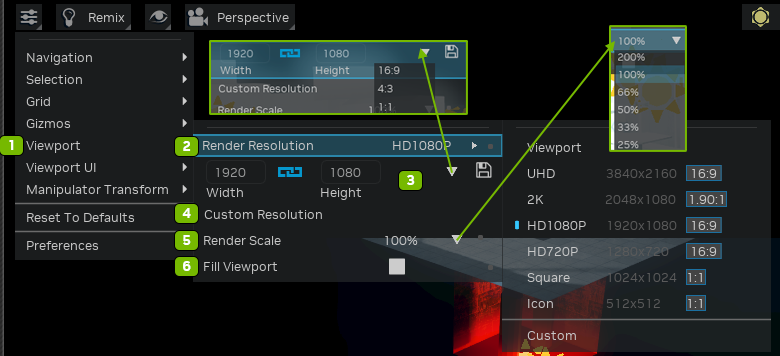
Viewport
Ref |
Option |
Description |
|---|---|---|
1 |
Viewport Menu |
Opens the Viewport Menu |
2 |
Render Resolution |
Defines the base or custom resolution rendered in the Viewport, allowing you to create, save, and delete custom resolutions. Options include: |
3 |
Ratio Options |
Click the disk icon to Save Settings. Options include: |
4 |
Custom Resolution |
Enables users to set a personalized viewport resolution |
5 |
Render Scale |
Adjusts the Viewport size relative to the specified Render Resolution, either upsampling or downsampling. |
6 |
Fill Viewport |
Occupies the entire viewport with the scene. |
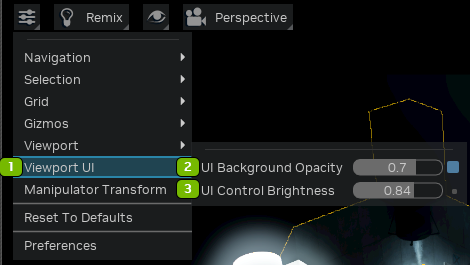
Viewport UI
Ref |
Option |
Description |
|---|---|---|
1 |
UI Background Opacity |
Sets the background opacity of the Viewport’s control UI |
2 |
UI Control Brightness |
Sets the brightness of the Viewport’s control UI |
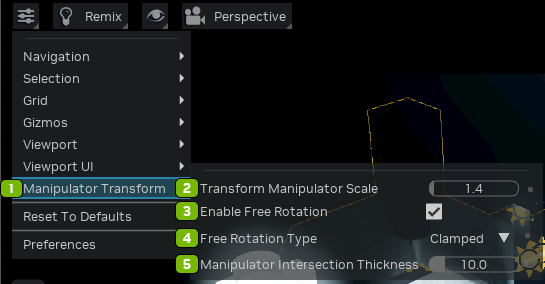
Manipulator Transform
Ref |
Option |
Description |
|---|---|---|
1 |
Manipulator Transform |
A tool enabling intuitive and precise movement of objects |
2 |
Transform Manipulator Scale |
Adjusts the size of the transform manipulator for precise control in the viewport |
3 |
Enable Free Rotation Checkbox |
Allows unrestricted rotation of an object when enabled |
4 |
Free Rotation Type |
Defines rotation nature—choose “Clamped” for restricted rotation or “Continuous” for unrestricted rotation |
5 |
Manipulator Intersection Thickness |
Sets handle thickness for easy selection and manipulation of an object components based on user preference |
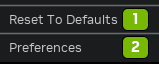
Reset and Preferences
Ref |
Option |
Description |
|---|---|---|
1 |
Reset To Defaults |
Resets all settings to their default values |
2 |
Preferences |
Opens the Preferences panel |
Viewing Options#
There are a few icons that appear on the left side of these menu options as you change them:
The blue checkmark indicates that the visibility is on.
The blue “M” indicates that the visibility options are “mixed”; some are visible, and some are invisible.
Ref |
Option |
Description |
|---|---|---|
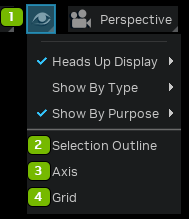
1 |
Interface Visibility |
|
2 |
Selection Outline |
Toggles selection highlighting |
3 |
Axis |
Toggles the visibility of axes |
4 |
Grid |
Toggles the visibility of the grid |
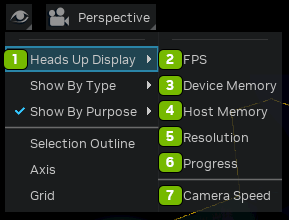
Heads Up Display
Ref |
Option |
Description |
|---|---|---|
1 |
Heads Up Display |
Toggles the visibility of HUD statistics |
2 |
FPS |
Displays frames per second, indicating real-time performance for smoother navigation in the Heads Up Display (HUD). |
3 |
Device Memory |
Shows the GPU’s memory usage, providing insights into the graphical processing resources utilized. |
4 |
Host Memory |
Indicates the system’s RAM usage, offering visibility into memory consumption on the host device. |
5 |
Resolution |
Presents the current display resolution information, aiding users in optimizing visual quality. |
6 |
Progress |
Highlights the progress status, keeping users informed about ongoing tasks or processes within the viewport. |
7 |
Camera Speed |
Adjusts the navigation speed of the camera within the viewport, allowing users to control the pace of their exploration. |
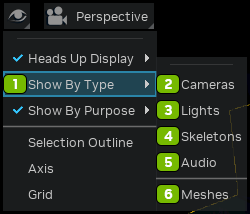
Show By Type
Ref |
Option |
Description |
|---|---|---|
1 |
Show By Type |
Toggles the visibility of the following elements in the Viewport |
2 |
Cameras |
Filters and displays camera entities, streamlining navigation focus to camera viewpoints within the scene. |
3 |
Lights |
Categorizes and reveals light sources, aiding users in managing and adjusting lighting elements efficiently. |
4 |
Skeletions |
Highlights skeletal structures, making it easier to visualize and manipulate character or object animations. |
5 |
Audio |
Identifies and showcases audio-related components, simplifying the management of sound elements within the scene. |
6 |
Meshes |
Filters and displays 3D meshes, allowing users to selectively view and work with specific geometric entities. |
7 |
Physics |
Reveals objects associated with physics simulations, assisting users in understanding and refining the physical behavior of elements in the scene. |
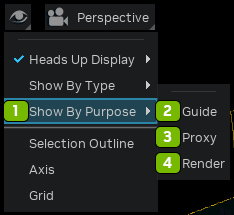
Show By Purpose
Ref |
Option |
Description |
|---|---|---|
1 |
Show By Purpose |
Toggles the visibility of Display Purpose assets |
2 |
Guide |
Filters and displays guide elements, aiding in the visualization and management of guiding components within the scene. |
3 |
Proxy |
Highlights proxy objects, making it easier to identify and work with simplified representations of complex assets for optimized performance. |
4 |
Render |
Focuses on rendering components, allowing users to selectively view and manage elements relevant to the final visual output of the scene. |
Camera Settings#
See also
Since the Remix Toolkit is built on Omniverse. More information on camera settings can be found here: https://docs.omniverse.nvidia.com/materials-and-rendering/latest/cameras.html
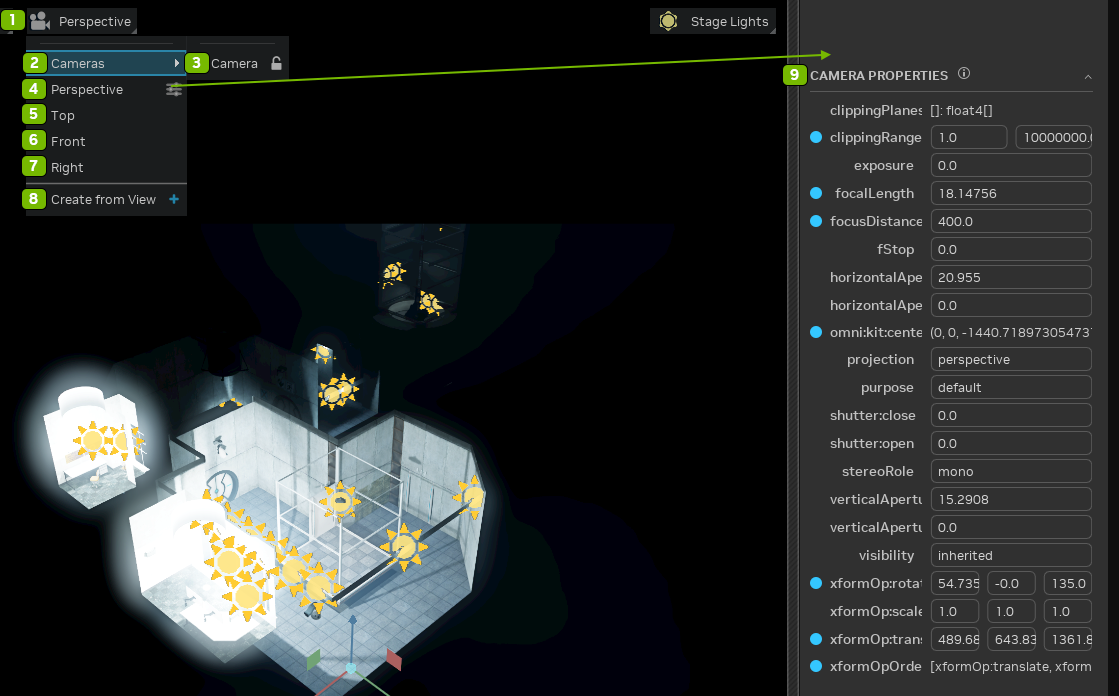
Ref |
Option |
Description |
|---|---|---|
1 |
Camera Settings |
Opens the Camera Settings Menu |
2 |
Camera Lock |
Locks the cameras in the scene |
3 |
Cameras |
Provides a view through the selected camera |
4 |
Perspective |
Provides a view through a configured perspective |
5 |
Top |
Provides a view through the origin from the positive side of z-axis |
6 |
Front |
Provides a view through the origin from the positive side of x-axis |
7 |
Right |
Provides a view through the origin from the positive side of y-axis |
8 |
Create from View |
Creates a new camera from the currently configured camera |
9 |
Camera Properties |
Opens the Camera Properties panel |
Stage Lights#

Ref |
Option |
Description |
|---|---|---|
1 |
Lights Off |
Turns off all lights in the Stage Light Viewport, providing a clear view without any illumination |
2 |
Camera Light |
Activates a light source attached to the camera, illuminating the scene from the camera’s perspective for enhanced visibility. |
3 |
Stage Lights |
Displays lights specifically set up for the stage, allowing users to focus on and manipulate the lighting elements relevant to the overall stage setup in the viewport |
4 |
Autoshop |
Applies a lighting setup resembling an automotive workshop, providing a predefined lighting environment in the Stage Light Viewport. |
5 |
Bush Restaurant |
Implements a lighting configuration suitable for outdoor restaurant scenes with a natural and ambient feel. |
6 |
Env Studio08 |
Utilizes a lighting rig designed for studio environments, offering controlled and adjustable lighting conditions. |
7 |
Kloofendal |
Applies lighting characteristics inspired by the Kloofendal area, creating a specific ambiance within the Stage Light Viewport. |
8 |
Old Room |
Implements a lighting setup ideal for simulating the ambiance of an older or vintage interior space. |
9 |
Parking Garage |
Utilizes a lighting configuration suitable for simulating the lighting conditions found in a parking garage. |
10 |
Rectlight |
Implements a lighting setup using rectangular lights, offering specific and controlled illumination in the viewport. |
11 |
Small Workshop |
Applies a lighting rig suitable for simulating the lighting conditions within a small workshop environment. |
12 |
Urban Exploring |
Utilizes a lighting configuration inspired by urban exploration settings, offering a distinct atmospheric lighting environment. |
13 |
Use Auto Light Rig on Startup Checkbox |
Enables the automatic application of a default lighting setup when the Stage Light Viewport is initiated. |
14 |
Add Current Light Rig to Stage |
Allows users to save and incorporate the current lighting setup into the Stage, providing flexibility in managing and reusing custom lighting configurations. |
Need to leave feedback about the RTX Remix Documentation? Click here