Part Two: Create Your Own Graph#
In Part Two of this tutorial, you create a new Push Graph to implement some of the logic you reviewed in the Part One. In particular, you script the color and position transformations for one letter in response to the sphere’s movements.
Create a New Push Graph#
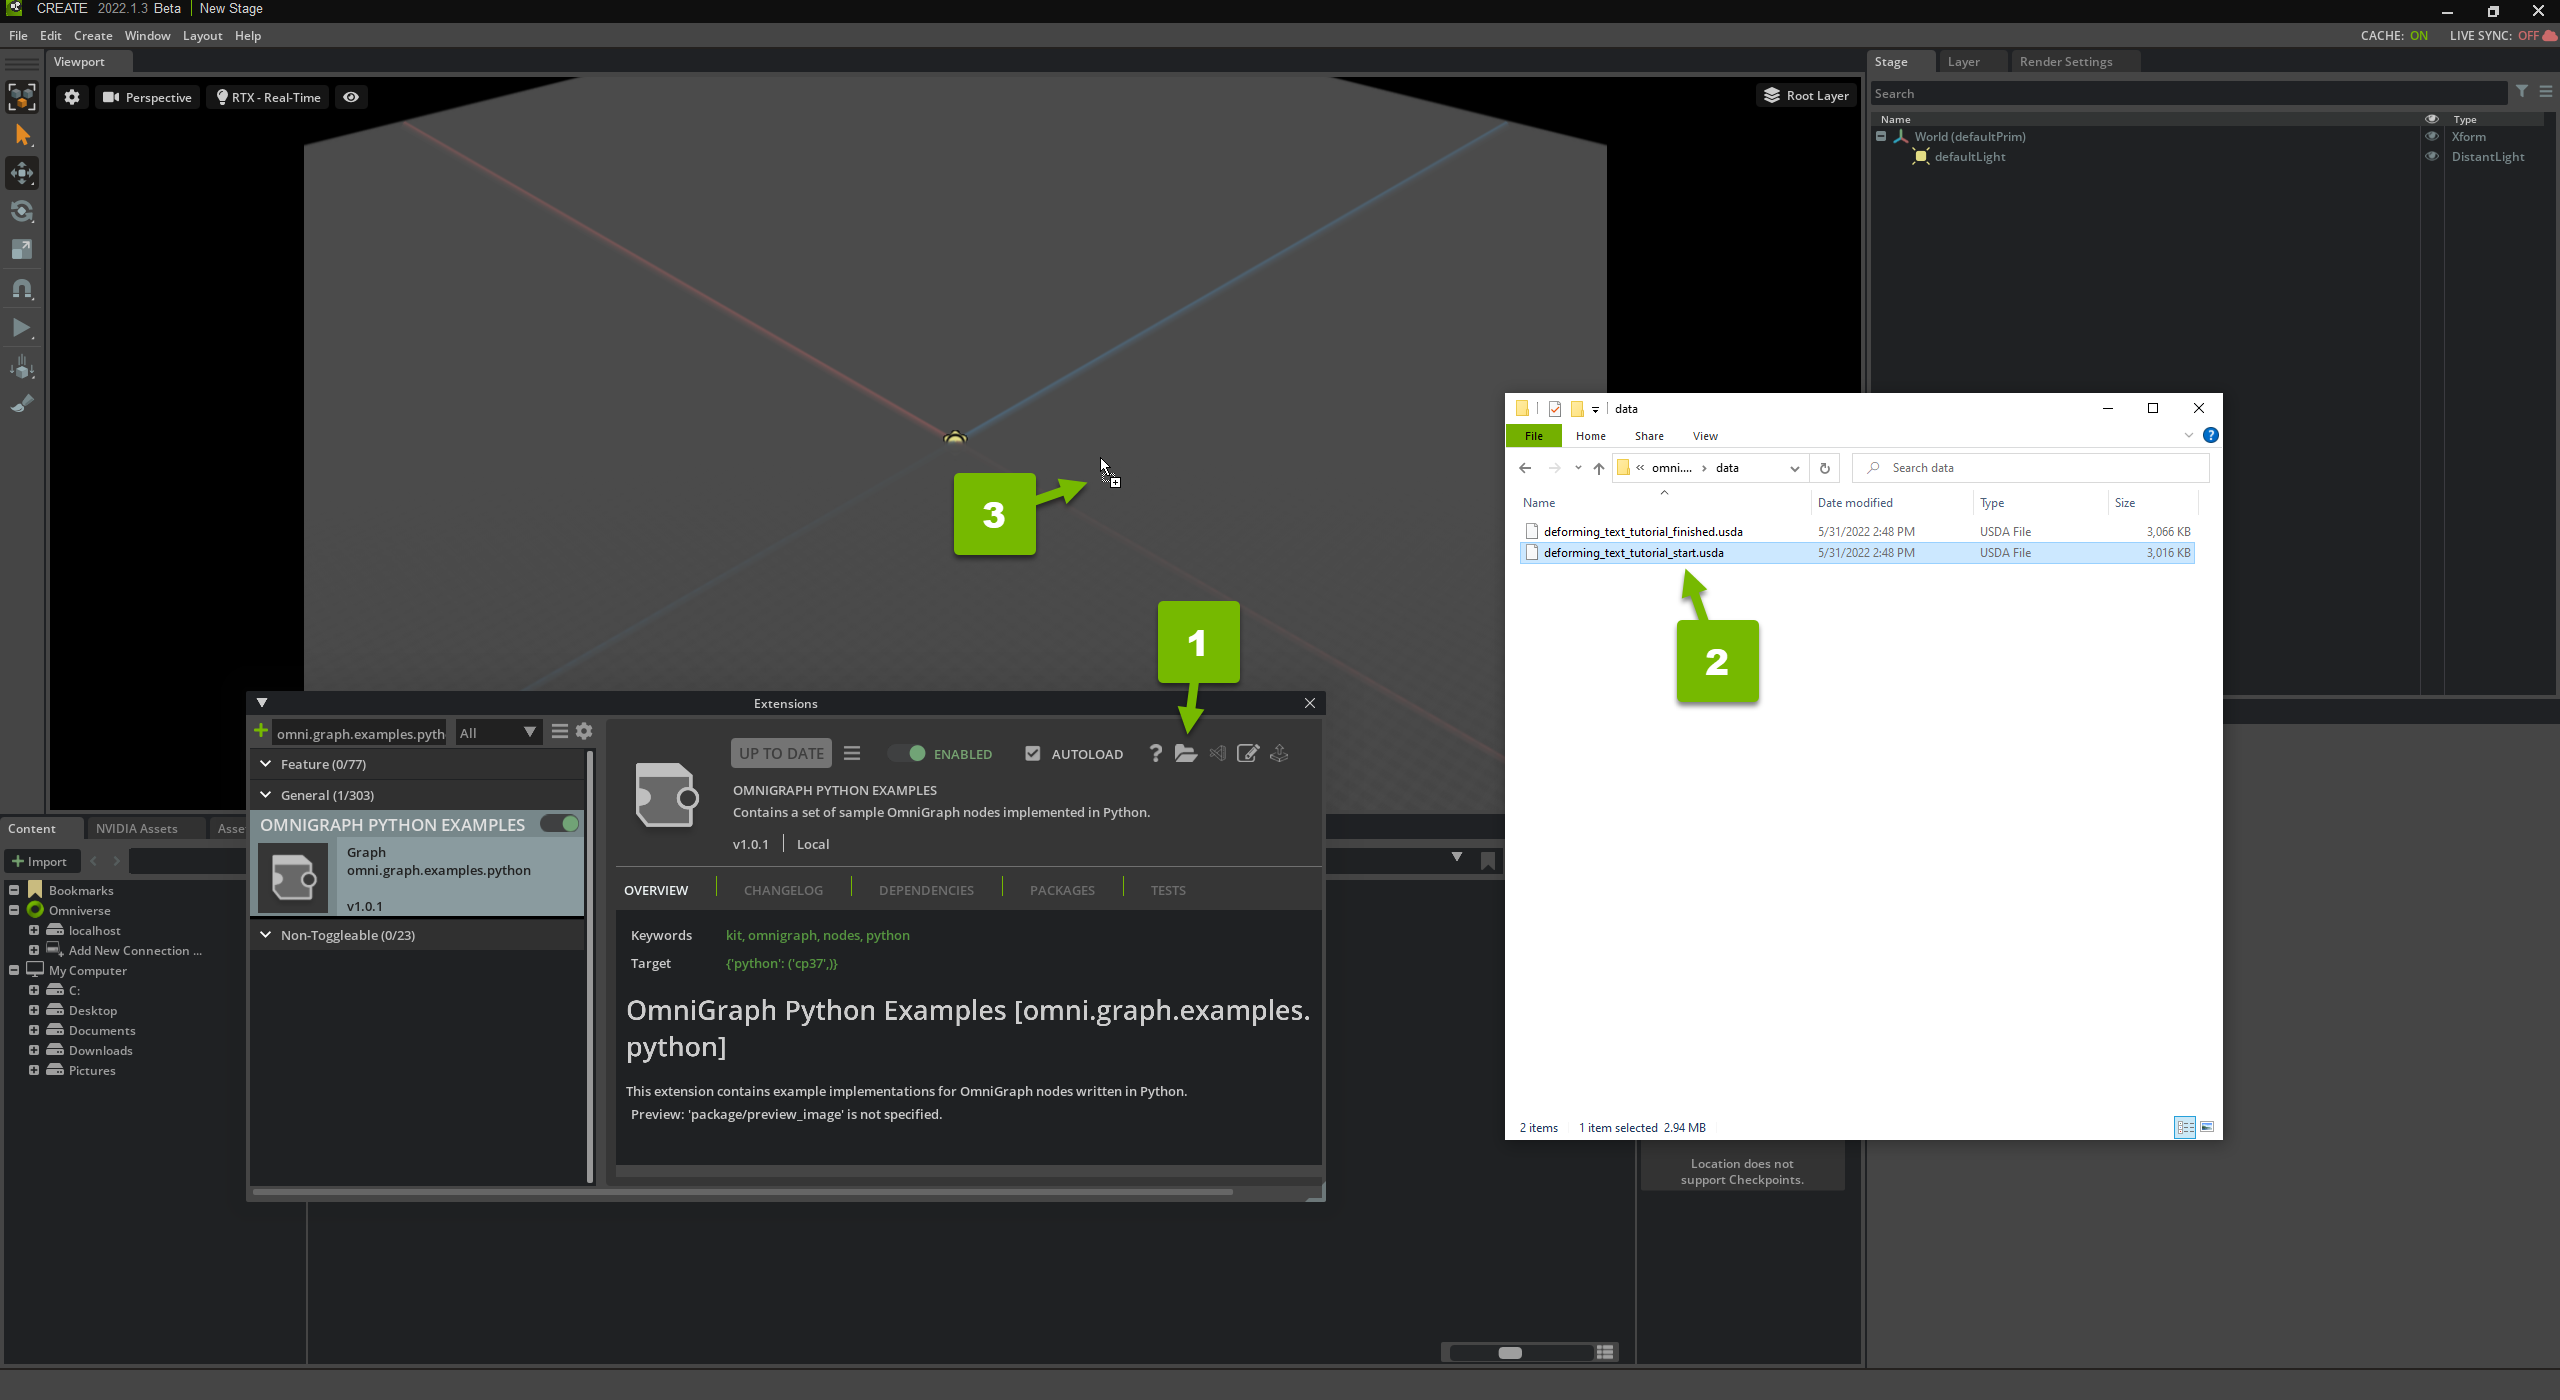
Begin by opening the start USD file from the Python node Extension bundle so you have the necessary assets. Then, create a new Push Graph.
Open the Starting USD File#
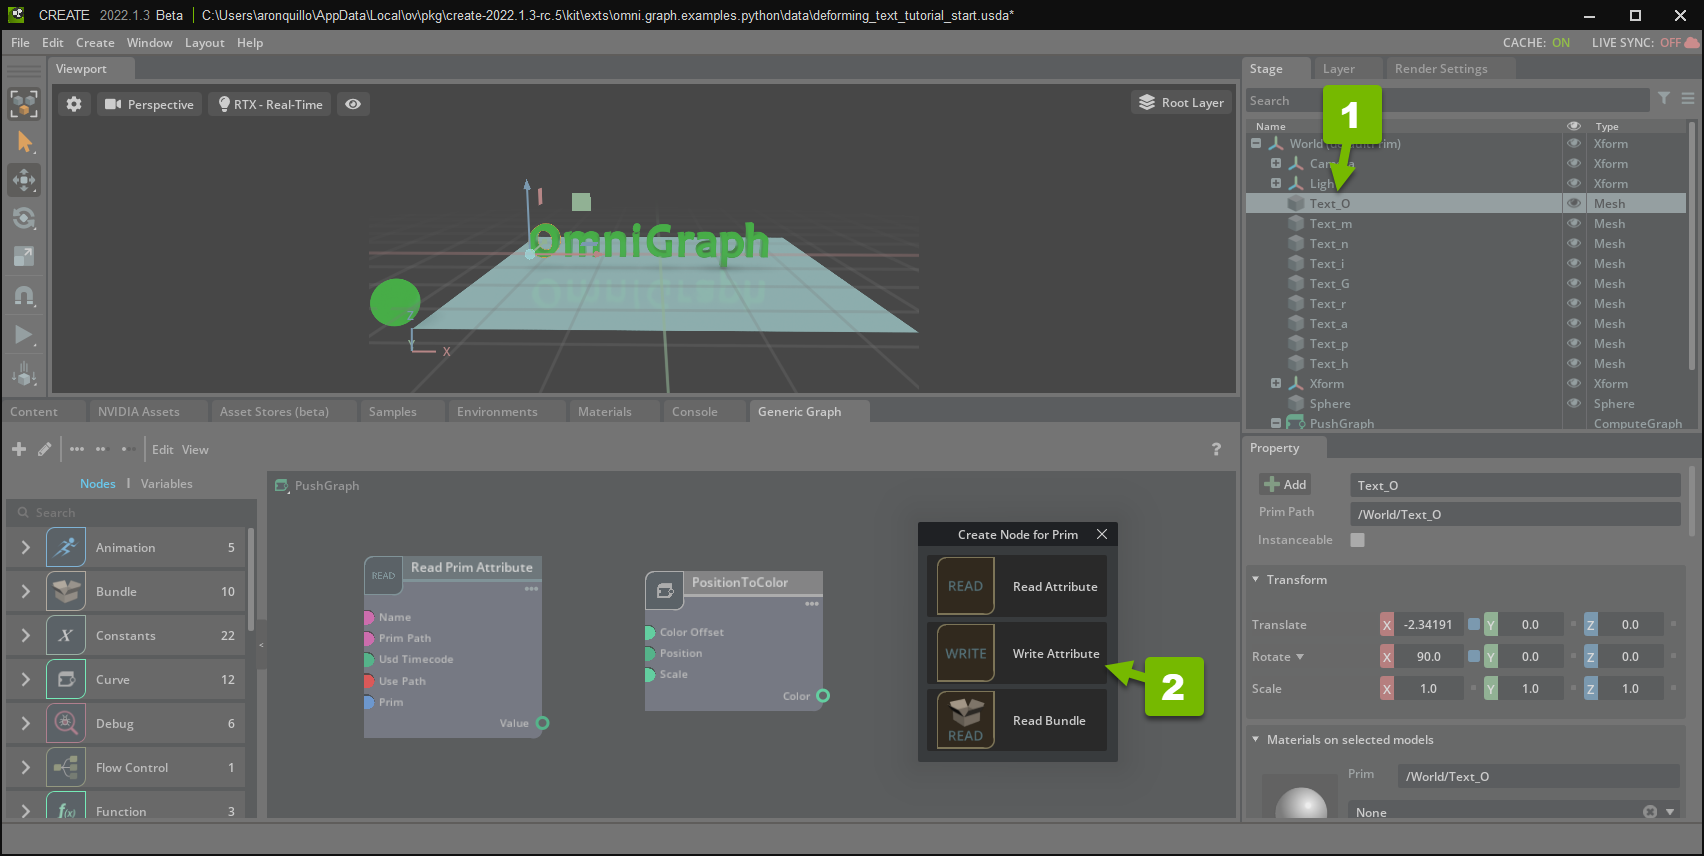
Drag the deforming_text_tutorial_start.usda file from omni.graph.examples.python/data into Omniverse USD Composer:
Create a New Push Graph#
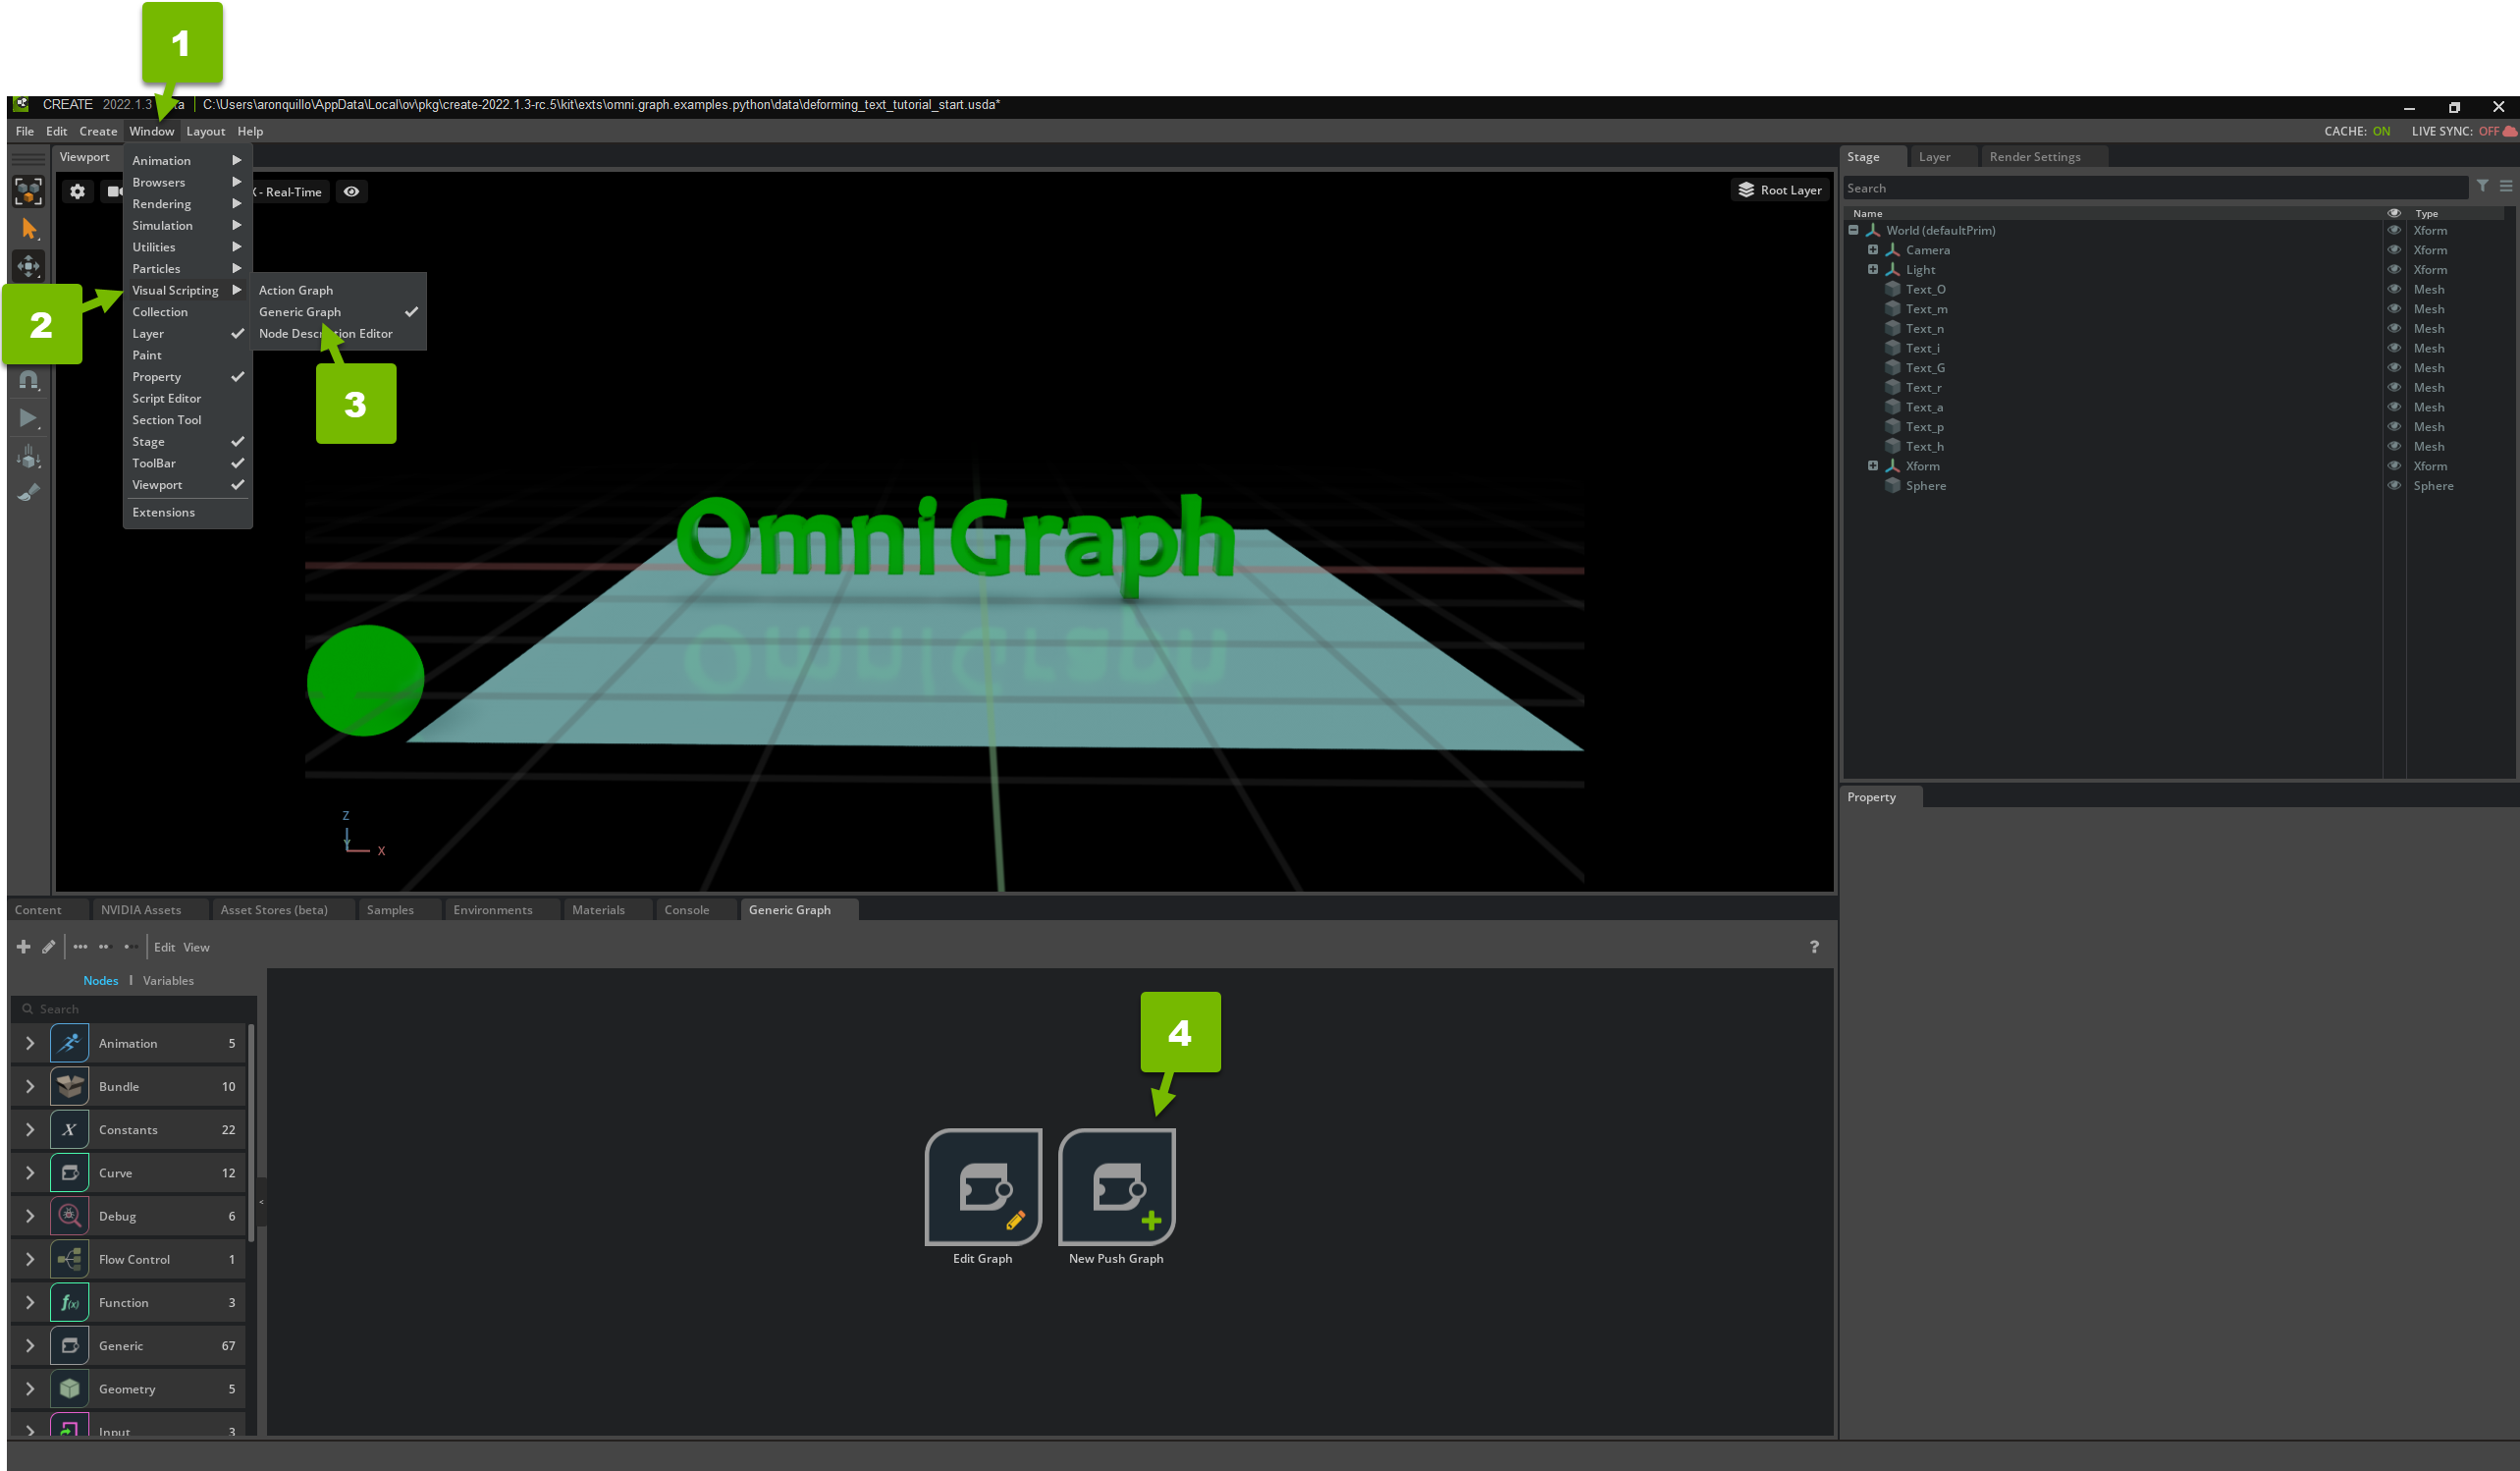
Create a new Push Graph:
Use a Read Prim Local Transform Node#
Drag the sphere prim from the Stage to the Push Graph editor, and select Read Transform.
Then, add a Get Translation node and connect the output from the Read node to the input of this node:
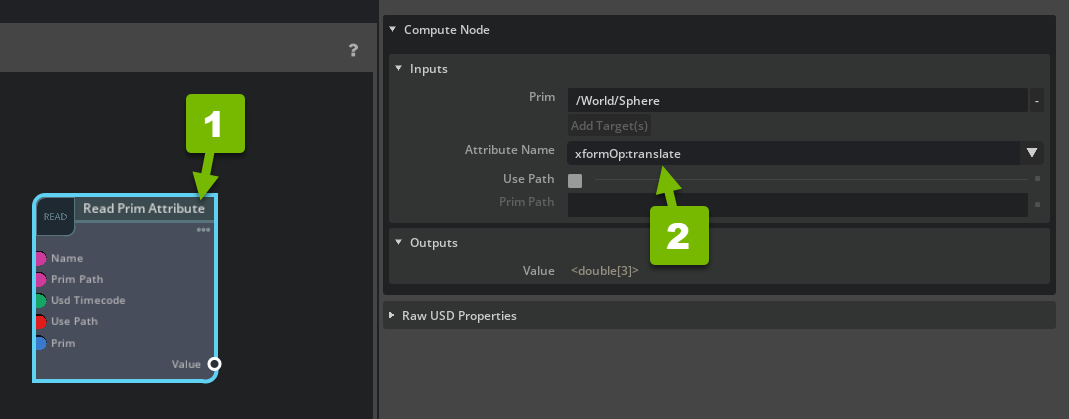
This means you want to read the sphere’s position.
Use a PositionToColor Node#
Search for the PositionToColor node, drag it into the editor, and set its scale input attribute to 3:
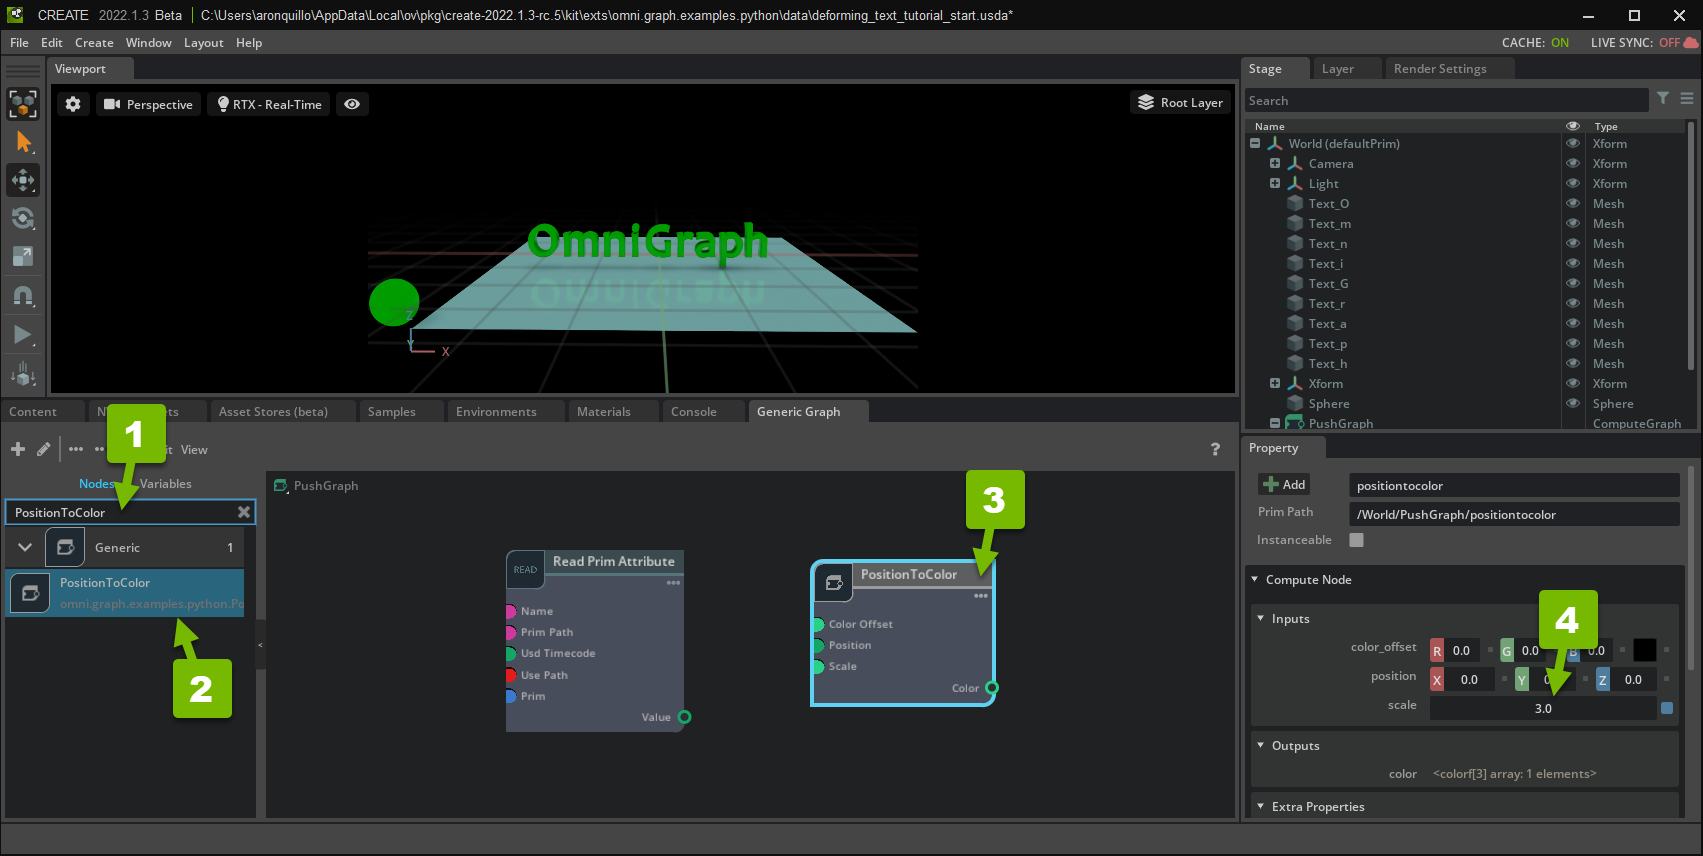
As you move the sphere, this scale attribute determines the how much the color changes with respect to the positional change. In this case, you want the color to gradually—but not too gradually—change as the ball passes over the plane.
Tip
If you can’t find this node, make sure you’ve enabled the OmniGraph Python Examples Extension.
Technical Detail
As you learned in Part One, this is a custom Python node. If you want to see how it works, navigate to omni/graph/examples/python in the Extension’s folder. From here, open ogn/python/nodes/tutorial1/OgnPositionToColor.py.
Use a Write Prim Attribute Node#
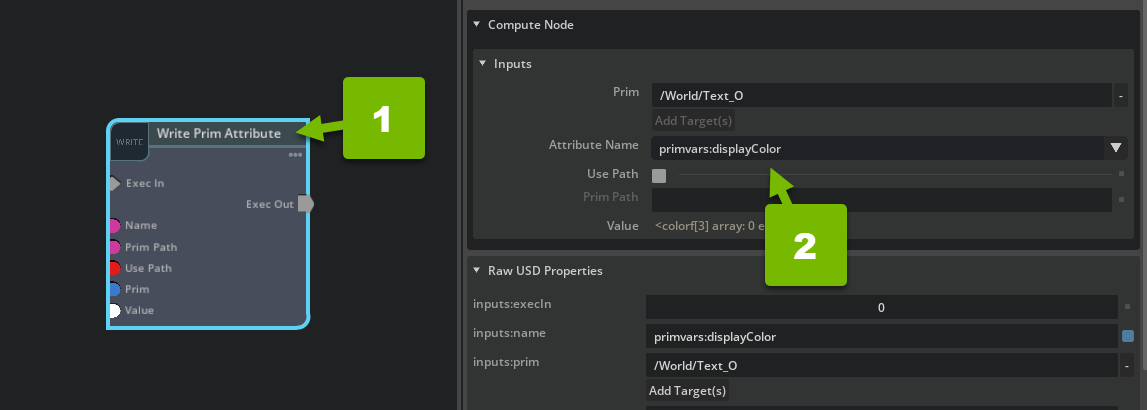
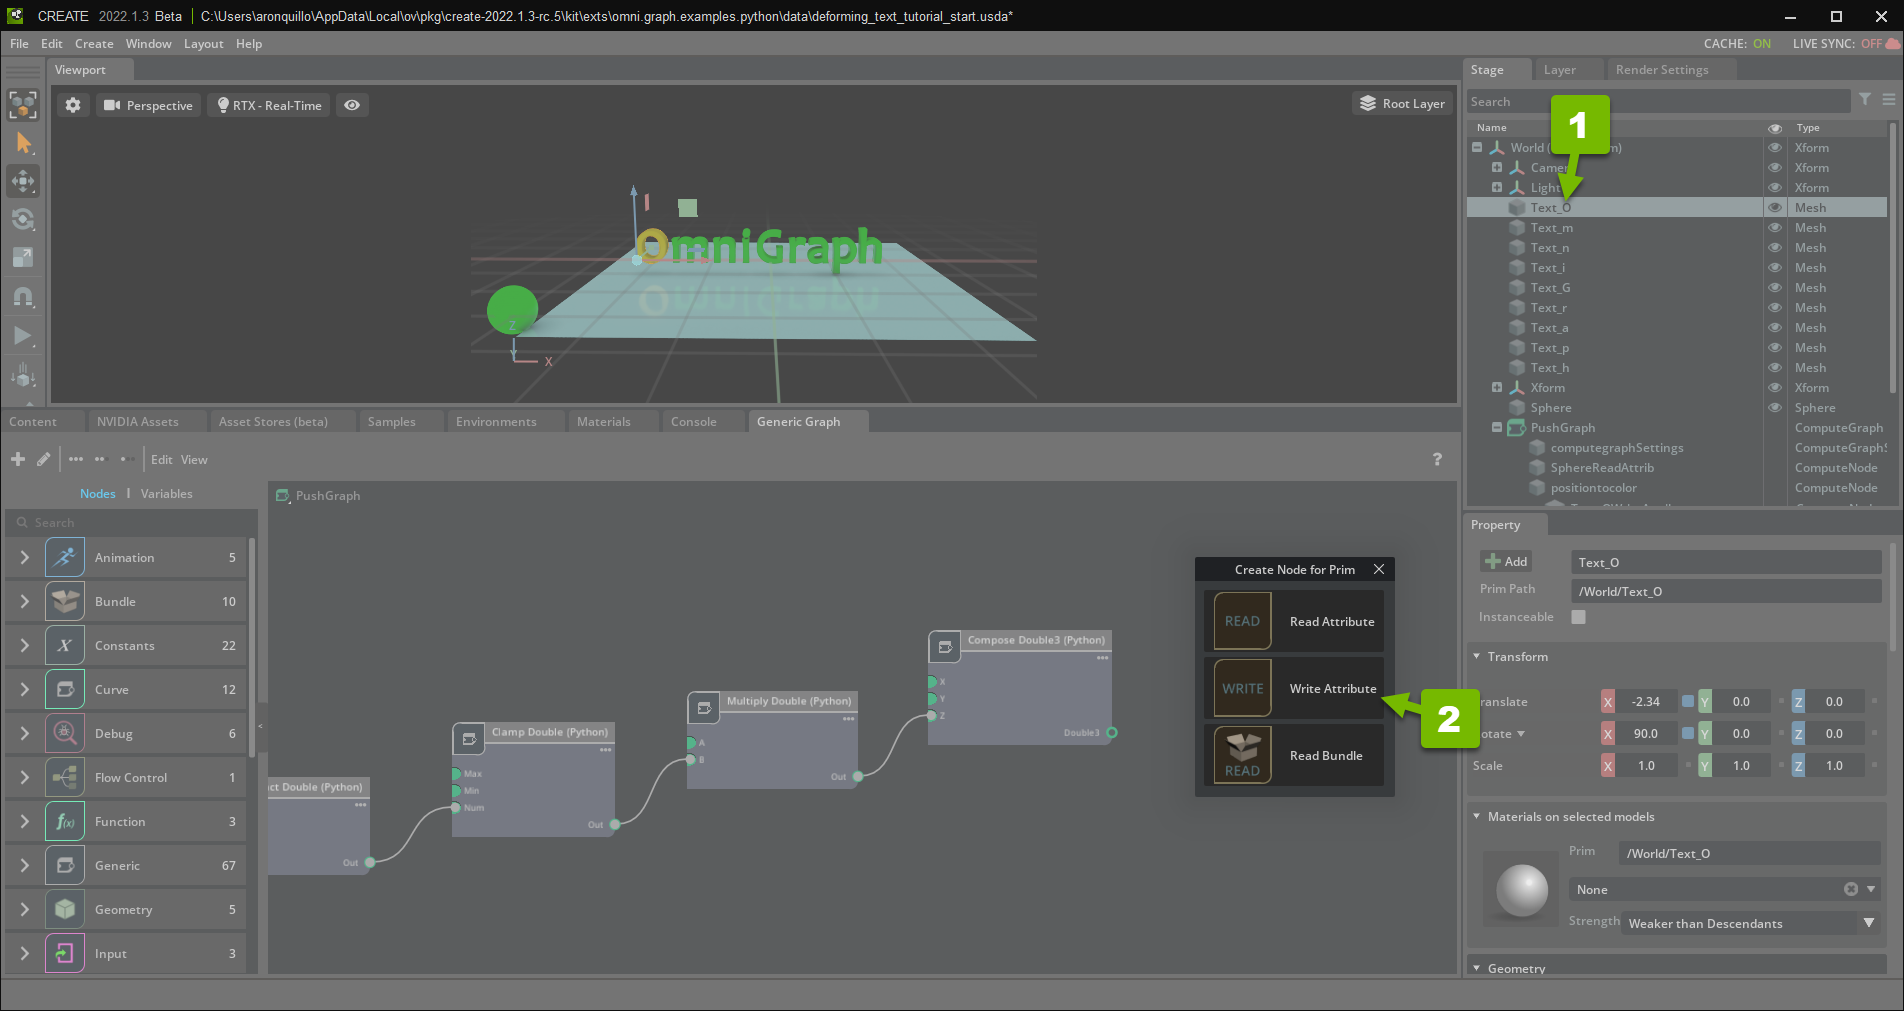
Drag the Text_O prim from the Stage to the Push Graph editor, and select Write Attribute:
Then, set its Attribute Name to primvars:displayColor:
Wire Up the Nodes#
Now, it’s time to wire up your nodes and direct the flow of execution.
Convert the Sphere’s Position to a Color#
Click and drag the Get Translation node’s Translation pin to the PositionToColor node’s Position pin:

This takes the sphere’s position and passes it to PositionToColor to convert it to a color.
Change the Text’s Color#
Next, click and drag the PositionToColor node’s Color pin to the Write Prim Attribute node’s Value pin:
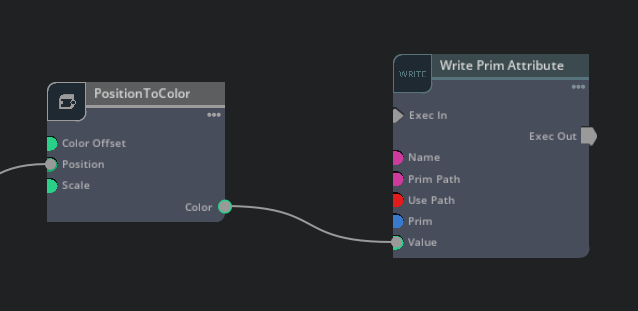
This sets the color of the letter “O” based on the position of the sphere.
Review Your Work#
Move the sphere along the x axis:
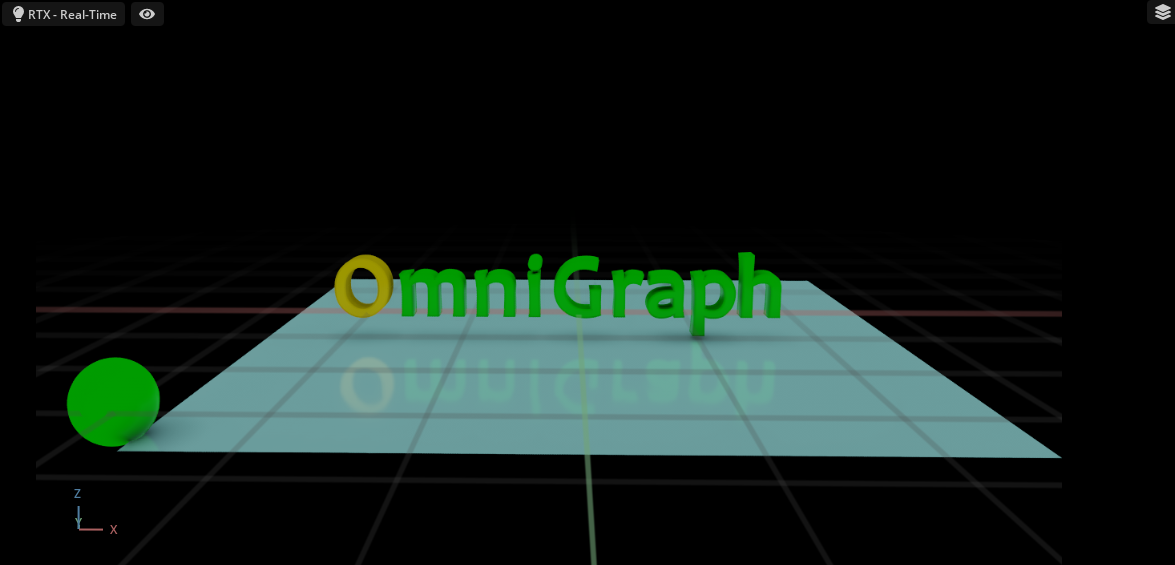
The letter “O” changes color!
Move the Letter Based on the Sphere’s Position#
Now that you’re changing the letter’s color based on the sphere’s position, set up another branch of the graph to move the letter.
Decompose the Sphere’s Position#
Search for the Decompose Double3 (Python) node, drag it into the editor, and pass it the sphere’s position:
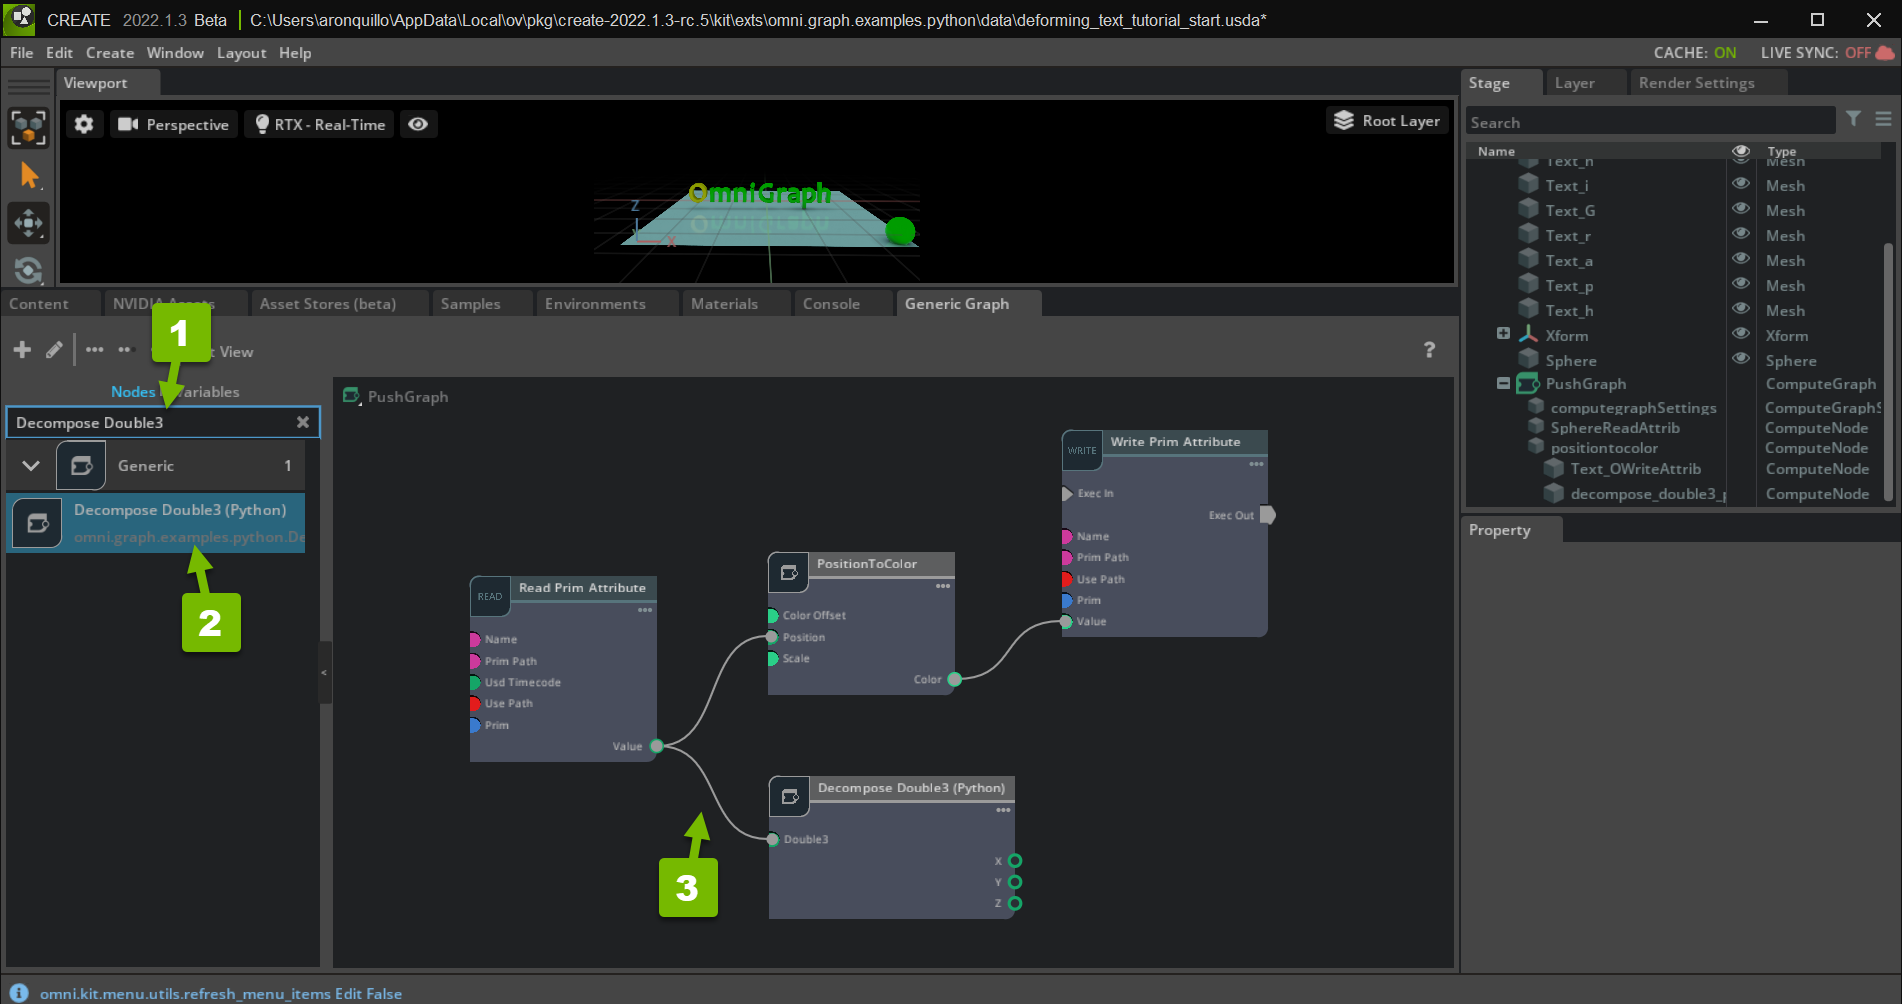
The sphere’s position is stored internally as a 3-tuple, consisting of x, y, and z coordinates. But in this tutorial, we only care about its x value, as it’s moved across the axis. Decompose Double3 breaks down the position tuple into three, individual values so that you can use the x value.
Find the Absolute Value of X#
Search for the Abs Double (Python) node, drag it into the editor, and pass it the sphere’s x position:
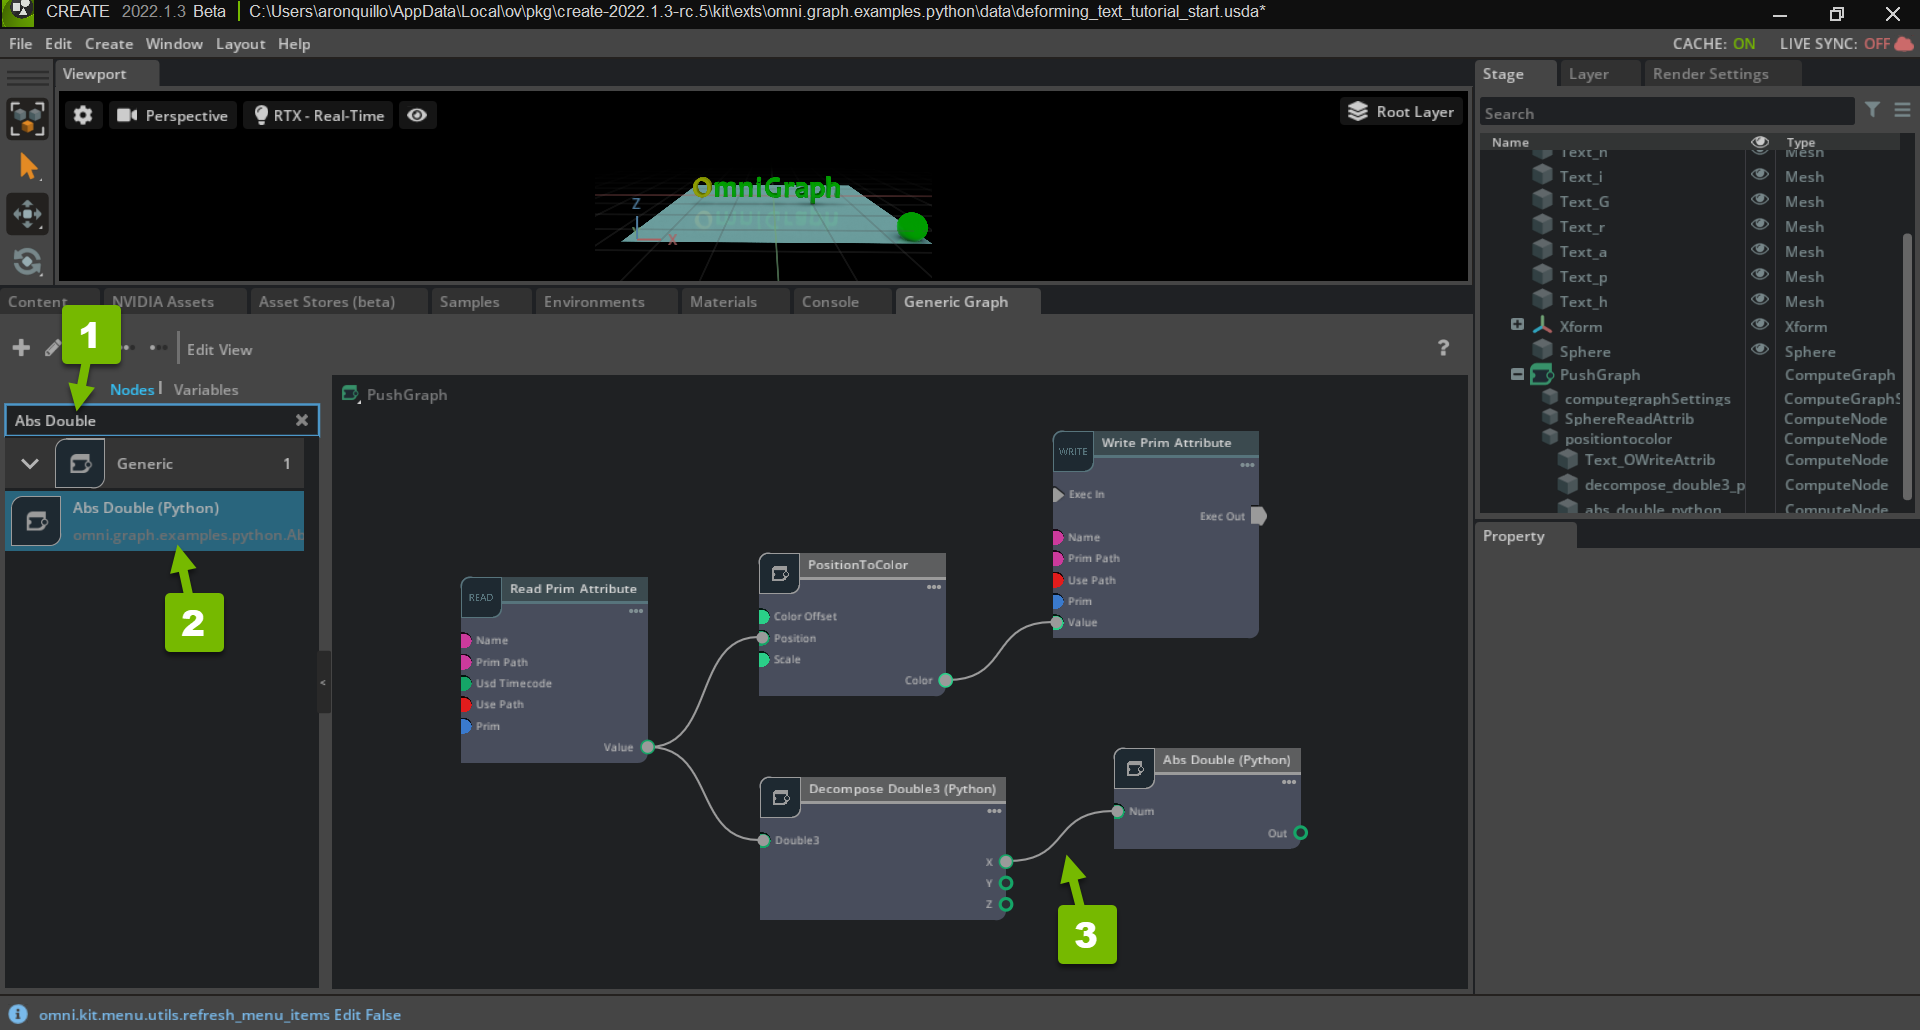
Remember the end goal that you reviewed in Part One. As you move the sphere along the x axis, you want the letter to move vertically. As the sphere approaches zero on the negative side of the x axis, the letter should move up. As the sphere moves in the positive direction, the letter should move down. The mathematical way to do this is to calculate the x position’s absolute value.
Establish the Horizontal Bounds for the Sphere#
Search for the Subtract Double (Python) node, drag it into the editor, and pass the absolute value of the sphere’s x position to the node’s b attribute:

You’re going to use the sphere’s x position to determine the height of the letter. When x equals zero, you want the letter to be at its highest position. When x is at the leftmost or rightmost edge of the plane, you want the letter to be at its lowest position. The mathematical way to do this is to subtract the x position from the limit value. In this case, the limit value is the absolute value of x at the edge of the plane, which is about three units.
Set its a to 3:
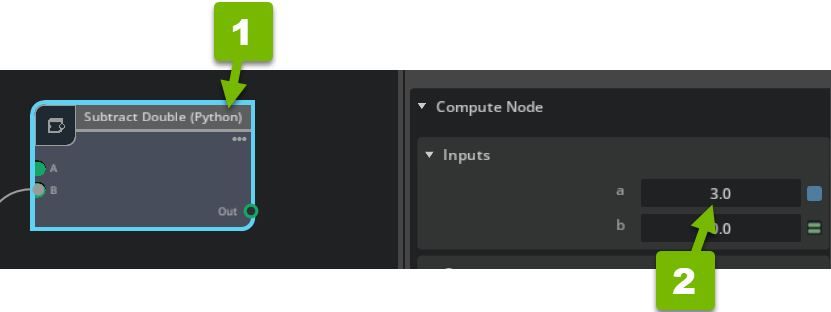
Subtract Double subtracts the absolute value of the sphere’s x position from the constant 3.
Establish the Vertical Bounds for the Letter#
Search for the Clamp Double (Python) node, drag it into the editor, and pass the difference you calculated in the last step to the node’s num attribute:
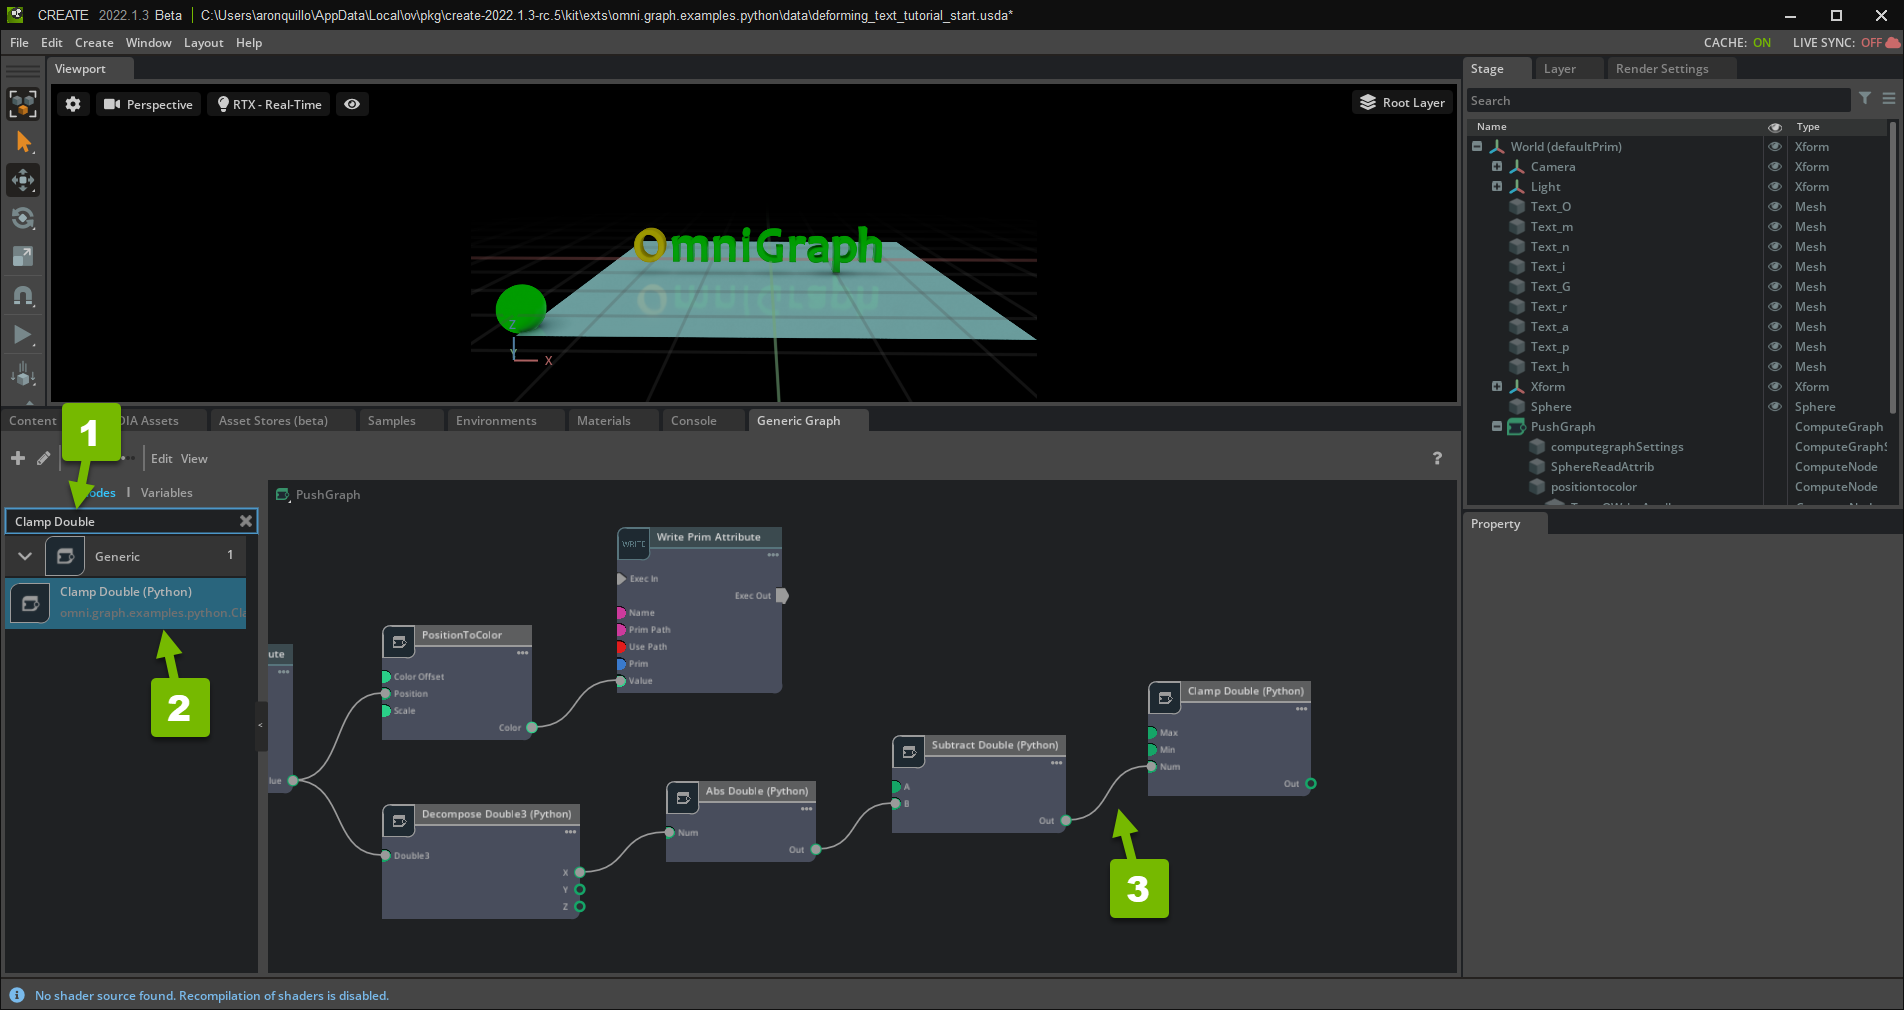
Clamp Double applies upper and lower bounds to a double value. In this case, the double value represents the sphere’s x position with several mathematical transformations. Ultimately, you’ll use this value to move the letter “O” up and down the z axis, and Clamp Double helps to prevent it from going too high or low.
Set the node’s max value to 10:
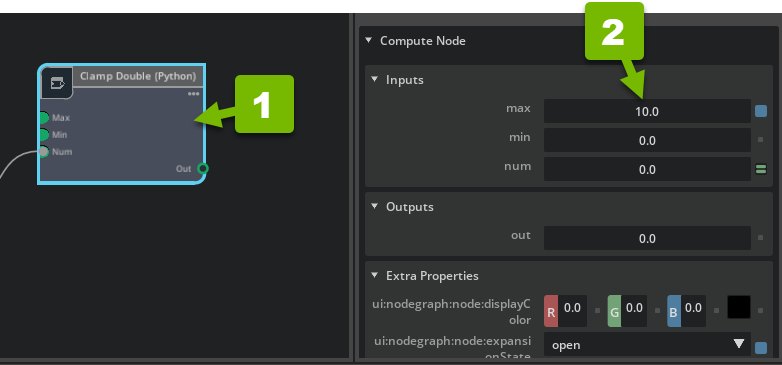
This prevents the letter from rising above 10 units. Notice that it also prevents the letter from dropping below zero units with its min value.
Reduce the Letter’s Movement Rate#
Search for the Multiply Double (Python) node, drag it into the editor, and pass the difference you calculated in the last step to the node’s b attribute:

Because you’ll use the sphere’s x position to move the letter, the letter will move at the same rate. However, it will look nicer to have the letter stay lower and closer to the plane, even if the sphere moves far away. In other words, the rate at which the letter moves should be a fraction of the rate at which the sphere moves. The mathematical way to do this is to multiply a constant fraction to the transformed x position.
Set its a to 0.18:
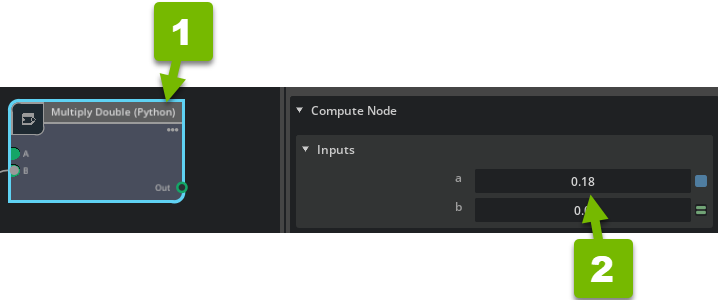
Multiply Double multiplies 0.18 and the transformed x position.
Compose the Letter’s Position#
Search for the Compose Double3 (Python) node, drag it into the editor, and pass the product you calculated in the last step to the node’s z attribute:
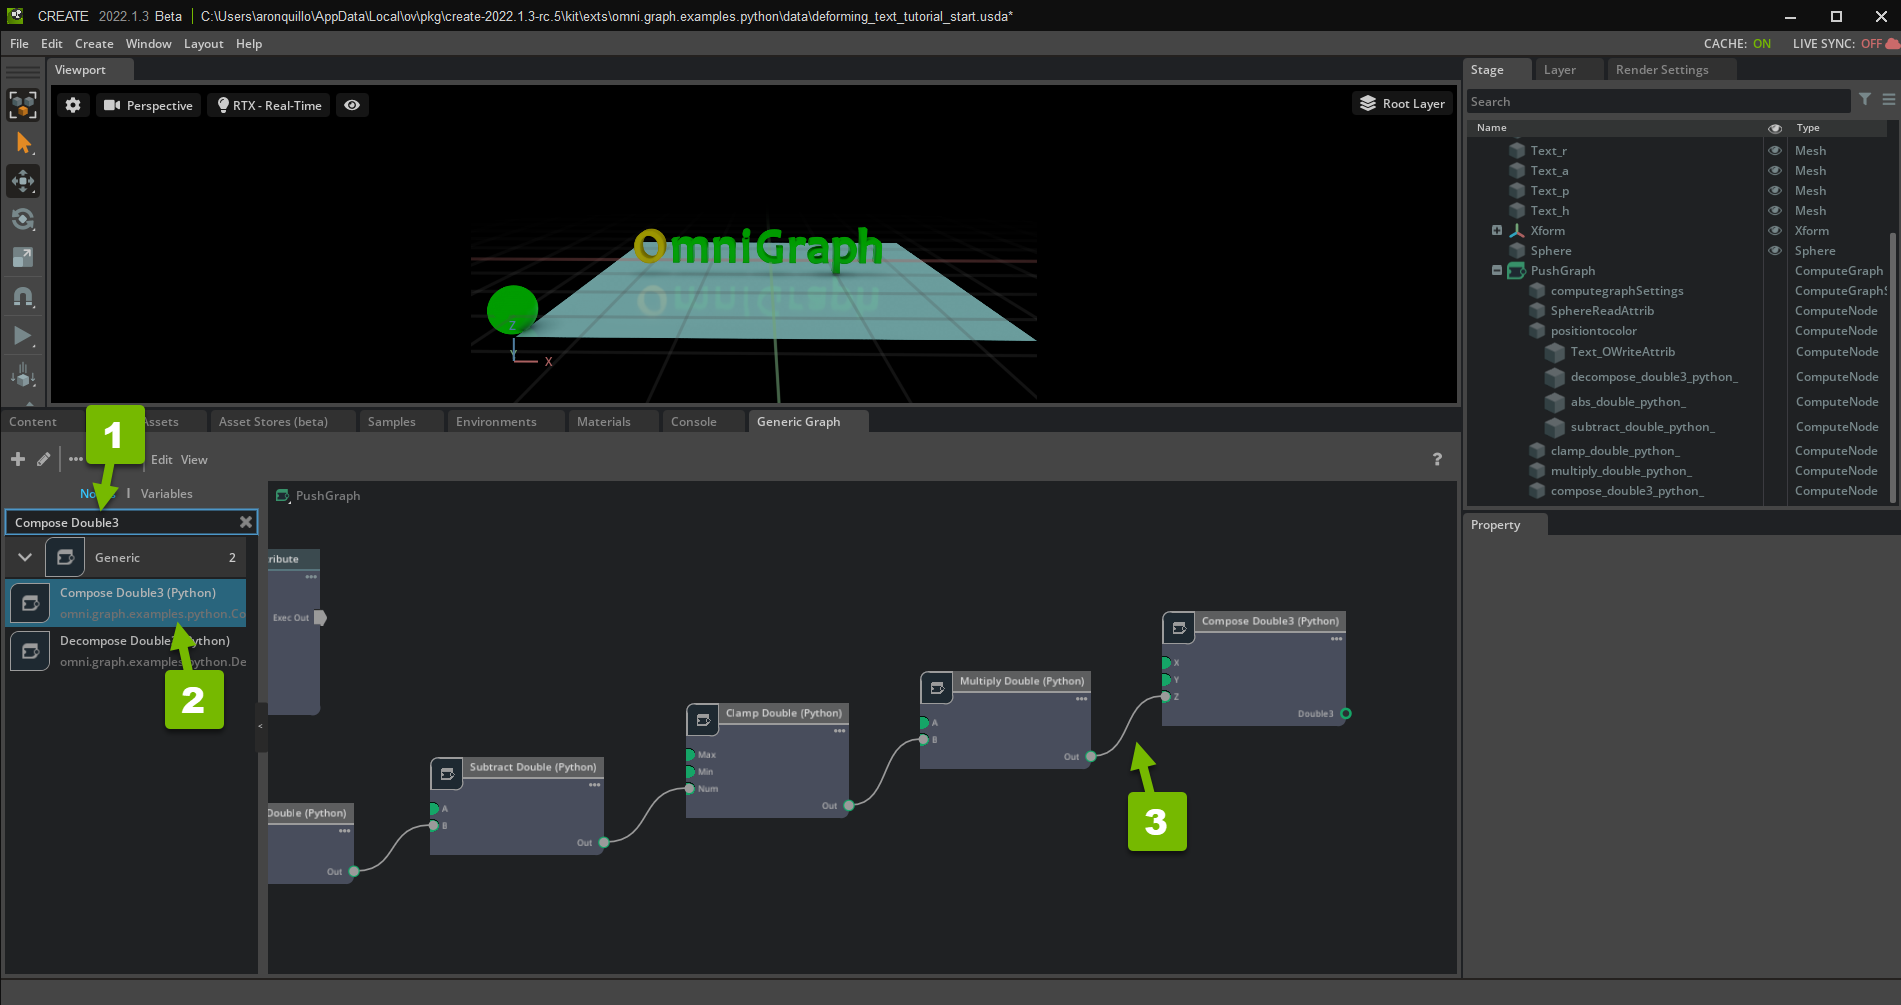
Compose Double3 performs the inverse operation of Decompose Double3. It composes a 3-tuple out of three individual values. In this case, you pass the transformed x value to the z attribute to change the position on the z axis.
Set the x attribute to -2.34:
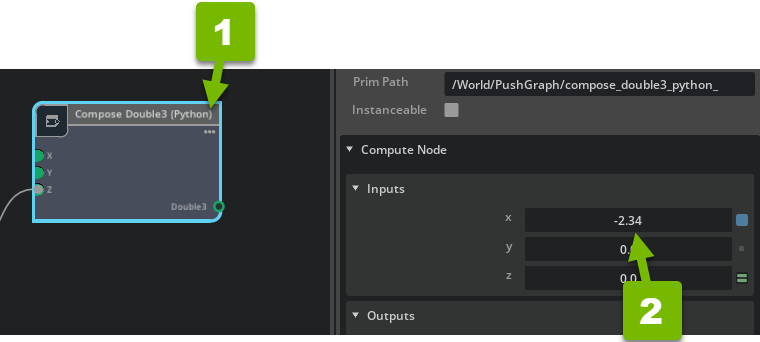
Compose Double3 composes a 3-tuple based on the x, y, and z values it receives. In this case, you’ve only passed a z value; x and y remain their default values of zero. So, if you set the position of the letter “O” to this tuple, its z axis position will be dynamic, but it’ll move to the origin of the x and y planes. The letter prims are already on the origin of the y axis, but they’re spread across the x axis. Here, you’ve hard-coded the x value to the letter “O“‘s starting position.
Note
You could have read the prim’s x value from the Get Translation node, but hard-coding this value is fine for this tutorial.
Move the Letter#
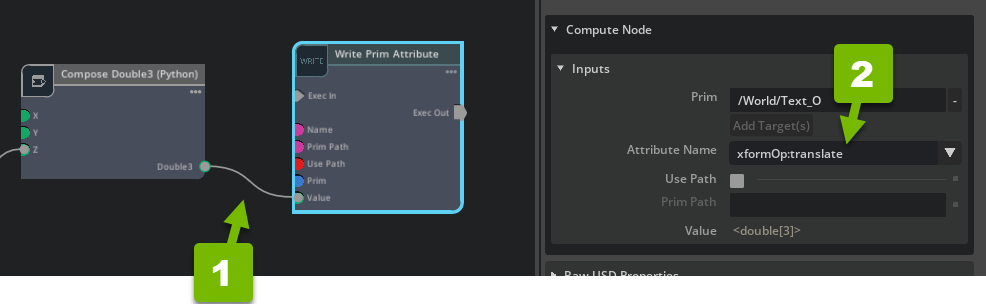
Drag the letter “O” prim from the Stage to the Push Graph editor, and select Write Attribute:
Then, pass it the composed position and set its Attribute Name to xformOp:translate:
Note
Be sure to set this Write Prim Attribute node’s Persist to USD on. This means they are Authoring the value of the XformOp:translate property. Compare this to the nodes which are writing to primvars:displayColor. In that case, the nodes are only updating the Runtime value of the property, which does not get written back to USD. If you wanted to only update the Runtime value of the transform, you could instead use a combination of Get Prim Local Transform, Set Translation and Write Prim Local Transform nodes.
Review Your Work#
Move the sphere along the x axis:
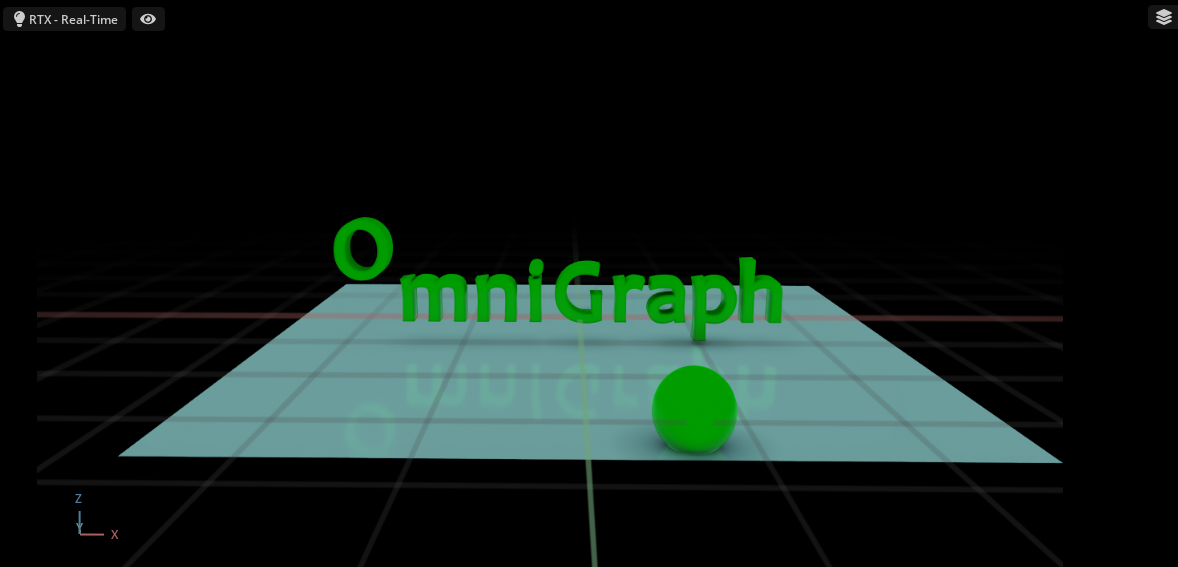
The letter “O” changes color and moves up the z axis!
Extra Credit
Now that you know how to visually script the logic for the letter “O”, try to do the same for the rest of the letters. If you get stuck, refer to deforming_text_tutorial_finished.usda for help.