Paint Tool
The paint tool is a powerful surface placement tool extension allowing users to “paint” meshes onto the surface of other meshes. Useful for painting trees, grass, and debris the Paint Tool makes quick work of the controlled scattering of meshes on surfaces.
Enabling the Extension
In any supported Kit based App, the paint tool can be enabled via the Extension Manager
Simply search for Paint Tool and enable the extension.
Using the Paint Tool
The Paint tool has two main interface panels. The Paint Library is used for creating new and selecting existing brushes. The Paint Settings allows fine tune adjustment to your currently selected brushes.

Ref # |
Option |
Result |
|---|---|---|
1 |
Paint Library |
Opens the Paint Library Panel |
2 |
Paint Settings |
Opens the Paint Settings Panel |
Paint Library Panel
Using the Paint Library
The Paint library acts as your quick access palette for brushes you have created and saved. Simply select a brush and paint.
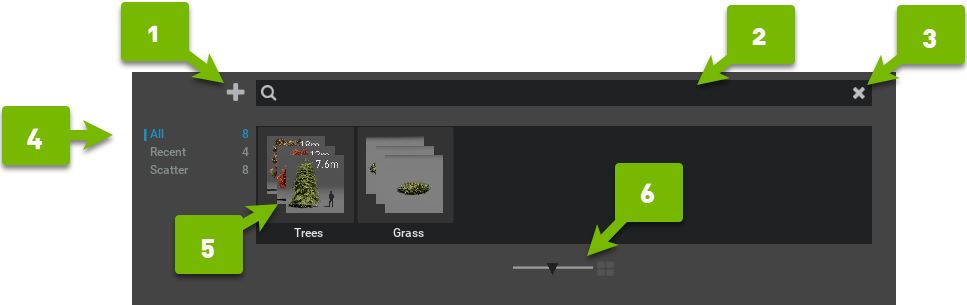
Ref # |
Option |
Result |
|---|---|---|
1 |
Plus (+) |
Opens dialogue to create new brush and give name.
|
2 |
Search |
Enter text to refine brush list contextually.
|
3 |
X |
Clears the Search Criteria.
|
4 |
Category List |
Refines brush list based on category.
|
5 |
Brush List |
Brushes listed based on category/search refinement with thumbnails.
|
6 |
Thumbnail Size |
Drag slider to increase and decrease the size of the thumbnails.
|
Paint Settings Panel
Brushes
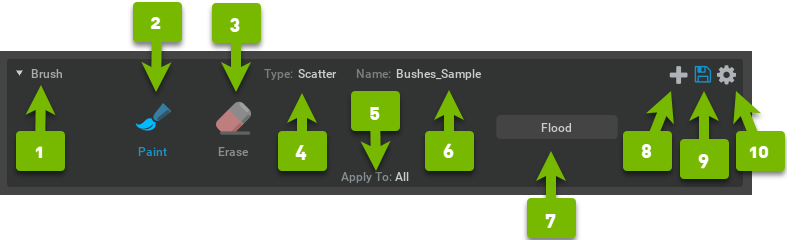
Ref # |
Option |
Result |
|---|---|---|
1 |
Drop Down List |
Allows creation of new or selection of loaded brushes.
|
2 |
Paint Mode |
Sets the mode of the current brush to add points/prims based on brush parameters.
|
3 |
Erase Mode |
Sets the Mode of the current brush to remove points/prims based on brush parameters.
|
4 |
Type |
Displays currently selected brush type.
Note: Currently, only
scatter type is available. |
5 |
Apply To |
Shows what the current brush is able to paint/erase on.
All: Activating mode with nothing selected in stage allows all assets to be affected by brush tool.
Selected: Activating mode while one or more prims are selected locks brush tool to selected prims.
|
6 |
Name |
Displays the name of the currently selected.
|
7 |
Flood |
Activates flooding using the currently selected brush settings on apply to conditions.
|
8 |
Plus (+) |
Opens dialogue to create new brush and give name.
|
9 |
Save |
Saves the brush to the users documents folder.
Hint: Use
Go-To Brush to locate the exact directory on your system. |
10 |
Gear |
Rename Brush: Allows renaming the currently selected brush.
Clone Brush: Makes a copy of the current brush.
Remove Brush: Deletes the current brush from disk. This is permanent.
Go-To Brush: Opens browser window to the stored location of the currently selected brush.
|
Modes
Modes allow brushes to take the form of an “eraser” (removing brushed content) or a “brush” (adding brushed content).
Paint Mode
The Paint Mode allows users to brush randomly scattered assets or point instances on surfaces based on the brush parameters.
Erase Mode
The Erase Tool allows users to use a brush interface to delete selected assets.
Note
if there are no assets listed in the assets pane, the erase brush will have no effect.
Assets
The assets portion of the paint tool allows users to select 1 or more assets to be used in the paint operation.
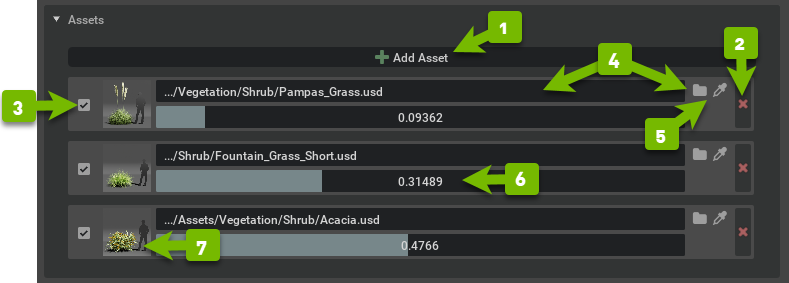
Ref # |
Option |
Result |
|---|---|---|
1 |
Add Asset |
Adds an asset to be placed by the brush.
|
2 |
Remove Asset |
Removes an asset from the brush.
|
3 |
Enable Toggle |
Enables/Disables the asset.
|
4 |
Select Asset |
Opens browse dialogue to select an asset to be used in the brush.
|
5 |
Eye-drop |
Allows selection of stage/viewport asset to be used in the brush.
|
6 |
Weight |
Controls the amount/chance the asset is selected during placement.
|
7 |
Thumbnail |
Displays a preview of the brush asset.
|
Note
Users can drag and drop assets into the select asset dialogue box.
Parameters
Option |
Result |
|---|---|
Brush Size |
The radius of the brush in centimeters.
|
Brush Falloff |
Allows selection of several pre-configured falloff types.
|
Density |
Determines the number of placed assets, higher numbers place more assets.
|
Stamp Spacing |
Used when dragging the brush, controls the distance between each stamp.
|
Object Padding |
Controls the spacing between assets, used to reduce overlap.
|
Vertical Offset |
Offsets placed assets on the z axis.
|
Conform to Surface |
Rotate painted meshes/instances to match the surface geometries normal
facing direction.
|
Physics |
Enable Zero Gravity placement
If vertical offset > 0, and this switch enabled, assets will “drop” onto Marked surface.
|
Gravity |
Enables generic gravity when placing.
|
Instancing |
Allows the user to replicate meshes in a variety of ways.
Point Instance: Places point markers which are then populated by instances
Instance Asset: Places instanced assets directly in the scene.
None: Places assets directly and does not use instancing.
|
Align to Stroke |
Aligns the rotation of the placed assets to the stroke. Overrides Rotation Parameters.
|
Rotation |
Randomly rotate placed assets within low/high range parameters. (Applied to the Z axis)
|
Scale |
Toggles Scaling on/off for the selected brush.
|
Bias |
Controls the favor of scale factors.
Towards Min: Values Less than 1
Towards Max: Values Greater than 1
1: No favor is given, disables bias
|
Min |
The minimum scale permitted during distribution
|
Max |
The maximum scale permitted during distribution
|
Weight |
Controls the curve of scale factors used in distribution
Lower numbers sharpen the distribution curve
Greater numbers flatten the distribution curve
|
Note
Density is directly related to object padding. If greater density is needed and increasing density appears to have little effect, reducing the padding amount to negative values can help in increasing the density of the brush.
Hot Keys
Key Command |
Function |
|---|---|
|
Toggle Paint Mode |
|
Brush Size |
|
Erase |
|
Undo |