Animation Stage Recorder (Beta)
Overview
The Stage recorder enables the user to capture the motion and USD property changes within a USD stage. With options to write directly to a layer or to write to disk as a timeSampled USD file. The stage recorder will record at the framerate specified in your timeline with the exception of when “live Mode” is enabled - In live mode you can specify a max target framerate in the recorder. The recorder uses the same hierarchy in the output USD as existed at the time of recording, So the layer structure and asset names must match when applying the animation as a layer.
User Manual
To Load the Stage Recorder - enable the extension omni.kit.stageRecorder To access the Stage Recorder window - Click the “record” Icon in the timeline window or go to Window/Animation/StageRecorder
Option |
Result |
|---|---|
Add Selection |
Any prims currently selected in the stage view will be added to the stage recorder.
|
Add Prim |
Opens a menu that allows to search for and add individual prims.
|
Record |
Initiates playback and capture. Provided are the options to display progress in Frames or Time.
|
Note
To remove a prim from the Recorders target List after it has been added, Mouse over the entries in the recorders list to reveal the Delete icon.
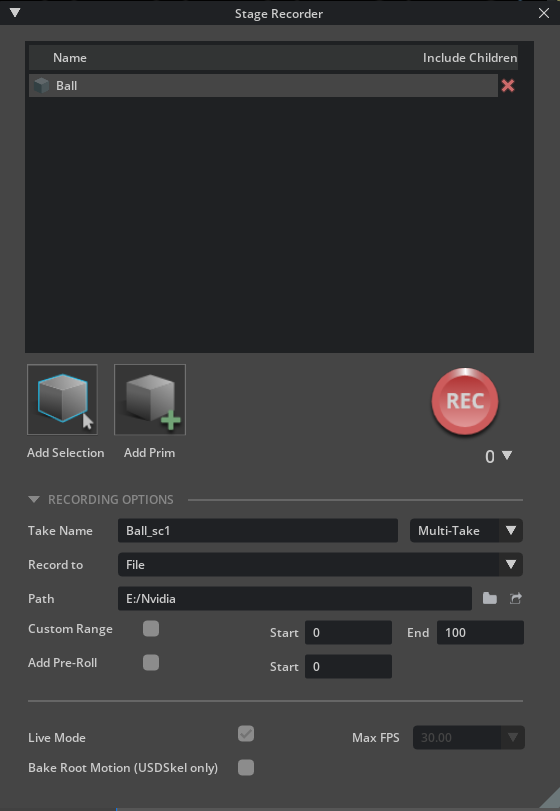
Record Options
Option |
Result |
|---|---|
Take Name |
Here you can specify a take name for the output TimeSample file. Selecting Multi-take will automatically increment the file name where multiple recordings have been made.
|
Record To |
Provided are the options to write the recorded TimeSample data to a layer and to create a USDTimeSample file on disk that can be applied to the asset as a layer over.
|
Custom Range |
Allows the user to specify a specific frame range to be captured.
|
Add Pre Roll |
For use in capturing simulations - where the simulation needs a lot of frames to ramp up the simulation. Use this setting to specify how much pre roll time should pass before data is captured.
|
Live Mode |
Decouples the recorder from the timeline and captures all live updates as timeSamples.
|
Max FPS |
When Live Mode is enabled this sets a target FPS to capture the live session in.
|
Bake Root motion-usdskel |
Only Record Skel animation. Related x-form animation on the skel will be baked into the skelroot.
|
Using the Captured TimeSamples
The Stage-Recorder writes out the timeSamples as .usd files intended to be applied as layer overs.
The recorder uses the same hierarchy in the output USD as existed at the time of recording, So the layer structure and asset names must match when applying the animation as a layer.
When applying the captured animation as a sublayer - the layer must be of a higher opinion in order for the deltas to have an effect on the lower layer.
The most direct way to achieve this is to add your original stage to a new stage as a sublayer - then add the captured animation as another sublayer and place it “above” the original sublayer.
Please see the Layers Documentation for more details on using USD layers.
Using Stage Recorder with Anim Graph
For playing Back animation captured from animation generated in the animation graph - the user needs to do 2 things.
Disconnect the AnimGraph from the character. Otherwise AnimGraph will have priority over the time samples. The standard way to do this is to select the SkelRoot prim (e.g., /World/Character) and go to the properties panel to remove the Animation Graph property by clicking the red “x”.
With the captured time samples loaded in a layer, select the Skeleton prim (e.g., /World/Character/Root) and click “Add Target” in the Skeletal Animation property for Animation Source. In the “Select Targets” popup, select the SkelAnimation prim (e.g., /World/Character/Root/AnimPose) as the source of the time samples.
Tips
USD does not consider the existing time samples to warrant a change event. So, in it’s current form, Stage Recorder is not aware of existing time samples. If the source is time samples already, the recorder does not re-sample and therefore captures nothing.
When using AnimGraph for character animation, be sure to select the skelanim that AnimGraph writes to rather than the skelroot. Otherwise you may find that the recording is empty.
If you wish to record a large stage with lots of assets as a single animation recording - You can add the root to the stage recorder and write out all the assets under that one hierarchy to a single file. Adding each individual Prim will generate a file.usd for each prim.
API commands
Start recording using the specified arguments.
Args |
Result |
|---|---|
target_paths (List[Tuple[str,bool]]) |
A list of tuples, each specifying the path and whether to include children.
|
live_mode (bool) |
Whether to record live or lockstep.
|
use_frame_range: (bool) |
Whether to use the specified arguments for start and end frame.
|
start_frame: (int) |
Starting frame.
|
end_frame: (int) |
Ending frame.
|
use_preroll: (bool) |
Whether to use the specified argument for preroll frame.
|
preroll_frame: (int) |
Starting frame after pre-roll (to allow sim to “warm-up”).
|
record_to: (str) |
“FILE” or “NEW_LAYER”
|
take_name: (str) |
Base name for takes.
|
record_folder: (str) |
Folder path for takes.
|
increment_name: (bool) |
Whether to increment name for each take or overwrite.
|
apply_root_anim: (bool) |
Whether to bake root motion (UsdSkel only).
|
fps: (float) |
Frame rate in Live Mode, otherwise just for setting timeCodesPerSecond (0=stage fps).
|
Start recording
omni.kit.commands.execute(

    'StartRecording',
    target_paths= [["/World/Character_Center", True], ["/World/Character_Left", True]],
    live_mode=True,
    use_frame_range=False,
    start_frame=0,
    end_frame=100,
    use_preroll=False,
    preroll_frame=0,
    record_to="New Layer",
    take_name="My_Cool_Take",
    record_folder="C:/Temp",
    increment_name=False,
    apply_root_anim=True,
    fps=30.0
    )
Stop recording
omni.kit.commands.execute(
    'StopRecording'
     )