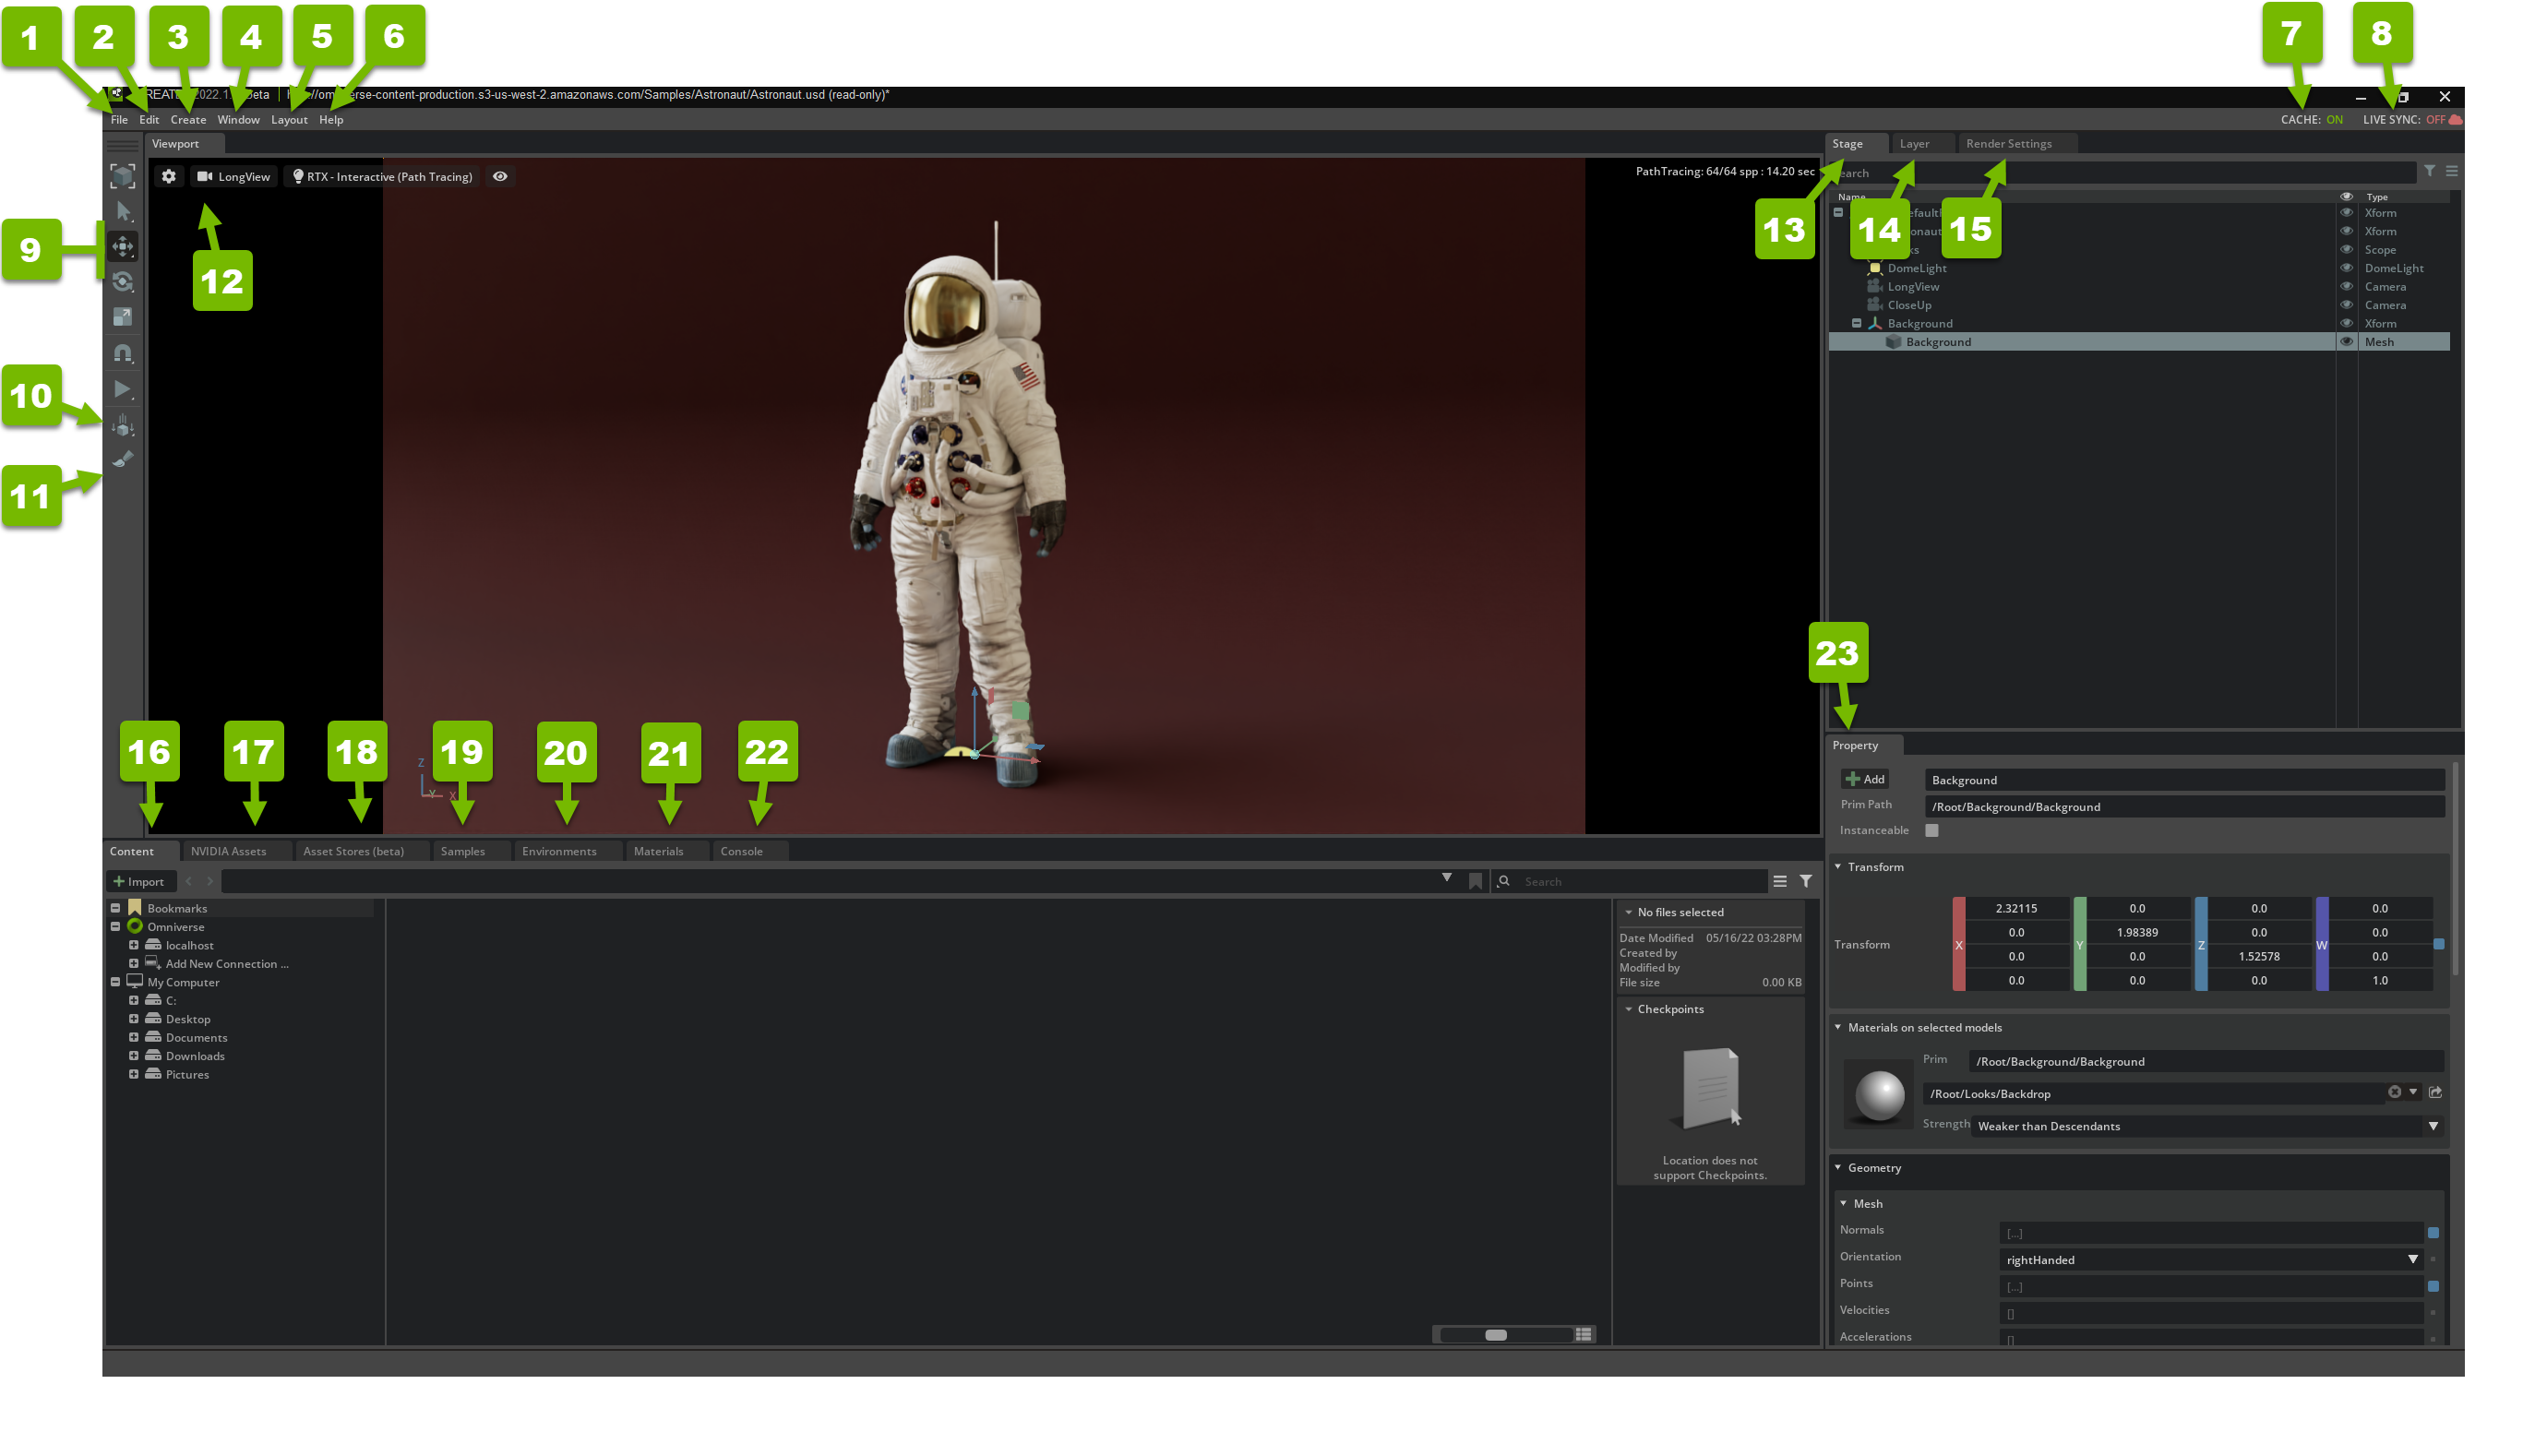
User Interface
Omniverse Create features a modern style interface allowing the user to customize their interface based on the task at hand. The image above represents a typical (default) layout. This section is intended to give you a clear understanding of the interface elements and their intended purpose.
Viewport

Viewport Settings
Camera Selection
Shading Mode
Element Visibility
Current Layer
Viewpoint settings

Option |
Usage |
---|---|
Viewport Settings |
Resets settings found in the panel to their default values
|
Camera Speed |
When in fly mode, how fast does the camera move
|
Gamepad Camera Controller |
Enables Gamepad for camera control
|
Grid Color |
The color of the grid lines
|
Selection Color |
The color for selected entities
|
Selection Width |
How large the selection box is
|
Bounding Box |
Color of bounding box
|
Gizmo Constant Scale |
Scale of Gizmos using Constant
|
Gizmo Global Scale |
Scale of Gizmos using Global
|
Gizmo Style |
Use 2D or 3D icons
|
Bind Camera to Gamepad |
Connects the viewport to the gamepad input
|
Render Resolution Multiplier |
Allows you to up/downres your based off Render Resolution.
|
Render Resolution |
Base Render Resolution
|
Selected Camera
Perspective
Top
Front
Right
Shading Mode
RTX Realtime
RTX Path-traced
Iray Photoreal
Iray Interactive
Axis Indicator
Informs the user about the world orientation
FPS Indicator
Informs the user about the current framerate
Current Layer Indicator
Informs the user about the layer currently selected
Resolution Indicator
Displays the current resolution.
Transform Gizmo
Gizmo for transforms on the USD
Selection Outline
Outlines the currently selected entity or group of entities
Viewport Widgets
General Usage
Operates in World or Local space
Free move, constrained to a plane, constrained to an axis
Incremental adjustments via snap settings
Translate
Rotation
Scale
Tool Bar

Icon |
Menu Item |
Action |
---|---|---|
Select (Model / Primitive) |
Allows user to pick select and object in the viewport.
This is also the default viewport mouse behavior.
|
|
Move (Global / Local) |
Instantiates a user widget that allows user to move a
selected object or group of objects
|
|
Rotate (Global / Local) |
Instantiates a user widget that allows user to rotate
a selected object or group of objects
|
|
Scale |
Instantiates a user widget that allows user to scale a
selected object or group of objects
|
|
Snap (enable/disable) |
Sets snapping to specified increments or surface snap.
|
|
Select Mode |
Toggles transform widgets between local and global
translation modes
|
|
|
Start an animation
|
|
|
Stop an animation
|
Note
Tools with a small triangle below their icon denotes additional options are available by right clicking the icon.
Snap Tool
The snap tool allows the user to “snap” to specific increments for exact rotations and alignments. To enable or disable snap, simply click the toolbar icon to toggle it back and forth. To edit the settings of the snap, simply right click the icon to set.
Snap Rollout

When you right click the Snap Tool, the Snap rollout appears.
Option |
Result |
---|---|
Snap Settings |
Opens the Settings Panel (See Below)
|
Increment Snap |
When Snap to Increment is selected the increments used in Snap Settings are Used.
|
Face Snap |
When Snap to Face is selected the selected object will snap to nearby faces.
|
Snap Settings

These options are relative only to Incremental Snap Mode and define the distance of each snap “jump”.
Option |
Result |
---|---|
x/y/z Position |
The number of units in Centimeters to use for Incrementing Snap Position
|
x/y/z Rotation |
The number of degrees to use for Incrementing Snap Rotation
|
Scale |
The number of scalar value to use for Incrementing Snap Scale
|
Note: The snap tool in Omniverse is a relative snapping tool. This means that the snap will be incremental to whatever your current position/rotation/scale is. For example, if you have an object rotated 1 degree then set snapping on for 90 degree increments, the rotation will be 91, 181, 271, etc.
Tabs
Tabbed windows can be docked anywhere in the user interface (UI)

Panel Being Dragged (See Note Below)
Panels Original location
Acceptable Docking Location(s)
Note
A tab can be “torn-off” and moved to another panel or window by click-hold-drag on the tabs title-bar and dragging it to another location or UI pane.
Grab Handles
A grab handle in the UI designates something that can be adjusted by the user

Grab Handle
Grab Handles are “invisible” UI Element dividers that, when rolled over, will illuminate and can be click-dragged. This allows for UI customization especially helpful in managing window content.
Note
Sliding is restricted to horizontal or vertical only.
Console

Menu Items |
Action |
---|---|
|
Clears the log window
|
|
This is where Omniverse Create feeds
back useful information to the user
|
|
Users put in commands here
- Supplies command argument information to the user
- Supports command history
|
Utilities
The utilities Top-Menu allows access to some useful and specialized features and toggles.
Note
If this menu is not visible, be sure to enable the omni.utils.utilities_menu extension in Window > Extension Manager.
Prim Exporter
Prim exporter allows you to export a primitive from a model and store it in a directory of your choosing.

Option |
Result |
---|---|
Output Directory |
Displays the location selected for output.
|
Select Folder |
Opens a browser allowing selection of export location.
|
Use Current |
Use the directory your file is currently stored in.
|
Save as Single Asset |
If multiple prims are exported, this option allows them to be combined into one asset.
|
Toggles
Toggle Wireframe Mode
Enables and Disables wireframe rendering on selected objects. When an object is drawn in wireframe mode, the material is still applied to the visible wireframe of the object. The thickness of the wireframe lines can be controlled with a setting in the Common Rendering Settings window called ‘Wireframe Thickness’ (in Debug View section)
Toggle Cast Shadows
Enables and Disables casting of shadows by the selected objects.
Toggle Matte Objects
Enables and Disables the treatment of an object as a so-called ‘matte’ object. A matte object can be used in AR/XR setups to collect the lighting contributions caused by non-matte objects in the scene. The lighting collected in this way can then be composited with a background plate or video. The matte object itself will not be visible, only the lighting it receives from non-matte objects is.
Toggle Camera Visibility
Enables and Disables the visibility of an object directly to the camera. When an object is not visible to the camera directly it is still reachable through secondary bounces. Therefore such objects will still appear on mirrors and glossy reflections, and contribute to diffuse interactions.
Stage +Y/+Z Up
Sets the global orientation based on either Y Up or Z up.
Update MDL Schema
Upgrades MDL references to use the most current UsdShade MDL schema (version).