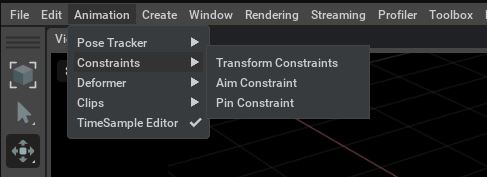
Animation Constraints (beta)#
Option |
Result |
|---|---|
Transform Constraint |
Allows you to setup a fixed distance constraint between the Driver and Driven xformable’s transforms.
|
Pin Constraint |
Allows you to setup a fixed distance constraint between the Driven xformable’s transform and its closest point on the Driver Mesh
|
Aim Constraint |
Allows one object to point towards another object and track its position as it moves.
|
Transform Constraint#
The transform constraint module is included in the extension omni.anim.xform_constraint. It is about to constrain an object to a certain transform. The source of the transform could be a joint of a skeleton, or a Xformable prim.
A transform constraint can be created between two xformable prims with the following steps:
Select two xformable prims. The first one is the driver prim while the second one is the driven prim.
Click the Animation/Constraints/Transform Constraint menu to create several ComputeNode typed prims as the children of the driven prim. These ComputeNode prims implement the xformable constraint feature.
Note that the relative transform between the driver and driven can be modified after the ComputeNode prims are created.
By checking the computeRelativeTransform attribute in the [driven]/xformConstraint/constraint prim, you are free to move either the driver or driven prim. At the time when you uncheck the computeRelativeTransform, the driver and the driven will keep the relative transform as is.
You can also create a constraint between a skeleton joint and an Xformable. First you need to toggle the skeleton visualization from the eye icon as shown in Skeletal Animation. Then just follow the same guide as to constrain two Xformables. The only difference is to select joint prim as the driver prim.
Pin Constraint#
In the image above, pinConstraint is created to attach the red cube to preexisting jiggly animation.
Pin constraint is used for sticking Xformable onto a point on mesh surface while maintaining its offset. Example use case is for constraining buttons onto deforming cloth.
PinConstraint Attributes |
Type |
Result |
|---|---|---|
node:type |
Token
|
OmniGraph node type
|
active |
Bool
|
Main switch for the node
|
computeRelativeTransform |
Bool
|
Enable edit mode of the node to live update relativeTransform using current pose
|
input:masterPrim |
Relationship
|
Driver Mesh
|
input:slavePrim |
Relationship
|
Driven Xformable
|
input:masterPoints |
Point3fArray
|
Driver Mesh points
|
baryCoord |
Vec3f
|
Barycentric coordinate of the surface point
|
triangleIndices |
Int3Array
|
Driver mesh triangle vertex indices to stick the point on
|
relativeTransform |
Matrix4d
|
Recorded relative pose between the driven and the surface point. Updated by the node when computeRelativeTransform is True.
|
Create a Pin Constraint#
The Pin Constraint menu will create a PinConstraint OmniGraph node under the driven Prim.
Enable omni.anim.pinConstraint extension
Select master Mesh (first) and to be driven Xformable (second).
Click Animation >> Constraint >> Pin Constraint menu
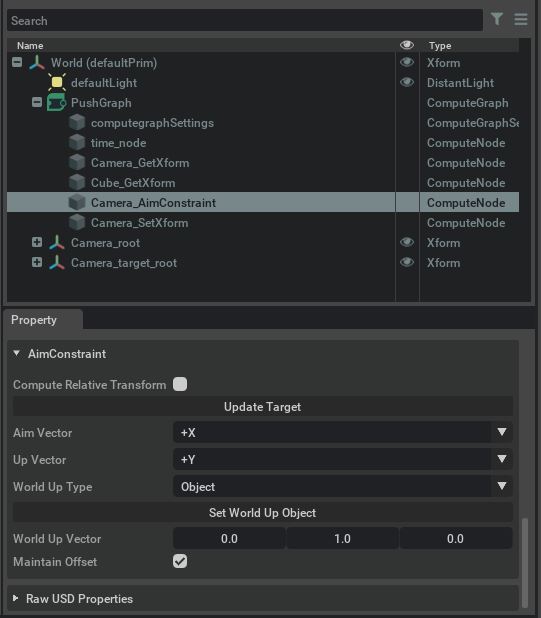
Aim Constraint#
Allows one object to point towards another object and track its position as it moves.
AimConstraint Attributes |
Result |
|---|---|
computeRelativeTransform |
Enable edit mode of the node to live update relativeTransform using current pose
|
Update Target |
Allows you to select the target/driver object
|
Aim Vector |
Sets which axis to point the object along
|
World Up Type |
Select from “Scene, Object or vector” to set preferred Up Vector method - If scene is selected it will default to the stages world up axis
|
Set World Up Object |
If “object” is set as “World Up Type” Click to select an object from the stage to set Up object target. This target can be animated
|
World Up vector |
If “Vector” is selected in “World Up Type” Use these fields to Specify the desired up vector
|
Maintain offset |
The driven object remains at its relative position/orientation when the constraint is applied and does not snap to align the pivot orientations
|
Create a Aim Constraint#
Enable omni.anim.pinConstraint extension or In Machinima - access constraints from the animation/constraints menu.
To use - Select the first object - Then holding the control key - select the second object.
First select the object to be the aim target or driver object.
Holding down the control key select the second object. This will be the driven object. Eg camera.
On some prims - upon creation of the Aim constraint - The orientation of your driven object may change so its not pointing towards the target. This indicates that prims have different default orientations. Check the “maintain offset” box in the AIM_constraint compute node so the driver object maintains its original orientation.