Create a New Variant Set on a Layer#
Pipeline Developer Look Developer
In this example, most variant sets come directly from DELTAGEN and may be edited in your Omniverse application. New variant sets may also be created. Before introducing that workflow, it’s important to review some important topics about USD variants.
USD Strength Ordering#
Variants are type of composition arc in USD. How the various composition arcs are combined in order of strength is often referred to by the acronym LIVRPS. Learn more about this topic in the OpenUSD documentation.
Layers → Inherits → Variants → References → Payloads → Specialize (LIVRPS) |
Prim Location#
Variant sets are defined on prims in the stage hierarchy rather than being standalone prims themselves. When using Kit template applications like USD Composer, these variant sets can only modify prims and properties at or below their location in the hierarchy. For example, in the workflow below, both the left and right headrests need to be modified by the new variant set, so it must be added to a prim higher than both headrests, but not any higher than necessary.
Performance Considerations#
For the best performance with variants, it is best to follow a few guidelines:
Author variants as close to the prim you are changing as possible, ideally on the prim being modified by the variant or on its direct parent.
Variants that swap prims using visibility are more performant, but have a greater impact on memory usage.
Variants that swap payloads by asset paths will require less memory, but the stage will take longer to compose after swapping.
Variants that swap shader parameters perform better than variants that change material bindings.
Refer to the Variant Workflows documentation for more information.
Workflow#
The following workflow was used to create a new variant set to toggle the visibility of both headrests. Note: This file in the Authored folder already has these changes made to it for you for reference.
Using the Layer panel, insert Variant_HeadrestVisibility.usd as another layer. This layer can be created using the steps below.
Open the project USD file in the Authored folder (ConceptCar.usdc).
Navigate to the Layer panel and verify the Root Layer is set to be the authoring layer. If set correctly, the Root Layer should look like Root Layer (Authoring Layer) and any changes you make are applied to this layer.
Select the Create Sublayer icon at the bottom of the Layer panel.
Navigate to the Authored/SubUSDs folder. Enter the file name Variant_HeadrestVisibility and click Save.
Observe that the gray save icons to the right of the Root Layer, and the newly created Variant_HeadrestVisibility.usd layer, have both turned blue. This color change indicates there are unsaved changes on those layers. Click both of these blue save icons to save both layers.
Important
Double-click on the Variant_HeadrestVisibility.usd layer to set the layer as the authoring layer. Now that the new layer has been set up, the new variant can be created using it.
Right-click on this prim and select Edit Variants. This automatically opens the Variant Editor panel.
World > ConceptCar_3xf > ConceptCar > carInterior > frontSeatAllGroupIn the Variant Editor panel, click on the Add New Variant Set button.
Right-click on the new Variant Set in the list and select Rename Variant Set.
Rename the variant set to “Headrests”.
Right-click on the only Variant in the set and select Rename Variant.
Rename this first variant to “Headrests_ON”.
Click on the Headrests_ON variant. When selected, the variant turns blue to indicate it is now active.
In the right pane of the
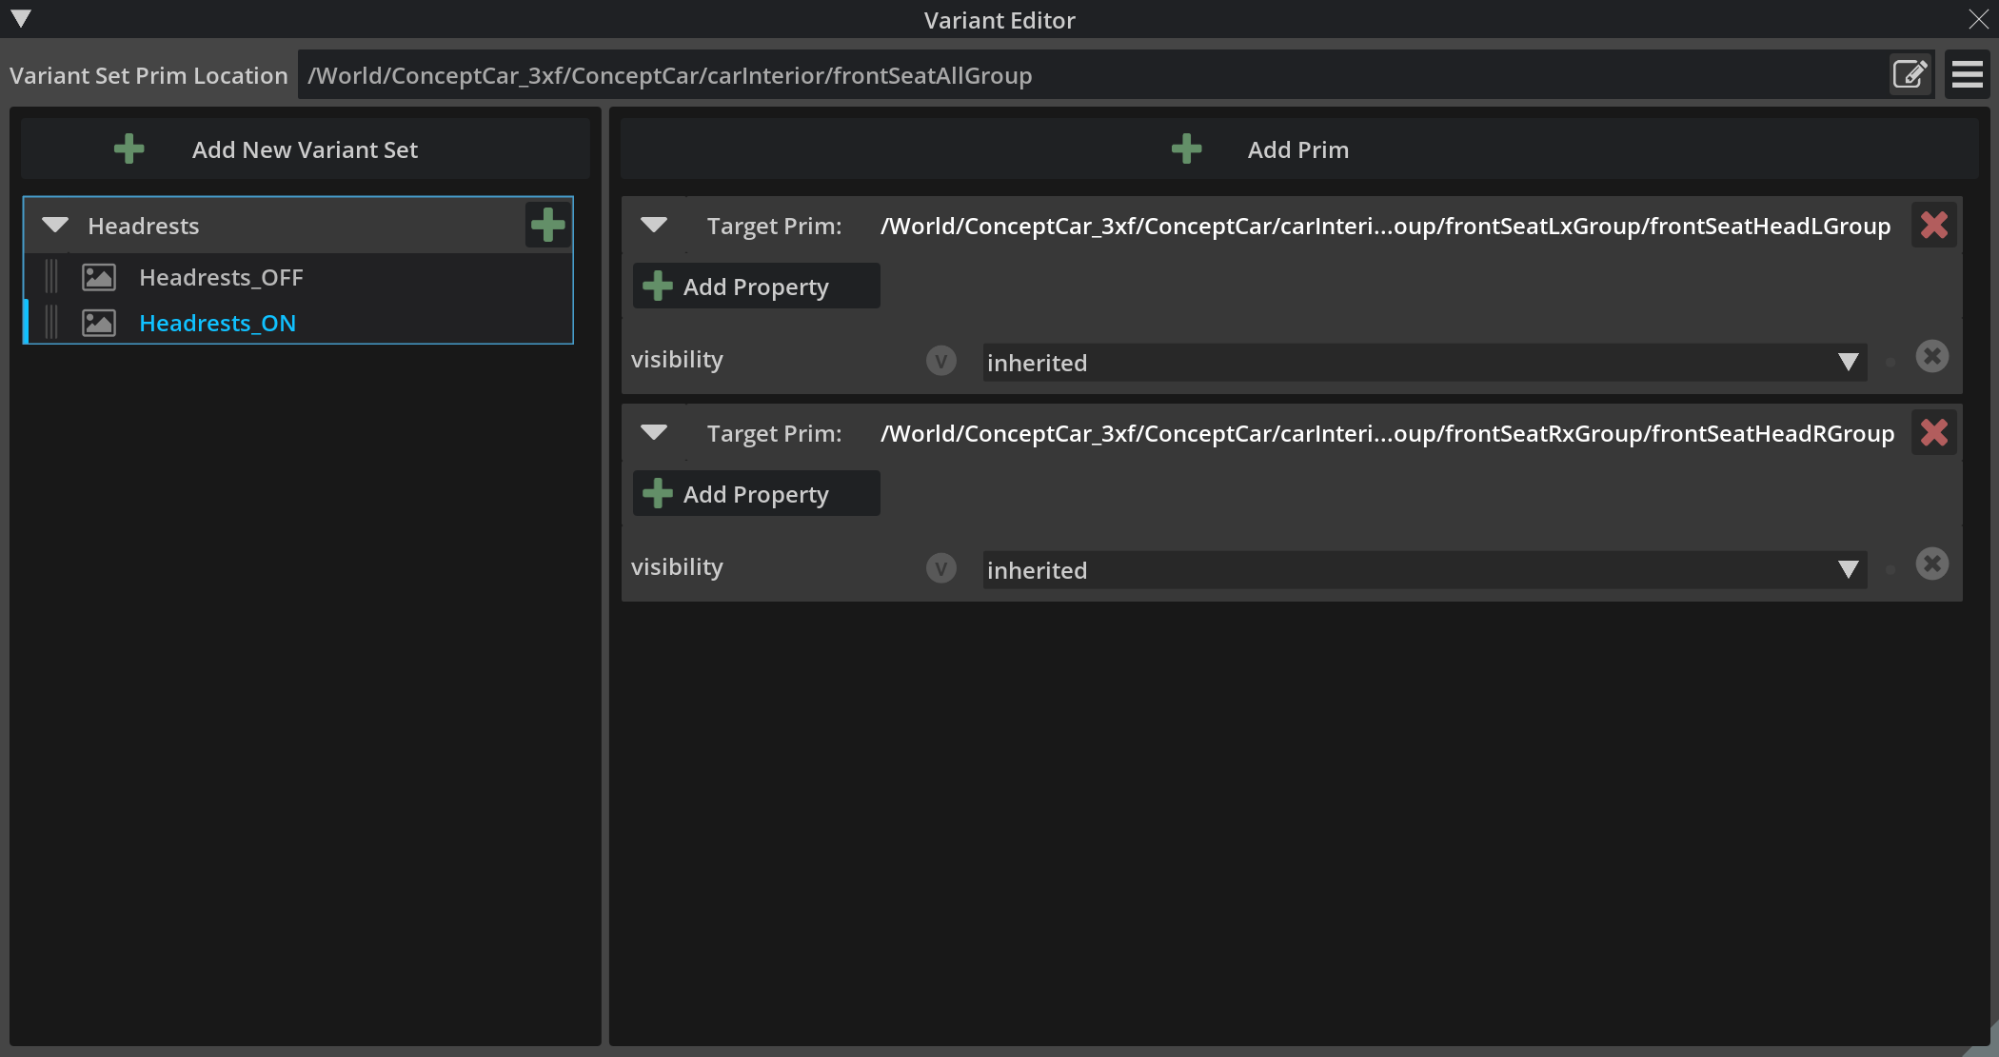
Variant Editor, click on the Add Prim button to add a new prim to this variant set. In theSelect Primspanel, navigate to the left headrest prim that you should modify:World > ConceptCar_3xf > ConceptCar > carInterior > frontSeatAllGroup > frontSeatLGroup > frontSeatLxGroup > frontSeatHeadLGroupSelect this prim using the Select button at the bottom of the Select Prims panel. If this button is not visible, the panel may need to be resized slightly.
Use the Add Prim button again to add this right headrest prim to the variant set:
World > ConceptCar_3xf > ConceptCar > carInterior > frontSeatAllGroup > frontSeatRGroup > frontSeatRxGroup > frontSeatHeadRGroupBoth prims that the variant modifies are now defined. Next, specify which properties must be changed. Click on the Add Property button on one of the target prims, and in the Select Properties panel, select visibility.
Click Add To All Prims to add this property for both left and right headrests. The visibility property can now be seen on each target prim and is set to a default value of inherited for both prims. For this setup, inherited is synonymous with visible. This is exactly what is needed for the ON variant.
Next, create the OFF variant by right-clicking on the Headrests_ON variant in the list and select Duplicate Variant.
Right-click on this new variant (
Headrests_ON_1) and select Rename Variant. Rename it toHeadrests_OFF.Click on the
Headrests_OFFvariant to make it active.You have now completed all of the tasks to add target prims and properties. The only remaining tasks you need to perform is to redefine the state of the visibility property for this variant. Click on the dropdown box for each prim and change its value from inherited to invisible. Now, when you choose to activate each variant, the headrest geometry can make the variant either visible or not visible in the Viewport.
Close the
Variant Editorand save the layer.