Assemble a Configurable USD Stage#
Pipeline Developer Look Developer
Before any work is completed to make interactive graphs, a stage needs to be created that houses all content being configured. The actual configurator stage is kept separate from the content USD data so these two items can be worked on simultaneously. This keeps each stage specialized for only one purpose, and keeps the intent of each USD file clear. Listed below are the major stage components in the concept car example with an overview of their role in the final configurator.
The files referenced in this phase are provided in the 3_ConceptCar_Example_106.0.3.zip sample asset.
Payloads#
Each component is added to the stage as a payload, and any updates to these components trickles up to the configured stage through USD composition. Payloads are easily created by simply dragging and dropping the component’s USD into the stage from the content browser. Payloads (as opposed to layers) are the ideal way to insert content that does not need to be precisely edited in the configured stage. A payload provides all variant data from its prims, but its composition layers and prims outside the defaultPrim are not editable. These protections allow developers to curate a final “deliverable” form of the payload USD for downstream use in the configurator, while ensuring all of its complex authoring steps occur on the file itself (and not in the configurator stage).
Ideally, once a payload is placed in the stage, the person authoring the configurator almost never needs to expand them or edit the prims within. Any updates would be received automatically by the people making changes to the constituent files.
Organization#
In an empty stage, some scope prims may be created for organization. These scope prims are optional, but an organized stage is much easier to work in, so NVIDIA always recommends you create some structure whenever possible.
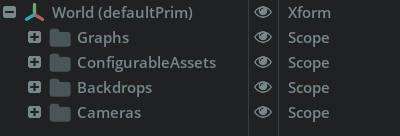
Graphs- the parent for all the graphs created.ConfigurableAssets- any 3D content or assets that are the focus of the configurator.Backdrops- anything related to the scene background or lighting.Cameras- all cameras, both interactive and static shot angles.
Backdrops#
Lights are found in the file .\Authored\SubUSDs\Lighting.usd. This is added as a payload to bring in the lighting setup. This payload brings in Lighting Sets and all of their variants. This allows the lighting to be worked on independently by other team members, be reused between multiple files, and this configured stage to receive all the latest lighting updates automatically.
Configurable Assets#
The concept car asset itself is in the file .\Authored\ConceptCar_3xf_mat.usdc, and is added to the stage as a payload. This is the highest level of the car’s USD data chain so the entirety of the work is layered into the configurator USD stage. All material changes, posing, and geometry work culminates in this final file. After the payload is placed, the prim has also been renamed to something easier to read (e.g., ConceptCar).
Cameras#
Cameras have been added from the file .\Authored\SubUSDs\Cameras.usd. This brings in several static cameras set up for this car. These cameras are all locked, and represent marketing style images tuned to an exact position. They are not intended to be interactive style cameras. The orbit camera asset is used instead for user interaction.
A unique configurator camera is provided in the file .\Configured\SubUSDs\Camera_Orbit.usd. It is placed alongside the static cameras. This is a prebuilt USD asset with its own custom graphs meant to work within this configurator sample. A more detailed tour of the orbit camera setup can be found here: Camera Smart Asset

The graphs used by the sample orbit camera assume a stage with Y-up orientation. This is the default setting in Kit. If the orbit camera is placed into an existing file with Z-up orientation, it will not rotate correctly. The graphs would need to be edited to work in a Z-up stage or the stage itself would need to be switched to a Y-up orientation.
Remember, the orbit camera IS NOT a default USD asset in Omniverse and is a custom created collection of graphs and a camera designed to work explicitly within the configurator examples provided. The orbit camera cannot function in any other stage without some supporting graph systems.
Graphs#
Finally, a graphs layer is added from the file .\Configured\SubUSDs\Graphs.usd. This contains the actual configuration graphs. These graphs could be added directly to the stage, but using a layer takes advantage of composition arcs and allows work to be distributed more easily across a team. When editing or authoring the graphs, remember to always switch to the graphs layer (by double clicking in the layer window), or open the graph layer file directly. An overview of layers can be found here: Overview of Layers in Omniverse
The concept car example uses the following graphs:
Name |
Purpose |
CarColors |
This graph controls incoming messages about packages of variants from the web app and sets multiple variants across the car based on the incoming inputs from the user. The names and options used by these presets are heavily coordinated with the variant package CSV options detailed in the next section. |
Backgrounds |
This is a small graph that switches the active background variant. |
Doors |
This graph blends between the open and closed variants of the doors, creating an animation between the two states. Much of the logic of this graph is a state machine, to check if the doors are in the middle of moving or already open before attempting to blend their variants. |
Wheels |
Another blending graph that follows the workflow from the door graph to rotate the wheels between their requested variants. |
CacheGeneration |
An optional graph used during the publishing process to cache all variants used by the configurator. A user would not be able to trigger this and is only used in the development and publishing of a configurator. |
SystemStartup |
A graph that manages the startup and stage preparation for the configurator. It handles the look and feel of the 3d viewport, enables the interactive camera, and has a start/stop command for configuration mode (pressing Ctrl-Alt-C) Note The systemStartup graph has two boolean options for auto-starting the configurator, and running in full-screen mode. In the configurable USD file, these options are left off so the file is easier to open and work on. When packaging, it is recommended to turn these both on so the configurator starts automatically and runs as a proper fullscreen experience in its final deliverable form. |
➤ Next: Build Configurator Functions