User Interface
Modes
NVIDIA Omniverse™ View has two user selected modes which tailor the User Interface based upon the needs of the current task. The UI modes are named according to their use case.
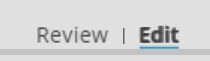
Edit Mode
Edit mode allows users to edit a scene and manage the way the scene is presented. It grants access to a variety of scene manipulation functions, lighting, cameras and accompanying UI.
Review Mode
Review Mode allows users to review or present the scene and hides most of the editing features. The viewport is expanded and controls needed for review such as camera selection are retained.
Top Menu

File
Menu Items |
Action |
|---|---|
Connect |
Connects NVIDIA Omniverse™ View to an Omniverse Nucleus.
|
Disconnect |
Disconnects a Connection between NVIDIA Omniverse™ View and an NVIDIA Omniverse™ Nucleus.
|
New |
Starts a New USD Document in NVIDIA Omniverse™ View.
|
New From Scene Template |
Starts a New USD Document in NVIDIA Omniverse™ View with some Prebuilt Elements.
|
|
Starts a scene with Cloudy Sky Lighting.
|
|
Starts a scene with Simple Studio Lighting.
|
|
Starts a scene with Sunny Day Lighting.
|
Open Recent |
Displays a list of recently opened USD files for quick access.
|
Open |
Launches a selected USD File.
|
ReOpen |
Reloads the Currently Opened USD file again.
|
Save |
Saves the current USD file in the previously saved location.
|
Save As |
Saves the current USD file with the option to select a location and name for the file.
|
Save Flattened As |
Saves the current USD file while merging all components to one mesh.
|
Exit |
Quits NVIDIA Omniverse™ View.
|
Edit
Menu Items |
Action |
|---|---|
Undo |
Reverts last action
|
Redo |
Reverts last Revert Action
|
Instance |
Creates a child of the selected item
|
Duplicate |
Makes a copy of the selected item on the current layer
|
Duplicate All Layers |
Makes a copy of the selected item on ALL layers
|
Duplicate Collapsed |
|
Delete |
Removes the current item from the scene permanently.
|
Focus |
Centers the viewport on the selected item.
|
Unhide All |
Reverts the visibility state of all items to visible in the scene.
|
Toggle Visibility |
Toggles the visibility state of the currently selected item.
|
Toggle Visualization Mode |
Switches between review and edit modes
|
Capture Screenshot |
Captures a screenshot with current screenshot settings.
|
Preferences |
Opens the preferences window.
|
Create
Menu Items |
Action |
|---|---|
Cube |
Adds a Cube Primitive |
Sphere |
Adds a Sphere Primitive |
Cylinder |
Adds a Cylinder Primitive |
Capsule |
Adds a Capsule Primitive |
Cone |
Adds a Cone Primitive |
Light |
Allows Creation of Lights |
Distant Light |
Adds a Directional Distant light (ie: Sun) |
Disk Light |
Adds a Directional Light based on a Disk Shape |
Rect Light |
Adds a Directional Light based on a Rectangle Shape |
Dome Light |
Adds an Hemispherical Omnidirectional Light |
Sphere Light |
Adds an Spherical Omnidirectional Light |
Camera |
Adds a camera to the stage |
Xform |
Adds a (null) locator to the stage |
Window
Menu Items |
Action |
|---|---|
Toolbar |
Shows/Hides the Toolbar
|
Asset Browser |
Shows/Hides the Asset Browser
|
Asset Details |
Shows/Hides the Details Panel
|
Material Browser |
Shows/Hides the Material Browser
|
Set Location |
Opens the Location Panel
|
Set Date and Time |
Opens the Date and Time Panel
|
Sky Browser |
Shows/Hides the Sky Browser
|
Stage View |
Shows/Hides the Stage
|
Sun Study |
Opens the Sun Study Window
|
Render Settings |
Opens the Render Settings Window
|
Preferences |
Opens the Preference Panel
|
UI Toggle Visibility |
Shows/Hides the User Interface (F7)
|
Full Screen Mode |
Enables and Disables Full Screen Mode
|
Rendering
Menu Items |
Action |
|---|---|
Common Render Settings |
Render Settings That Are Common to All Modes
|
Post-Processing Settings |
Settings That Are Applied After the Rendered Frame
|
Path Tracing Settings |
Parameters That Control Photo Mode
|
Real Time Settings |
Parameters That control Preview Mode
|
Eco Mode |
Toggles on Fast Rendering Mode (Sacrificing Quality)
|
Advanced
Menu Items |
Action |
|---|---|
Layers |
Shows/Hides the Layers Panel
|
USD Paths |
Shows/Hides the USD Path Tool
|
Extension Manager |
Shows/Hides the Extensions Panel
|
Help
Menu Items |
Action |
|---|---|
Reference Guide |
Opens NVIDIA Omniverse™ View Documentation
|
USD Paths |
Opens the Python Scripting API Documentation
|
Provide Feedback |
Sends Feedback to the Omniverse Development Team
|
About |
Gets Information About Your Omniverse Setup
|
Tool Bar
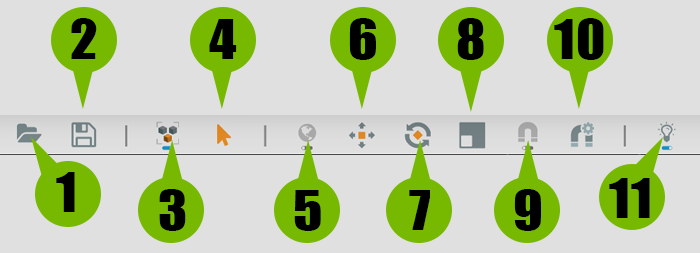
The Omniverse Tool Bar offers quick access to the most common actions used in NVIDIA Omniverse™ View.
Ref # |
Menu Items |
Action |
|---|---|---|
1 |
Open |
Launches a Selected USD File
|
2 |
Save |
Saves the Current USD File in the Previously Saved Location
|
3 |
Select Mode |
Toggles between selection of Scene Models or individual components
|
4 |
Select Tool |
Selects objects in the viewport based on selection mode
|
5 |
Local/Global |
Toggles between Local and Global Manipulation
|
6 |
Translate |
Moves/Translates Selected Objects based on Local/Global toggle
|
6 |
Rotate |
Rotates Selected Objects based on Local/Global toggle
|
8 |
Scale |
Scales Selected Objects
|
9 |
Snap |
Enable/Disable Snap to Grid
|
10 |
Snap Settings |
Allows configuration of the Snap Tool
|
11 |
Lights |
Toggles visibility of Lights in the Scene
|
Selection (Video)
Transforming Objects (Video)
Toggling Lights
Side Bar
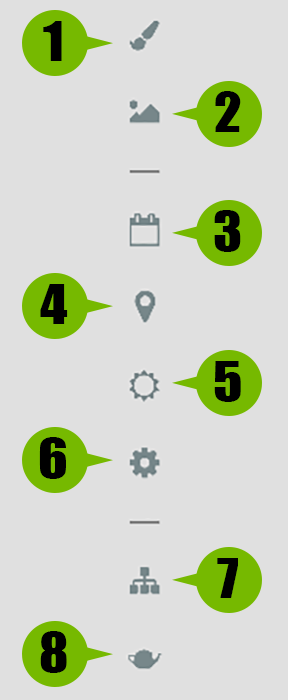
The NVIDIA Omniverse™ View Sidebar offers quick and easy access to the most commonly used areas of NVIDIA Omniverse™ View.
Ref # |
Menu Items |
Action |
|---|---|---|
1 |
Material Browser |
Shows/Hides the Material Browser
|
2 |
Sky Browser |
Shows/Hides the Sky Browser
|
4 |
Date and Time Panel |
Shows/Hides the Date and Time Panel
|
5 |
Location Panel |
Shows/Hides the Location Panel
|
6 |
Sun Study |
Shows/Hides the Sun Study Timeline
|
9 |
Preferences |
Shows/Hides the Settings Panel
|
7 |
Stage |
Shows/Hides the Scene Hierarchy
|
8 |
Render Settings |
Shows/Hides the Render Settings Panel
|
Note
Use of the Sun Study requires scene to have a Dynamic Sky.
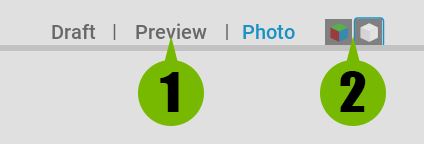
Display Options
Option |
Result |
|---|---|
Quality |
Sets the viewport visual fidelity.
Preview: RTX mode with some features turned off.
Draft RTX: Good quality features turned on, but still generally tuned for interactive speed over render quality.
Photo: Path Traced. this favors render quality over interactive speed.
|
Style |
Sets the rendering style for the viewport.
Shaded: This is the default rendered mode.
White Mode: White mode sets all opaque objects to use a simple mode material.
|
Viewport Toolbar
The Viewport toolbar is used to control various attributes and settings related to the viewport.

Ref # |
Option |
Result |
|---|---|---|
1 |
Display Options |
Allows access to enable and disable visibility of various scene elements.
|
2 |
Cameras Options |
Lists all cameras in a sub menu, selected menu is marked by a check.
|
3 |
Lock |
Disable/Enable edits to camera properties
|
4 |
Lens Length |
Drop down with common lens from 10mm - 300mm. If zoom lens is picked, 17mm-70mm for example, then an additional zoom
slider appears to allow user to adjust between the min/max lens values.
|
5 |
F-Stop |
Realistic f stops 1 - 32
|
6 |
Focal Distance |
When using depth of field, sets the focus point for objects to be clear and in focus.
|
7 |
Ratio |
Allows users to select from a list of common screen ratios/resolution.
|
8 |
Screen Resolution |
Allows for a custom resolution to be set
|
9 |
Ratio Lock |
Locks the ratio of the current screen resolution.
|
10 |
Take Snapshot |
Creates a snapshot with current snapshot settings
|
11 |
Screenshot Settings |
Selects Between Screen, High Quality, 360 Degree or Custom Resolution
Allows Quick Access to Snapshot Settings and Snapshot Folder Through Carat
|
Viewport Toolbar Walkthrough (Video)
Visibility Settings
Option |
Result |
|---|---|
Axis |
Up axis indicator that is is in lower left of the viewport.
|
Cameras |
Display of the visual camera meshes
|
FPS |
FPS display in upper right of viewport
|
Grid |
Ground plane grid visibility
|
Lights |
Visual indicators of the light.
|
Location |
Lower right Heads Up display of current location in file
|
Selection Outline |
Display of outline on selected objects.
|
Camera Options
Option |
Result |
|---|---|
Cameras |
Lists cameras in the scene and switches to selected camera.
|
Views |
Lists all default camera views.
|
Selected Camera |
Selected camera, clicking this opens a menu.
|
Create From View |
Copies all current camera settings and adds a new camera. Launches a name dialog to name new camera.
|
Screenshot Settings
Option |
Result |
|---|---|
Screenshot Path |
Chooses the path for saving your Screenshots
|
Capture Viewport |
Captures only the viewport
|