7.1.3. Cameras
7.1.3.1. Learning Objectives
In this example, we will learn how to
Add additional cameras to the scene and onto the robot
Add camera publishers
Send ground truth synthetic perception data through rostopics
7.1.3.2. Getting Started
Prerequisite
Completed ROS & ROS 2 Installation: installed ROS, enabled the ROS extension, built the provided Isaac Sim ROS workspace, and set up the necessary environment variables .
It is also helpful to have some basic understanding of ROS topics and how publisher and subscriber works.
Completed tutorial on OmniGraph and Add Camera and Sensors
Completed URDF Import: Turtlebot and Driving TurtleBot via ROS messages so that there is a Turtlebot ready on stage.
roscoreis running.
7.1.3.3. Camera Publisher
7.1.3.3.1. Setting up Cameras
The default camera displayed in the Viewport is the Perspective camera. You can verify that by the Camera button on the top left hand corner inside the Viewport display. Click on the Camera button and you will see there are a few other preset camera positions: Top, Front, and Right side views.
For the purpose of this tutorial, let’s add two stationary cameras, naming them Camera_1 and Camera_2, viewing the room from two different perspectives. The procedures for adding cameras to the stage can be found in Add Camera and Sensors.
You may want to open additional Viewports to see multiple camera views at the same time. To open additional Viewports: Window -> Viewport -> Viewport 2 to open the viewport, and select the desired camera view from the Cameras button on the upper left corner in the viewport.

7.1.3.3.2. Building the Graph for a RGB publisher
Open Visual Scripting: Window > Visual Scripting > Action Graph.
Click on the New Action Graph Icon in middle of the Action Graph Window, or Edit Action Graph if you want to append the camera publisher to an existing action graph.
Build an Action Graph with the nodes and connection of the following image, and parameters using the table below.
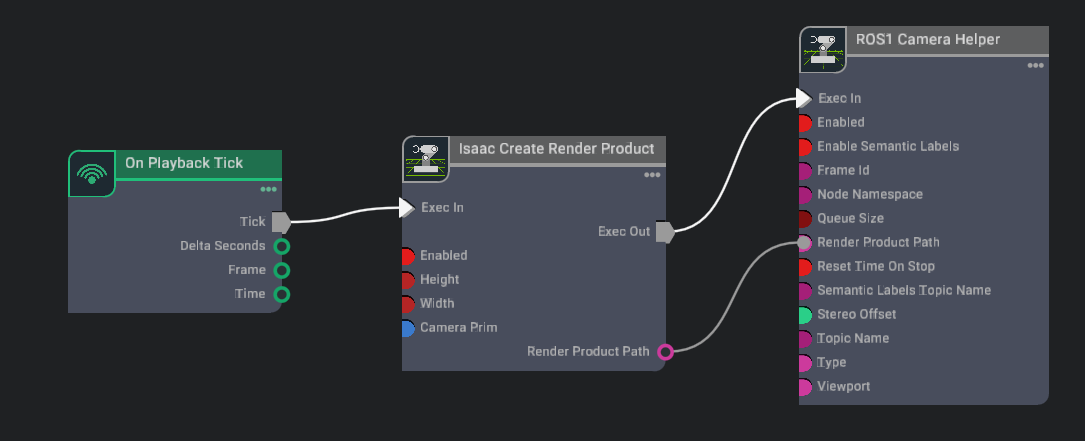
Parameters:
Node
Input Field
Value
Isaac Create Render Product
cameraPrim
/World/Camera_1
enabled
True
ROS1 Camera Helper
type
rgb
topicName
rgb
frameId
turtle
Ticking this graph will automatically create a new render product assigned to Camera_1.
7.1.3.3.3. Graph Explained
Isaac Create Render Product: Creating a render product prim which acquires the rendered data from the given camera prim and outputs the path to the render product prim. Rendering can be enabled/disabled on command by checking/unchecking the
enabledfield.ROS1 Camera Helper: Indicating which type of data to publish, and which rostopic to publish it on.
Camera Helper Node
The Camera Helper Node is abstracting a complex postprocessing network from the users. Once you press Play with a Camera Helper Node connected, you may see that in the list of Action Graphs when you click on the icon on the upper left corner of the Action Graph window, a new one appears: /Render/PostProcessing/SDGPipeline. This graph is automatically created by the Camera Helper Node. The pipeline retrieves relevant data from the renderer, process it, and send them to the corresponding ROS publisher. This graph is only created in the session you are running. It will not be saved as part of your asset and will not appear in the Stage tree.
7.1.3.4. Depth and other Perception Ground Truth data
In addition to RGB image, the following synthetic sensor and perceptual information also are available for any camera.
Camera Info
Depth
Point Cloud
BoundingBox 2D Tight
BoundingBox 2D Loose
BoundingBox 3D
Semantic labels
Instance Labels
Each Camera Helper node can only retrieve one type of data. You can indicate which type you wish to assign to the node in the dropdown menu for the field type in the Camera Helper Node’s Property tab.
Note
Once you specify a type for a Camera Helper node and activated it (i.e. started simulation and the underlying SDGPipeline has been generated), you cannot change the type and reuse the node. You can either use a new node, or reload your stage and regenerate the SDGPipeline with the modified type.
An example of publishing multiple rostopics for multiple cameras can be found in our asset Isaac/Samples/ROS/Scenario/turtlebot_tutorial.usd.
7.1.3.4.1. Verifying ROS connection
Use rostopic echo /<topic> to see the raw information that is being passed along.
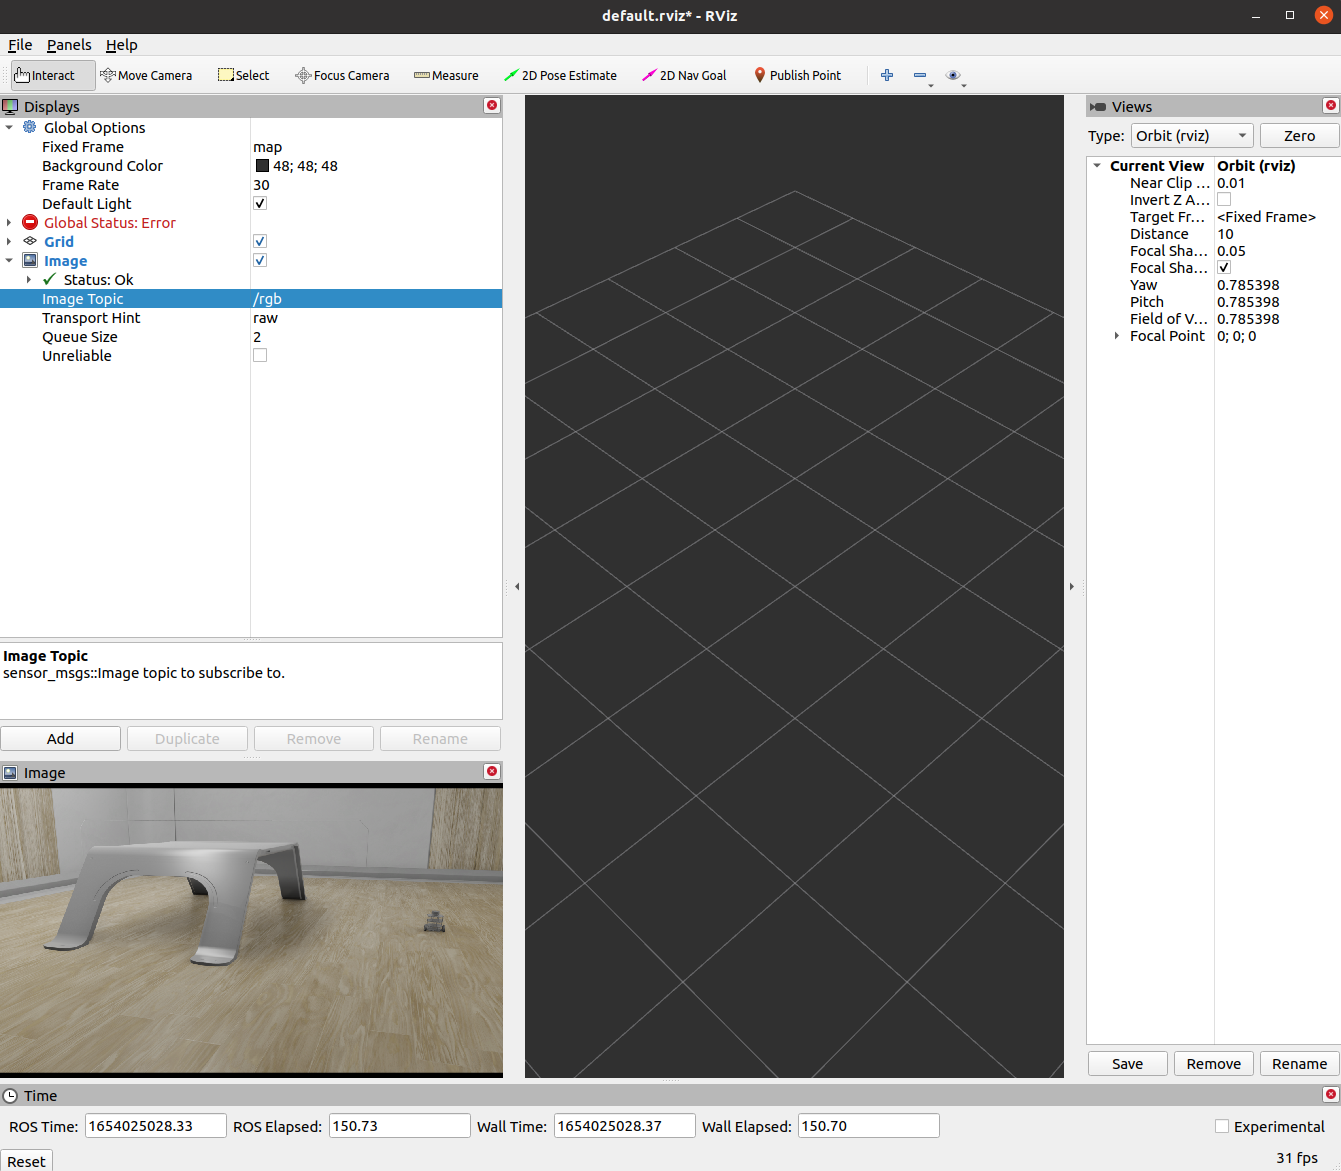
To view the published image, open a new terminal with ROS environment sourced, make sure roscore is running and the simulator is playing, and run command rosrun image_view image_view image:=/rgb to see the image published on the /rgb topic. It should reflect what is seen in the viewport. If you move the camera around in the viewport, the published image should follow.
We can also view the image in RViz. open a new terminal with ROS environment sourced, type in rviz to open RViz. Add a Image Topic in the Display window, and make sure to match the image topic to the topic Name in the Camera Helper node, or in this case /rgb.
Note
If your depth image only shows black and white sections, it is likely due to somewhere in the field of view has “infinite” depth and skewed the contrast. Adjust your field of view so that the depth range in the image is limited.
7.1.3.5. Additional Publishing Options
To publish images on demand or periodically at a specified rate, you will need to use Python scripting. Go to ROS Camera for examples.
7.1.3.6. Summary
This tutorial introduces how to publish camera and perception data in ROS.
7.1.3.6.1. Next Steps
Continue on to the next tutorial in our ROS Tutorials series, ROS Clock to learn to setup ROS Clock publishers and subscribers with Omniverse Isaac Sim.
Go to Add Noise to Camera to learn how to publish camera images with noise.
Checkout Publishing Camera’s Data to learn how to publish camera’s data through Python scripting.
7.1.3.6.2. Further Learning
Additional information about synthetic data generation can be found in the Replicator Tutorial Series.
Examples of running similar environment using Standalone Python workflow is outlined here.