7.1.8. ROS Navigation
7.1.8.1. Learning Objectives
In this ROS example, We will
Demonstrate Omniverse Isaac Sim integrated with the ROS Navigation stack.
Use the Occupancy Map Generator.
7.1.8.2. Getting Started
Prerequisite
The ROS Navigation stack is required to run this sample. Install the ROS Navigation stack:
sudo apt-get install ros-$ROS_DISTRO-navigationThis tutorial requires
carter_2dnav,carter_description, andisaac_ros_navigation_goal. The packages are located under the directory<noetic_ws>/src/navigation/. They contain the required launch file, navigation parameters, and robot model. Complete ROS & ROS 2 Installation, make sure ROS environment is setup correctly and those packages are inside yourROS_PACKAGE_PATH.ROS bridge is enabled and
roscoreis running before running Omniverse Isaac Sim.OPTIONAL: Explore the inner workings of RTX Lidar sensors by learning How They work, the RTX Lidar Nodes that use them, and how to get RTX Lidar Synthetic Data.
7.1.8.3. The ROS Navigation Setup
This block diagram shows the ROS messages required for the ROS Navigation stack.
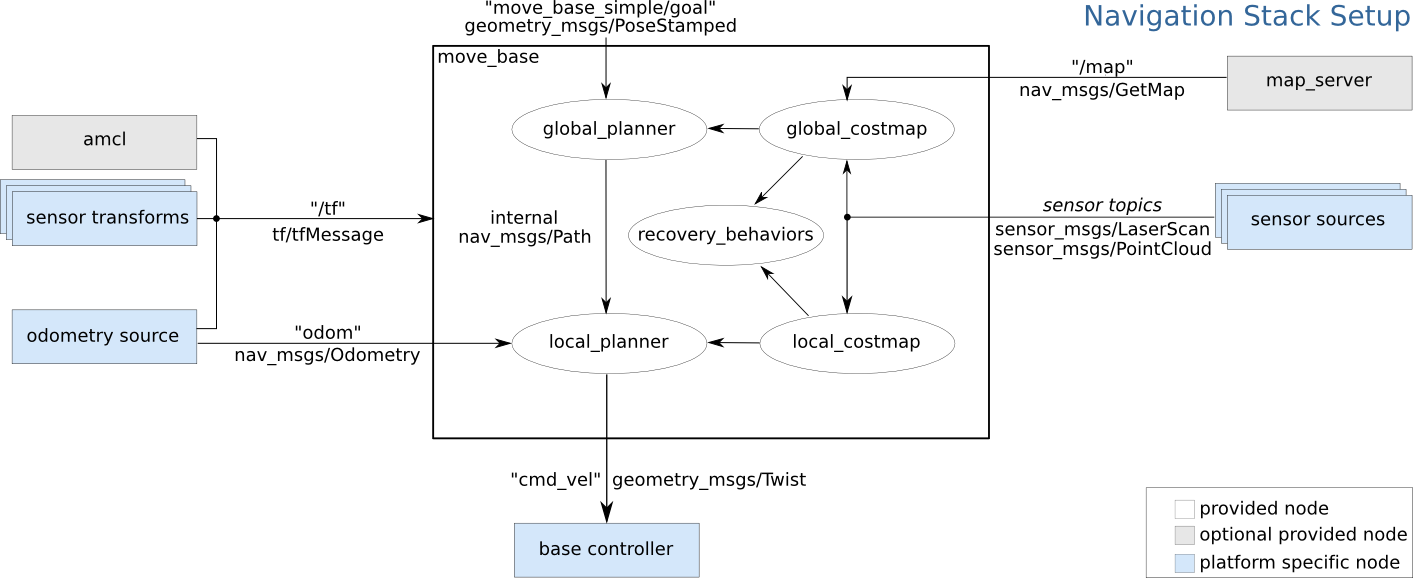
As described above, the following topics and message types being published to the ROS Navigation stack in this scenario are:
ROS Topic
ROS Message Type
/tf
tf2_msgs/TFMessage
/odom
nav_msgs/Odometry
/map
nav_msgs/OccupancyGrid
/scan
sensor_msgs/LaserScan
7.1.8.3.1. Carter_ROS OmniGraph Nodes
Go to Isaac Examples -> ROS -> Navigation to load the warehouse scenario.
Open the main ActionGraph by expanding
Carter_ROS. Right click onActionGraphand press Open Graph. The following ROS OmniGraph nodes are setup to do the following:Ominigraph Node
Function
ros1_subscribe_twist
Subscribes to the /cmd_vel topic and triggers the differential and articulation controllers to the move the robot
ros1_publish_odometry
Publishes odometry received from the
isaac_compute_odometry_noderos1_publish_raw_transform_tree
Publishes the transform between the odom frame and base_link frame
ros1_publish_transform_tree
Publishes the static transform between the base_link frame and chassis_link frame. Keep in mind that since the target prim is set as
Carter_ROS, the entire transform tree of the Carter robot (with chassis_link as root) will be published as children of the base_link frameros1_publish_transform_tree_01
Publishes the static transform between the chassis_link frame and carter_lidar frame
ros1_publish_laser_scan
Publishes the 2D LaserScan received from the
isaac_read_lidar_beams_nodeOpen the ROS_Cameras graph by expanding
Carter_ROS. Right click onROS_Camerasand press Open Graph. The following ROS Camera OmniGraph nodes are setup to do the following:Ominigraph Node
Function
ros1_create_camera_left_info
Auto-generates the CameraInfo publisher for the /camera_info_left topic. It automatically publishes since the
enable_camera_leftbranch node is enabled by defaultros1_create_camera_left_rgb
Auto-generates the RGB Image publisher for the /rgb_left topic. It automatically publishes since the
enable_camera_leftandenable_camera_left_rgbbranch nodes are enabled by defaultros1_create_camera_left_depth
Auto-generates the Depth (32FC1) Image publisher for the /depth_left topic. To start publishing, ensure
enable_camera_leftandenable_camera_left_depthbranch nodes are enabledros1_create_camera_right_info
Auto-generates the CameraInfo publisher for the /camera_info_right topic. To start publishing, ensure the
enable_camera_rightbranch node is enabledros1_create_camera_right_rgb
Auto-generates the RGB Image publisher for the /rgb_right topic. To start publishing, ensure
enable_camera_rightis enabled. Theenable_camera_right_rgbbranch node is already enabled by defaultros1_create_camera_right_depth
Auto-generates the Depth (32FC1) Image publisher for the /depth_right topic. To start publishing, ensure
enable_camera_rightandenable_camera_right_depthbranch nodes are enabledFinally, to ensure all external ROS nodes reference simulation time, a
ROS_Clockgraph is added which contains aros1_publish_clocknode responsible for publishing the simulation time to the /clock topic.
7.1.8.3.2. Generate Occupancy Map
In this scenario we will use an occupancy map. To generate a map there are 2 options:
Using the Occupancy Map Generator extension within Omniverse Isaac Sim (Recommended)
Using the
slam_gmappingROS package
7.1.8.3.2.1. Using the Occupancy Map Generator extension (Recommended):
To learn more about the Occupancy Map Generator extension click here.
Go to Isaac Examples -> ROS -> Navigation to load the warehouse scenario.
At the upper left corner of the viewport, click on Camera. Select Top from the dropdown menu.
Go to Isaac Utils -> Occupancy Map.
In the Occupancy Map extension, ensure the Origin is set to
X: 0.0, Y: 0.0, Z: 0.0. For the lower bound, setZ: 0.1. For the Upper Bound, setZ: 0.62. Keep in mind, the upper bound Z distance has been set to 0.62 meters to match the vertical distance of the lidar onboard Carter with respect to the ground.Select the warehouse_with_forklifts prim in the stage. In the Occupancy Map extension, click on
BOUND SELECTION. The bounds of the occupancy map should be updated to incorporate the selected warehouse_with_forklifts prim. The map parameters should now look similar to the following: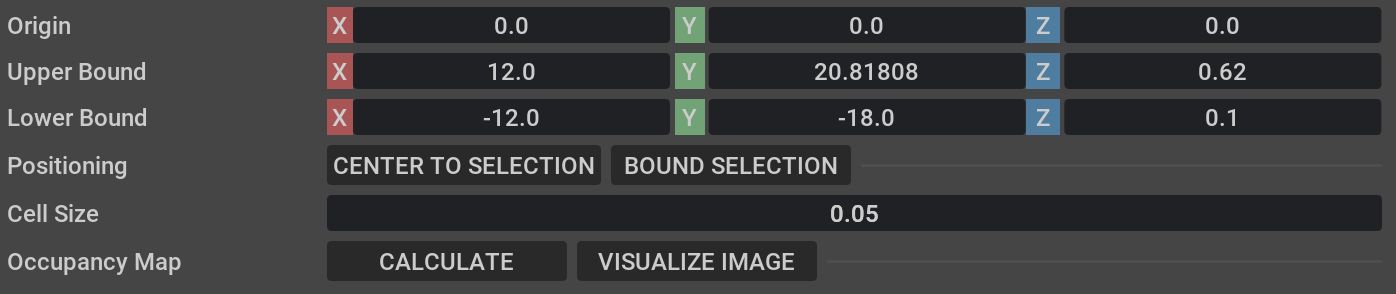
A perimeter will be generated and it should resemble this Top View:
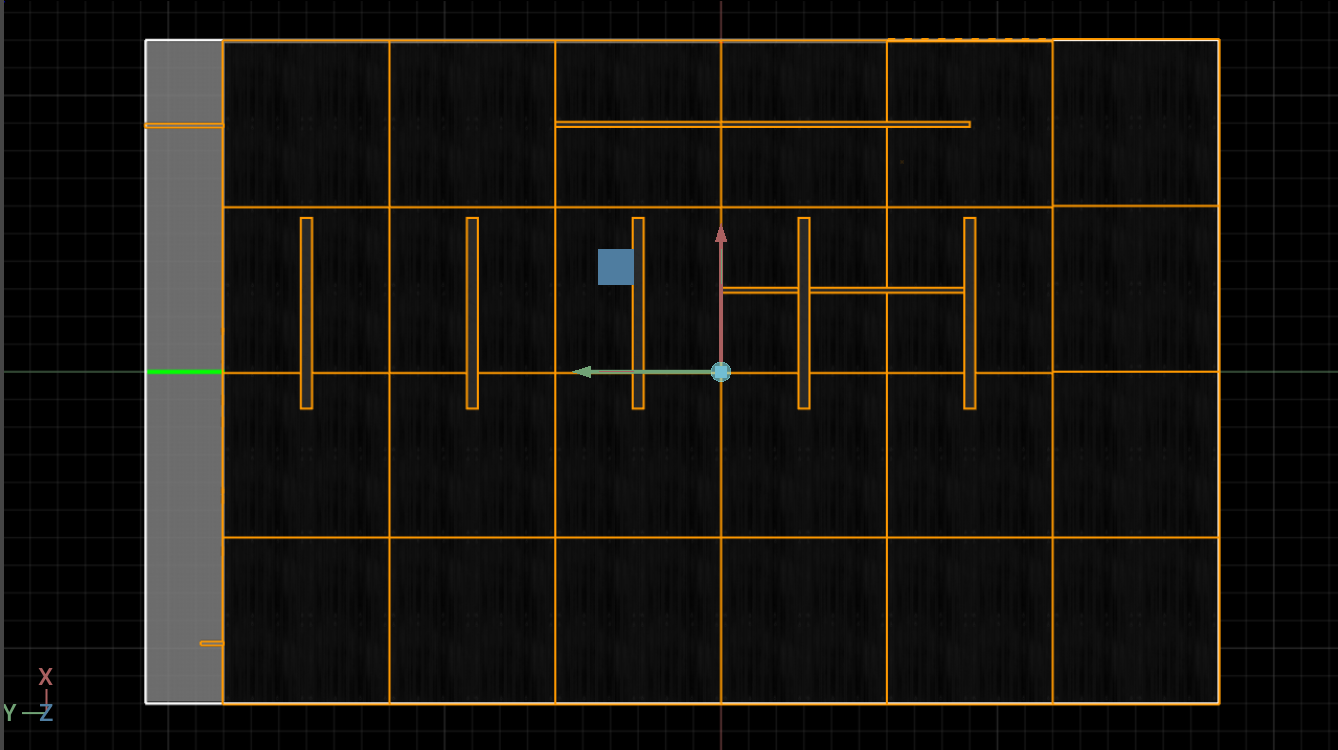
Remove the Carter_ROS prim from the stage.
Once the setup is complete, click on
CALCULATEfollowed byVISUALIZE IMAGE. A Visualization popup will appear.For Rotate Image, select 180 degrees and for Coordinate Type select
ROS Occupancy Map Parameters File (YAML). ClickRE-GENERATE IMAGE. The ROS camera and Isaac Sim camera have different coordinates.Occupancy map parameters formatted to YAML will appear in the field below. Copy the full text.
Create a YAML file for the occupancy map parameters called
carter_warehouse_navigation.yamland place it in the map directory which is located in the samplecarter_2dnavROS package (carter_2dnav/map/carter_warehouse_navigation.yaml).Insert the previously copied text in the
carter_warehouse_navigation.yamlfile.Back in the visualization tab in Omniverse Isaac Sim, click
Save Image. Name the image ascarter_warehouse_navigation.pngand choose to save in the same directory as the map parameters file.The final saved image will look like the following:

An occupancy map is now ready to be used with ROS Navigation!
7.1.8.3.2.2. Using the slam_gmapping ROS package:
Install the
slam_gmappingROS package, run the command below:sudo apt-get install ros-$ROS_DISTRO-slam-gmappingInstall the
teleop_twist_keyboardROS package:sudo apt-get install ros-$ROS_DISTRO-teleop-twist-keyboard
Go to Isaac Examples -> ROS -> Navigation to load the warehouse scenario. Press
Playto begin simulation.Follow the tutorial: http://wiki.ros.org/slam_gmapping/Tutorials/MappingFromLoggedData
Note
Since a rosbag is not available, substitute the rosbag command in the tutorial with the following command:
rosrun teleop_twist_keyboard teleop_twist_keyboard.py. This will start the teleop_twist_keyboard ROS node and enable you to use your keyboard to manually drive the robot around the warehouse to simultaneously generate a map.Press
Stopto terminate the simulation.
7.1.8.4. Running ROS Navigation
Go to Isaac Examples -> ROS -> Navigation to load the warehouse scenario.
Click on
Playto begin simulation.In a new terminal, run the ROS launch file to begin ROS Navigation.
roslaunch carter_2dnav carter_navigation.launch
RViz will open and begin loading the urdf model of the robot, the global occupancy map, as well as the local costmap which will be overlaid on top.
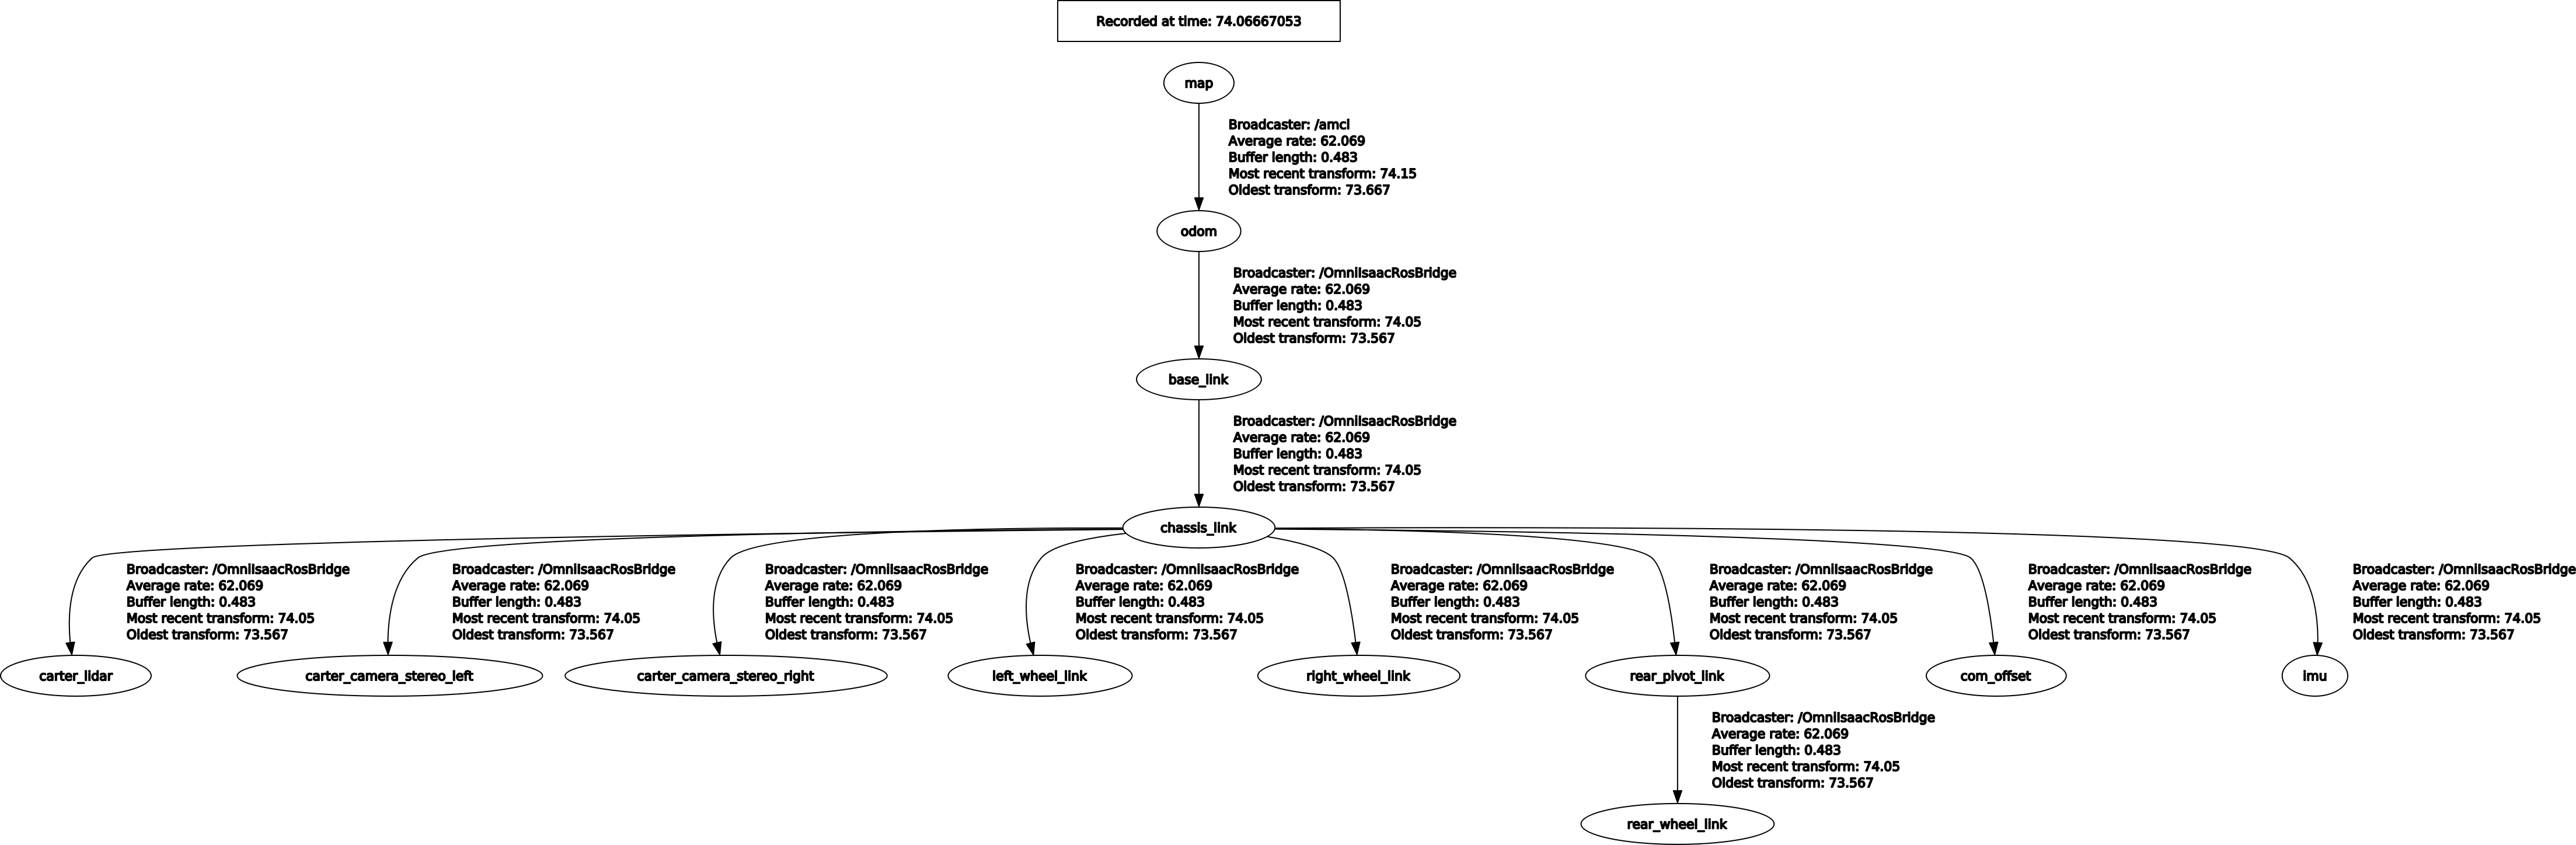
To verify that all of the transforms are broadcasting, run the following command in a new terminal to visualize the ROS TF frame tree:
rosrun rqt_tf_tree rqt_tf_tree
The generated graph should look similar to the one shown below.
Since the position of the robot is defined in
carter_navigation.launch, the robot should already be properly localized. If required, the2D Pose Estimatebutton can be used to re-set the position of the robot.Click on the
2D Nav Goalbutton and then click and drag at the desired location point in the map. The ROS Navigation stack will now generate a trajectory and the robot will start moving towards its destination!
7.1.8.6. Sending Goals Programmatically
The isaac_ros_navigation_goal ROS package can be used to set goal poses for the robot using a python node. It is able to randomly generate and send goal poses to the navigation stack. It is also able to send user-defined goal poses if needed.
Make any changes to the parameters defined in the launch file found under
isaac_ros_navigation_goal/launchas required. The parameters are described below:goal_generator_type: Type of the goal generator. Use
RandomGoalGeneratorto randomly generate goals or useGoalReaderfor sending user-defined goals in a specific order.map_yaml_path: The path to the occupancy map parameters yaml file. Example file is present at
isaac_ros_navigation_goal/assets/carter_warehouse_navigation.yaml. The map image is being used to identify the obstacles in the vicinity of a generated pose. Required if goal generator type is set asRandomGoalGenerator.iteration_count: Number of times goal is to be set.
action_server_name: Name of the action server.
obstacle_search_distance_in_meters: Distance in meters in which there should not be any obstacle of a generated pose.
goal_text_file_path: The path to the text file which contains user-defined static goals. Each line in the file has a single goal pose in the following format:
pose.x pose.y orientation.x orientation.y orientation.z orientation.w. Sample file is present at:isaac_ros_navigation_goal/assets/goals.txt. Required if goal generator type is set asGoalReader.initial_pose: If initial_pose is set, it will be published to /initialpose topic and goal poses will be sent to action server after that. Format is
[pose.x, pose.y, pose.z, orientation.x, orientation.y, orientation.z, orientation.w].
To run the launch file, use the following command:
roslaunch isaac_ros_navigation_goal isaac_ros_navigation_goal.launch
Note
The package will stop processing (setting goals) once any of the below conditions are met:
Number of goals published till now >= iteration_count.
If
GoalReaderis being used then if all the goals from file are published, or if condition (1) is true.A goal is rejected by the action server.
In case of
RandomGoalGenerator, if a goal was not generated even after running the maximum number of iterations, which is rare but could happen in very dense maps.
To learn more about programmatically sending navigation goals to multiple robots simultaneously see Sending Goals Programmatically for Multiple Robots.
7.1.8.7. Troubleshooting
If you are noticing performance related issues with the ROS Navigation stack or errors such as:
Could not transform the global plan to the frame of the control
Consider increasing the transform_tolerance parameter for the local and global occupancy maps found in local_costmap_params.yaml and global_costmap_params.yaml.
7.1.8.8. Summary
In this tutorial, we covered
Occupancy map
Running Isaac Sim with ROS navigation stack.
Running the Isaac ROS Navigation Goal package to send nav goals programmatically.
7.1.8.8.1. Next Steps
Continue on to the next tutorial in our ROS Tutorials series, Multiple Robot ROS Navigation to move multiple navigating robots.
7.1.8.8.2. Further Learning
To learn more about ROS Navigation.
More about Occupancy Map Generator.