7.1.10. Joint Control: Extension Python Scripting
7.1.10.1. Learning Objectives
In this tutorial, we will interact with a manipulator, the Franka Emika Panda Robot. We will
Add a ROS Joint State publisher and subscriber via UI
Add a ROS Joint State publisher and subscriber using the OmniGraph python API using the script editor.
7.1.10.2. Getting Started
Prerequisite
Completed Isaac Sim Workflows to understand the Extension Workflow.
ROS bridge is enabled.
noetic_wswas sourced.
7.1.10.3. Add Joint States in UI
Go to Content tab below the viewport, and open
Isaac/Robots/Franka/franka_alt_fingers.usd.Go to Create -> Visual Scripting -> Action Graph to create an Action graph.
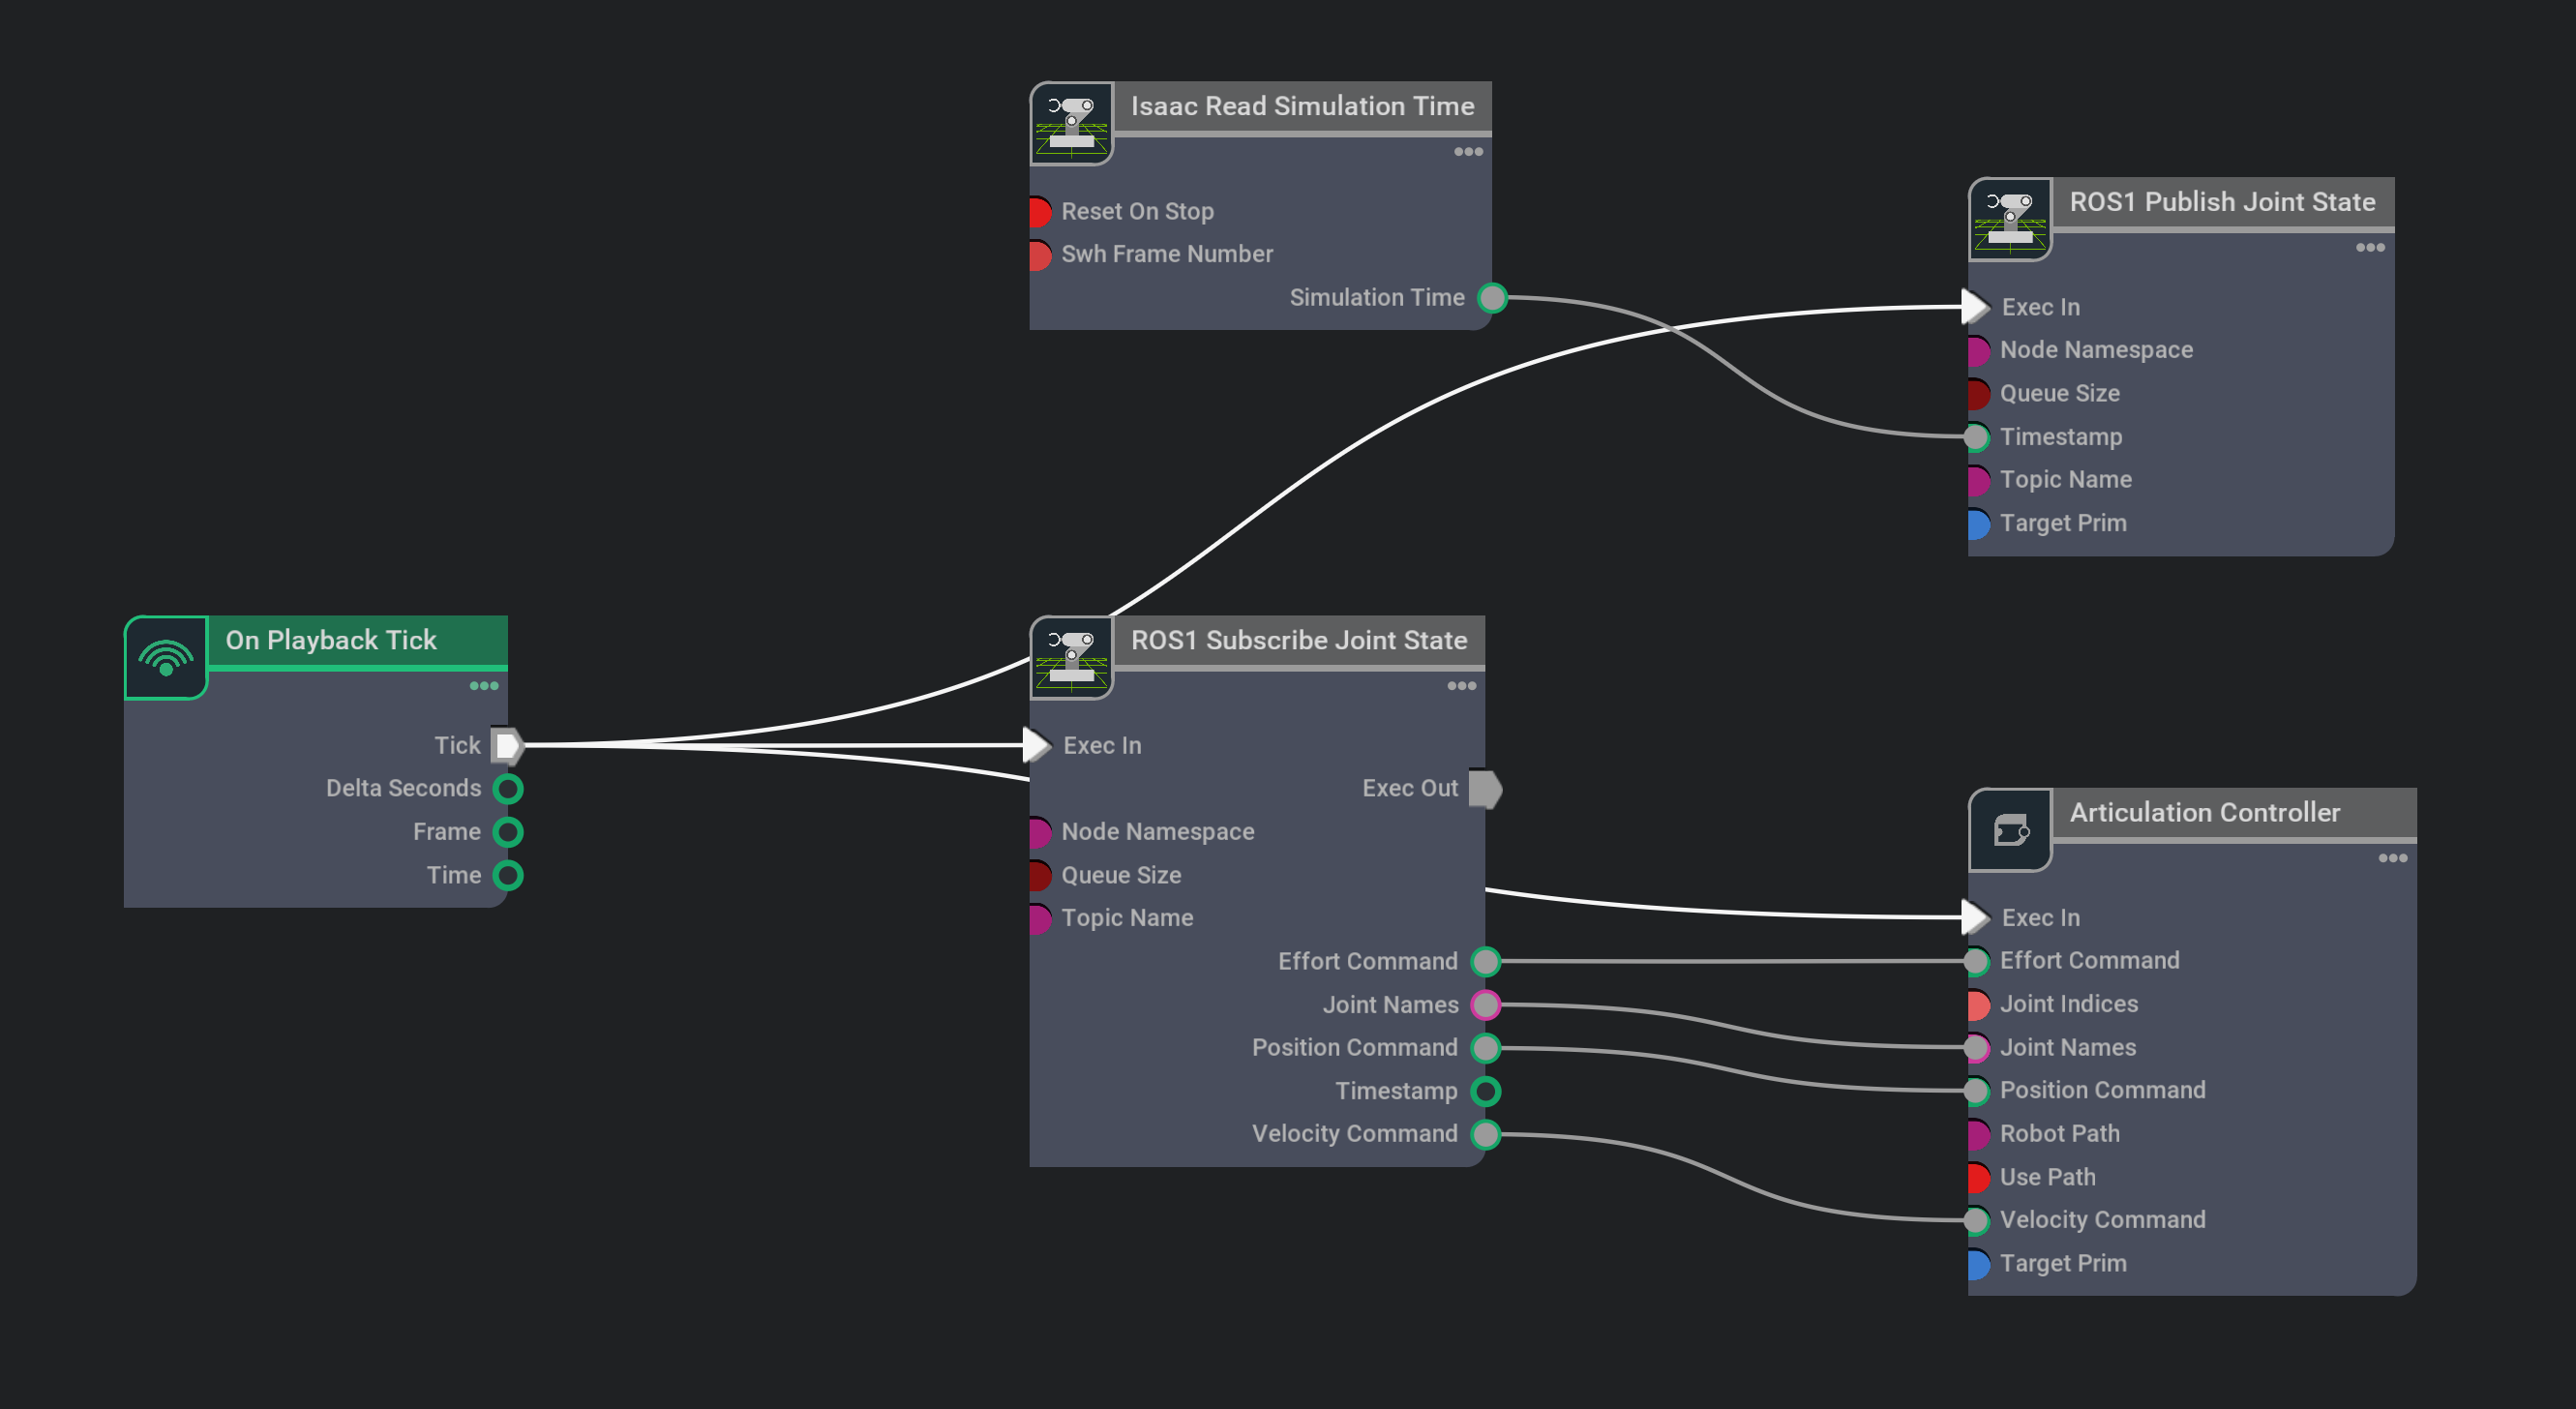
Add the following OmniGraph nodes into the Action graph:
On Playback Tick node to execute other graph nodes every simulation frame.
Isaac Read Simulation Time node to retrieve current simulation time.
ROS1 Publish Joint State node to publish ROS Joint States to the
/joint_statestopic.ROS1 Subscribe Joint State node to subscribe to ROS Joint States from the
/joint_commandtopic.Articulation Controller node to move the robot articulation according to commands received from the subscriber node.
Select ROS1 Publish Joint State node and add the /panda robot articulation to the targetPrim.
Select Articulation Controller node and add the /panda robot articulation to the targetPrim. Additionally make sure to uncheck usePath.
Connect the Tick output of the On Playback Tick node to the Execution input of the ROS1 Publish Joint State, ROS1 Subscribe JointState and Articulation Controller nodes.
Connect the Simulation Time output of the Isaac Read Simulation Time node to the Timestamp input of the ROS1 Publish Joint State node. Setup other connections between nodes as shown in the image below:
Make sure
roscoreis running, press Play to start publishing joint states to the/joint_statestopic and subscribing commands on the/joint_commandtopic.To test out the ROS bridge, use the provided python script to publish joint commands to the robot. In a ROS-sourced terminal:
rosrun isaac_tutorials ros_publisher.py
While the robot is moving, open a ROS-sourced terminal and check the joint state rostopic by
rostopic echo /joint_states. You’ll see that the position of the joints are changing following the robot.
7.1.10.4. Add Joint States in Extension
The same action done via UI can also be done using python script. More details regarding the different workflow of using Omniverse Isaac Sim can be found Isaac Sim Workflows.
Go to Content tab below the viewport, and open
Isaac/Robots/Franka/franka_alt_fingers.usd.Open Script Editor in Window -> Script Editor and copy paste the following code into it. This is the equivalent to Steps 2-7 of the previous section. If the robot appears other than /panda on the stage tree, make sure to match the Articulation Controller and Publish Joint State nodes’ targets to the robot’s prim path (line 30 and 36).
 1import omni.graph.core as og
 2
 3og.Controller.edit(
 4    {"graph_path": "/ActionGraph", "evaluator_name": "execution"},
 5    {
 6        og.Controller.Keys.CREATE_NODES: [
 7            ("OnPlaybackTick", "omni.graph.action.OnPlaybackTick"),
 8            ("PublishJointState", "omni.isaac.ros_bridge.ROS1PublishJointState"),
 9            ("SubscribeJointState", "omni.isaac.ros_bridge.ROS1SubscribeJointState"),
10            ("ArticulationController", "omni.isaac.core_nodes.IsaacArticulationController"),
11            ("ReadSimTime", "omni.isaac.core_nodes.IsaacReadSimulationTime"),
12        ],
13        og.Controller.Keys.CONNECT: [
14            ("OnPlaybackTick.outputs:tick", "PublishJointState.inputs:execIn"),
15            ("OnPlaybackTick.outputs:tick", "SubscribeJointState.inputs:execIn"),
16            ("OnPlaybackTick.outputs:tick", "ArticulationController.inputs:execIn"),
17
18            ("ReadSimTime.outputs:simulationTime", "PublishJointState.inputs:timeStamp"),
19
20            ("SubscribeJointState.outputs:jointNames", "ArticulationController.inputs:jointNames"),
21            ("SubscribeJointState.outputs:positionCommand", "ArticulationController.inputs:positionCommand"),
22            ("SubscribeJointState.outputs:velocityCommand", "ArticulationController.inputs:velocityCommand"),
23            ("SubscribeJointState.outputs:effortCommand", "ArticulationController.inputs:effortCommand"),
24        ],
25        og.Controller.Keys.SET_VALUES: [
26            # Providing path to /panda robot to Articulation Controller node
27            # Providing the robot path is equivalent to setting the targetPrim in Articulation Controller node
28            ("ArticulationController.inputs:usePath", True),
29            ("ArticulationController.inputs:robotPath", "/panda"),
30            ("PublishJointState.inputs:targetPrim", "/panda"),
31        ],
32    },
33)
Make sure
roscoreis running, press Run in the Script Editor and the Action Graph with all required nodes should be added. You can find the corresponding ActionGraph in the Stage Tree.Same as the previous section, test out the ROS bridge using the provide python script to publish joint commands to the robot.
rosrun isaac_tutorials ros_publisher.py
Check the joint state with
rostopic echo /joint_stateswhile it’s moving.
7.1.10.5. Position and Velocity Control Modes
The joint state subscriber currently supports position and velocity control. Each joint can only be controlled by a single mode at a time, but different joints on the same articulation tree can be controlled by different modes. Make sure each joint’s stiffness and damping parameters are setup appropriately for the desired control mode (position control: stiffness >> damping, velocity control: stiffness = 0).
The snippet is an example of how to command a robot using both position and velocity controls by grouping joints that use the same mode into one message, and create two different messages for position control joints and velocity controlled joints. Separating them is for organization and potentially sending them at different rates. They can be combined into a single message if desired.
import rospy
from sensor_msgs.msg import JointState

rospy.init_node('position_velocity_publisher')
pub = rospy.Publisher('joint_command', JointState, queue_size=10)

joint_state_position = JointState()
joint_state_velocity = JointState()

joint_state_position.name = ["joint1", "joint2","joint3"]
joint_state_velocity.name = ["wheel_left_joint", "wheel_right_joint"]
joint_state_position.position = [0.2,0.2,0.2]
joint_state_velocity.velocity = [20, -20]

rate = rospy.Rate(10)
while not rospy.is_shutdown():
    pub.publish(joint_state_position)
    pub.publish(joint_state_velocity)
    rate.sleep()
7.1.10.6. Summary
This tutorial covered adding a ROS Joint State publisher and subscriber via both UI and Extension scripting.
7.1.10.6.1. Next Steps
Continue on to the next tutorial in our ROS Tutorials series, MoveIt Motion Planning Framework, to learn how to connect the manipulator up with MoveIt!