USD Optimization#
The Scene Optimizer is a Kit Extension that performs scene optimization at the USD level. This allows complex scenes to be converted into more lightweight representations which can be displayed and evaluated more quickly. Additionally, the Scene Optimizer has operations that can be used to augment data to conform to validation rules.
Optimization for Structure and Scale#
Optimization contributes to asset structure principles beyond just performance. Proper optimization improves:
Legibility: Clean geometry with meaningful topology aids inspection and debugging
Navigability: Proper prim and kind hierarchy supports automated processing and tool integration
Interoperability: Well-formed structure helps fulfill technical contracts needed for assets to work reliably across CAE tools, simulators, and operations systems
Performance through Instancing: Consistent asset structure enables efficient instancing where repeated assets (robots, racks, components) share composed representations, reducing memory and traversal cost at facility scale
Optimization is particularly important for facility-scale digital twins where hundreds or thousands of components must be composed interactively.
Benefits of Optimizing Your Data#
Improved quality and performance: The Scene Optimizer can fix and enhance data, leading to higher quality and better-performing digital twins.
Enhanced interaction: Optimized digital twins offer improved responsiveness and interactivity for real time scenarios.
Quicker iteration: By optimizing assets, the iteration process becomes more efficient, allowing for faster development cycles.
Faster start-up times: The Scene Optimizer framework helps streamline digital twins, resulting in quicker initialization.
In the hands-on section below, we will use the scene optimizer to fix some geometry problems that were discovered by the asset validator in the prior step. You can insert any number of scene optimizer operations during or after the conversion process, but it is important to re-run validation anytime you change data to make sure your data is clean.
Hands On#
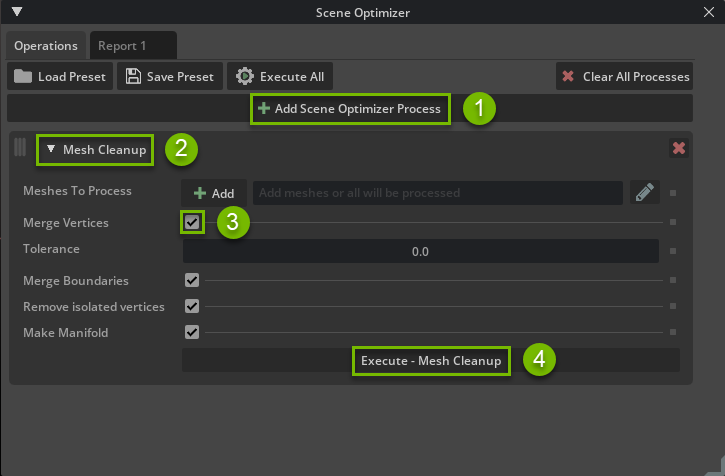
The Asset Validator info for the asset WeldChecker displays the message: “Some points are co-located and may be able to be merged.” This means there are duplicate vertices in your geometry occupying the same position, which can lead to unnecessary complexity and potential issues in your scene. To address these WeldChecker errors, let’s run the Mesh Cleanup operation. This will combine co-located points into single vertices, resulting in a cleaner and more efficient mesh.
Each process has its own execution button which allows you to more easily experiment with individual steps. The Execute All button will run all processors in the stack that you have built up.
Open the
Bolt.usdstage and go to Window -> Utilities -> Scene Optimizer.Click + Add Scene Optimizer Process -> Geometry -> Mesh Cleanup, ensure Merge Vertices is enabled and then click Execute - Mesh Cleanup.
Note
There is no need to add specific prims to Meshes To Process. When this field is empty, all meshes in the stage will be processed.
A log will be generated in the GUI where you can inspect the result of the Scene Optimizer processors you just ran.#
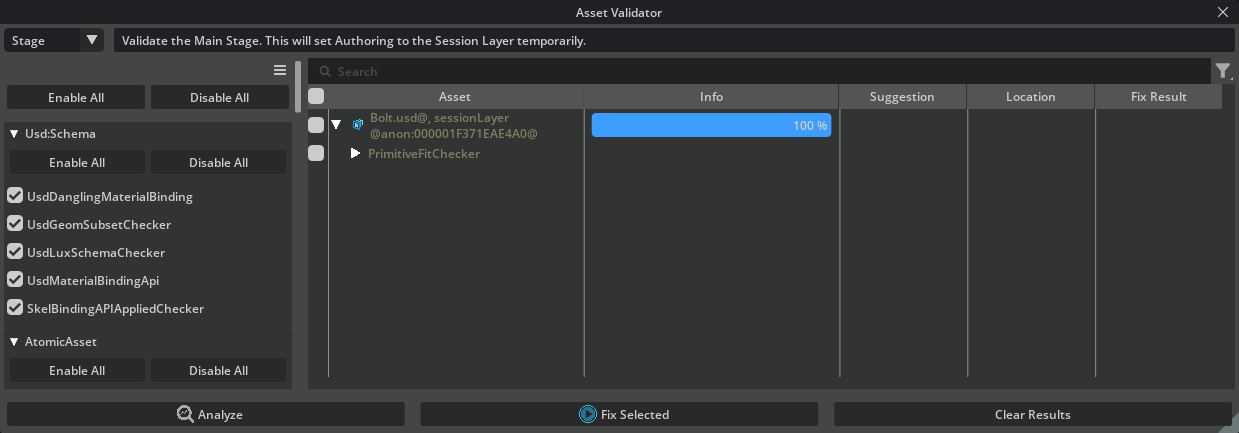
In Asset Validator (Window > Utilities > Asset Validator), change the top left input to Stage and click Analyze.
In this result, we can see that the Mesh Cleanup operation eliminated both the Weld and Zero Area Face checker errors. It is possible that new asset validator warnings will appear, such as the mdl material warning that will let you know that mdl materials might not work well outside of Omniverse. You may also see a PrimitiveFitChecker warning, which is unrelated to the optimization work being performed.
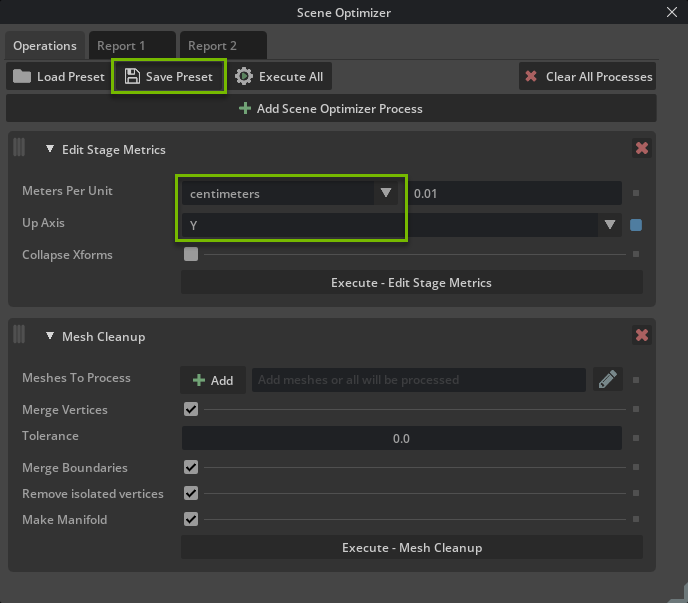
To add the Mesh Cleanup operation to a general conversion scene optimizer preset, we would want to include the processor that bakes the scene units and up axis into the geometry.
Open the Scene Optimizer and click + Add Scene Optimizer Process -> Stage -> Edit Stage Metrics.Change Up Axis to Y and keep it centimeters.
Drag the Edit Stage Metrics processor to the top of the stack by holding down the left mouse button and dragging the left vertical hamburger symbol.
Note
If you are doing a lot of tolerance and distance settings in your data processing, keeping the stage units consistent becomes important to achieve the results you expect as some tolerances and distances are based on your stage units.
Click Save Preset -> and save it into your so_preset folder in your data directory as
so_cad_ingest.json
To use our new export preset, re-convert all the JT files with the same settings by using any of the methods (File -> Import or RMB -> Convert to USD from Content Browser). This time change the scene optimizer config path to the one we saved as
so_cad_ingest.json(step 9 in CAD conversion).
Note
A preset can be shared with a wider team or automatically used in CAD converter spec files
Click Import or Convert depending on how you chose to convert. Click OK for each file you overwrite. No need to save the current stage if the parts were referenced in as part of the last conversion.
We have now implemented an export preset that takes care of geometry issues on export. You can validate this by running through the asset validation section of this guide (steps 2-5).