VFI Animation Workflow and Supporting Scripts#
Overview#
This workflow serves as a guide for creating a scalable animation pipeline that enables a more efficient workflow for animated assets. Separating animation data from assets, in the form of TimeSampled animation clips (Value clips), offers more flexibility in asset management and stage composition. When many instances of the same asset occur in a single stage, it removes the need for duplication of the whole asset with embedded animation, enabling lighter stages and databases. In addition, this workflow enables the sequencing of multiple animation clips.
Not all exporters and connectors will export value clips, so we have provided sample scripts that will assist in generating data suitable for an animation pipeline.
Benefits of TimeSampled animation (value) clips.#
Separation of animation data and model assets.
Lighter weight stages.
Improved asset management with more intuitive stage composition.
Simple workflow to swap out or update animations.
Enables the sequencing of multiple animations on the same asset.
Sample Asset files#
Factory Test Sample: Use this Sample file to test the USD Asset Extractor Script.
Factory Anim Pipeline: A reference file of the original Factory Test Sample (now recomposed using the extracted assets).
The sections below walk through extracting animation layers, composing stages with value clips, sequencing animations, and using helper scripts to refine timing data.
Animation Scripts#
Repository location: VFI Animation Scripts (GitHub)
The following sample scripts support value‑clip–based animation workflows in OpenUSD. They help extract and manage timeSamples and reference them as value clips so animation can be maintained separately from assets.
USD Animation Asset Extractor: Extracts timeSamples from a composed stage, writes a .anim.usda, clears embedded animation, and reapplies it as a referenced value clip.
Value Clip Sequencer: Allows the application of sequenced animation clips onto an asset.
USD Reference Time Offset: Offsets playback time for a referenced value clip.
Convert Orient to Eulers: Converts quaternion orientation (orient) to Euler rotations for curve-based editing.
USD Animation Asset Extractor#
Script source: usd_anim_asset_extractor.py
The USD Animation Asset Extractor separates animation data from composed stages so you can manage static geometry and animation clips independently. It writes clean .usd and .anim.usda layers, removes baked animation from the original prim, and reapplies the motion through value clips. Use it whenever you need portable, reusable animation assets that can be payloaded or referenced into other scenes.
Hands On#
Open
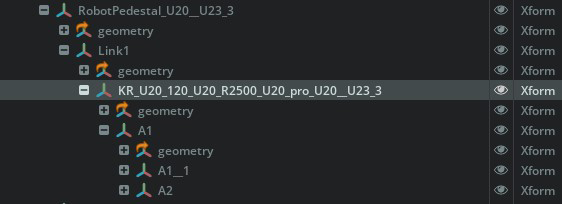
Factory.usdfrom the Factory Test SampleSelect the KR_U20_120_U20_R2500_U20_pro_U20__U23_3 prim (the root of a robot arm asset) for export. All of the essential animated pivots for the asset are down the hierarchical chain from this prim.
Select Developer > Script Editor and paste the contents of the usd_anim_asset_extractor script into the Script Editor.
Optionally, configuring Script options. At the top of the script, set flags to define behavior. Set a flag to
Falseto deactivate that feature:Script Configuration Flags## ============================================ # CONFIGURATION: Set default behavior for three independent features # ============================================ # extract_model: Extract model layer (creates file, doesn't modify stage) # extract_animation: Extract animation layer (creates file, doesn't modify stage) # replace_in_stage: Replace original prim with references (modifies stage) DEFAULT_EXTRACT_MODEL = ( True # <-- Copy the static model prim/attributes into another USD layer ) DEFAULT_EXTRACT_ANIMATION = ( True # <-- Copy the animated prim/attributes into another USD layer ) DEFAULT_REPLACE_IN_STAGE = ( False # <-- Replace the original prim with the two USD layers in payload/reference )
Click the Run button to execute the script. A dialog will appear allowing you to select an output folder for refactored assets.
After selecting an output directory, the script will complete execution and our target destination will now contain one model asset and one animation clip .anim.usda file.
If you open the model file directly, the hierarchy of the model file will look like this image below. The prim you exported has been placed under a ModelRoot node (the importance of why we added the “modelRoot” node is explained below).

Note
In some cases, the reference layers of the assets may be too deep and the script could fail to generate the clip or replace the asset in stage with a new reference. If this happens, opening the referenced layer that contains the asset and animation directly should resolve this issue.
Using the Exported Assets to Compose a New Stage#
In this section we will explore the optimal way to employ the exported assets. Use this workflow when you want to add a single time sample clip to an asset payload.
Create a new stage. Ensure the animation timeline is available by selecting Window > Animation > Timeline.
Extend the frame range to
2430frames and FPS to24on the animation timeline.Create an Xform prim and name it robot_01.
Right-click on the robot_01 prim and select Add > Payload.
Select and load the exported
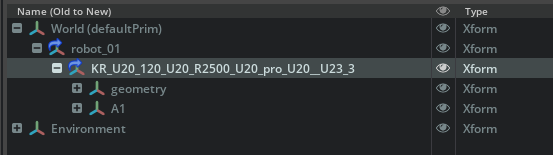
KR_U20_120_U20_R2500_U20_pro_U20__U23_3.model.usdaasset from the previous section.When the asset loads, you will see the
ModelRootprim is not visible in the payload. The prim you selected during export is the first visible prim beneath the payload.To add animation as a nested payload to the models payload, select the KR_U20_120_U20_R2500_U20_pro_U20__U23_3 prim that is visible within the model payload hierarchy.
Right-click and select Add > Payload and add the extracted TimeSample Clip
KR_U20_120_U20_R2500_U20_pro_U20__U23_3.anim.usda.Set the starting frame to
2051on the animation timeline and click the Play button to play the animation.
To see the sample factory file above rebuilt with the animation pipeline, open Factory_anim_pipeline.usd contained within the Factory Anim Pipeline sample asset.
Tips and Best Practices#
The reason for the root prim on the model is to allow the assembly of static scenes where animations can be added afterward and easily swapped out for newer animations using nested payloads. It is possible to have both model and value clips as payloads on the same prim/Xform, but OpenUSD standards require a specific reference order where animation is to be applied first, then the model. This would not allow for static scene composition and easy swapping of animations. Adding the root node, which exposes the asset base prim under the payload to which you can apply the value clip, solves this reference order limitation.
It is essential that models assets and timeSamples Value clips have matching hierarchies. Using this script to generate both model and animation clip will ensure that happens.
While the scripts provided are designed to work in various scenarios, and make it possible to generate animation clips and assets from fully composed scenes, you should use these scripts preemptively, and establish the animation asset and matching value clips prior to any construction of complex stage hierarchies.
Note
In versions prior to Kit 109, a bug exists with FSD that prevents the animation from playing upon initial loading. Saving and reloading the file will allow the Animation to play. If you wish to be able to see the animations play as you add them to the stage, please disable FSD during this process. This issue is resolved in 109 and above.
Note
With regard to the option in the script to reference the exported assets back into the composed stage, due to the unpredictable variation in user environments and complex layer structures within stages, the automatic referencing feature cannot be guaranteed to work in all scenarios. Where this occurs, manually adding the exported assets is required.
Value Clip Sequencer#
Script source: value_clip_sequencer.py
The Value Clip Sequencer is a tool for creating animation sequences using USD Value Clips. It allows you to sequence multiple animation clips on a single asset, enabling efficient reuse of animation data across your stage. In this section we will look at how to use the extracted model and animation clips to create a sequenced value clip using the provided sequence sample script.
Some benefits of using Value Clips include:
Efficient Asset Reuse - Add the same model multiple times.
Flexible Sequencing - Chain multiple animations together on a single asset.
Non-Destructive - Animation data stays separate from the model.
Scalable Pipeline - Build animation libraries that can be applied to any compatible asset.
Hands On#
The steps below walk through building a fresh stage, loading the exported robot arm asset, wiring in animation clips with the sequencer UI, and writing the resulting value-clip metadata back to the stage.
Select File > New Stage to create a new stage.
Select Create > Xform to create a new Xform. Rename it to robot_01.
Right-click the robot_01 Xform and select Add > Payload or Add > Reference. Select the
KR_U20_120_U20_R2500_U20_pro_U20__U23_3.model.usdaasset that was exported in the USD Animation Asset Extractor section.Note
If using a custom asset, position the asset as needed using transform controls. Do not put transforms within the asset hierarchy as these will likely be overwritten by the timesamples.
Save your stage file (this is required prior to applying clips because clip paths are saved relative to your sequence stage file location).
Select Developer > Script Editor and paste the contents of the value clip sequencer script into the Script Editor
Click the Run button to execute the script. The Value Clip Sequencer window will appear
In the Stage panel, select the robot_01 prim.
In the sequencer, click Get Selected.
The prim path will appear in the Prim Path field.
Click + ADD CLIP.
In the Select Animation Clip dialog, navigate to and select the
KR_U20_120_U20_R2500_U20_pro_U20__U23_3.anim.usdaanimation clip, click Add Clip to add it to the sequence.Note
If using a custom asset, repeat for additional clips as needed.
Close the Select Animation Clip dialog.
For the
KR_U20_120_U20_R2500_U20_pro_U20__U23_3.anim.usdaclip, leave the default value of0.0for the Stage Start field.Click APPLY TO STAGE.
The Value Clips metadata will be written to your stage file.
Click the Play button on the animation timeline to play the animation. Note that the animation will play starting at frame 0.

These sequenced Stages can be composed in any manner that is appropriate for your workflow. For example, a Sequence Stage can be used to compose a group of robots at a particular “station” in your factory. This file can then be added as a payload or reference to your main assembly where each station is well organized.
Value Clip Sequencer Options#
This section outlines additional options available in the Value Clip Sequencer UI.
Configure Timing
For each clip in the sequence, you can adjust:
Option |
Description |
|---|---|
Stage Start |
Frame on the stage timeline when this clip begins playing |
Clip Range |
Internal frame range within the clip file (for trimming) |
Example Configuration:
Clip 1: "wave.anim.usda"
  - Stage Start: 0
  - Clip Range: 2052 - 2778 (726 frames)

Clip 2: "walk.anim.usda"
  - Stage Start: 800
  - Clip Range: 2052 - 2500 (448 frames)

Clip 3: "idle.anim.usda"
  - Stage Start: 1300
  - Clip Range: 2052 - 2652 (600 frames)
Reorder Clips
Use the up and dn buttons to reorder clips in the list.
Use the ✕ button to remove a clip.
Use “Clear All” to remove all clips and start over.
Playback
Use the timeline controls to scrub through your animation.
Each clip will play at its designated start time.
If there is a gap between clips, the animation will hold at the last frame until the next clip begins.
Editing a Pre-Existing Sequence
Select the prim / payload that was previously sequenced and click the Load Existing button to the right of the Prim Path field. The value clip sequencer will load all the clips into the UI where you can edit the current values, remove or add clips too.
Tips & Best Practices#
Trimming Animations
If your animation clips contain frames you do not want to use.
Adjust the Clip Range Start to skip unwanted frames.
Adjust the Clip Range End to cut the animation short.
The duration displayed shows the resulting playback length.
Multiple Instances
To animate multiple instances of the same model:
Add the model payload multiple times to your stage.
Run the sequencer for each instance.
Each can have its own unique sequence of clips.
Troubleshooting#
Animation Not Playing:
Verify the Clip Prim Path matches your asset structure (default: /root).
Check that clip files exist at the specified paths.
Ensure the prim has a valid payload/reference.
Ensure matching hierarchies between model and clip.
Console Warnings (Kit 107.x)#
Some Hydra warnings may appear in Kit 107.x, but do not affect playback.
These warnings are resolved in Kit 109+.
Additional Resources#
For a more comprehensive understanding of Value clips please refer to the Value_Clips_developer_Guide.md that is contained within the animation scripts package. VALUE_CLIPS_DEVELOPER_GUIDE.md
USD Reference Time Offset#
Script source: reference_time_offset_editor.py
This script offsets the playback time of a selected value clip by a specified number of frames.
Note
This script should only be used for single clips applied directly to payloads. Do not use this script with the sequence value clips.
Hands On#
Complete the USD Animation Asset Extractor Hands On section to extract the animation data from the asset, including the Using the Exported Assets to Compose a New Stage section to add the model and animation clips to a new stage.
Note
By default, the animation for the robot arm will begin playing at frame 2430.
Select the KR_U20_120_U20_R2500_U20_pro_U20__U23_3 prim.
Select Developer > Script Editor and paste the contents of the reference time offset editor script into the Script Editor
Click Run to execute the script. The following dialog window will appear:
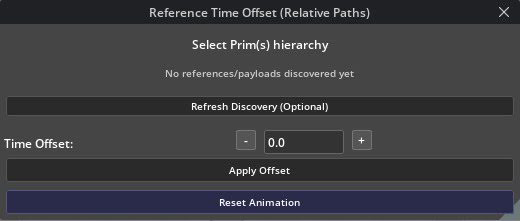
Enter a value of
-2051in the Time Offset field and click Apply Offset.On the animation timeline, set the starting frame to
0and click the Play button. Note that the animation will play starting at frame 0.
UI Options#
Refresh Discovery: This is optional and allows the user to look up a selected prim to see if it contains value clips.
Update Selection: After selecting a new asset, click to refresh the target.
Time Offset: Enter frames to offset (positive or negative).
+ / -: Increment or decrement the offset by one frame.
Apply Offset: Apply the current offset to the updated selection.
Reset Animation: Removes the previously applied offset and resets the animation to its original state.
Note
Ensure the selected prim contains a value clip payload or reference. If not, the tool will have no effect.
Convert Orient to Eulers#
Script source: convert_orient_to_euler_simple.py
Converts quaternion orientation data (default rotation values for OpenUSD) to Euler rotations for time‑sampled animation curves. This script supports the “USD TimeSample to Curve” extension in Kit: because that extension expects Euler samples, it cannot operate on the default quaternion xformOp:orient. If your connector or exporter only outputs quaternion rotations, run this script first to convert the time samples into Euler data that the curve converter can process.
Hands On#
Select Developer > Script Editor and paste the contents of the convert orient to eulers script into the Script Editor.
Select the prim that contains the quaternion timeSamples you want to convert.
Click Run to execute the script.
The selected prim’s quaternion rotations are converted to Euler rotations.
You can now use the “USD TimeSample to Curves” tool in kit to convert the timeSamples into animation curves.