Nucleus on Amazon EC2#

Deploy to Cloud#
This guide focuses on configuring and running an Omniverse Enterprise Nucleus Server on Amazon EC2. We outline the requirements for an NVIDIA Omniverse Nucleus deployment, and dive deep into the technical steps for getting Nucleus successfully running within your AWS account.
Why AWS?#
There are numerous reasons to deploy Nucleus on the AWS Global Cloud Infrastructure. With AWS, you have the ability to connect distributed users all over the globe. AWS’ security, identity, and access management controls allow you to retain complete control over your data. Also, with the variety of compute instance types and storage solutions AWS offers, you can right size your infrastructure and fine tune performance as needed.
Services used: Amazon Route 53, Amazon EC2, Amazon EBS, Amazon Certificates Manager, Amazon VPC
Solution Overview#
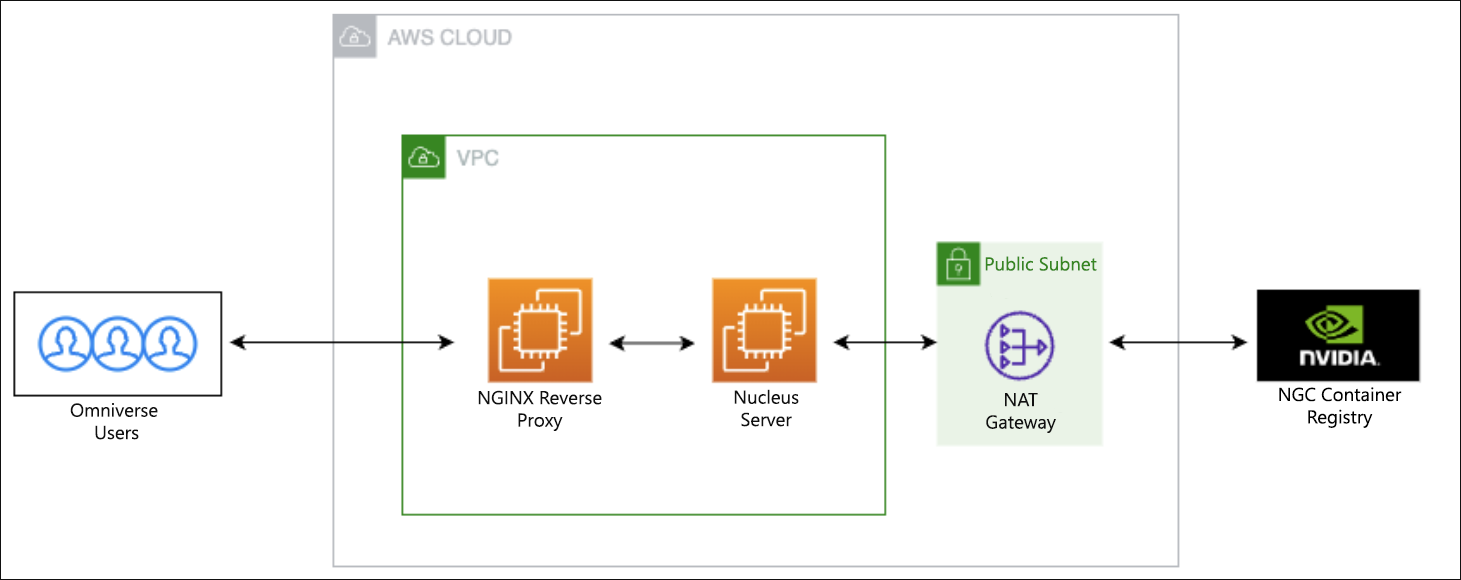
The following steps outline a solution that implements the basic components of a Nucleus deployment. To handle communication from end users, an Amazon Elastic Compute Cloud (Amazon EC2) instance configured as an NGINX reverse proxy is deployed in a public subnet. The reverse proxy accepts TLS traffic utilizing a TLS certificate from the Amazon Certificates Manager. Typically, this component would be an Elastic Load Balancer (ELB), but Nucleus requires path rewrites in the request which is not currently supported by an ELB.
The Nucleus Server is an Amazon EC2 instance deployed to a private subnet that only accepts traffic from the reverse proxy subnet. The Nucleus Server is running the Nucleus Enterprise Stack, which is deployed as a Docker Compose Stack. Thus, Nucleus will need a NAT Gateway and Internet Gateway to communicate with the NVIDIA Container Registry.
Prerequisites#
AWS Command Line Interface (CLI) - Installing or Updating the Latest Version of the AWS CLI
AWS Cloud Development Kit (CDK) - Install the AWS CDK - This may require the installation of nodejs and npm.
Python 3.9 or greater - Python Downloads
Nitro Enclaves Marketplace Subscription - AWS Certificate Manager for Nitro Enclaves
AWS GitHub Repository - Code Samples and Additional Documentation
Deploying Omniverse Nucleus on Amazon EC2#
Register a Domain and Create a Hosted Zone with Route 53#
First, you will need a Hosted Zone and a Domain for the Nucleus Server. Amazon Route 53 allows registration of a domain, such as my-omniverse.com, and create a subdomain, such as nucleus.my-omniverse.com, for the Nucleus Server. When registering a domain, there is communication that happens with the domain registrar. It is best to do this step manually and then reference the Hosted Zone ID, created by Route 53, in the subsequent configuration steps.
Visit this page for more information on registering a domain and creating a hosted zone: Registering a new domain.
Configure the CDK Stack#
Next, you will configure an CDK stack with basic resources for the Nucleus deployment.
Open a terminal and create a project folder for your CDK app. The name of the folder will become the application name. For this procedure
nucleus-appis the name used.Change directory into the folder created in the prior step and initialize your CDK app with the following command:
cdk init sample-app --language=typescriptNow your project structure should be the following:
nucleus-app/
    bin/
      nucleus-app.ts
    lib/
      nucleus-app-stack.ts

 additional config files ...
nucleus-app.tsis the main entry point for the app and the file that subsequent CDK commands will reference. When viewing this file, you can see it importslib/nucleus-stack.ts, which is where you’ll put custom code for your deployment.
Run a basic “Hello World” test.
Deploy the starter CDK stack with
cdk deploy. This will produce a basic stack and ensure your CLI and CDK are properly configured.
Set default account and Region environment values.
Open
bin/nucleus-app.tsand set the default account and Region environment (env) values. The contents of the file should look like the following:#!/usr/bin/env node import * as cdk from 'aws-cdk-lib'; import { NucleusAppStack } from '../lib/nucleus-app-stack'; const app = new cdk.App(); new NucleusAppStack(app, 'NucleusAppStack', { env: { account: process.env.CDK_DEFAULT_ACCOUNT, region: process.env.CDK_DEFAULT_REGION }, });
Remove sample resources.
Open
lib/nucleus-stack.tsand remove the sample Amazon Simple Queue Service (SQS) and Amazon Simple Notification Service (SNS) resources. Your file should now look like the following:import { Stack, StackProps } from 'aws-cdk-lib'; import { Construct } from 'constructs'; export class NucleusAppStack extends Stack { constructor(scope: Construct, id: string, props?: StackProps) { super(scope, id, props); // custom resources go here } }
Add the below CDK libraries, as these are required in subsequent steps.
import * as route53 from 'aws-cdk-lib/aws-route53';
import { Tags, CfnOutput } from 'aws-cdk-lib';
import * as s3 from 'aws-cdk-lib/aws-s3';
import * as ec2 from 'aws-cdk-lib/aws-ec2';
import * as iam from 'aws-cdk-lib/aws-iam';
import * as acm from 'aws-cdk-lib/aws-certificatemanager';
Define the Stack Resources#
Next, you will define custom infrastructure resources required for the deployment. Code samples in this section need to be added inside the constructor of the NucleusAppStack class.
Create an S3 bucket for artifacts.
First, create an S3 bucket that will be used to transfer artifacts from your local client to EC2 instances. As per security best practices, enable encryption, enforce SSL, and block public access. Then create an AWS Identity and Access Management (IAM) policy that allows access to list bucket and get objects from the bucket. This policy will be attached to our EC2 instance profile role.
const artifactsBucket = new s3.Bucket(this, 'artifactsBucket', {
    encryption: s3.BucketEncryption.S3_MANAGED,
    enforceSSL: true,
    blockPublicAccess: s3.BlockPublicAccess.BLOCK_ALL,
});

const getBucketObjectsPolicy = new iam.PolicyDocument({
   statements: [
   new iam.PolicyStatement({
       actions: [
           "s3:GetObject",
           "s3:ListBucket",
       ],
resources: [
    `${artifactsBucket.bucketArn}`,
    `${artifactsBucket.bucketArn}/*`
       ]
   })]
});
Add an Amazon Virtual Private Cloud (VPC) configuration.
Specify the private subnet that contains the NAT gateway with a route to the Internet. Then provision two security groups that the proxy server and the Nucleus Server will use.
const eip = new ec2.CfnEIP(this, 'natGatewayElasticIP', {
      domain: 'vpc'
    });

const vpc = new ec2.Vpc(this, 'nucleusVpc', {
  cidr: '10.0.0.0/20',
  natGateways: 1,
  subnetConfiguration: [{
    name: 'publicSubnetNatGateway',
    subnetType: ec2.SubnetType.PUBLIC,
    cidrMask: 24
  }, {
     name: 'privateSubnet',
     subnetType: ec2.SubnetType.PRIVATE_WITH_NAT,
     cidrMask: 24
  }],
  natGatewayProvider: ec2.NatProvider.gateway({
      eipAllocationIds: [eip.attrAllocationId]
  }),
});

const proxySG = new ec2.SecurityGroup(this, 'reverseProxySG', {
  vpc: vpc,
  allowAllOutbound: true,
  description: "Reverse Proxy Security Group"
  });


const nucleusSG = new ec2.SecurityGroup(this, 'nucleusSG', {
  vpc: vpc,
  allowAllOutbound: true,
  description: "Nucleus Server Security Group"
});
Add security group ingress rules.
Configure the proxy and Nucleus security groups to allow traffic on required ports. The Nucleus security group only allows traffic from the proxy security group. The proxy security group allows traffic from a specific CIDR range. you will want to set this to a range you will use to connect to the server. For example, you can use the IP Address of the client machine you plan to connect from. Then, you enter that IP appended with a network mask as the CIDR range. For this solution, the recommended network mask is /32.
const allowedCidrRange = 'ip-address/network-mask'

    proxySG.addIngressRule(ec2.Peer.ipv4(allowedCidrRange), ec2.Port.tcp(443), "HTTPS Traffic");
    proxySG.addIngressRule(ec2.Peer.ipv4(allowedCidrRange), ec2.Port.tcp(3180), "Auth login");
    proxySG.addIngressRule(ec2.Peer.ipv4(allowedCidrRange), ec2.Port.tcp(3100), "Auth Service");
    proxySG.addIngressRule(ec2.Peer.ipv4(allowedCidrRange), ec2.Port.tcp(3333), "Discovery Service");
    proxySG.addIngressRule(ec2.Peer.ipv4(allowedCidrRange), ec2.Port.tcp(3030), "LFT");
    proxySG.addIngressRule(ec2.Peer.ipv4(allowedCidrRange), ec2.Port.tcp(3019), "Core API");
    proxySG.addIngressRule(ec2.Peer.ipv4(allowedCidrRange), ec2.Port.tcp(3020), "Tagging Service");
    proxySG.addIngressRule(ec2.Peer.ipv4(allowedCidrRange), ec2.Port.tcp(3400), "Search Service");

const proxySGId = proxySG.securityGroupId

    nucleusSG.addIngressRule(ec2.Peer.securityGroupId(proxySGId), ec2.Port.tcp(8080), "HTTP Traffic");
    nucleusSG.addIngressRule(ec2.Peer.securityGroupId(proxySGId), ec2.Port.tcp(3180), "Auth login");
    nucleusSG.addIngressRule(ec2.Peer.securityGroupId(proxySGId), ec2.Port.tcp(3100), "Auth Service");
    nucleusSG.addIngressRule(ec2.Peer.securityGroupId(proxySGId), ec2.Port.tcp(3333), "Discovery Service");
    nucleusSG.addIngressRule(ec2.Peer.securityGroupId(proxySGId), ec2.Port.tcp(3030), "LFT");
    nucleusSG.addIngressRule(ec2.Peer.securityGroupId(proxySGId), ec2.Port.tcp(3019), "Core API");
    nucleusSG.addIngressRule(ec2.Peer.securityGroupId(proxySGId), ec2.Port.tcp(3020), "Tagging Service");
    nucleusSG.addIngressRule(ec2.Peer.securityGroupId(proxySGId), ec2.Port.tcp(3400), "Search Service");
Add a TLS Certificate and set the domain from an earlier step for validation. The root-domain variable must be set to the domain registered with the Route 53 hosted zone.
const rootDomain = root-domain;
  const fullDomain = 'nucleus.'+rootDomain;
  const hostedZone = route53.HostedZone.fromLookup(this, 'PublicHostedZone', {domainName: rootDomain}
  );

  const certificate = new acm.Certificate(this, 'PublicCertificate', {
    domainName: rootDomain,
    subjectAlternativeNames: [`*.${rootDomain}`],
    validation: acm.CertificateValidation.fromDns(hostedZone),
  });
Note
There is currently no additional automated management of this CNAME record. When you no longer require it, it will need to be removed manually from your Route 53 Hosted Zone.
Add Reverse Proxy Resources.
For the reverse proxy, configure it with Nitro Enclaves enabled. Enclaves provides features to create isolated compute environments to protect and securely process highly sensitive data. In this case that’s our TLS certificate. On top of that, Nitro Enclaves has support for integration with Amazon Certificates Manager. Meaning Certificates Manager can automatically handle the rotation of the certificate. For more information see the AWS Nitro Enclaves User Guide.
Starting from the Certificate Manager for Nitro Enclaves AMI, create a c5.xlarge instance with 32GB of storage. In this case c5.xlarge was chosen as one of the smallest available instances required for the Nitro Enclaves AMI. Configure a basic instance role with the AmazonSSMManagedInstanceCore policy. This allows you to connect to the instance with SSM and avoid opening the instance to SSH traffic over the internet.
Finally, attach a “dummy” IAM policy to the reverse proxy. This is an empty policy which will get updated with the configuration scripts.
If your Region is not in the list below, review the AMI listing on the AWS Marketplace or the AWS Documentation for finding the correct AMI ID.
// AWS Certificate Manager for Nitro Enclaves AMI
const proxyServerAMI = new ec2.GenericLinuxImage({
  'us-west-1': 'ami-0213075968e811ea7',    //california
  'us-west-2': 'ami-01c4415fd6c2f0927',    //oregon
  'us-east-1': 'ami-00d96e5ee00daa484',    //virginia
  'us-east-2': 'ami-020ea706ac260de21',    //ohio
  'ca-central-1': 'ami-096dd1150b96b6125', //canada
  'eu-central-1': 'ami-06a2b19f6b97762cb', //frankfurt
  'eu-west-1': 'ami-069e205c9dea19322',    //ireland
  'eu-west-2': 'ami-069b79a2d7d0d9408'     //london
})

const proxyInstanceRole = new iam.Role(this, 'proxyInstanceRole', {
  assumedBy: new iam.ServicePrincipal('ec2.amazonaws.com'),
  description: 'EC2 Instance Role',
  managedPolicies: [
      iam.ManagedPolicy.fromAwsManagedPolicyName('AmazonSSMManagedInstanceCore')
  ],
  inlinePolicies: {
    getBucketObjectsPolicy: getBucketObjectsPolicy
  }
});

const cfnInstanceProfile = new iam.CfnInstanceProfile(this, 'proxyInstanceProfile', {
  roles: [proxyInstanceRole.roleName],
});

// using CfnInstance because it exposes enclaveOptions
const cfnInstance = new ec2.CfnInstance(this, 'reverseProxyServer',  {
  blockDeviceMappings: [{
      deviceName: '/dev/xvda',
      ebs: {
        encrypted: true,
        volumeSize: 32,
      }
    }],
  enclaveOptions: {
      enabled: true,
  },
  imageId: proxyServerAMI.getImage(this).imageId,
  instanceType: 'c5.xlarge',
  securityGroupIds: [proxySG.securityGroupId],
  subnetId: vpc.selectSubnets({subnetGroupName: 'publicSubnetNatGateway'}).subnetIds[0],
  tags: [{
      key: 'Name',
      value: 'Nucleus-ReverseProxy',
    }],
  iamInstanceProfile: cfnInstanceProfile.ref
})

new route53.CnameRecord(this, `CnameApiRecord`, {
  recordName: fullDomain,
  zone: hostedZone,
  domainName: cfnInstance.attrPublicDnsName,
});


const revProxyCertAssociationPolicy = new iam.ManagedPolicy(this, 'revProxyCertAssociationPolicy', {
    statements: [
    new iam.PolicyStatement({
      actions: ["s3:GetObject"], resources: ["*"]
    })
  ]
})
proxyInstanceRole.addManagedPolicy(revProxyCertAssociationPolicy)
Add Nucleus Server Resources.
Next, configure the Nucleus Server. Start with the Ubuntu 20.04 or 22.04 LTS AMI with c5.4xlarge as the instance type. C5 instances are optimized for compute-intensive workloads and deliver cost-effective high performance at a low price per compute ratio. The instance has 16 vCPUs and 32GB of RAM. An Amazon Elastic Block Store (EBS) volume is attached to the instance with 512GB of storage. These specs were chosen to be sufficiently large for a proof of concept, however may be suitable for your production workload.
The instance user data script is configured to install Docker, Docker Compose, and the AWS CLI.
const nucleusServerAMI = new ec2.GenericLinuxImage({
  'us-west-1': 'ami-0dc5e9ff792ec08e3',    //california
  'us-west-2': 'ami-0ee8244746ec5d6d4',    //oregon
  'us-east-1': 'ami-09d56f8956ab235b3',    //virginia
  'us-east-2': 'ami-0aeb7c931a5a61206',    //ohio
  'ca-central-1': 'ami-0fb99f22ad0184043', //canada
  'eu-central-1': 'ami-015c25ad8763b2f11', //frankfurt
  'eu-west-1': 'ami-00c90dbdc12232b58',    //ireland
  'eu-west-2': 'ami-0a244485e2e4ffd03'     //london
})

const nucleusEbsVolume: ec2.BlockDevice = {
  deviceName: '/dev/sda1',
  volume: ec2.BlockDeviceVolume.ebs(512, {
      encrypted: true,
  })
};

const nucleusInstanceRole = new iam.Role(this, 'nucleusInstanceRole', {
  assumedBy: new iam.ServicePrincipal('ec2.amazonaws.com'),
  description: 'EC2 Instance Role',
  managedPolicies: [
      iam.ManagedPolicy.fromAwsManagedPolicyName('AmazonSSMManagedInstanceCore')
  ],
  inlinePolicies: {
    getBucketObjectsPolicy: getBucketObjectsPolicy
  }
});

const nucleusUserData = `
#!/bin/bash
sudo apt-get update

# docker
sudo apt-get -y install apt-transport-https ca-certificates curl gnupg-agent software-properties-common
curl -fsSL https://download.docker.com/linux/ubuntu/gpg | sudo apt-key add -
sudo add-apt-repository -y "deb [arch=amd64] https://download.docker.com/linux/ubuntu $(lsb_release -cs) stable"
sudo apt-get -y update
sudo apt-get -y install docker-ce docker-ce-cli containerd.io

# docker compose
sudo curl -L "https://github.com/docker/compose/releases/download/1.29.2/docker-compose-$(uname -s)-$(uname -m)" -o /usr/local/bin/docker-compose
sudo chmod +x /usr/local/bin/docker-compose

# aws cli
sudo curl "https://awscli.amazonaws.com/awscli-exe-linux-x86_64.zip" -o "awscliv2.zip"
sudo apt-get install unzip
sudo unzip awscliv2.zip
sudo ./aws/install
sudo rm awscliv2.zip
sudo rm -fr ./aws/install
`

const nucleusServerInstance = new ec2.Instance(this, "NucleusServer", {
  instanceType: new ec2.InstanceType("c5.4xlarge"),
  machineImage: nucleusServerAMI,
  blockDevices: [nucleusEbsVolume],
  vpc: vpc,
  role: nucleusInstanceRole,
  securityGroup:  nucleusSG,
  userData: ec2.UserData.custom(nucleusUserData),
  vpcSubnets: vpc.selectSubnets({subnetGroupName: 'privateSubnet'}),
  detailedMonitoring: true,
});

Tags.of(nucleusServerInstance).add("Name", "Nucleus-Server");
Configure Stack Outputs and add output values so they can easily be referenced later.
new CfnOutput(this, 'region', {
    value: this.region
}).overrideLogicalId('region');

new CfnOutput(this, 'artifactsBucketName', {
    value: artifactsBucket.bucketName
}).overrideLogicalId('artifactsBucketName');

new CfnOutput(this, 'tlsCertifcateArn', {
    value: certificate.certificateArn
}).overrideLogicalId('tlsCertifcateArn');

new CfnOutput(this, 'proxyInstanceRoleArn', {
    value: proxyInstanceRole.roleArn
}).overrideLogicalId('proxyInstanceRoleArn');

new CfnOutput(this, 'proxyCertAssociationPolicyArn', {
    value: revProxyCertAssociationPolicy.managedPolicyArn
}).overrideLogicalId('proxyCertAssociationPolicyArn');

new CfnOutput(this, 'nucleusServerPrivateDnsName', {
    value: nucleusServerInstance.instancePrivateDnsName
}).overrideLogicalId('nucleusServerPrivateDnsName');

new CfnOutput(this, 'domain', {
    value: fullDomain
}).overrideLogicalId('domain');
Deploy the stack.
cdk deployOnce this completes, you will have the basic resources required and next you will configuring them. If you encounter the follow CDK deploy error:
[Error at /NucleusAppStack] Found zones: [] for dns:DOMAIN, privateZone:undefined,vpcId:undefined, but wanted exactly 1 zoneCheck that you have the correct domain specified and that your hosted zone exists in the Route 53 console Route 53 Hosted zones.
Make note of the stack output values. You’ll use them in the future:
NucleusAppStack.artifactsBucketName = nucleusappstack-artifactsbucket…
NucleusAppStack.domain = nucleus.my_omniverse.com
NucleusAppStack.nucleusServerPrivateDnsName = ip-...us-west-2.compute.internal
NucleusAppStack.proxyCertAssociationPolicyArn = arn:aws:iam::...:policy/...
NucleusAppStack.proxyInstanceRoleArn = arn:aws:iam::...:role/...
NucleusAppStack.region = ...
NucleusAppStack.tlsCertifcateArn = arn:aws:acm:...:...:certificate/...
Configure the Reverse Proxy Server#
Associate Enclave Certificate with Proxy instance IAM Role.
The first thing you have to do with the reverse proxy is associate your certificate with the IAM role that the Nitro Enclave uses. Replace tls-certificate-arn, proxy-instance-role-arn, proxy-cert-association-policy-arn, and region in the below script with stack output values from above.
The following script was written in Python 3.9. If you have issues with conflicting python versions, its recommended that you set a local
virtualenv. For more information see Python Tutorial Virtual Environments and Packages.CERT_ARN = tls-certificate-arn ROLE_ARN = proxy-instance-role-arn ROLE_POLICY_ARN = proxy-cert-association-policy-arn REGION = region import boto3 import json ec2_client = boto3.client('ec2') iam_client = boto3.client('iam') iam_rsrc = boto3.resource('iam') response = ec2_client.associate_enclave_certificate_iam_role( CertificateArn=CERT_ARN, RoleArn=ROLE_ARN ) print(response) bucket = response['CertificateS3BucketName'] s3object = response['CertificateS3ObjectKey'] kmskeyid = response['EncryptionKmsKeyId'] # update policy with association resources policy = iam_rsrc.Policy(ROLE_POLICY_ARN) policyJson = policy.default_version.document cur_version = policy.default_version_id policyJson['Statement'] = [ { "Effect": "Allow", "Action": "s3:GetObject", "Resource": [f"arn:aws:s3:::{bucket}/*"] },{ "Sid": "VisualEditor0", "Effect": "Allow", "Action": [ "kms:Decrypt" ], "Resource": f"arn:aws:kms:{REGION}:*:key/{kmskeyid}" },{ "Effect": "Allow", "Action": "iam:GetRole", "Resource": ROLE_ARN }] response = iam_client.create_policy_version( PolicyArn = ROLE_POLICY_ARN, PolicyDocument= json.dumps(policyJson), SetAsDefault= True ) print(response) response = iam_client.delete_policy_version( PolicyArn = ROLE_POLICY_ARN, VersionId = cur_version ) print(response)This script associates an Identity and IAM role with a AWS Certificate Manager (ACM) certificate. This enables the certificate to be used by the ACM for Nitro Enclaves application inside an enclave. For more information, see Certificate Manager for Nitro Enclaves in the Amazon Web Services Nitro Enclaves User Guide. The script then updates the IAM role policy with permissions to get its own role, download the certificate, and decrypt it.
Save the script to a file and run it from the terminal:
python ./associate_enclave_cert.py
Configure NGINX (nginx.conf).
A sample NGINX configuration is packaged within the Enterprise Nucleus Server artifact. As of the most recent review of this document, the latest available version is:
nucleus-stack-2022.4.0+tag-2022.4.0-rc.1.gitlab.6522377.48333833.tar.gzOpen the archive and look for:
ssl/nginx.ingress.router.confThis file needs to be updated and then placed in
/etc/nginx/nginx.confon the reverse proxy instance.First, you need to update the config with configuration outlined in the AWS Certificate Manager for Nitro Enclaves guide: Nitro Enclaves application: AWS Certificate Manager for Nitro Enclaves.
At the top of the file, in the main context add the following:
user nginx;
worker_processes auto;
error_log /var/log/nginx/error.log;
pid /run/nginx.pid;

ssl_engine pkcs11;

events {
  worker_connections 1024;
}
Wrap the remainder of the configuration file (starting with the comments at the top to the very bottom) with the following:
http {

# This config file is a sample section of an NGINX configuration
# file to set up an Ingress Router for Nucleus Base Stack.

# Existing configuration info...
# Ensure you have an adjoining closing brace at the bottom of the file to close this stanza.

}
Now after the line, # Configure your SSL options as required by your security practices, add the below snippet:
ssl_protocols TLSv1.2;
ssl_session_cache shared:SSL:1m;
ssl_session_timeout 10m;
ssl_prefer_server_ciphers on;

# Set this to the stanza path configured in /etc/nitro_enclaves/acm.yaml
include "/etc/pki/nginx/nginx-acm.conf";
Next, update the config file with the Nucleus Server private DNS Address and the fully qualified domain for your server. Replace instances of
my-ssl-nucleus.my-company.comwith the domain you are using. Then, replace instances ofBASE_STACK_IP_OR_HOSTwith the nucleusServerPrivateDnsName from the stack outputs above.For the DNS resolver configuration, change the defaults to the DNS Servers that are able to resolve the fully qualified domain name.
Copy the .conf file to S3.
aws s3 cp ssl/nginx.ingress.router.conf s3://artifactBucketName/nginx.conf
From your web browser, navigate to the EC2 Dashboard in the AWS Console, select the Nucleus-ReverseProxy instance, and click the Connect button to connect to the Proxy Instance. Then select the Session Manager tab, then click the Connect button.
In the terminal, copy the
nginx.conffile from S3 to/etc/nginx.sudo aws s3 cp s3://artifactBucketName/nginx.conf ./nginx.conf sudo mv ./nginx.conf /etc/nginx/nginx.conf
While still in the Proxy Server terminal, rename the sample ACM for Nitro Enclaves configuration file from
/etc/nitro_enclaves/acm.example.yamlto/etc/nitro_enclaves/acm.yaml.Update the
acm.yamlfile.
Using your preferred text editor, open
/etc/nitro_enclaves/acm.yaml. In the ACM section, updatecertificate_arn, with the ARN of the certificate from our stack. This is the tls-certificate-arn from the stack outputs above. Once the changes are complete, save and close the file.
Start NGINX.
sudo systemctl start nitro-enclaves-acm.service
sudo systemctl enable nitro-enclaves-acm
Note
Before continuing, ensure your NGINX services are running without errors or warnings.
Confirm the server is accepting TLS requests to your domain.
curl https://nucleus.my-omniverse.com
You’ll see a generic HTML template as output.
Configure Nucleus Server#
The following is derived from the Nucleus Server deployment documentation. Additional information is available by visiting: Enterprise Nucleus Installation Guide.
From your local computer using the AWS CLI, copy the Nucleus Stack archive to S3.
aws s3 cp  ./nucleus-stack-2022.1.0+tag-2022.1.0.gitlab.3983146.613004ac.tar.gz \
s3://artifactBucketName/nucleus-stack-2022.1.0+tag-2022.1.0.gitlab.3983146.613004ac.tar.gz
Connect to the Nucleus Server with EC2 Session Manager. With your web browser, navigate to the EC2 Dashboard in the AWS Console, select the Nucleus-Server instances, click the Connect button, then click the Connect button again within the Session Manager tab.
In the Nucleus-Server terminal, change directory to the home directory, and then copy the Nucleus Stack from S3.
cd ~
aws s3 cp s3://artifactBucketName/nucleus-stack-2022.4.0+tag-2022.4.0-rc.1.gitlab.6522377.48333833.tar.gz \
./nucleus-stack-2022.4.0+tag-2022.4.0-rc.1.gitlab.6522377.48333833.tar.gz
Unpack the archive to an appropriate directory, then cd into that directory.
omniverse_root=/opt/ove
sudo mkdir -p $omniverse_root
sudo tar xzvf  nucleus-stack-2022.1.0+tag-2022.1.0.gitlab.3983146.613004ac.tar.gz -C  $omniverse_root --strip-components=1
cd ${omniverse_root}/base_stack
Update
nucleus-stack.env.
With your preferred text editor, review the nucleus-stack.env file. It is recommended that you review this file in its entirety. You will use this file to confirm that you accept the NVIDIA Omniverse End User License Agreement.
Then update the following nucleus-stack.env variables as needed:
ACCEPT_EULA             Review the notes in the .env file for more information
SECURITY_REVIEWED       Review the notes in the .env file for more information
SERVER_IP_OR_HOST       Set to the Nucleus Server private DNS hostname
SSL_INGRESS_HOST        Set as fully qualified domain name (i.e., nucleus.my_omniverse.com)
MASTER_PASSWORD         Omniverse master user password
SERVICE_PASSWORD        Omniverse service user password
INSTANCE_NAME           Omniverse instance name
DATA_ROOT               Omniverse data root directory
WEB_PORT                NVIDIA recommends that you set this to 8080; this is also what nginx.conf is configured to expect
Generate secrets required for authentication.
The following is required because you are not using SSO integration at this time. See the security notes in
nucleus-stack.envfor more information.sudo chmod +x ./generate-sample-insecure-secrets.sh sudo ./generate-sample-insecure-secrets.sh
Pull the Nucleus Docker images.
sudo docker-compose --env-file ${omniverse_root}/base_stack/nucleus-stack.env -f ${omniverse_root}/base_stack/nucleus-stack-ssl.yml pullStart the Nucleus stack.
sudo docker-compose --env-file ${omniverse_root}/base_stack/nucleus-stack.env -f ${omniverse_root}/base_stack/nucleus-stack-ssl.yml up -d
Usage#
On your local machine, test a connection to your Nucleus Server by pointing your web browser to the domain you specified in
the .env file. You should be greeted with the following login dialog:

Here you can use the Master Username and Password as configured in the nucleus-stack.env, or click Create Account. Once logged in, you will be presented with a Navigator view of your Nucleus Server.

Additional Reading and Reference Links#
AWS Services#
Amazon EC2, secure and resizable compute capacity for virtually any workload
Amazon Route 53, a reliable and cost-effective way to route end users to Internet applications
Amazon S3, object storage built to retrieve any amount of data from anywhere
Amazon EBS, easy to use, high performance block storage at any scale
AWS Certificates Manager for Nitro Enclaves, public and private TLS certificates with web servers running on Amazon EC2 instances