Importing USD
Import Features
Import Mesh and Xform
Materials support: USDPreviewSurface, OmniPBR, OmniGlass
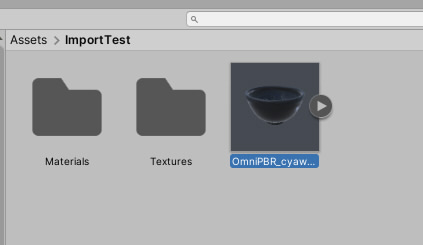
When importing a drop: If there are references, they will be imported into one Prefab
How to Import USD files
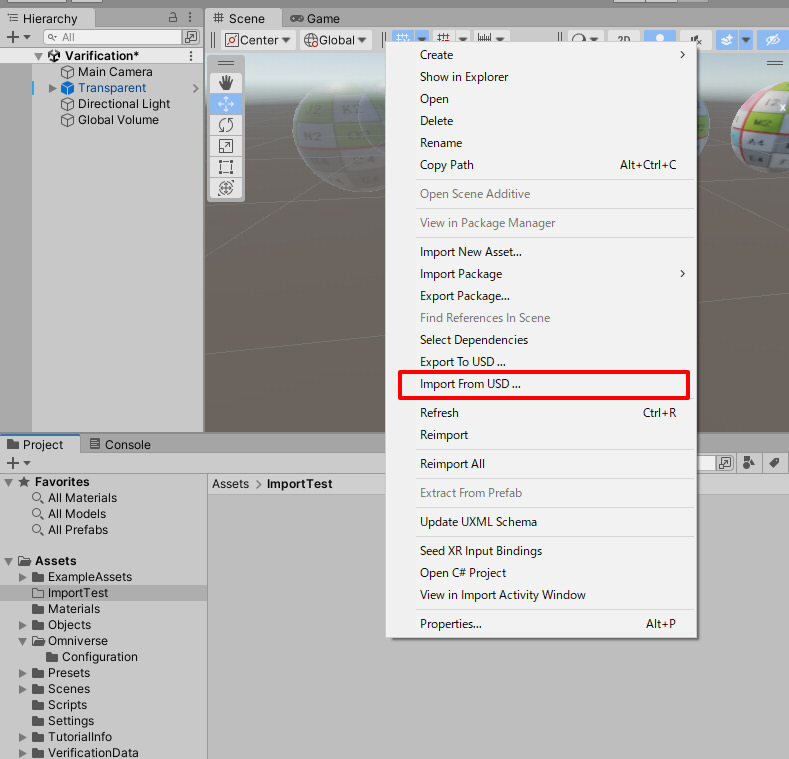
USD import can be done in three ways.
Drag-and-Drop USD file and folders in the Project window
Use Context Menu “Import From USD” in the pop-up menu of the Project window
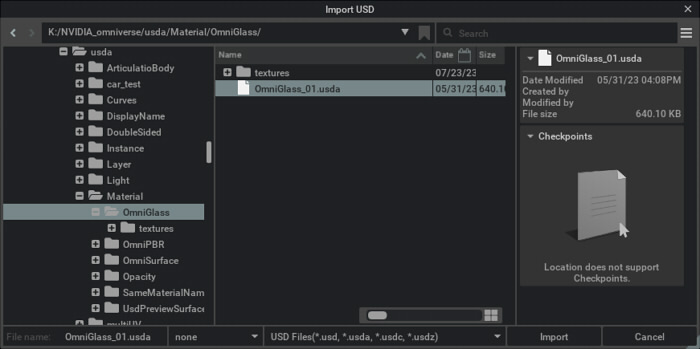
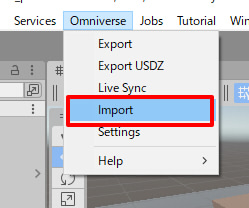
Omniverse menu select Import
Drag-and-Drop Import USD file in the Project window
Supported USD File Import: usd, usdc, usda, usdz
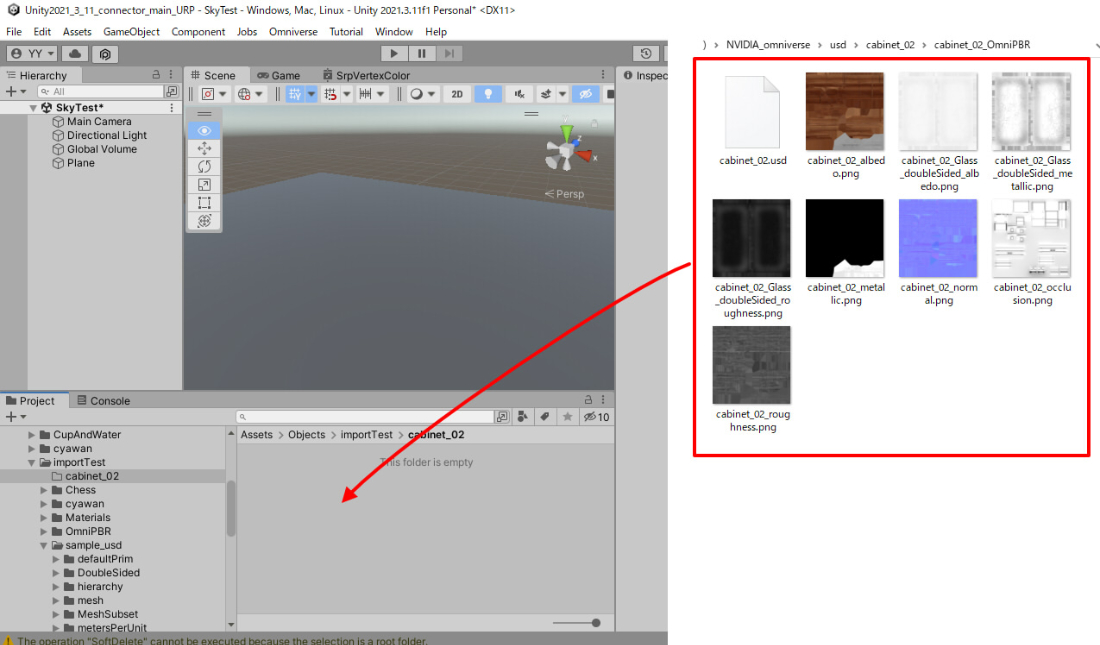
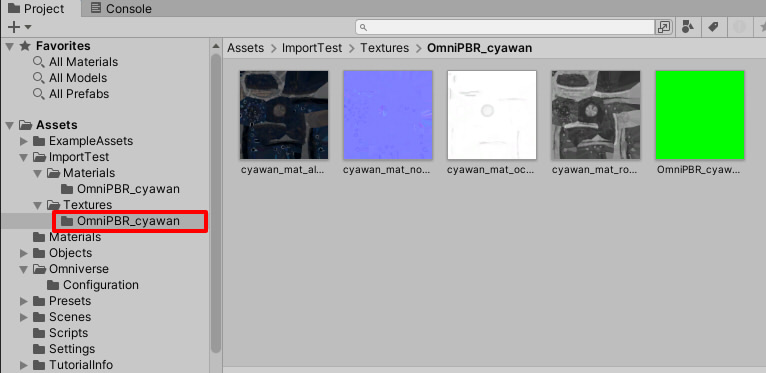
If only USD files are imported, the textures in the folder will be referenced and if there is a texture file name that is the same as the one referenced in USD, it will be assigned.
Note
Import does not follow the parent from the folder where the target USD is located to search of textures in other folders. You should drag-and-drop all folders and files at the same time for the initial Import.
Context Menu Right-Click “Import From USD”
Note
If the file path contains non-ASCII strings, the file may not be imported correctly. Best practice is for file and folders to usd ASCII characters and avoid special characters like # / ? | : $ @ in the file and folder names.
Import using the Omniverse menu
USD Information
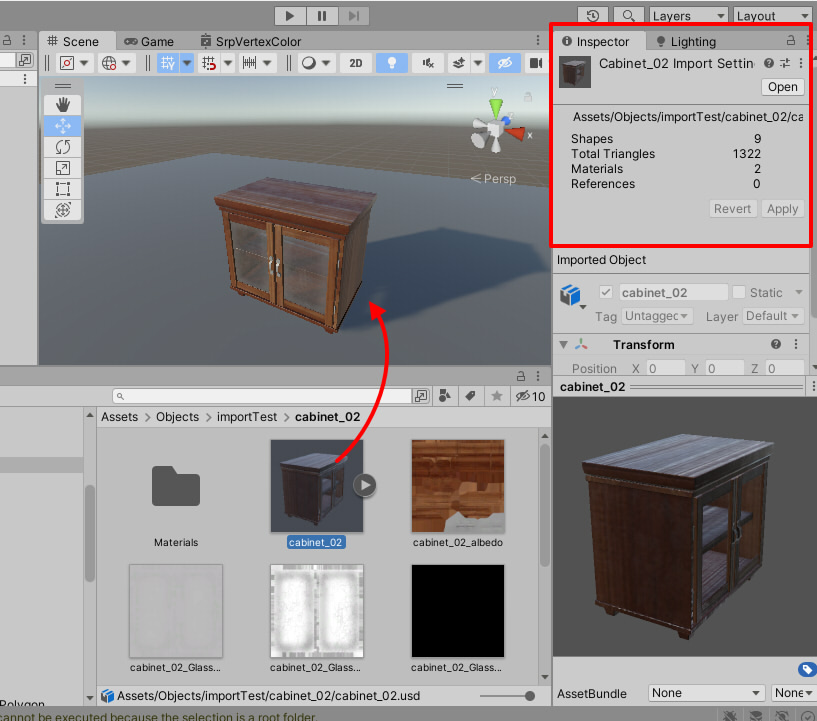
The number of shapes, total triangles, materials, and references are displayed.
Placed in scene
Drop a USD file from the Project window into the Scene View to place it in the scene as a GameObject.
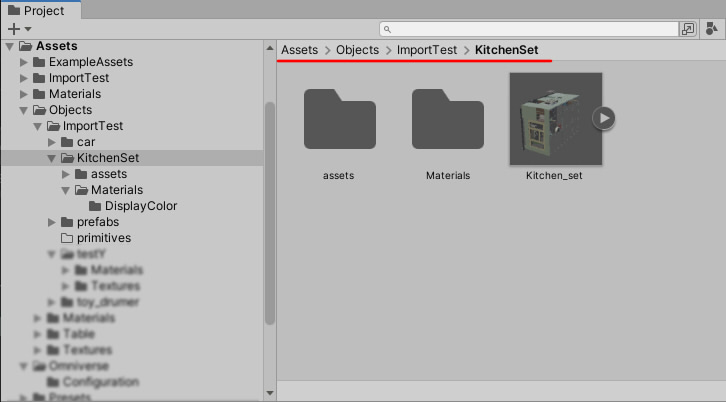
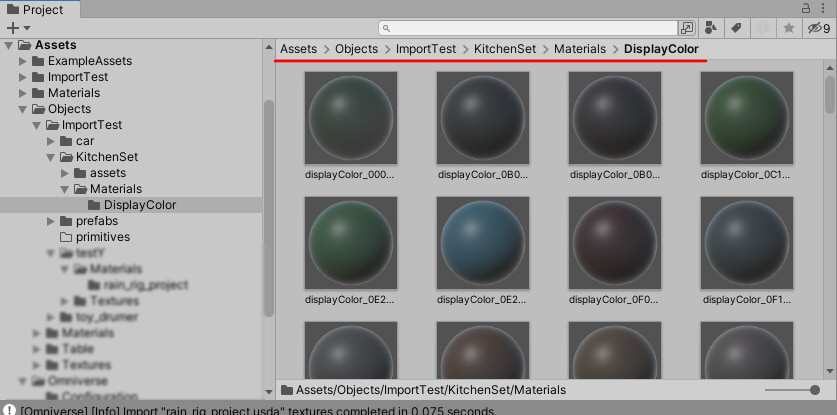
DisplayColor support
If DisplayColor is specified for USD, you can choose whether to use Unity’s Mesh vertex color or material on import in Settings.
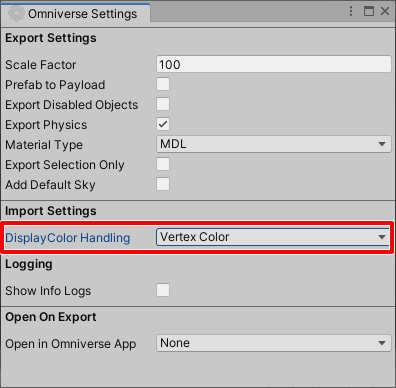
DisplayColor Handling : Vertex Color
DisplayColor Handling : Material
When “Material” is selected for DisplayColor Handling, a material is created for each DisplayColor color.
In this case, the mesh vertex color is not used, so the color cannot be changed for each vertex of the face.
Texture and material files are not overwritten
Texture files referenced in USD and material files generated by Unity will not be overwritten if the same path already exists as a Unity asset. If you want to replace materials and textures, be sure to delete the associated materials and textures once before reimporting the usd file in Unity.
Limitations
Currently only one usd is still to be imported. The usd specified in the usd Reference or Payload will not be imported.
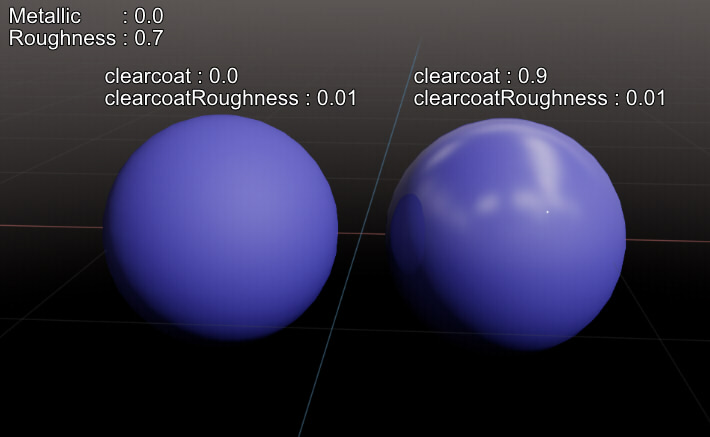
Material: Clearcoat support
Parameter |
Description |
Default |
|---|---|---|
clearcoat |
Clearcoat value (0.0-1.0) |
0.0 |
clearcoatRoughness |
Clearcoat roughness (0.0-1.0) |
0.01 |
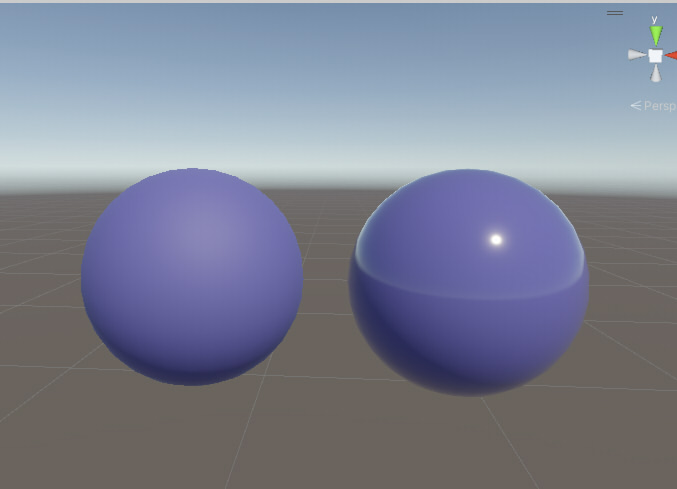
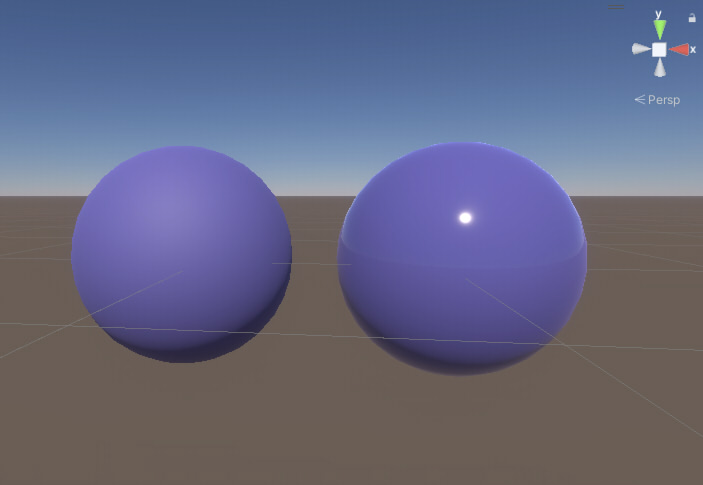
As an example, the material is specified in USD Composer as follows
URP - Clearcoat Mask Map
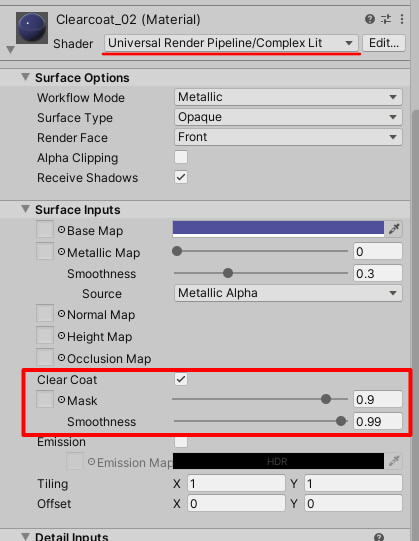
The ClearCoat Mask Map in Unity has the following channel configuration.
[R] Mask[G] Smoothness[B] None[A] None
If a clearcoat or clearcoatRoughness texture is specified in USD, it will be packed into this Unity texture.
HDRP - Coat Mask
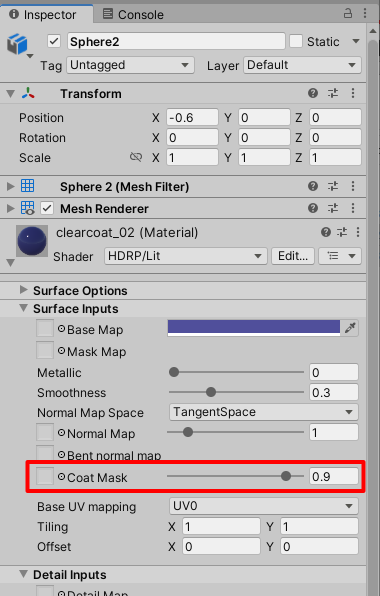
In the Clearcoat Mask texture, Clearcoat Mask was set on the R, G, and B channels.
[R] Mask[G] Mask[B] Mask[A] None
Material Map Import Support
BaseColor, BaseColor Map
Emissive Color, Emissive Color Map
Normal Map
Occlusion Map
Metallic, Metallic Map
Roughness, Roughness Map
Opacity, Opacity Map
OpacityThreshold
Clearcoat (URP, HDRP)
Texture transform (scale, offset)
Note
The USD Metallic Map and Roughness Map will be converted to a MetallicSmoothness Map in Unity. And the Opacity Map is packed into the Alpha value of the BaseColor Map.
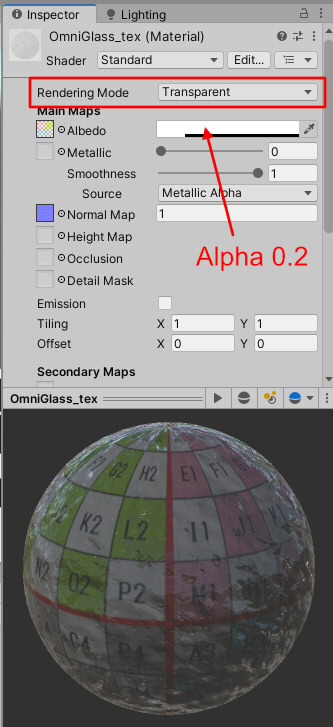
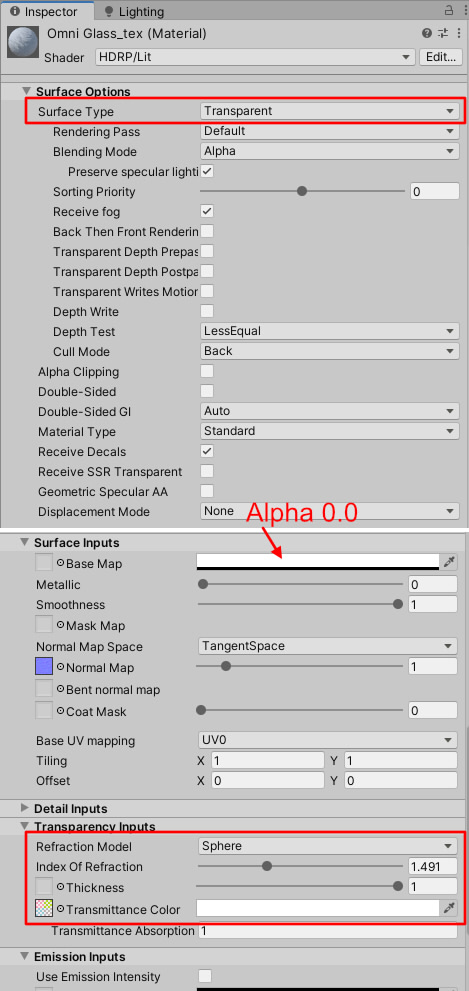
Material: OmniGlass support
When importing USD, OmniGlass will reflect the following parameters.
BaseColor(Albedo Color), BaseColor Map
Roughness, Roughness Map
Normal Map
Texture transform
IOR (HDRP only)
URP - Glass and Transparent Materials Import
For Unity’s Built-in/URP, if the Alpha of BaseColor is set to 0 in Transparent, it will be hidden. In URP, set Blending Mode to Pre-multiply. BaseColor==RGB(1, 1, 1) and BaseColor Map texture not exists.
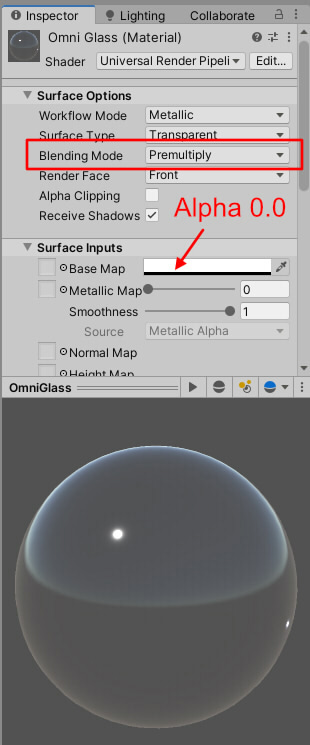
In URP, if a BaseColor (BaseColor!=RGB(1, 1, 1)) or BaseMap texture exists, set Alpha=1.0 and Blending Mode to Multiply.

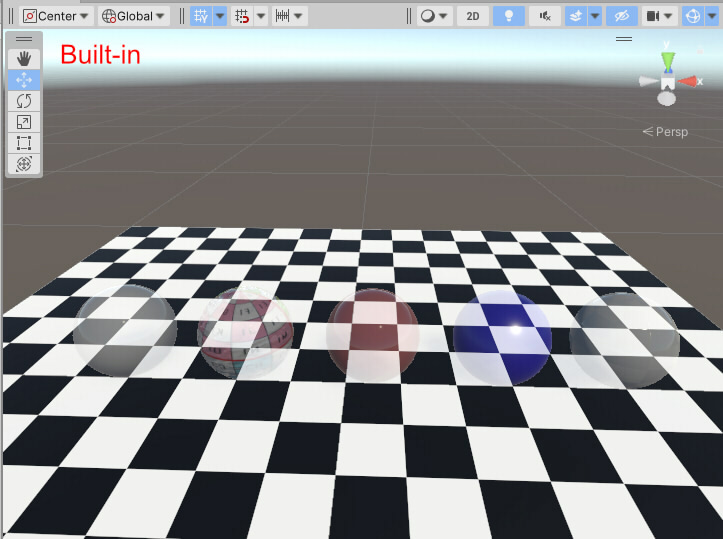
Built-in - Glass and Transparent Materials Import
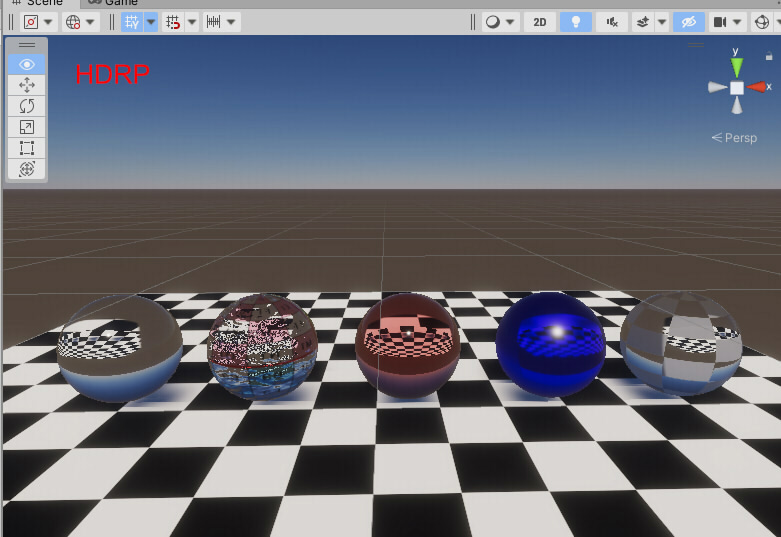
HDRP - Glass and Transparent Materials Import
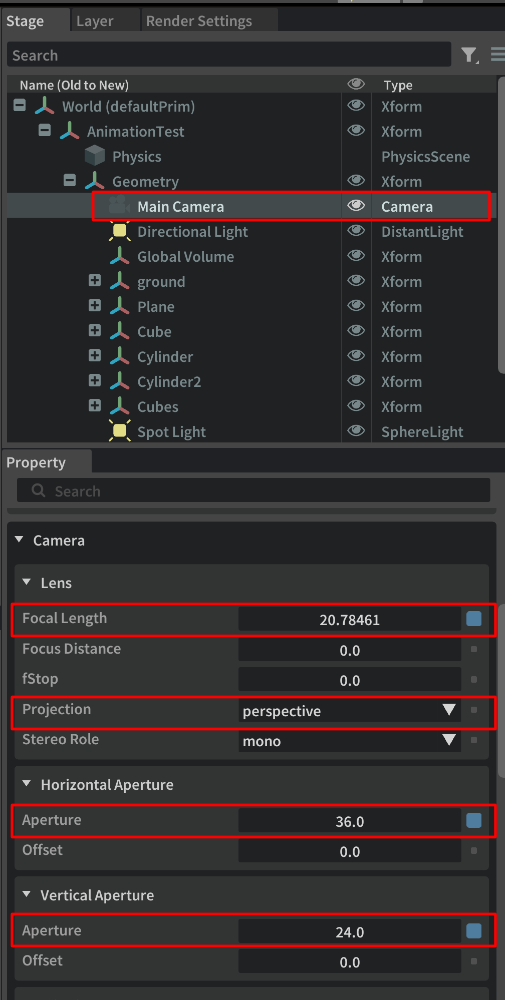
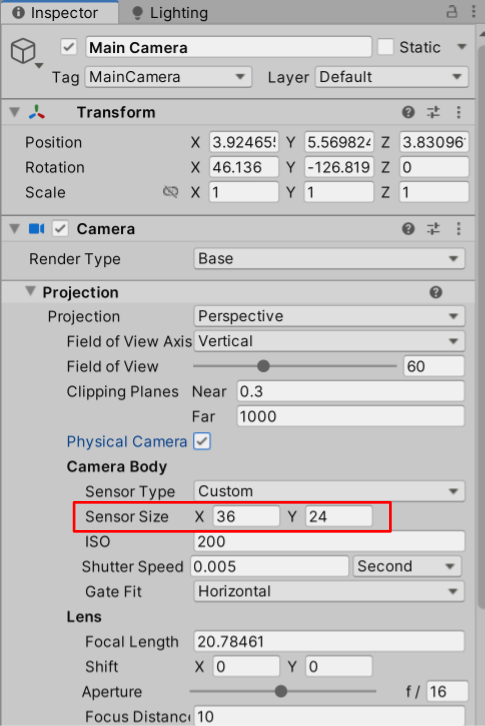
Camera support
Importing USD’s Camera supports the following parameters.
Parameter |
Description |
|---|---|
Focal Length |
Focal length in millimeters |
Projection |
Perspective, Orthographic |
Horizontal Aperture - Aperture |
Sensor Size Horizontal |
Vertical Aperture - Aperture |
Sensor Size Vertical |
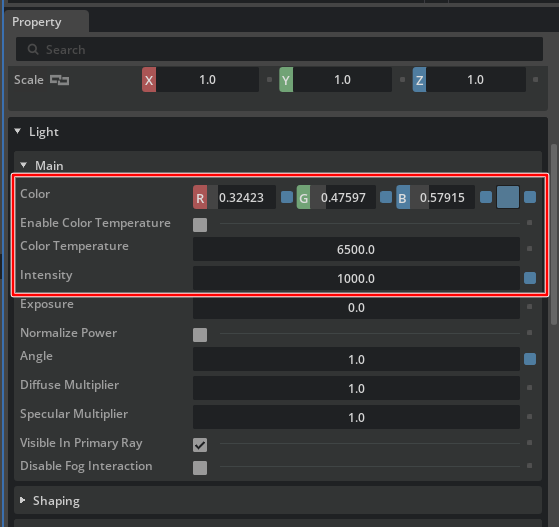
Light support
USD import supports the following USD lights.
DistantLight
SphereLight
RectLight
The Omniverse Unity Connector imports the parameters of the following lights of the USD into Unity.
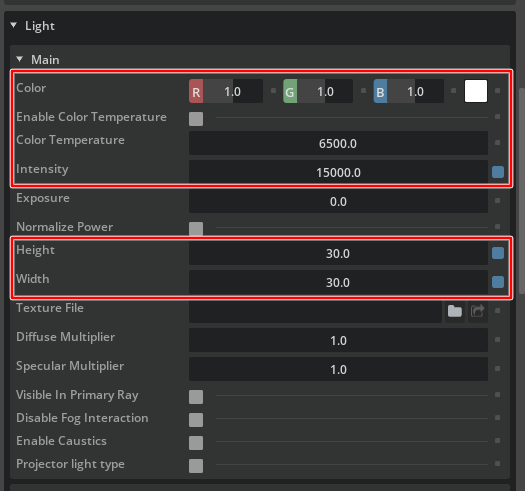
Main Parameters
These are parameters common to all lights.
Parameter |
Unity Target Render Pipeline |
Description |
|---|---|---|
Color |
Built-in, URP, HDRP |
Light color |
Enable Color Temperature |
URP, HDRP |
Whether to use Color Temperature |
Color Temperature |
URP, HDRP |
Color Temperature |
Intensity |
Built-in, URP, HDRP |
Light intensity |
DistantLight
Unity Intensity = (USD Intensity / 3000.0) * 100000.0;
SphereLight
Parameter |
Unity Target Render Pipeline |
Description |
|---|---|---|
Radius |
HDRP |
Radius of sphere light |
Cone Angle |
Built-in, URP, HDRP |
If it is smaller than 180, it becomes a spotlight |
Cone Softness |
URP, HDRP |
Softness value of the spotlight.
In Unity, it is used to calculate the interior and exterior angles of spotlights.
|
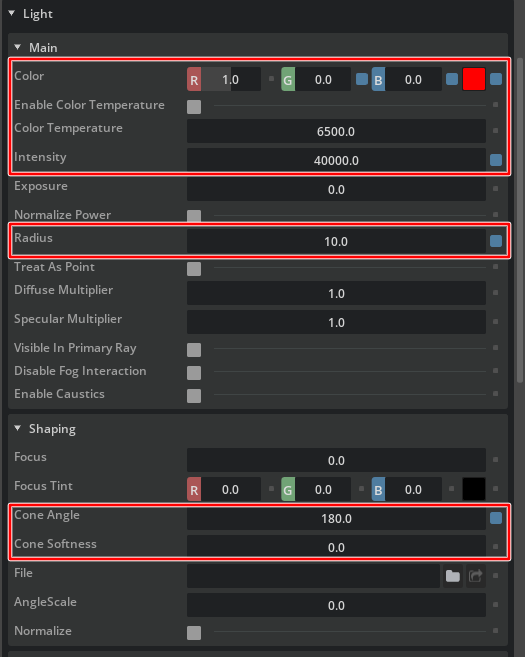
Radius does not exist as a light parameter in Built-in or URP, but radius is used in the intensity calculation.
RectLight
USD’s RectLight imports as Area Light in Unity.
Parameter |
Unity Target Render Pipeline |
Description |
|---|---|---|
Width |
Built-in, URP, HDRP |
Width of RectLight |
Height |
Built-in, URP, HDRP |
Height of RectLight |
Please refer to the Unity documentation for details.
https://docs.unity3d.com/2022.3/Documentation/Manual/UsingPrecomputedLighting.html
Light transform scale
In Unity, the scale value of the light’s transform is not reflected in the light.
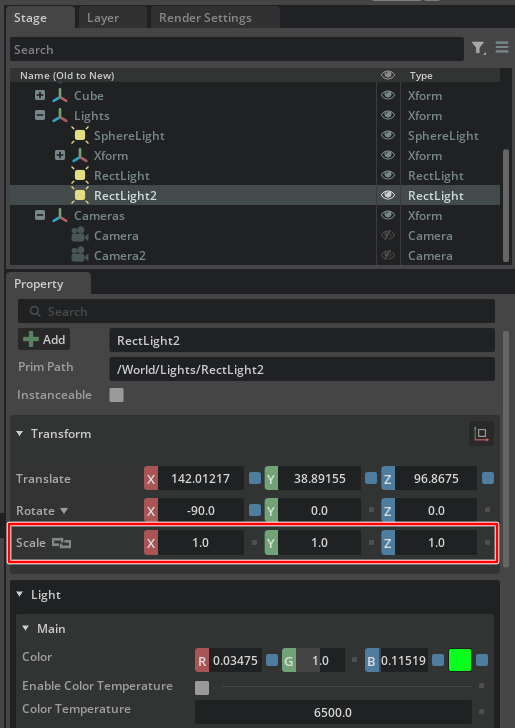
The scale of the light is always used as (1, 1, 1).
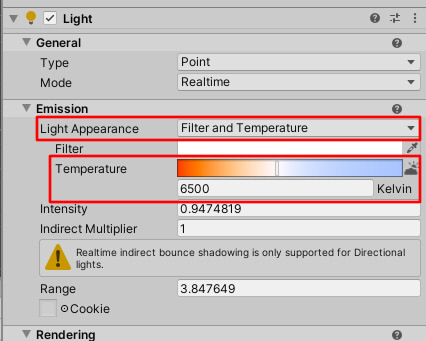
Light color temperature
In the case of Unity’s URP and HDRP, there is a color temperature parameter for the light.
Scene Exposure in HDRP
In URP/HDRP, Post Processing parameters is specified for Volume.
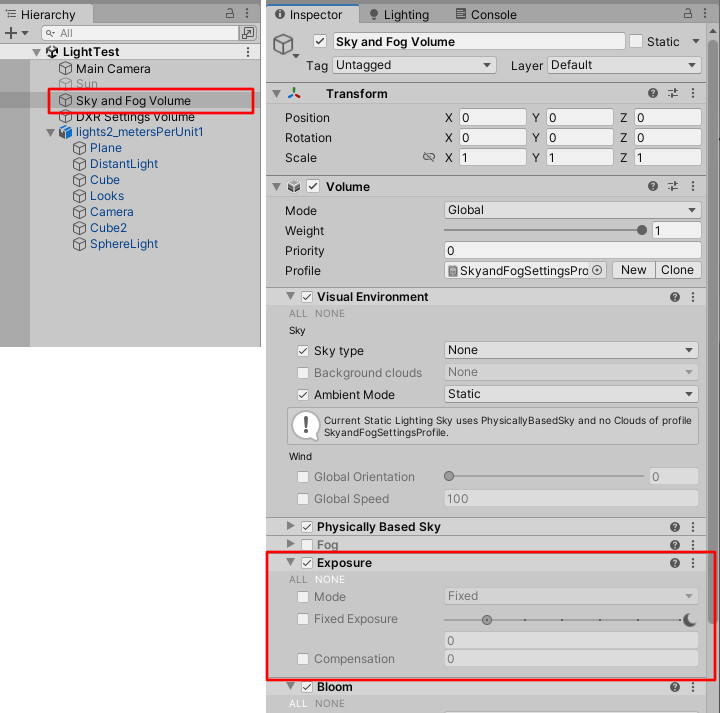
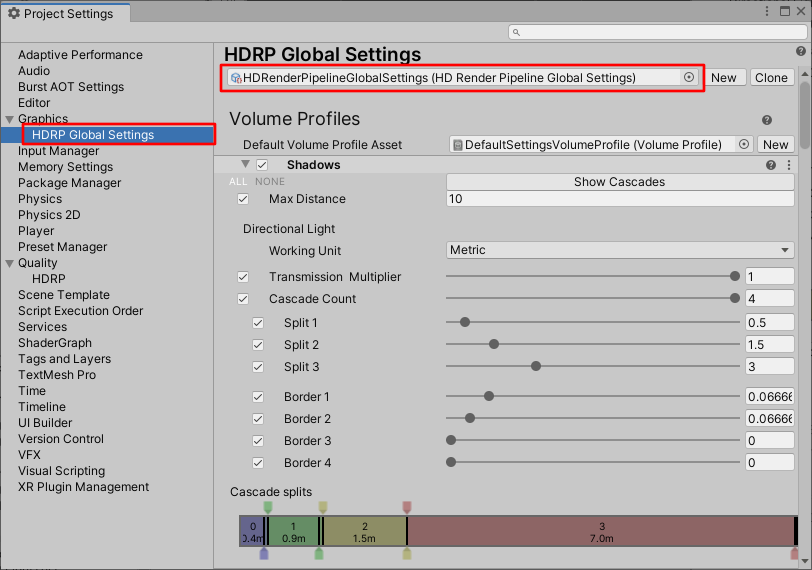
Exposure Mode is set to Automatic.
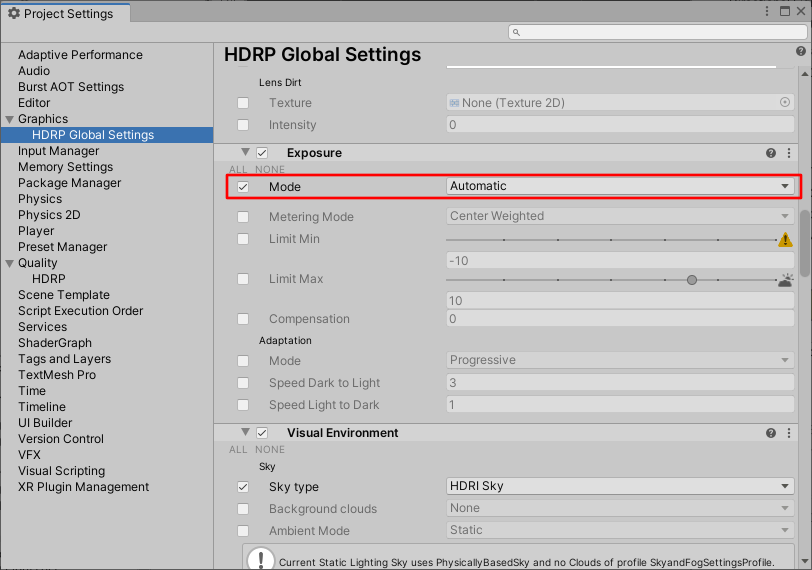
In this case, Exposure is automatically adjusted according to the brightness of the entire scene.
When importing USD to Unity, the Intensity is adjusted based on the following parameter values in Exposure of the scene’s Volume.
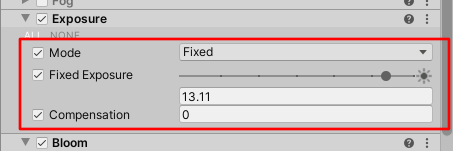
Mode : Fixed
Fixed Exposure : 13.11
Compensation : 0
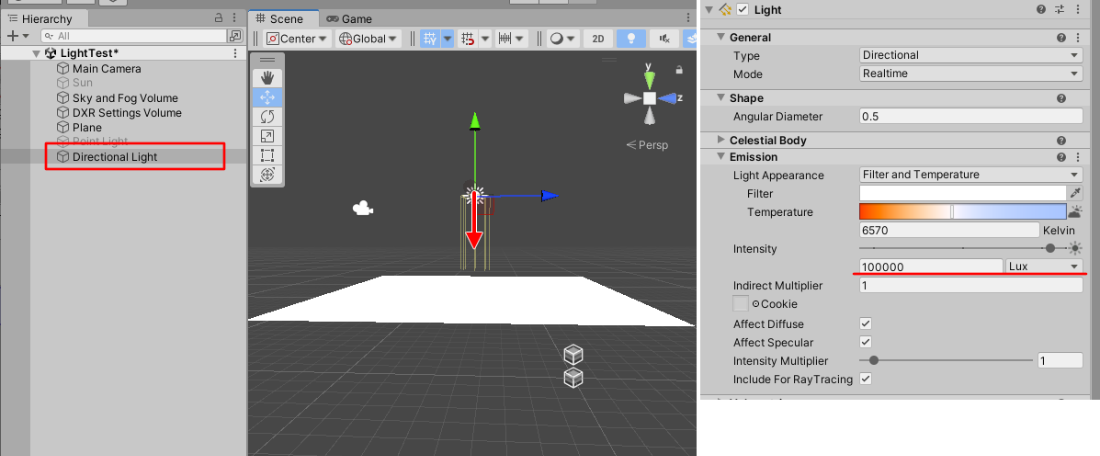
When importing USD, PointLight, SpotLight, and Area Light on Unity are adjusted to match relatively based on the Intensity of this Directional Light.
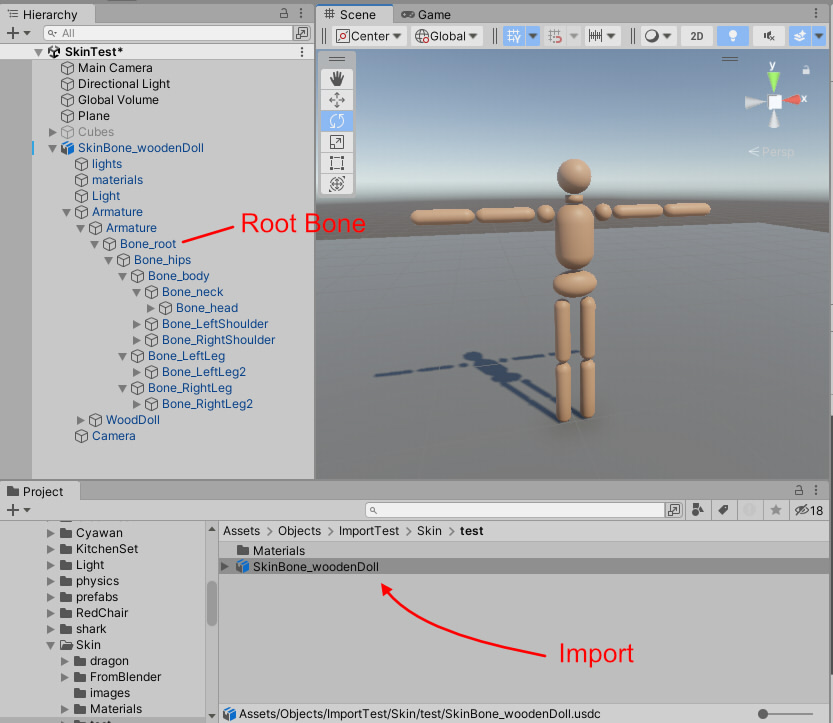
Skin and Skeleton support
Supports import of USD skins and skeleton structures.
The skeleton in USD is as follows.
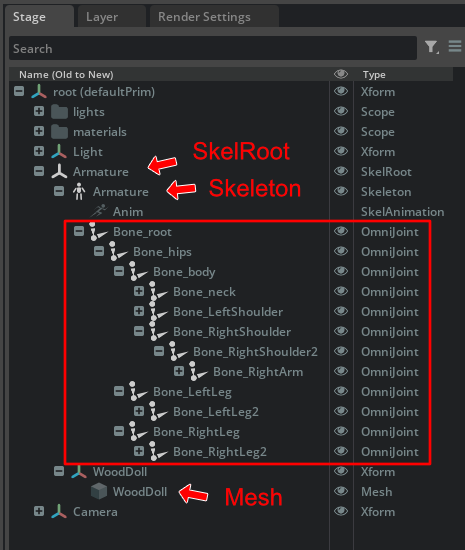
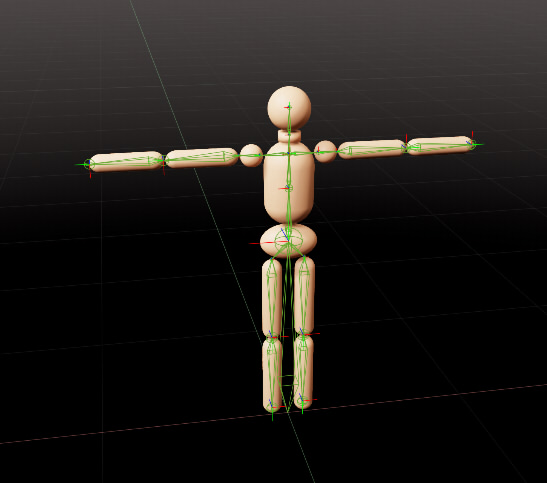
It is preferable for the joints in a Skeleton to have a hierarchical structure starting from a single joint.
Import this skin+skeleton structure USD file into Unity.