Omni.Anim.People
Warning
Omni.Anim.People is in Beta. For more information on pre-release and beta terms, refer to the Omniverse License Agreement.
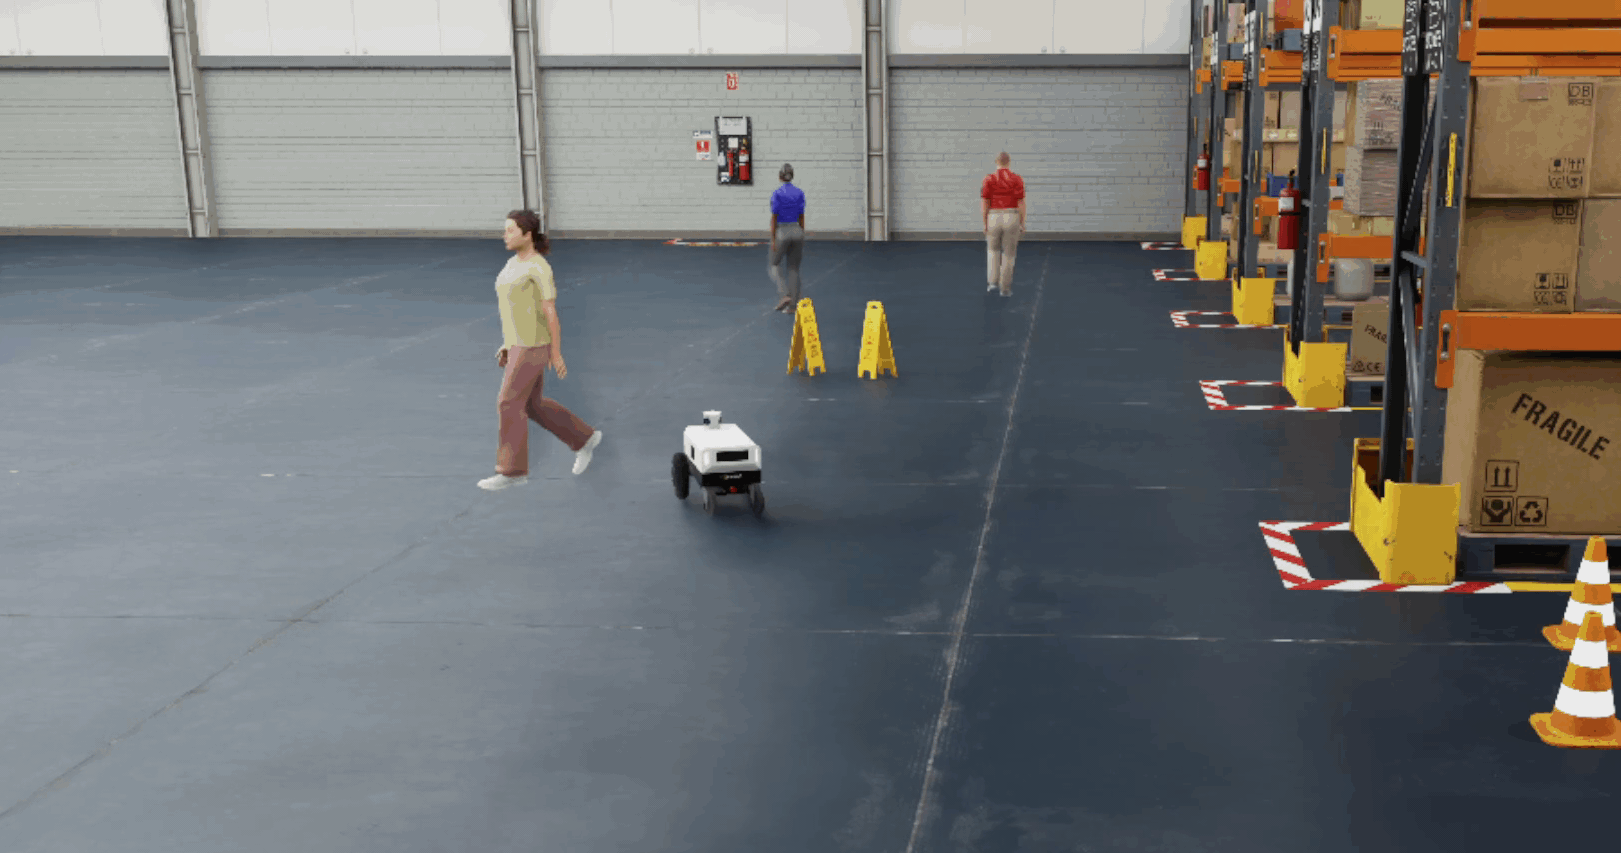
Omni.Anim.People is an Extension for simulating human events in environments such as retail stores, warehouses, and, traffic intersections.
A simulation consists of a sequence of actions for each character in the scene to perform. There are six supported character actions:
Idle
Look around
Queue
Sit
Stand
Walk
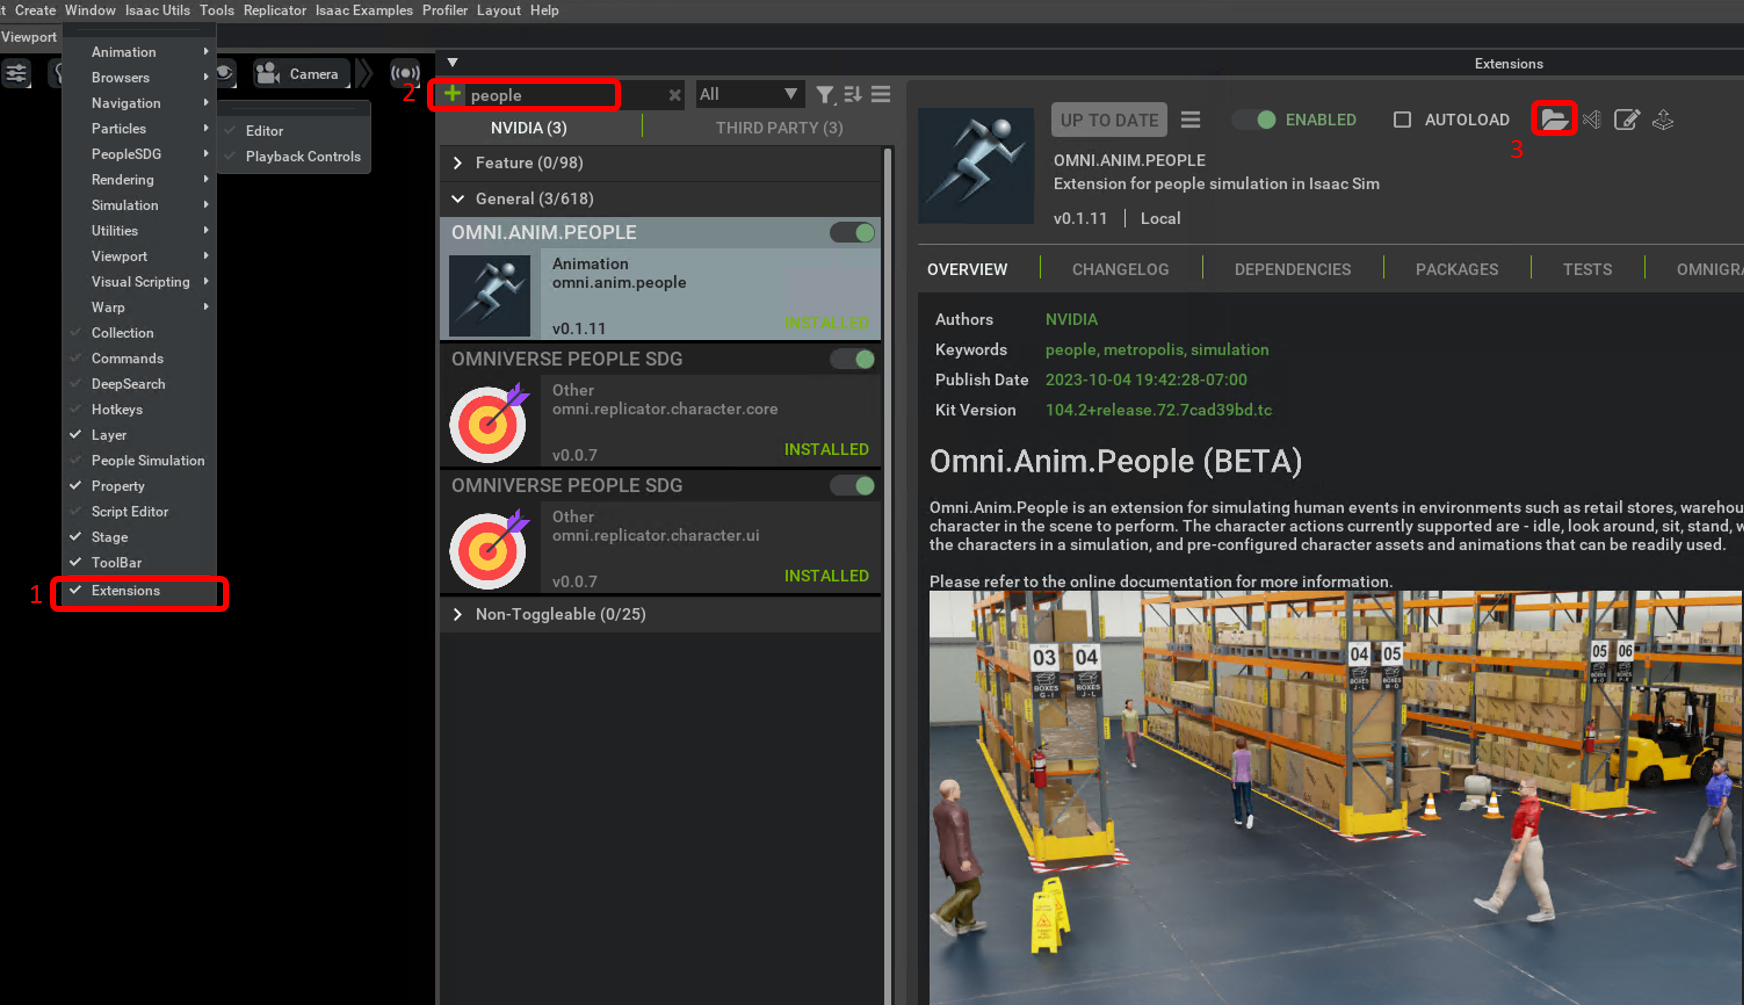
Enable omni.anim.people
Open the extension manager - Window > Extensions. In the extension manager, search for “people” and enable the omni.anim.people extension.
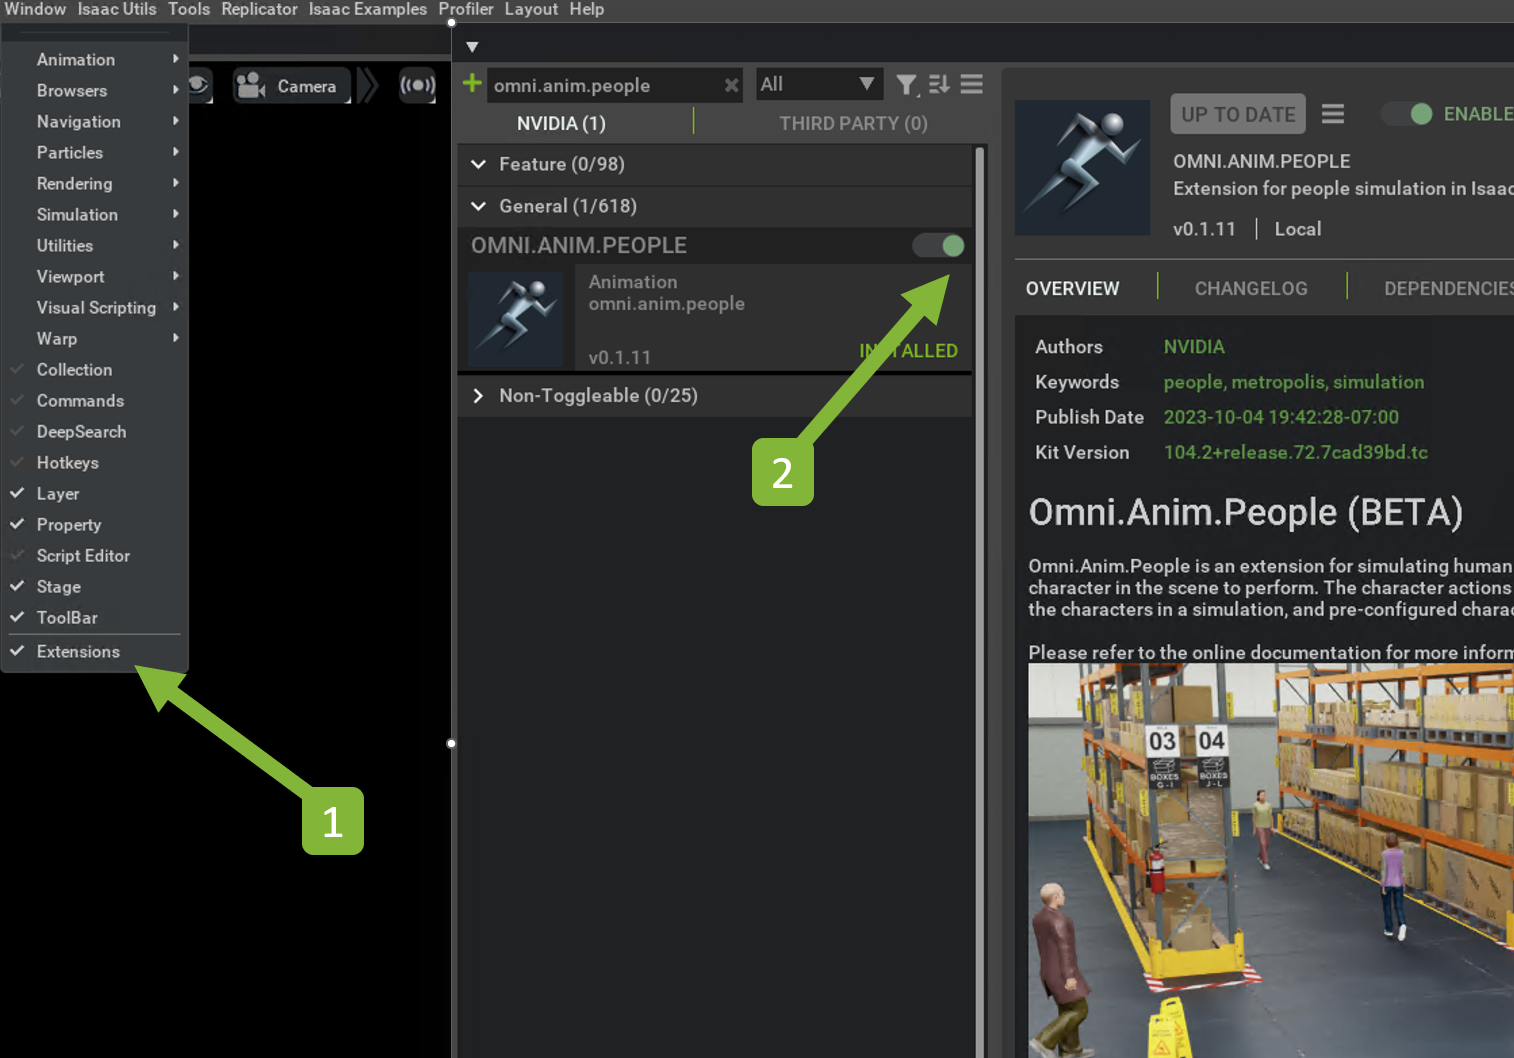
Load the People Simulation UI by navigating to Window > People Simulation.

Note
Click the auto-load button in the extension manger to have the extension auto-loaded on startup.
Getting Started
Basic Usage
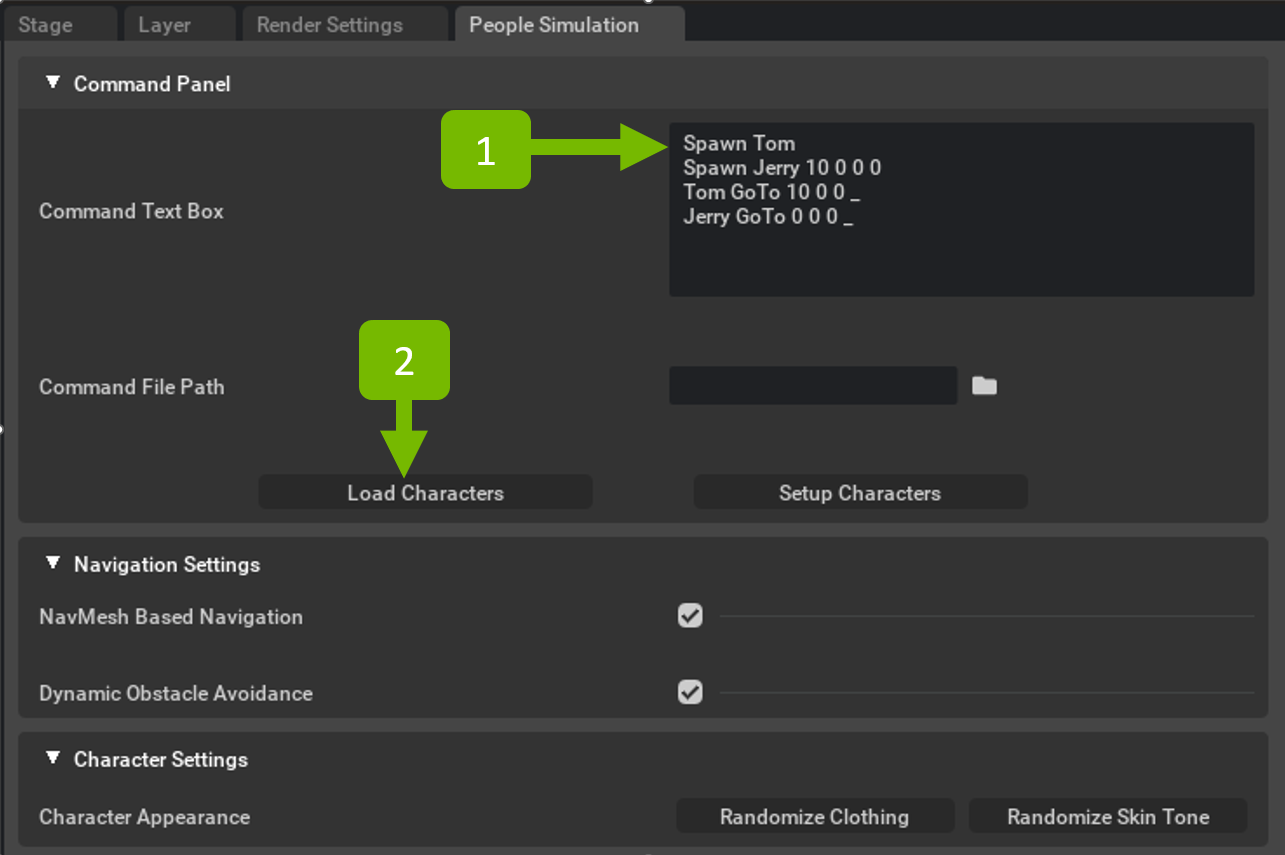
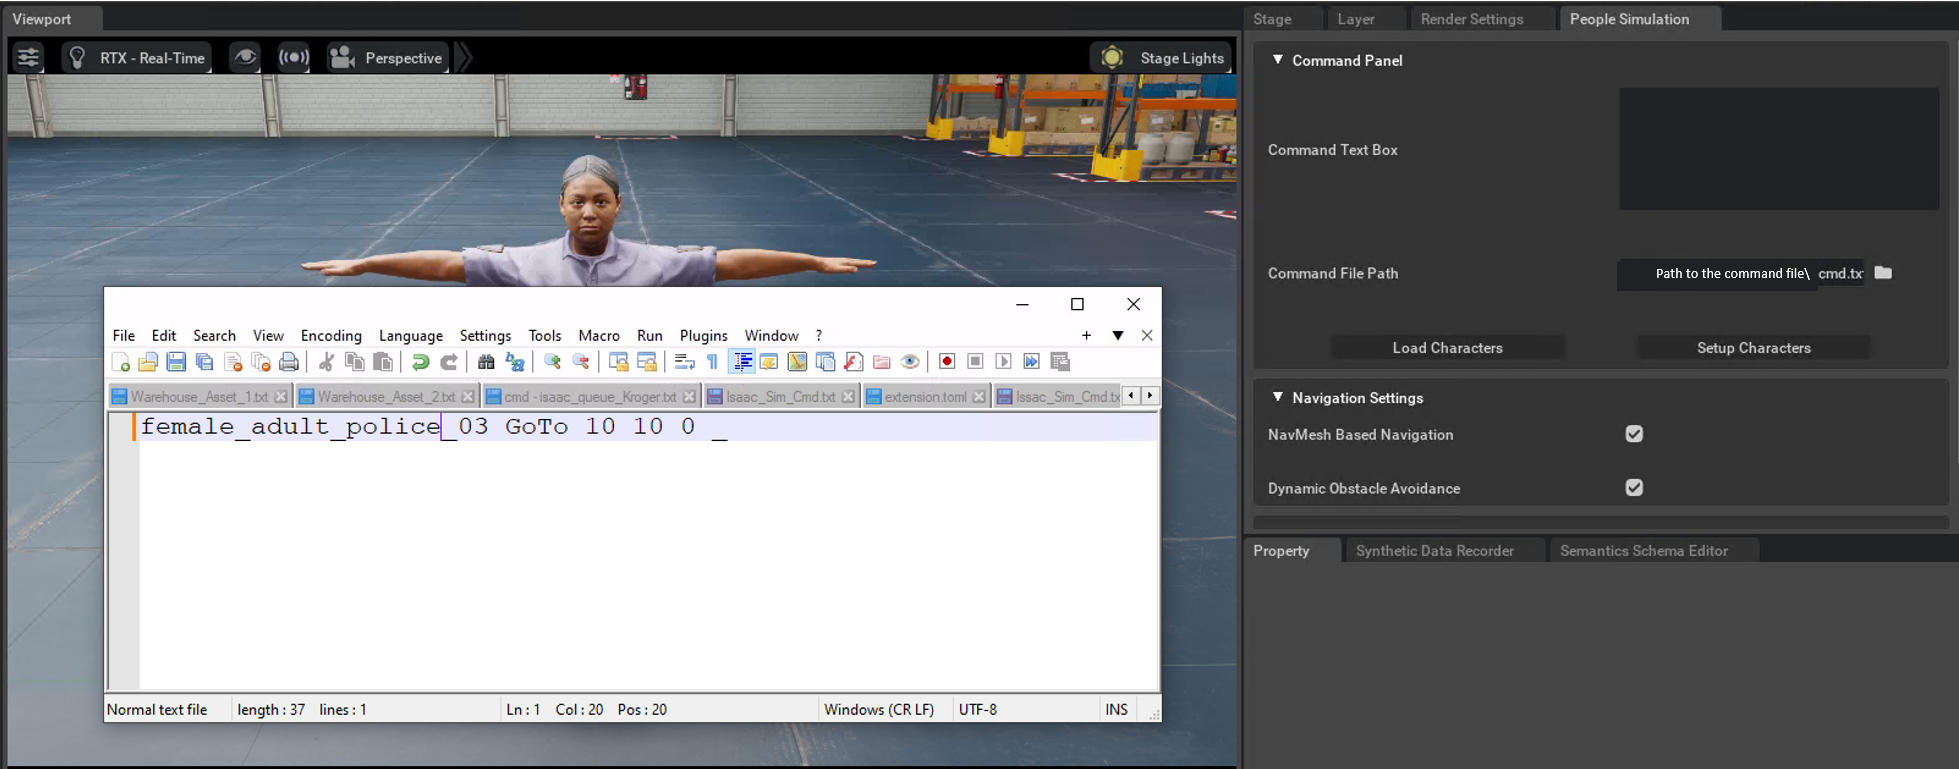
In the People Simulation UI, copy and paste the following text in the Command Text Box.
Spawn Tom
Spawn Jerry 10 0 0 0
Tom GoTo 10 0 0 _
Jerry GoTo 0 0 0 _
Click the Load Characters button to load the characters assets and animations required for the command.
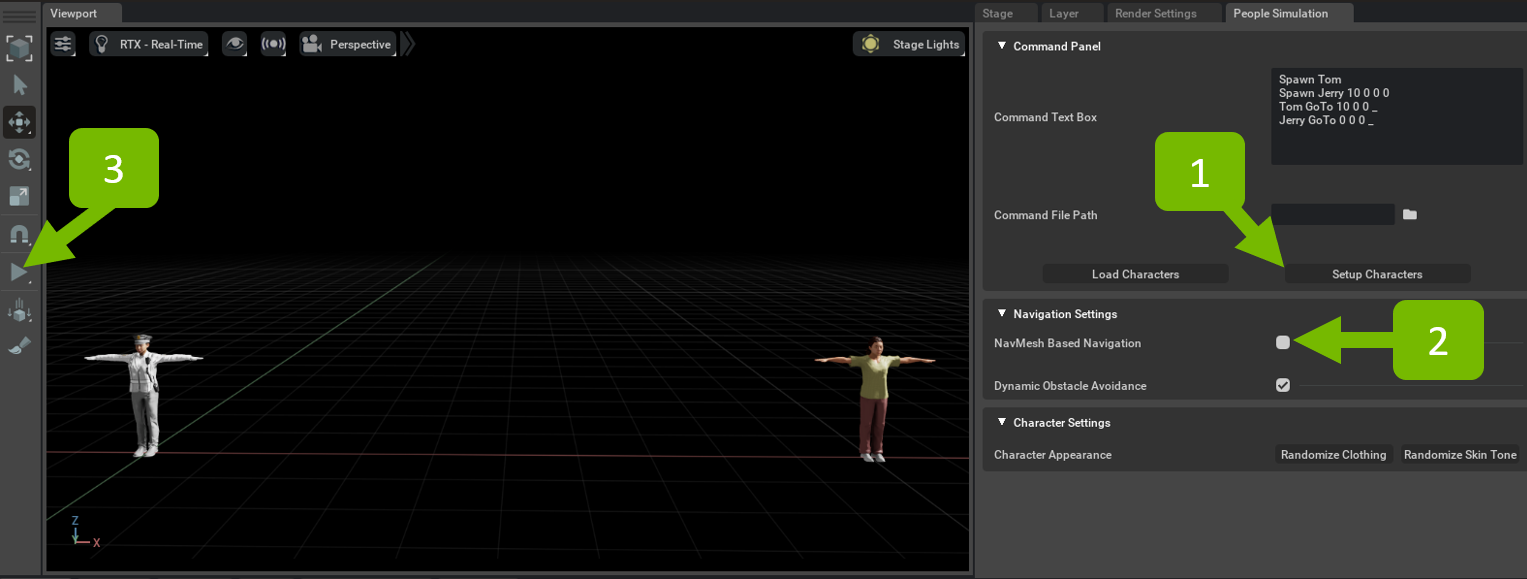
Next, click on Setup Characters button to attach Behavior Scripts and Animation Graph to the characters.
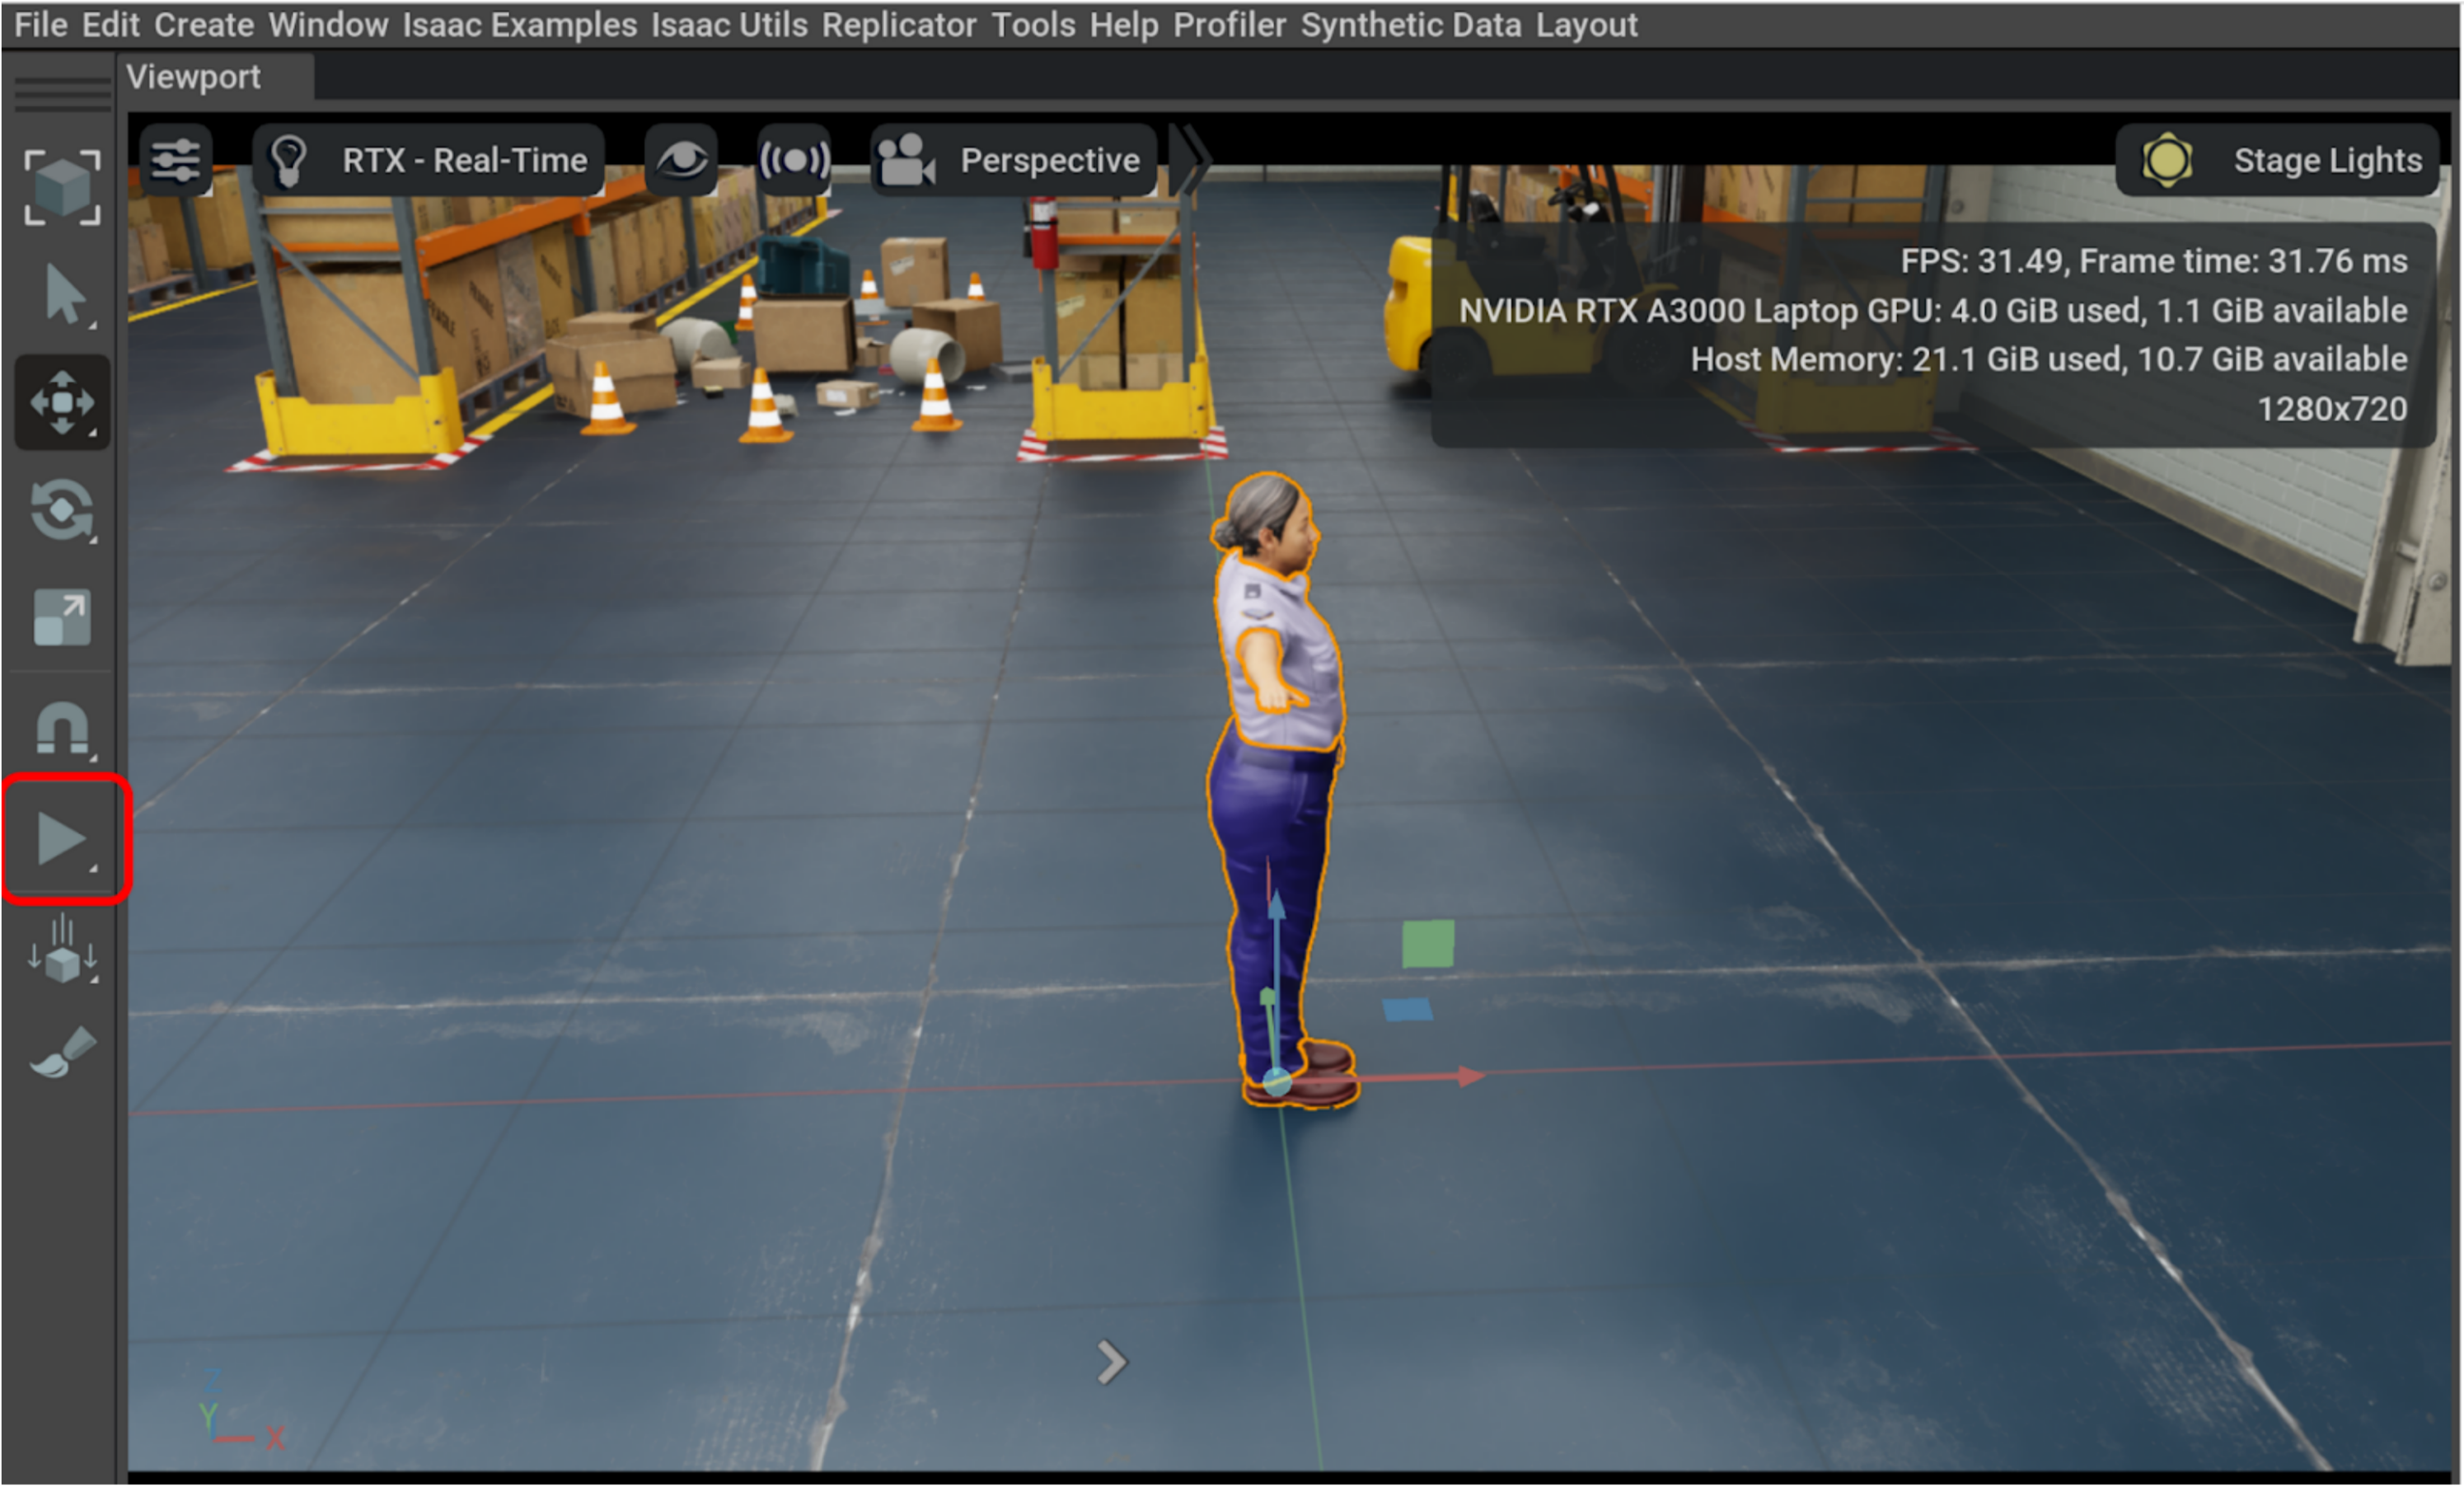
Next, turn off the Navmesh Based Navigation setting and click Play to run the simulation.
Run A Demo Simulation
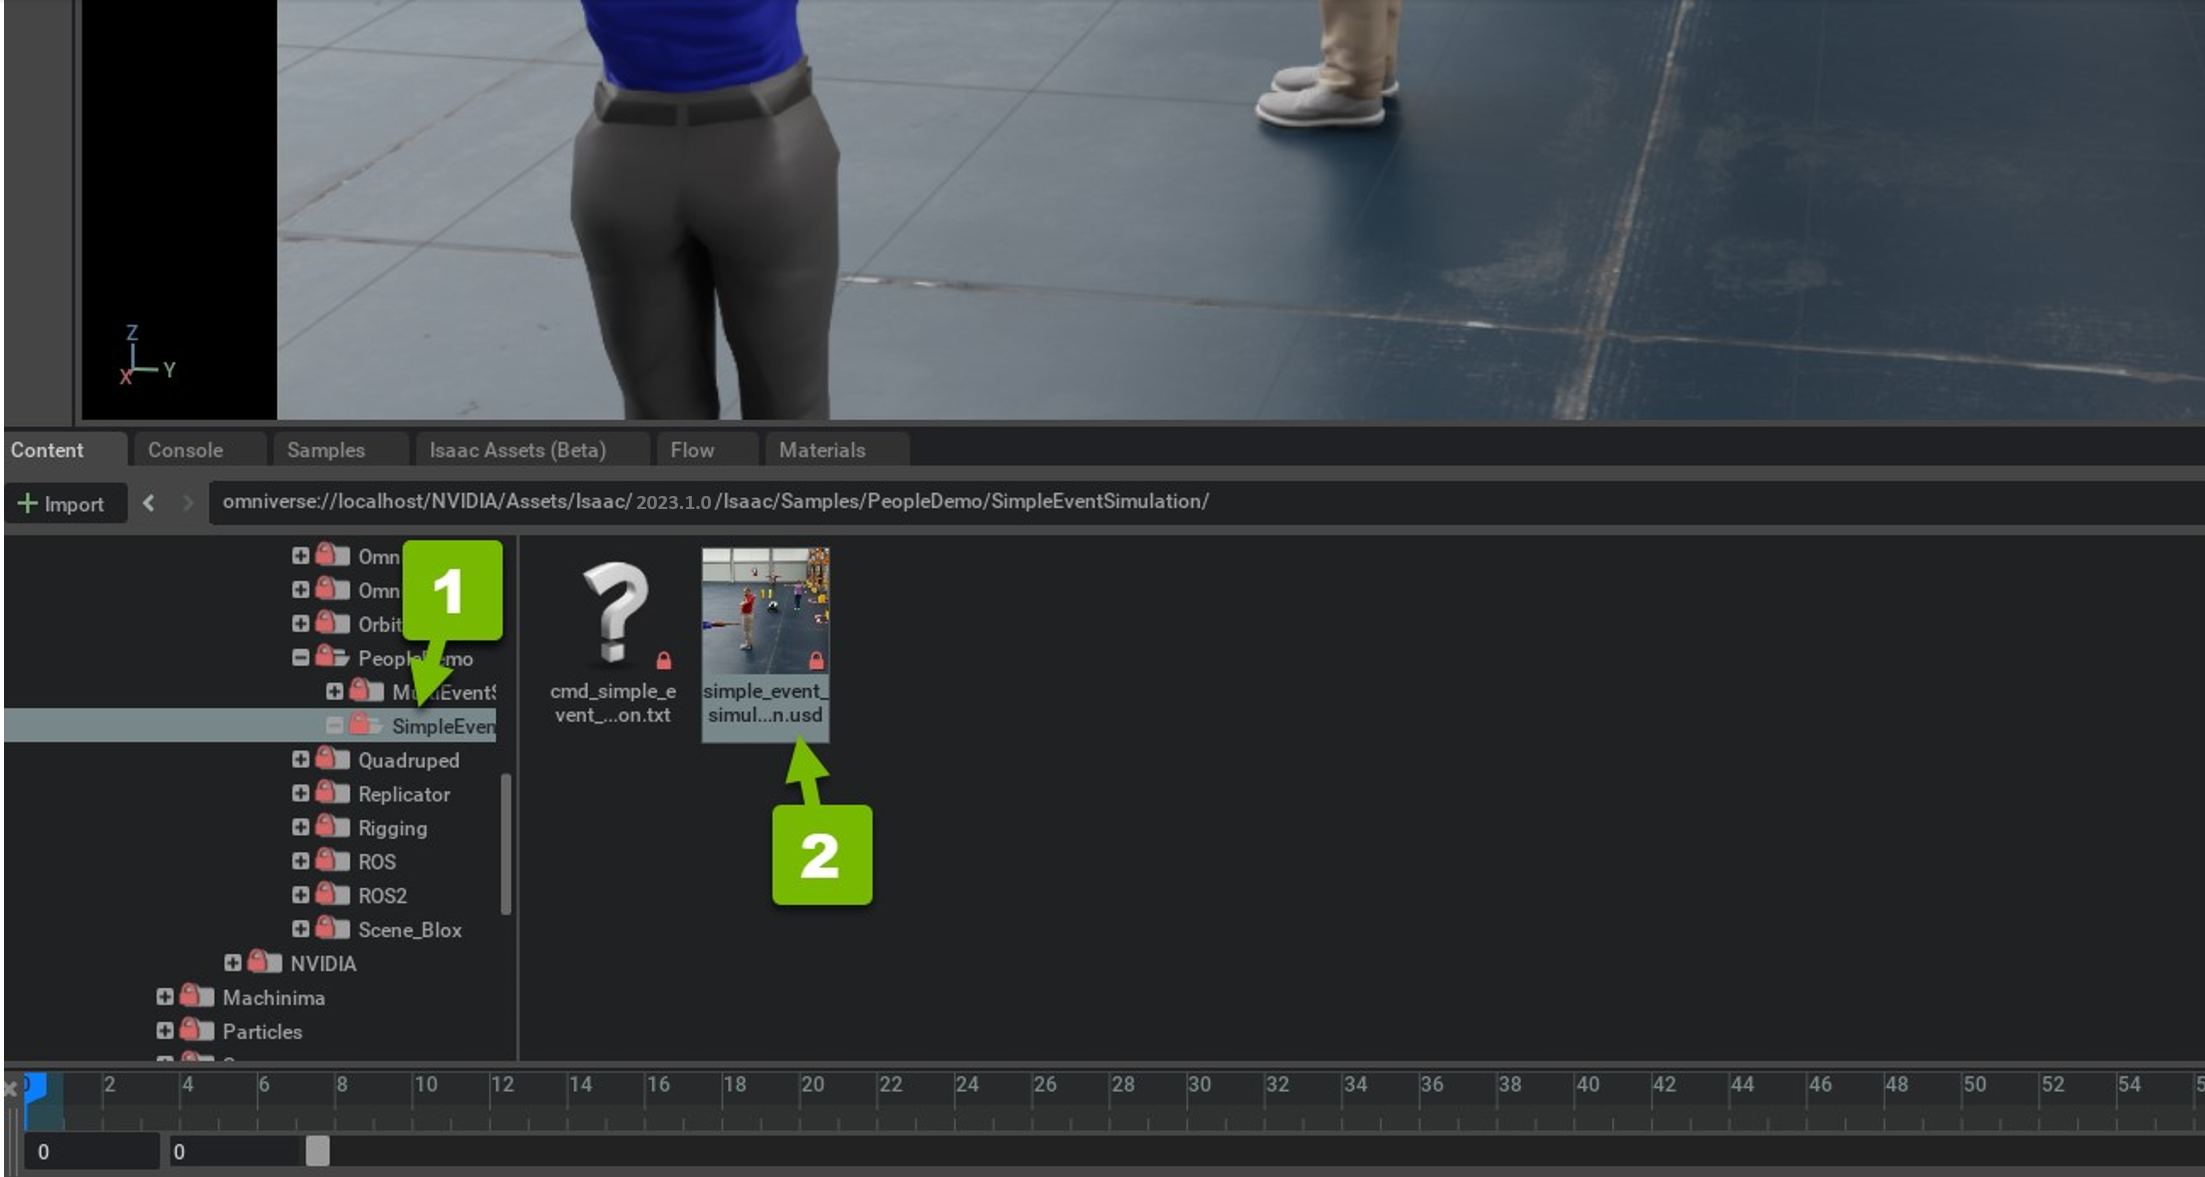
We’ve provided a few sample simulations to help you get started.
Open a sample by navigating to
omniverse://localhost/NVIDIA/Assets/Isaac/2023.1.1/Isaac/Samples/PeopleDemo/SimpleEventSimulationin the Content panel.Double-click
simple_event_simulation.usdand select Open Original File to try out the sample.
In the People Simulation UI, click the folder icon for Command File Path.
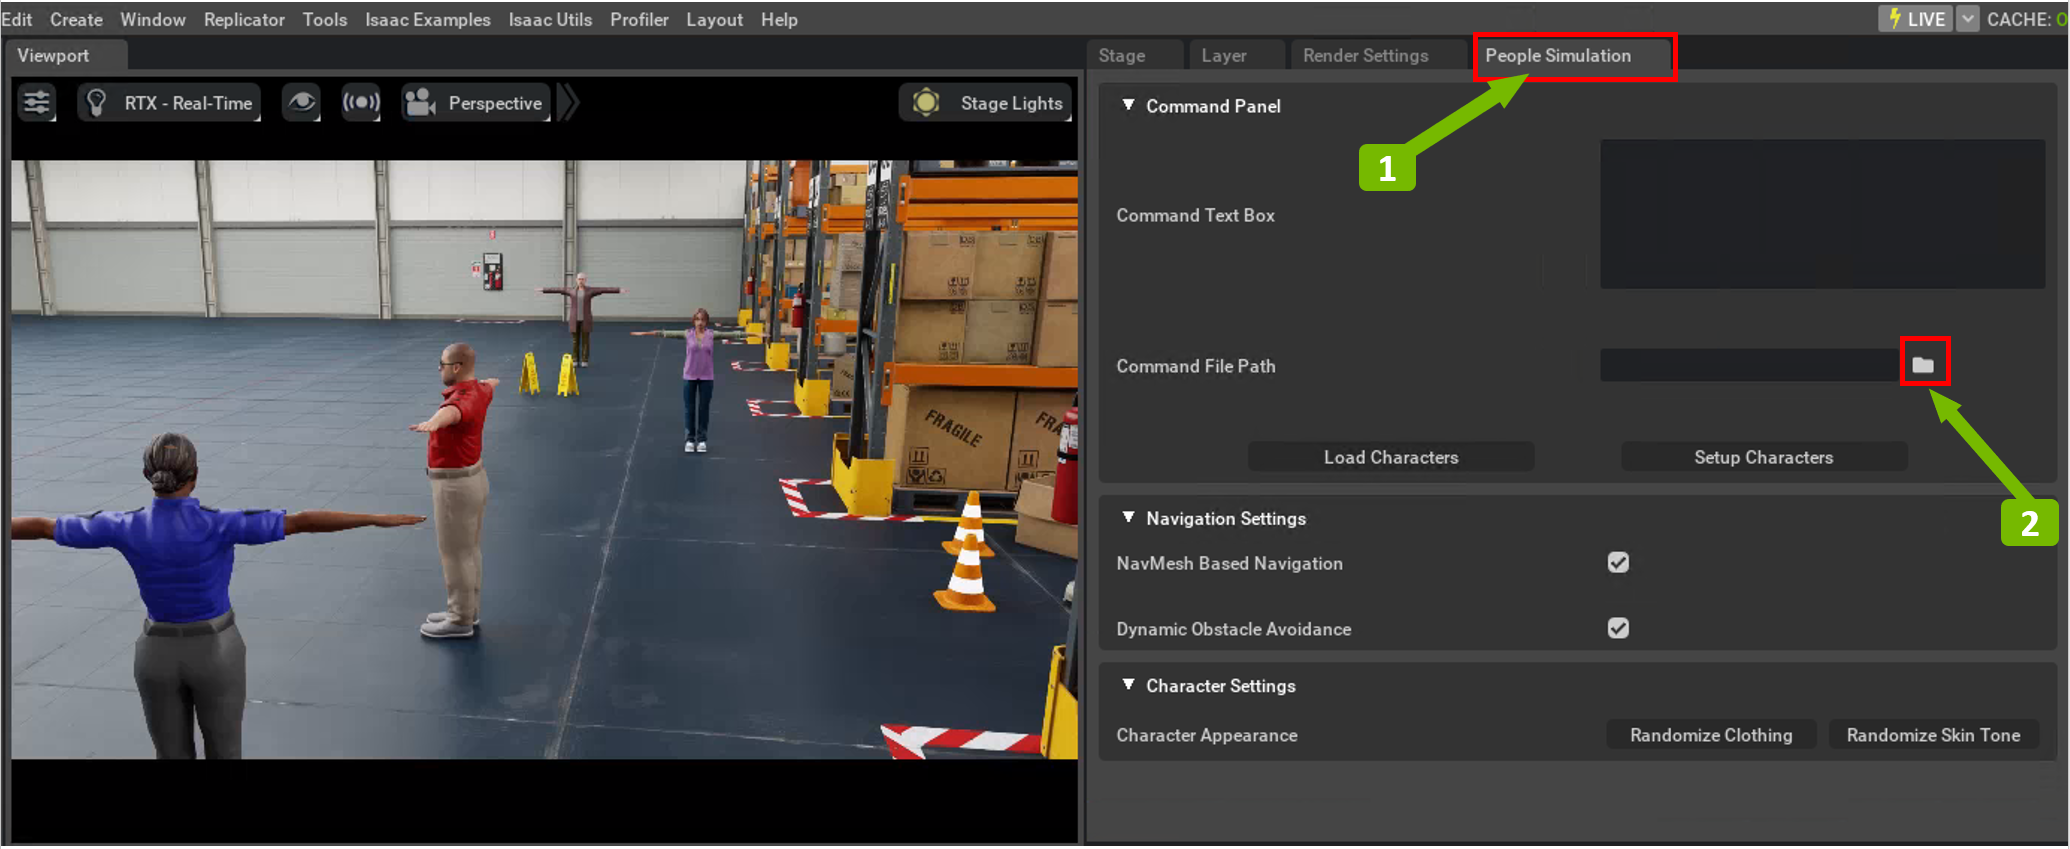
Navigate to
omniverse://localhost/NVIDIA/Assets/Isaac/2023.1.1/Isaac/Samples/PeopleDemo/SimpleEventSimulation, and select the commands text file.

Set up characters by clicking on the Setup Characters button in the People Simulation Window.
Click Play to run the scene.
Command Guide
A simulation contains a sequence of commands for every character. The command structure is character_name action action_params. Below, we list each command and its input format.
Spawn
Spawns a character at the given position and rotation. If the specified character_name does not match a existing character asset, a random character asset is loaded. Spawn also loads other components and assets required for executing commands such as an animation graph and character animation.
command structure:
    Spawn character_name x y z rot

example:
    Spawn female_adult_police_03 10 10 0 90
GoTo
GoTo moves the character to a location. GoTo can be followed by a single point or a sequence of points, the last point must specify the ending rotation the character should have upon reaching its destination.
command structure:
    character_name GoTo x y z end_rot

    character_name Goto x1 y1 z1 x2 y2 z2 x3 y3 z3 end_rot

example:
    female_adult_police_03 GoTo 10 10 0 90
You can use ‘_’ for ending rotation if you would prefer to not set a rotation. When a sequence of points is given, the character will cross every point. If Navmesh Navigation and Dynamic Obstacle Avoidance is on then the character will try to avoid both static and dynamic obstacles.
LookAround
LookAround makes the character stand in the same spot, while moving its head from left to right. LookAround takes a duration value and performs the action for that duration.
command structure:
    character_name LookAround duration

example:
    female_adult_police_03 LookAround 10
Idle
Idle makes the character stand still. Idle takes a duration value and performs the action for that duration.
command structure:
    character_name Idle duration

example:
    female_adult_police_03 Idle 10
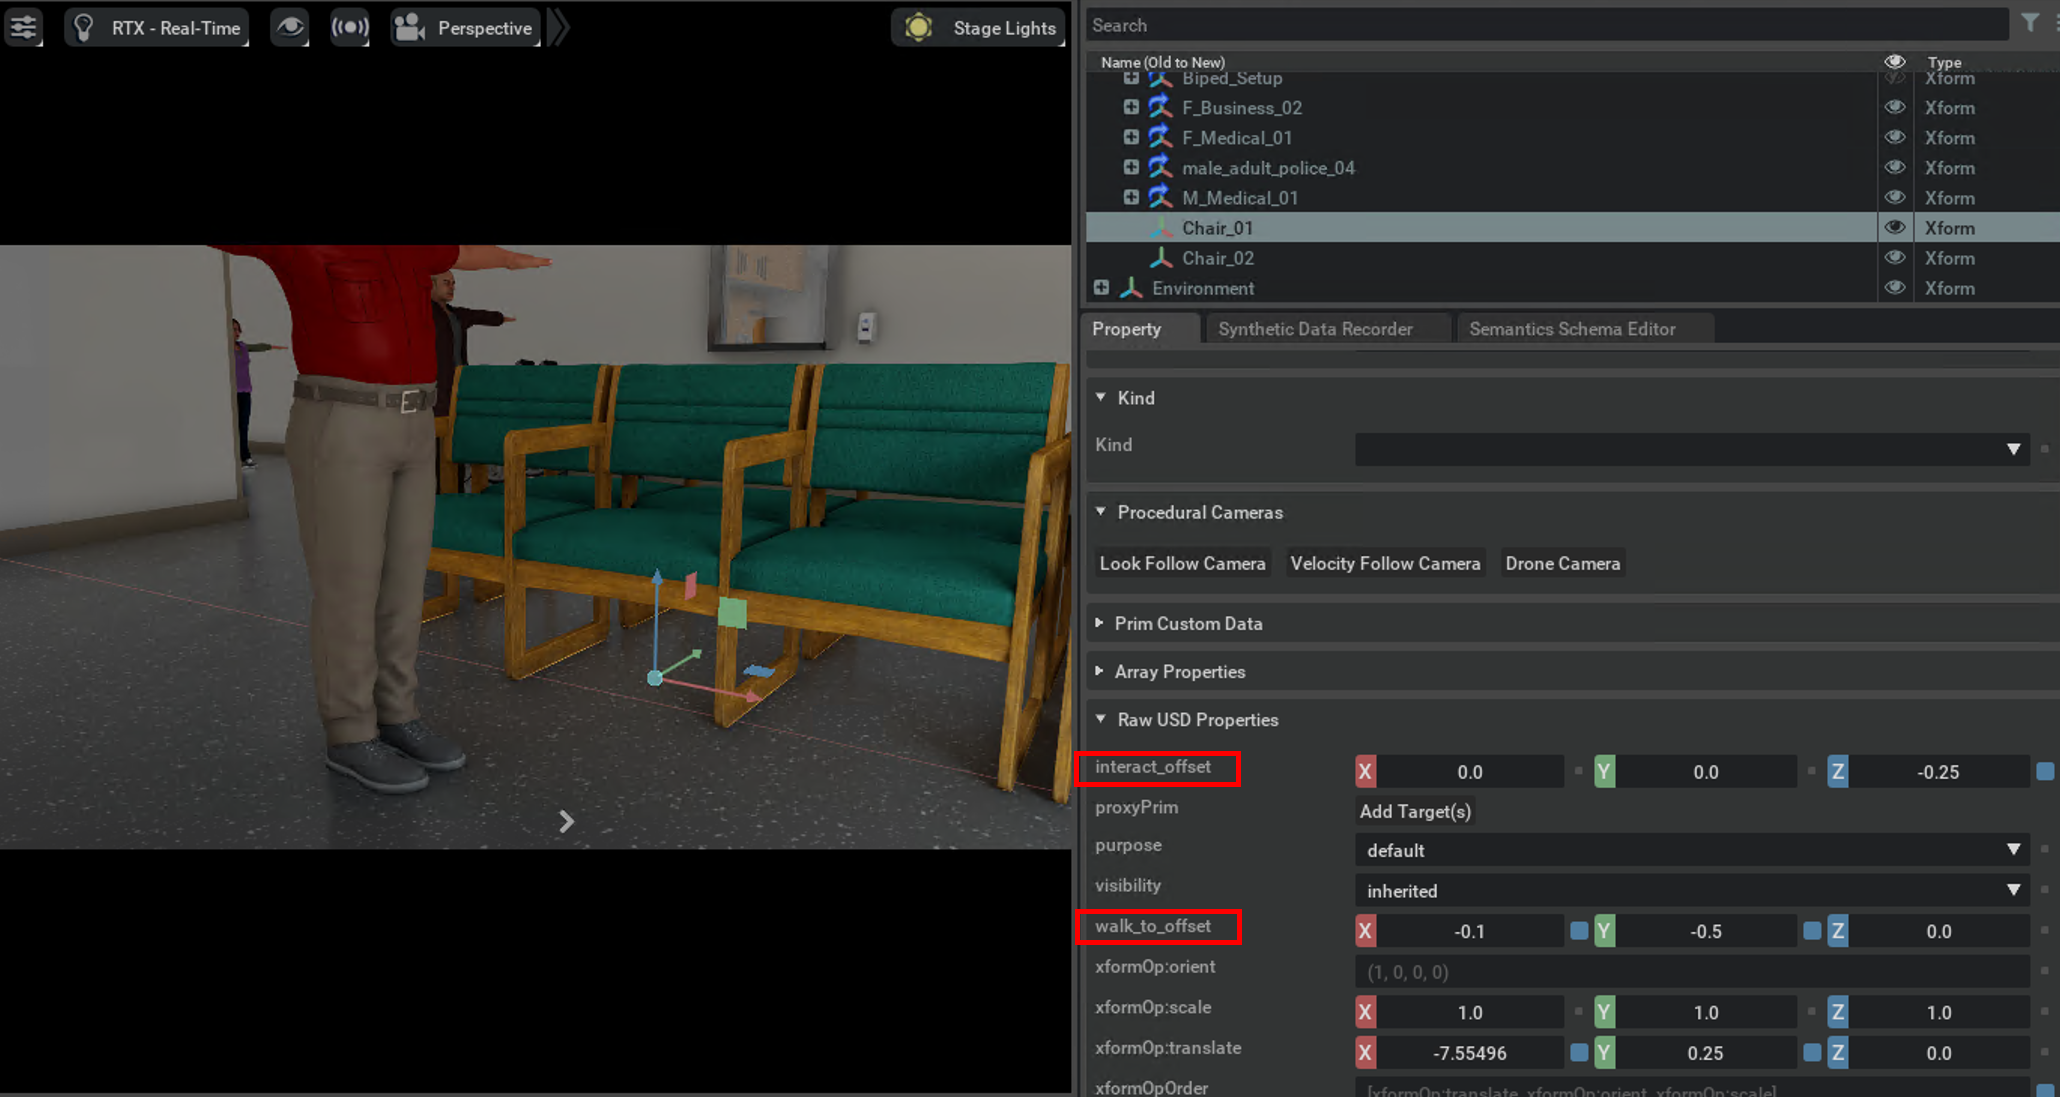
Sit
Sit makes the character go to a prim, and attempt to sit on it. After the specified duration ends, the character will stand back up.
command structure:
    character_name Sit seat_prim duration

example:
    female_adult_police_03 Sit /World/Chair 5
Note
Sit plays a fixed animation, hence the seat_prim must be scaled to fit the animation. The seat_prim must also contain two properties “walk_to_offset” and “interact_offset”. The “walk_to_offset” must specify the distance in front of the prim that the character should walk to. The “interact_offset” must specify the offset from where the sitting animation should be played. Checkout the Multi_Event_Simulation in the samples folder for an example.
Queue
For the Queue command, we must first define a queue. A queue can be defined in the command file as follows -
command structure:

    # defines the queue
    Queue Example_Queue

    # Defines each spot in the queue. Structure Queue_Spot 'Queue_name' 'Spot_Index' x y z rotation
    Queue_Spot Example_Queue 0 11 0 0 90

    Queue_Spot Example_Queue 1 9 0 0 0

    Queue_Spot Example_Queue 2 7 0 0 0

    Queue_Spot Example_Queue 3 5 0 0 0
After defining the queue, characters can be moved to the queue using the following -
command structure:

    # character goes to queue
    female_adult_medical_01 Queue Example_Queue

    # action to perform when at 1st position in a queue
    female_adult_medical_01 LookAround 10

    # destination to go to when leaving the queue. In this example, the character will go to 10, 10, 0.
    female_adult_medical_01 Dequeue Example_Queue 10 10 0 _
Note
All three commands listed above are mandatory for the queue command to work correctly.
Setup Simulation From Scratch
Load the environment needed for the simulation. Make sure the parent prim
/Worldexists, if not create the prim/World. Save and reload the scene.
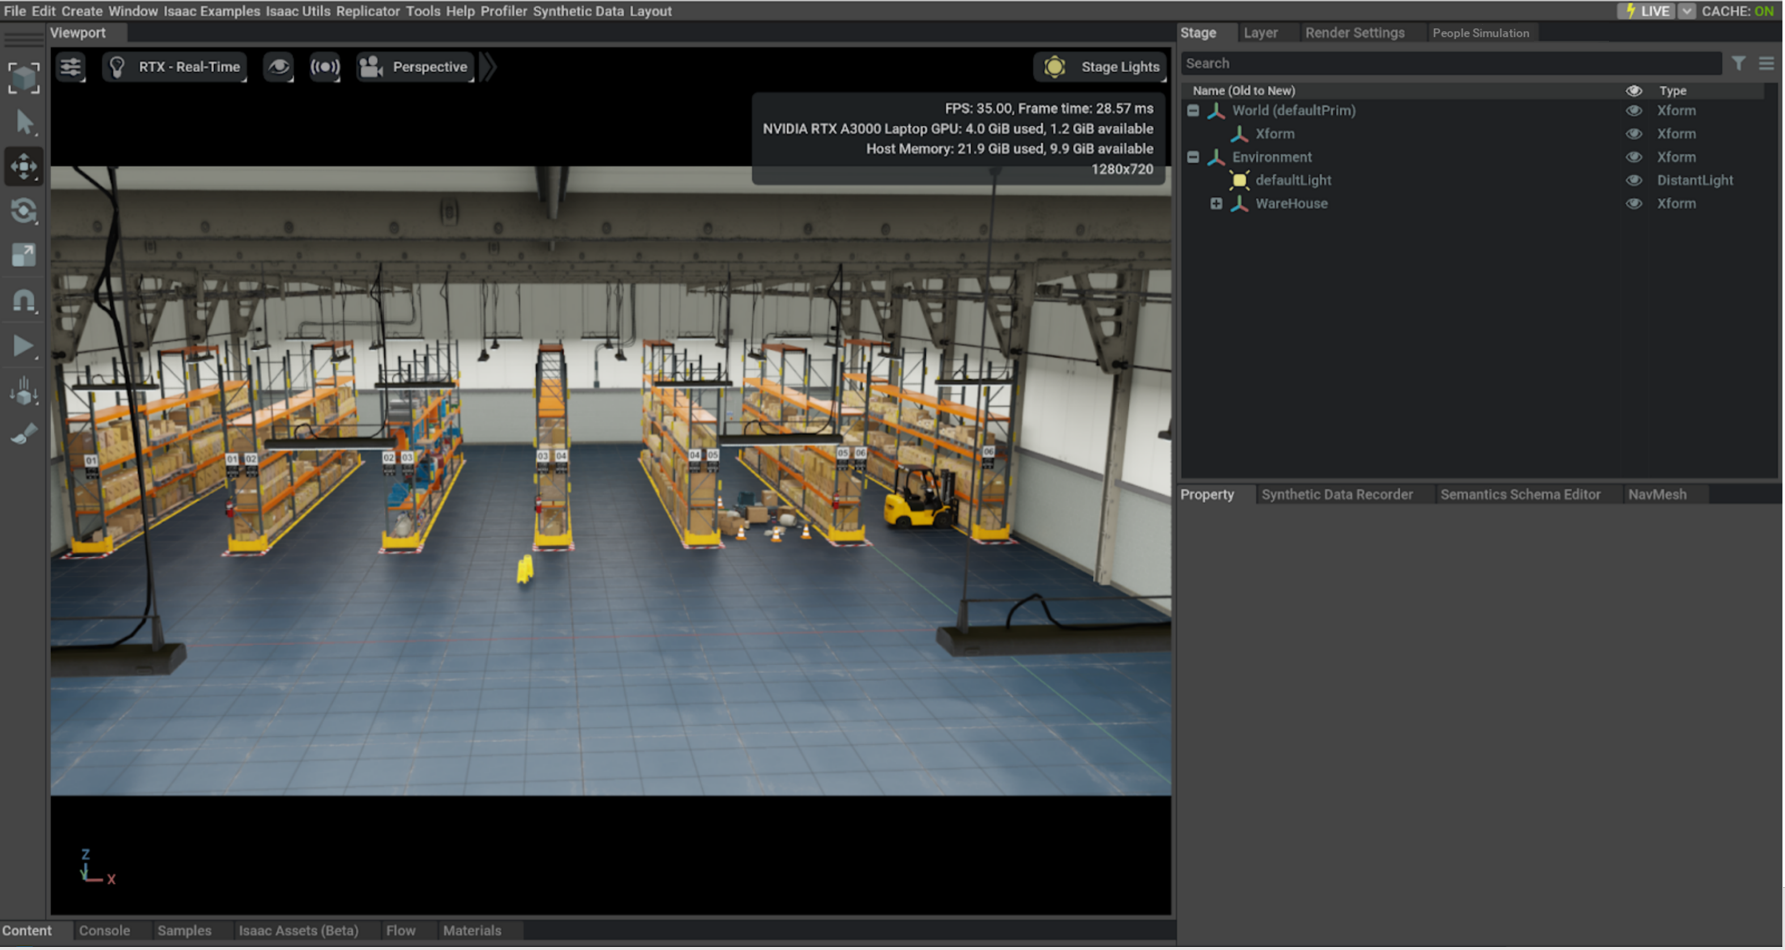
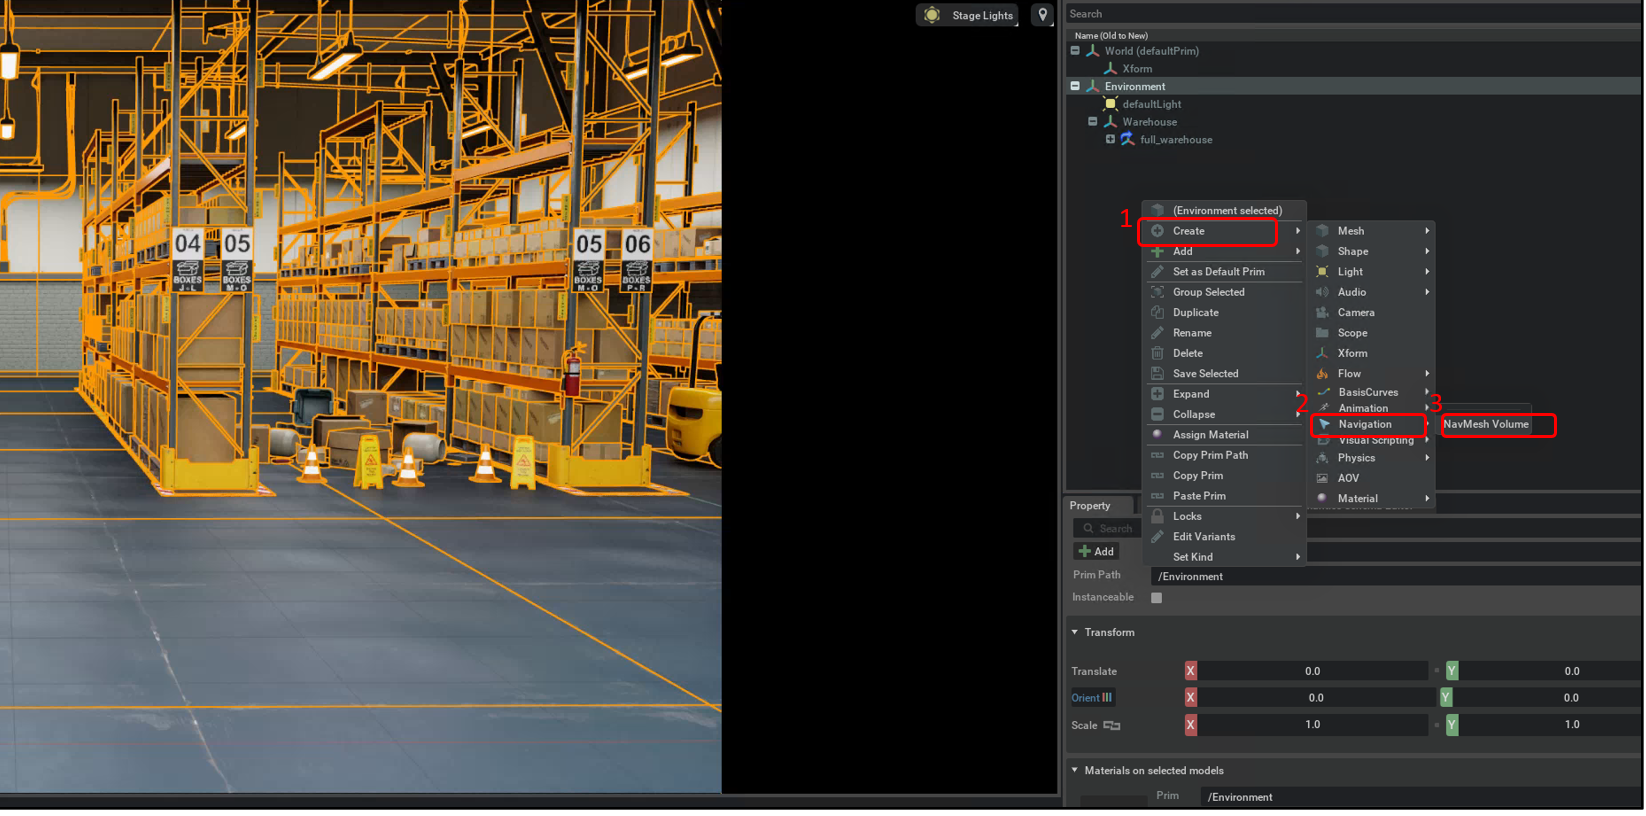
Next, create a navigation mesh for the stage by Right Click On Stage > Create > Navigation > NavMeshVolume.
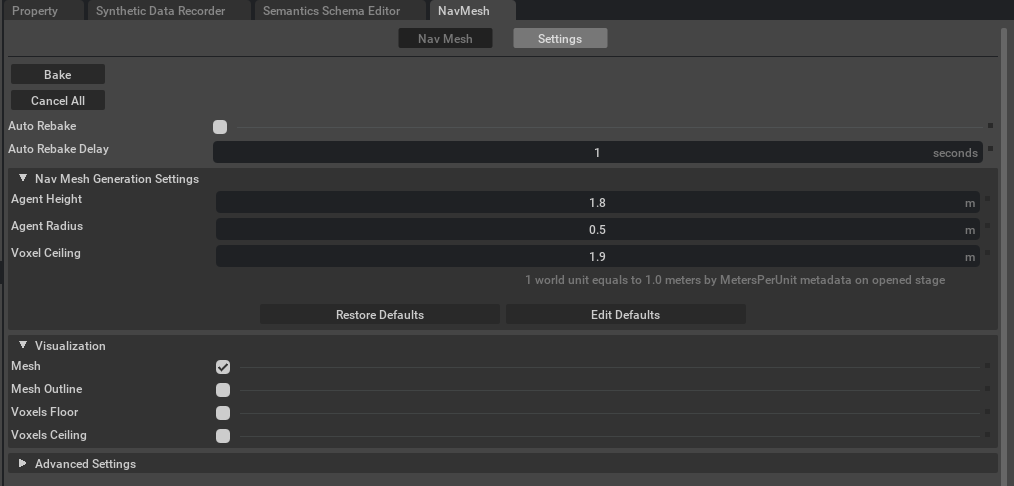
Open Window > Navigation > Navmesh. In the NavMesh panel reset the defaults to the values shown below.
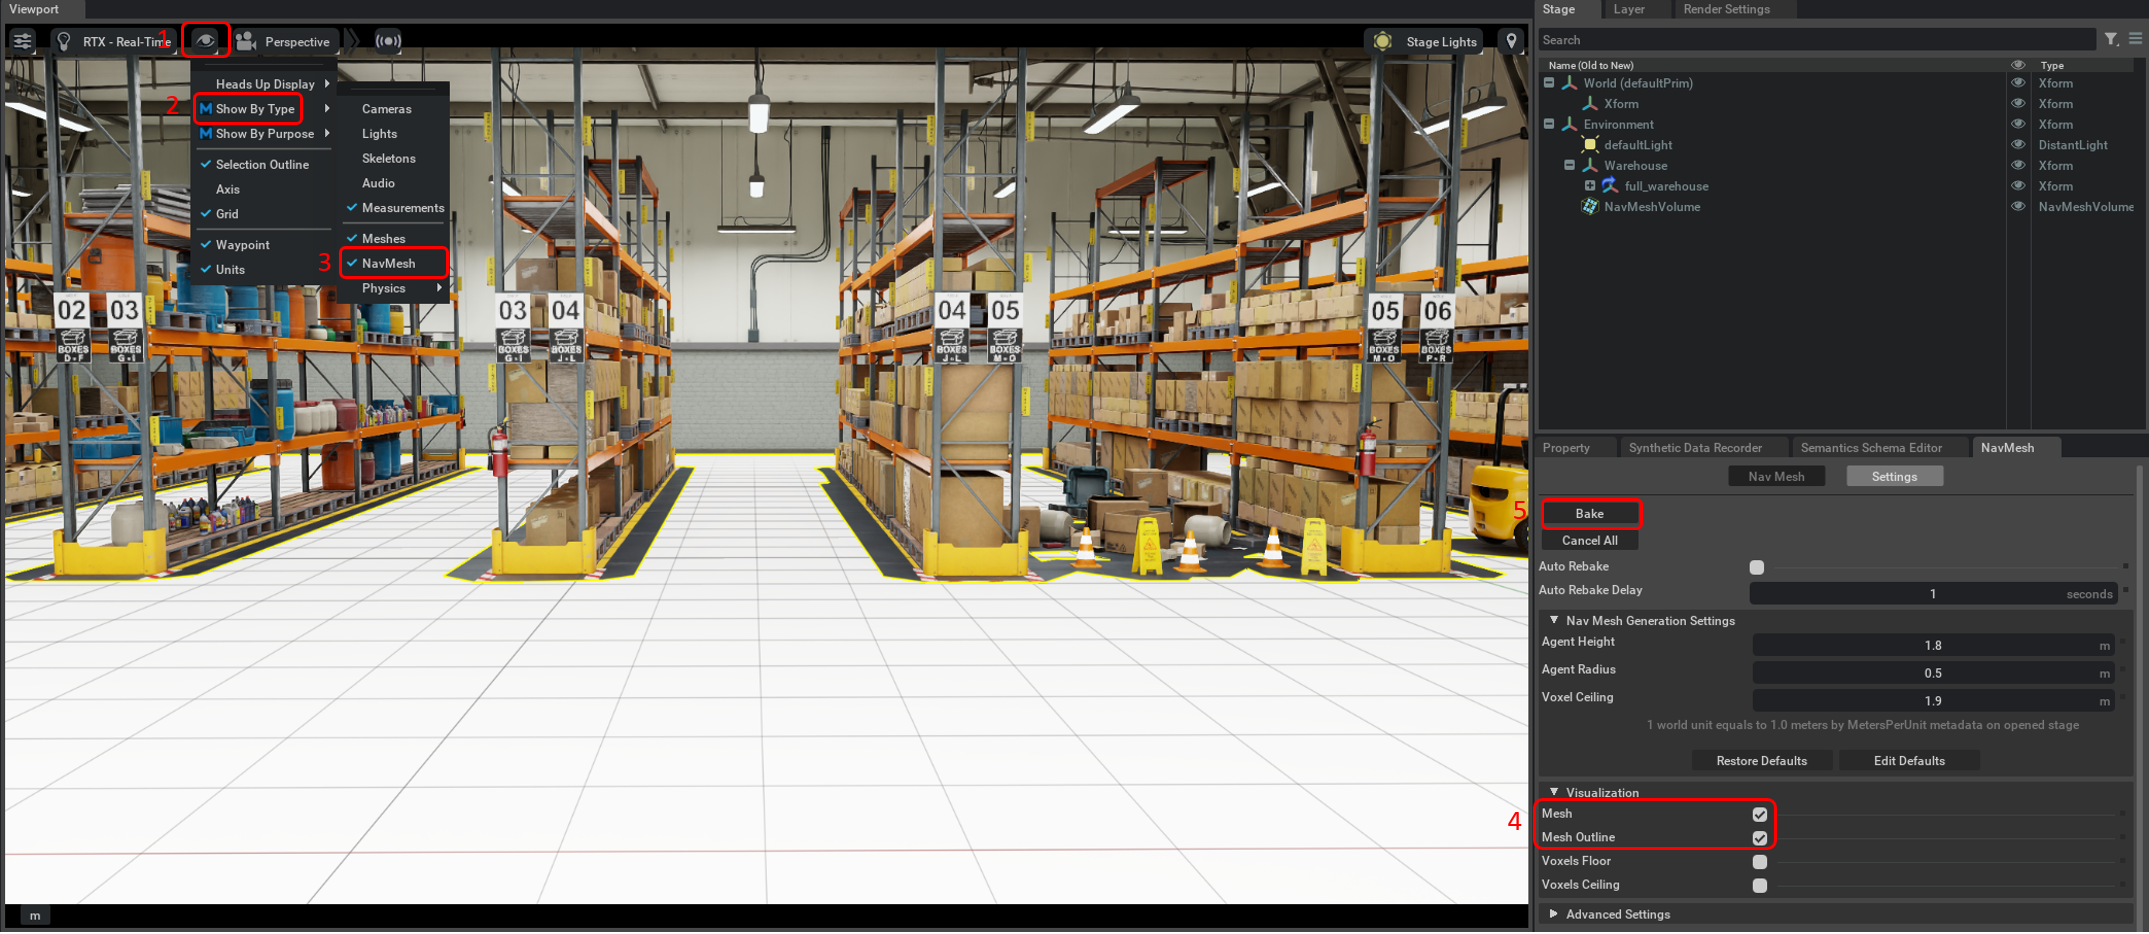
Enable Show By Type > Navmesh. In the NavMesh panel, enable the Mesh and Mesh Outline selection in Visualization, then Right Click On Bake button. This should create a navigation mesh with all the obstacles cut out of the navigation mesh.
After creating the navmesh, use the command text box or the command file shown in the examples above for setting up characters and creating a simulation.
Manually Setup Characters
We recommend populating characters through the UI of Omni.Anim.People, however characters can be manually setup by following the steps below -
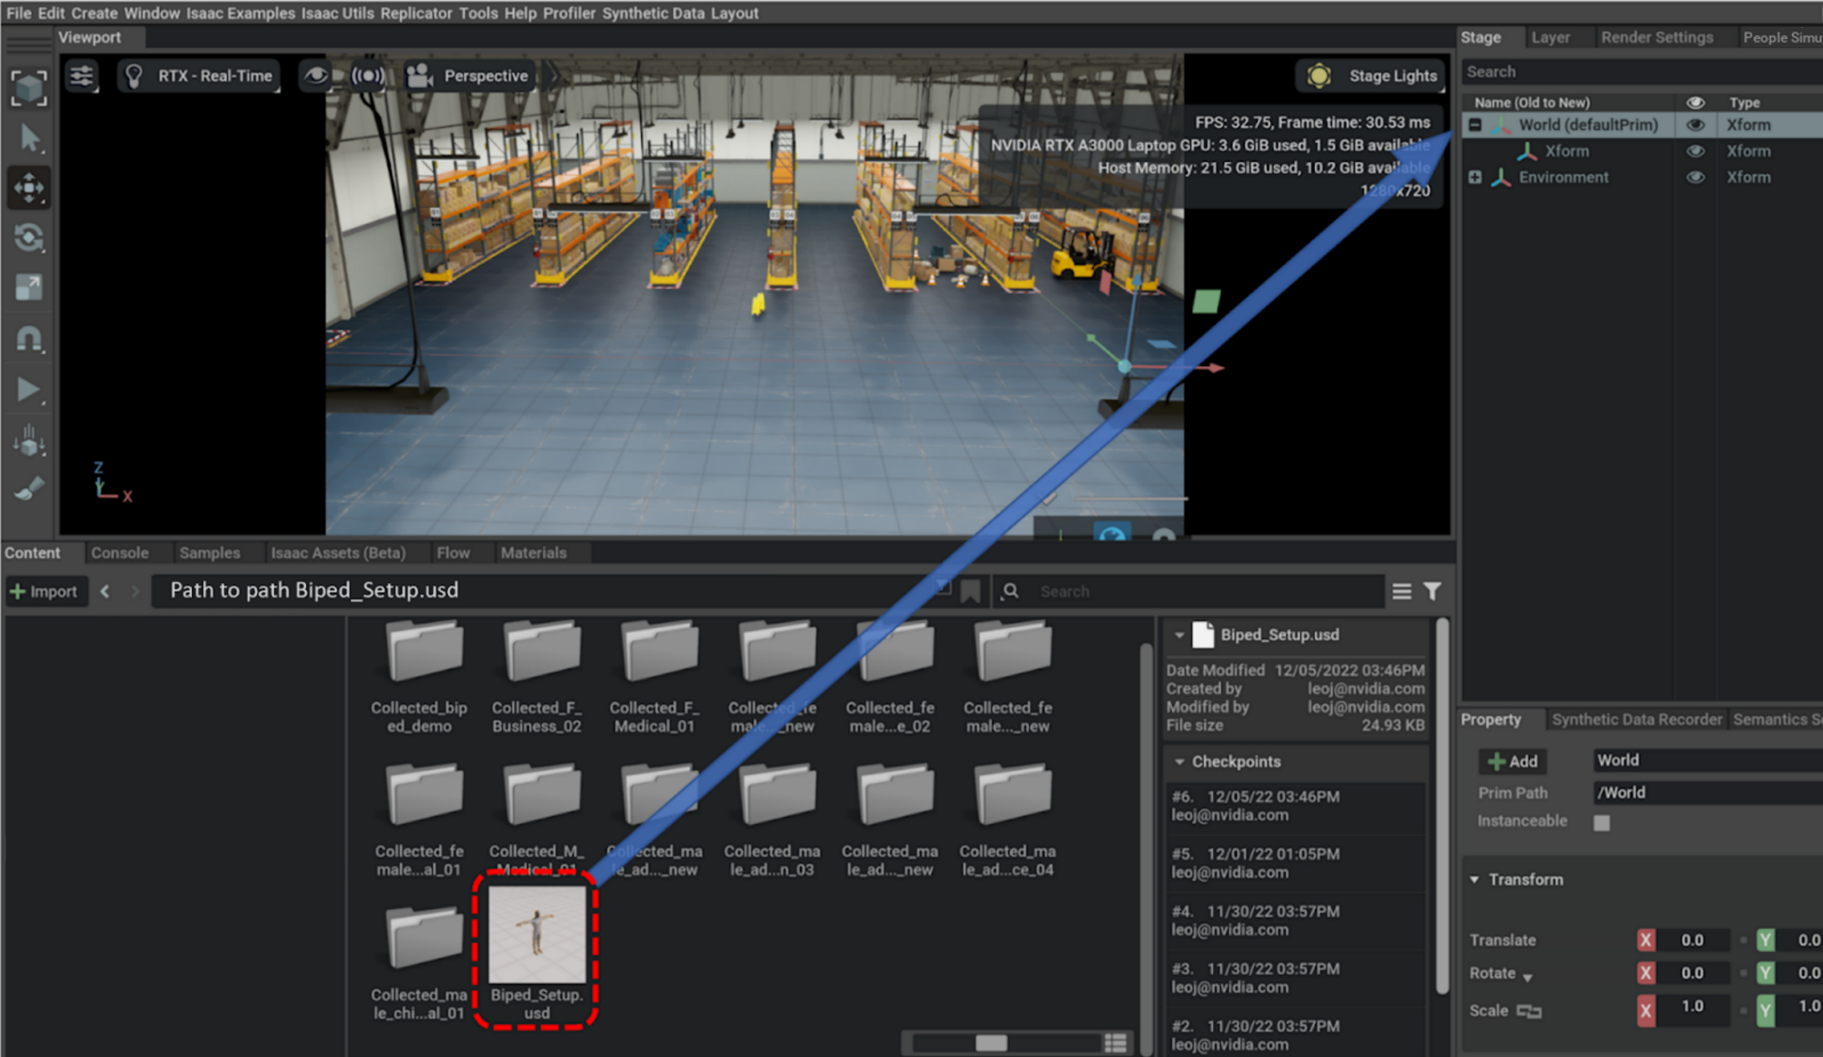
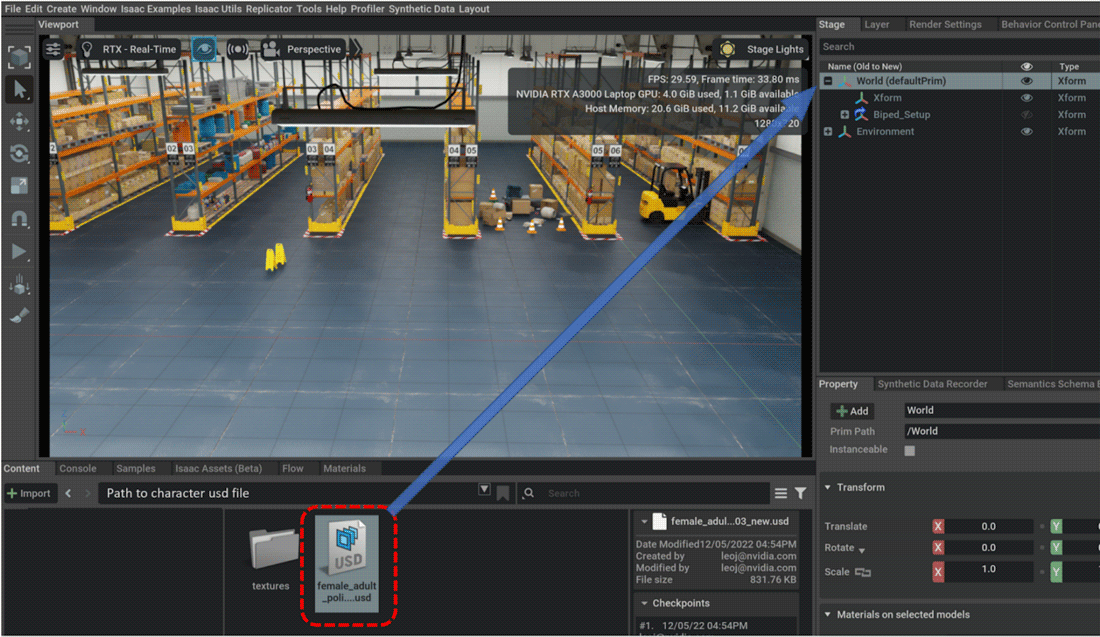
Navigate to the characters folder at
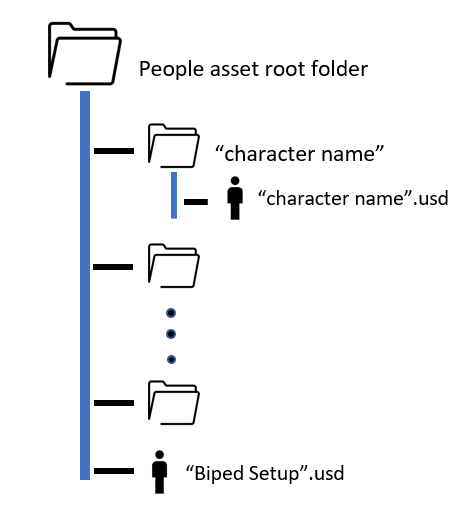
omniverse://localhost/NVIDIA/Assets/Isaac/2023.1.1/Isaac/People/Characters. Then, drag theBiped_Setup.usdfile onto the/Worldxform.
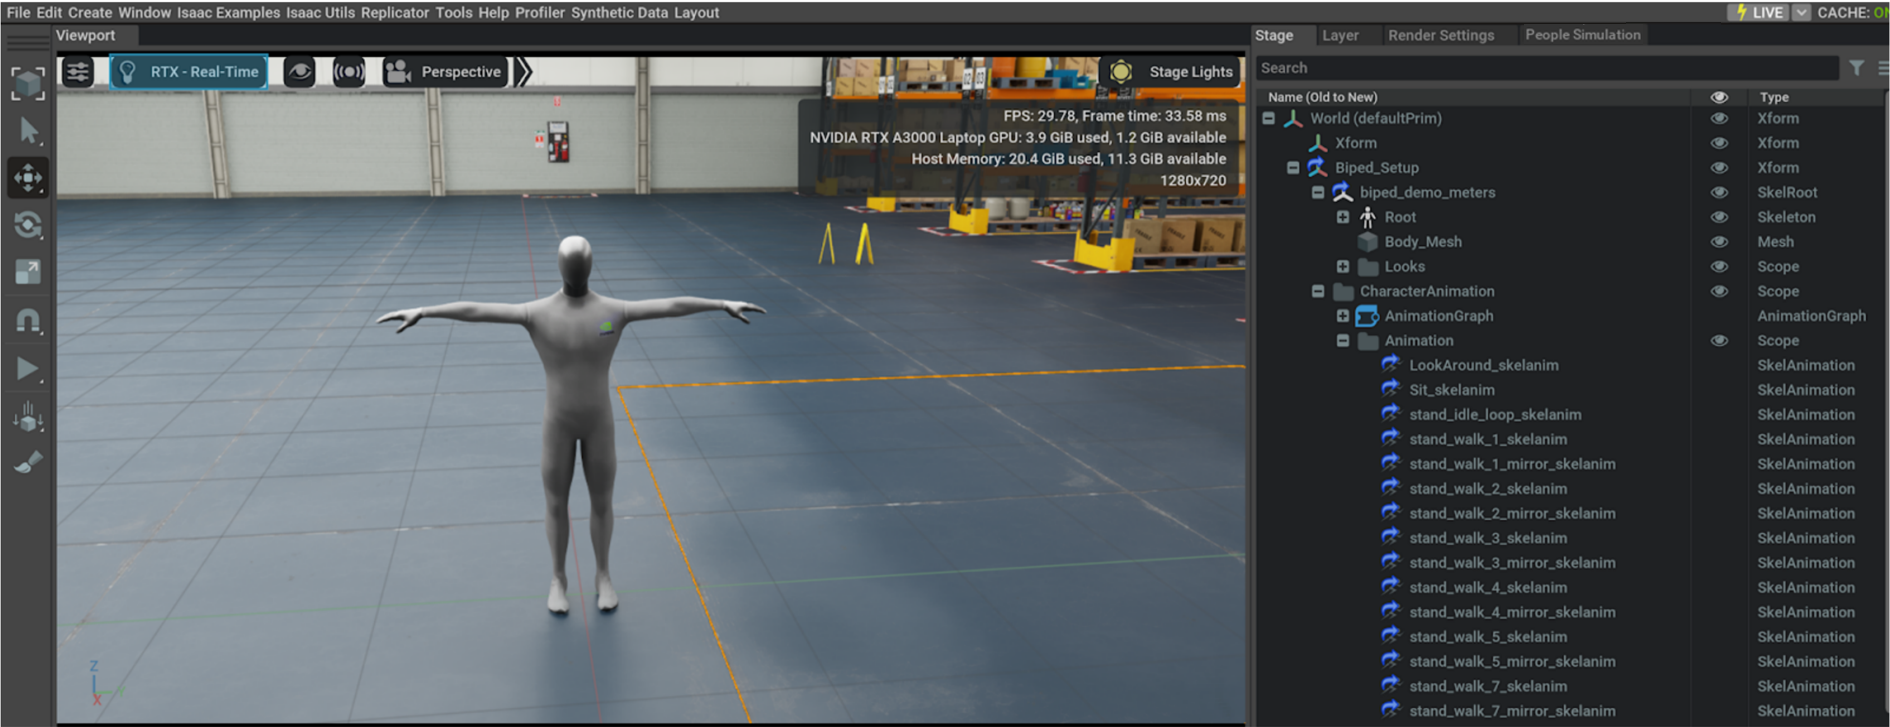
Next, from the Characters folder load the characters that you would like to use by navigating to a characters folder and dragging and dropping the usd file into the
/Worldxform.Move the characters to their starting positions in the scene.

Setting up the characters -
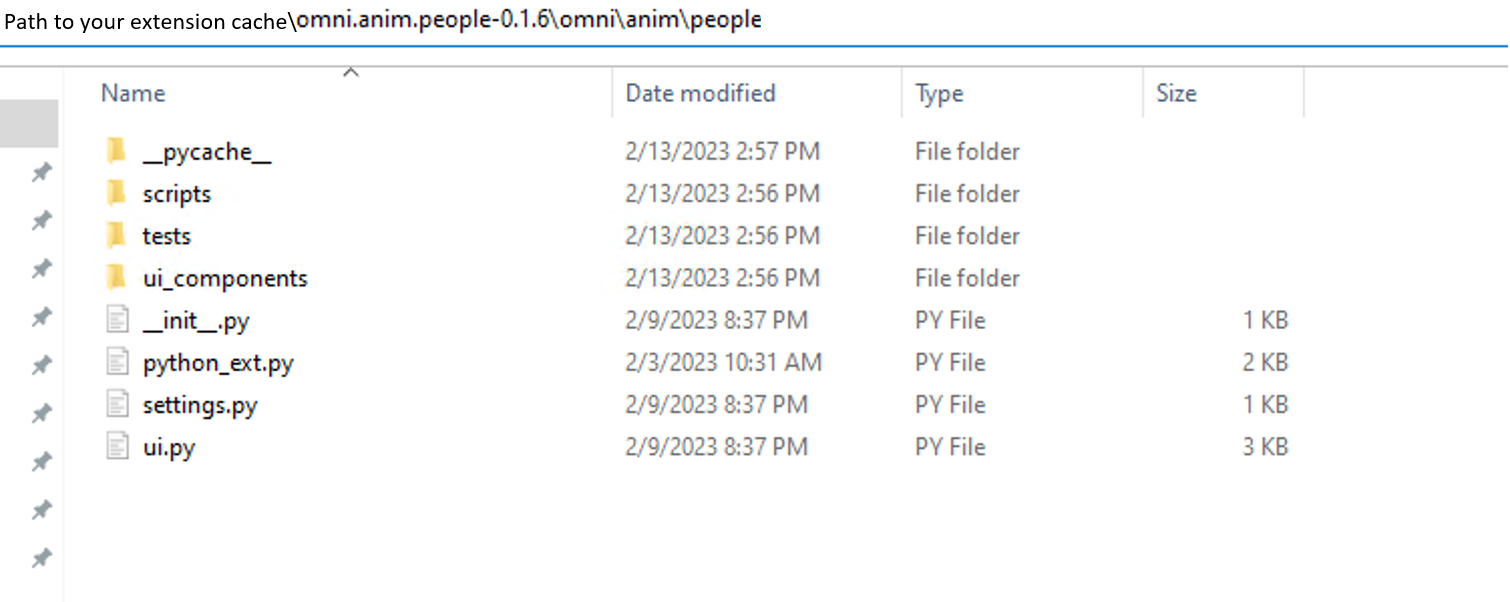
Find the behavior scripts provided with the extensions by navigating to Window > Extensions, searching for “people” and selecting omni.anim.people. Next, click on the folder icon to open the extension files.
Then navigate to
\omni\anim\people\scriptsand locate thecharacter_behavior.pyfile.
Expand each character on the stage menu and navigate till you find their
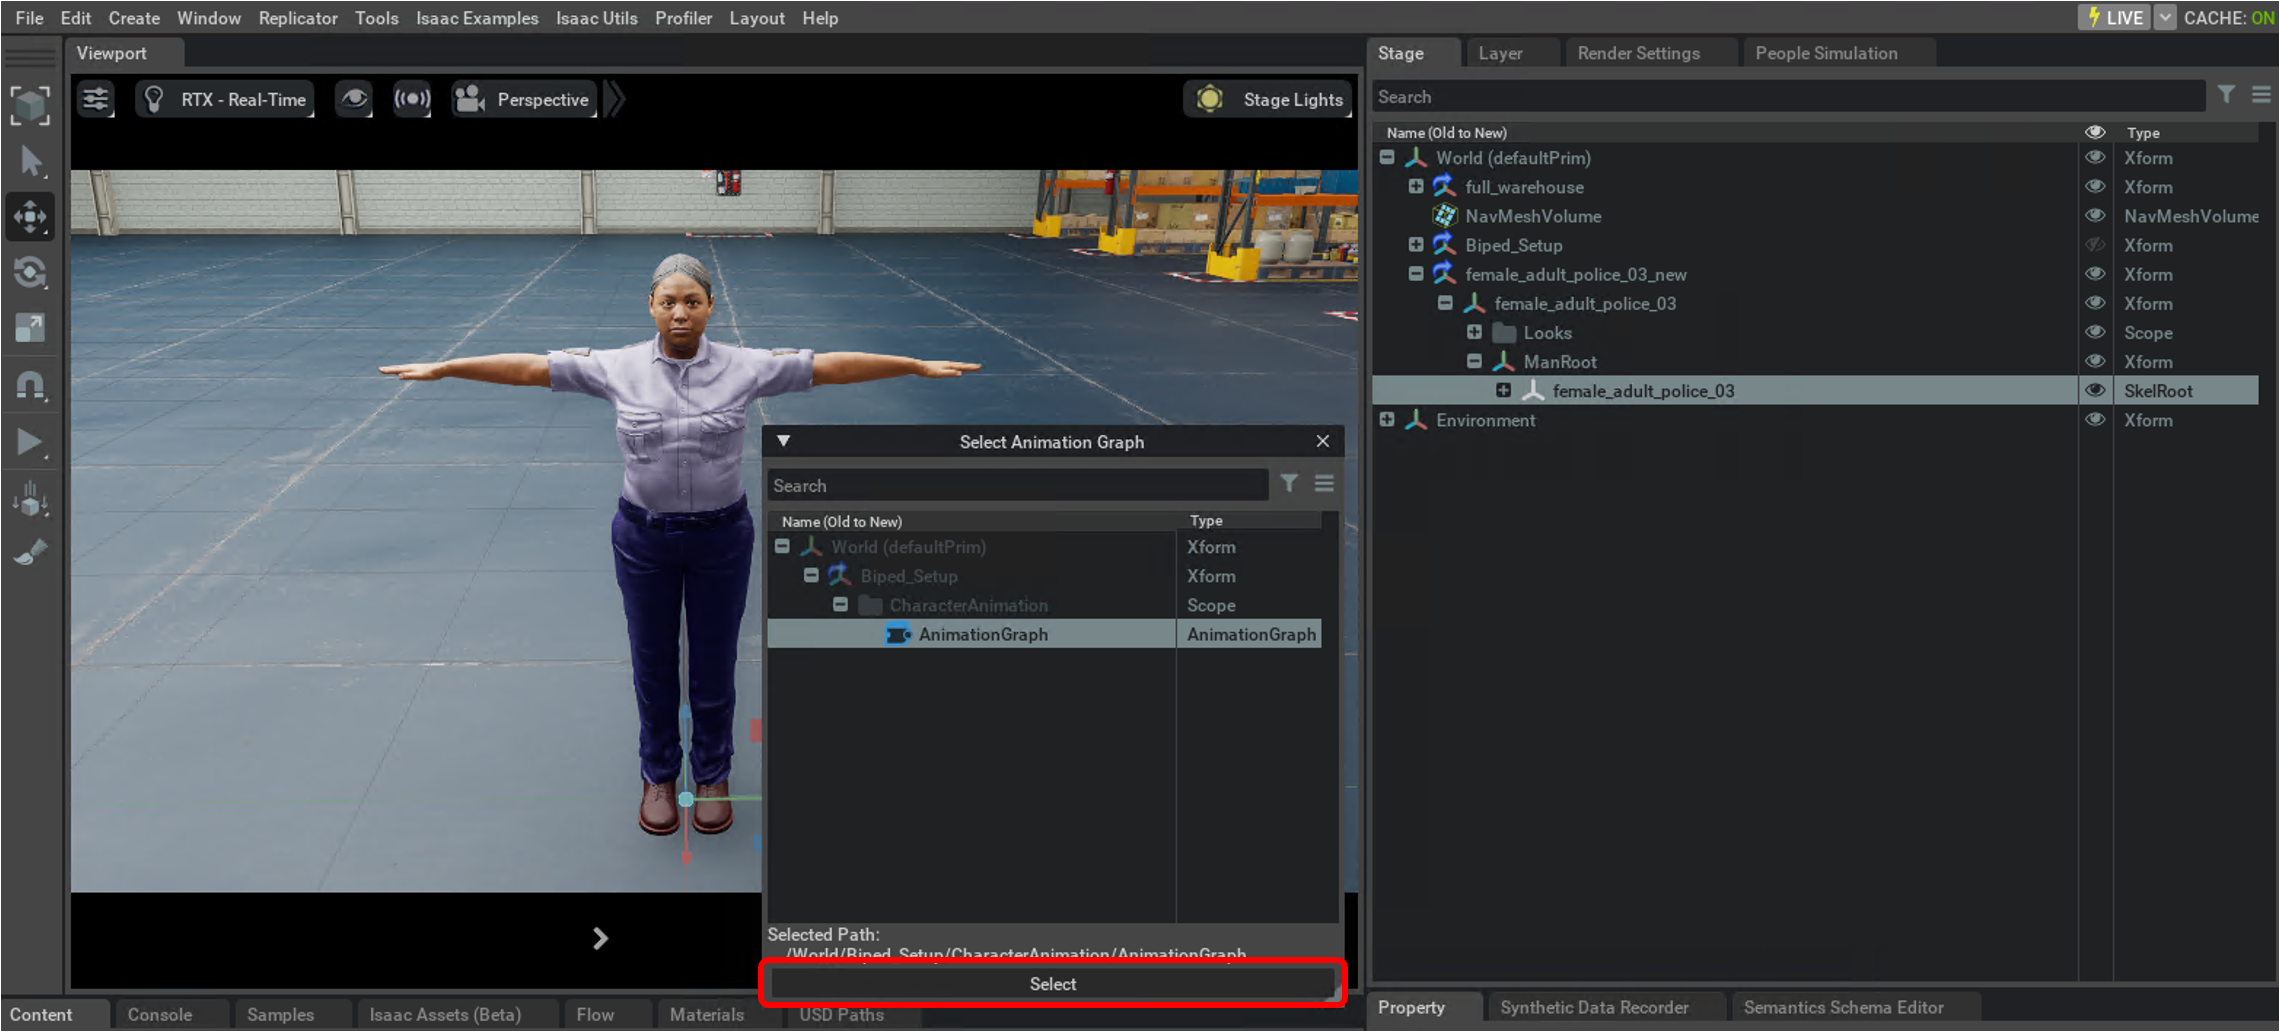
SkelRoot. Example -/World/female_adult_police_03_new/female_adult_police_03/ManRoot/female_adult_police_03.Select the
SkelRootof every character by holding down control and clicking on eachSkelRoot. Next navigate to SkelRoot > Right Click > Add > Animation > Animation Graph and select the only available animation graph.
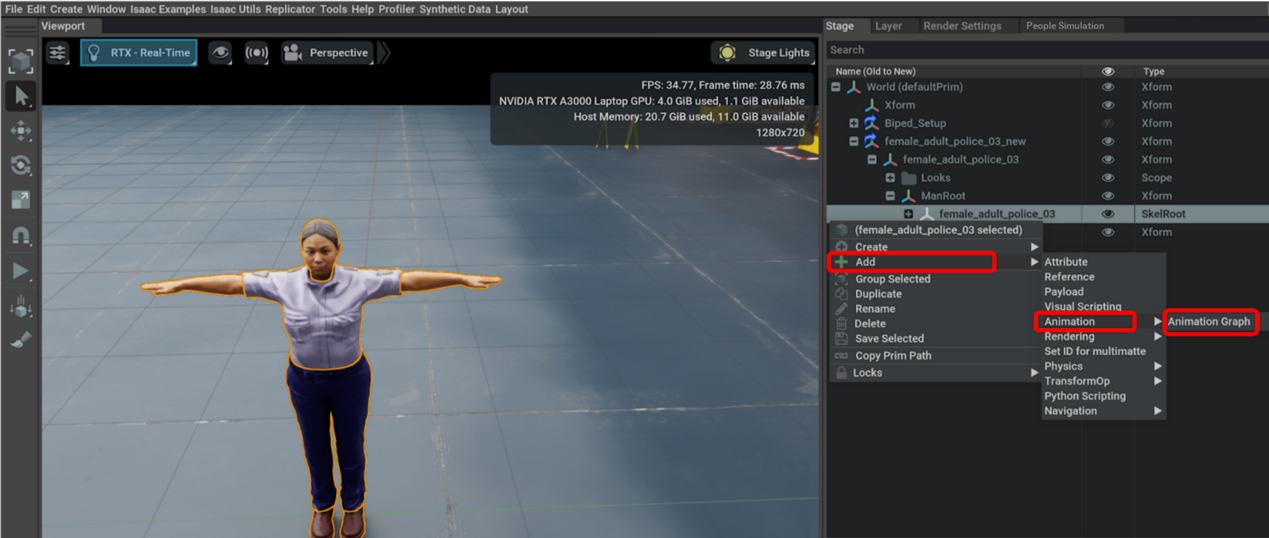
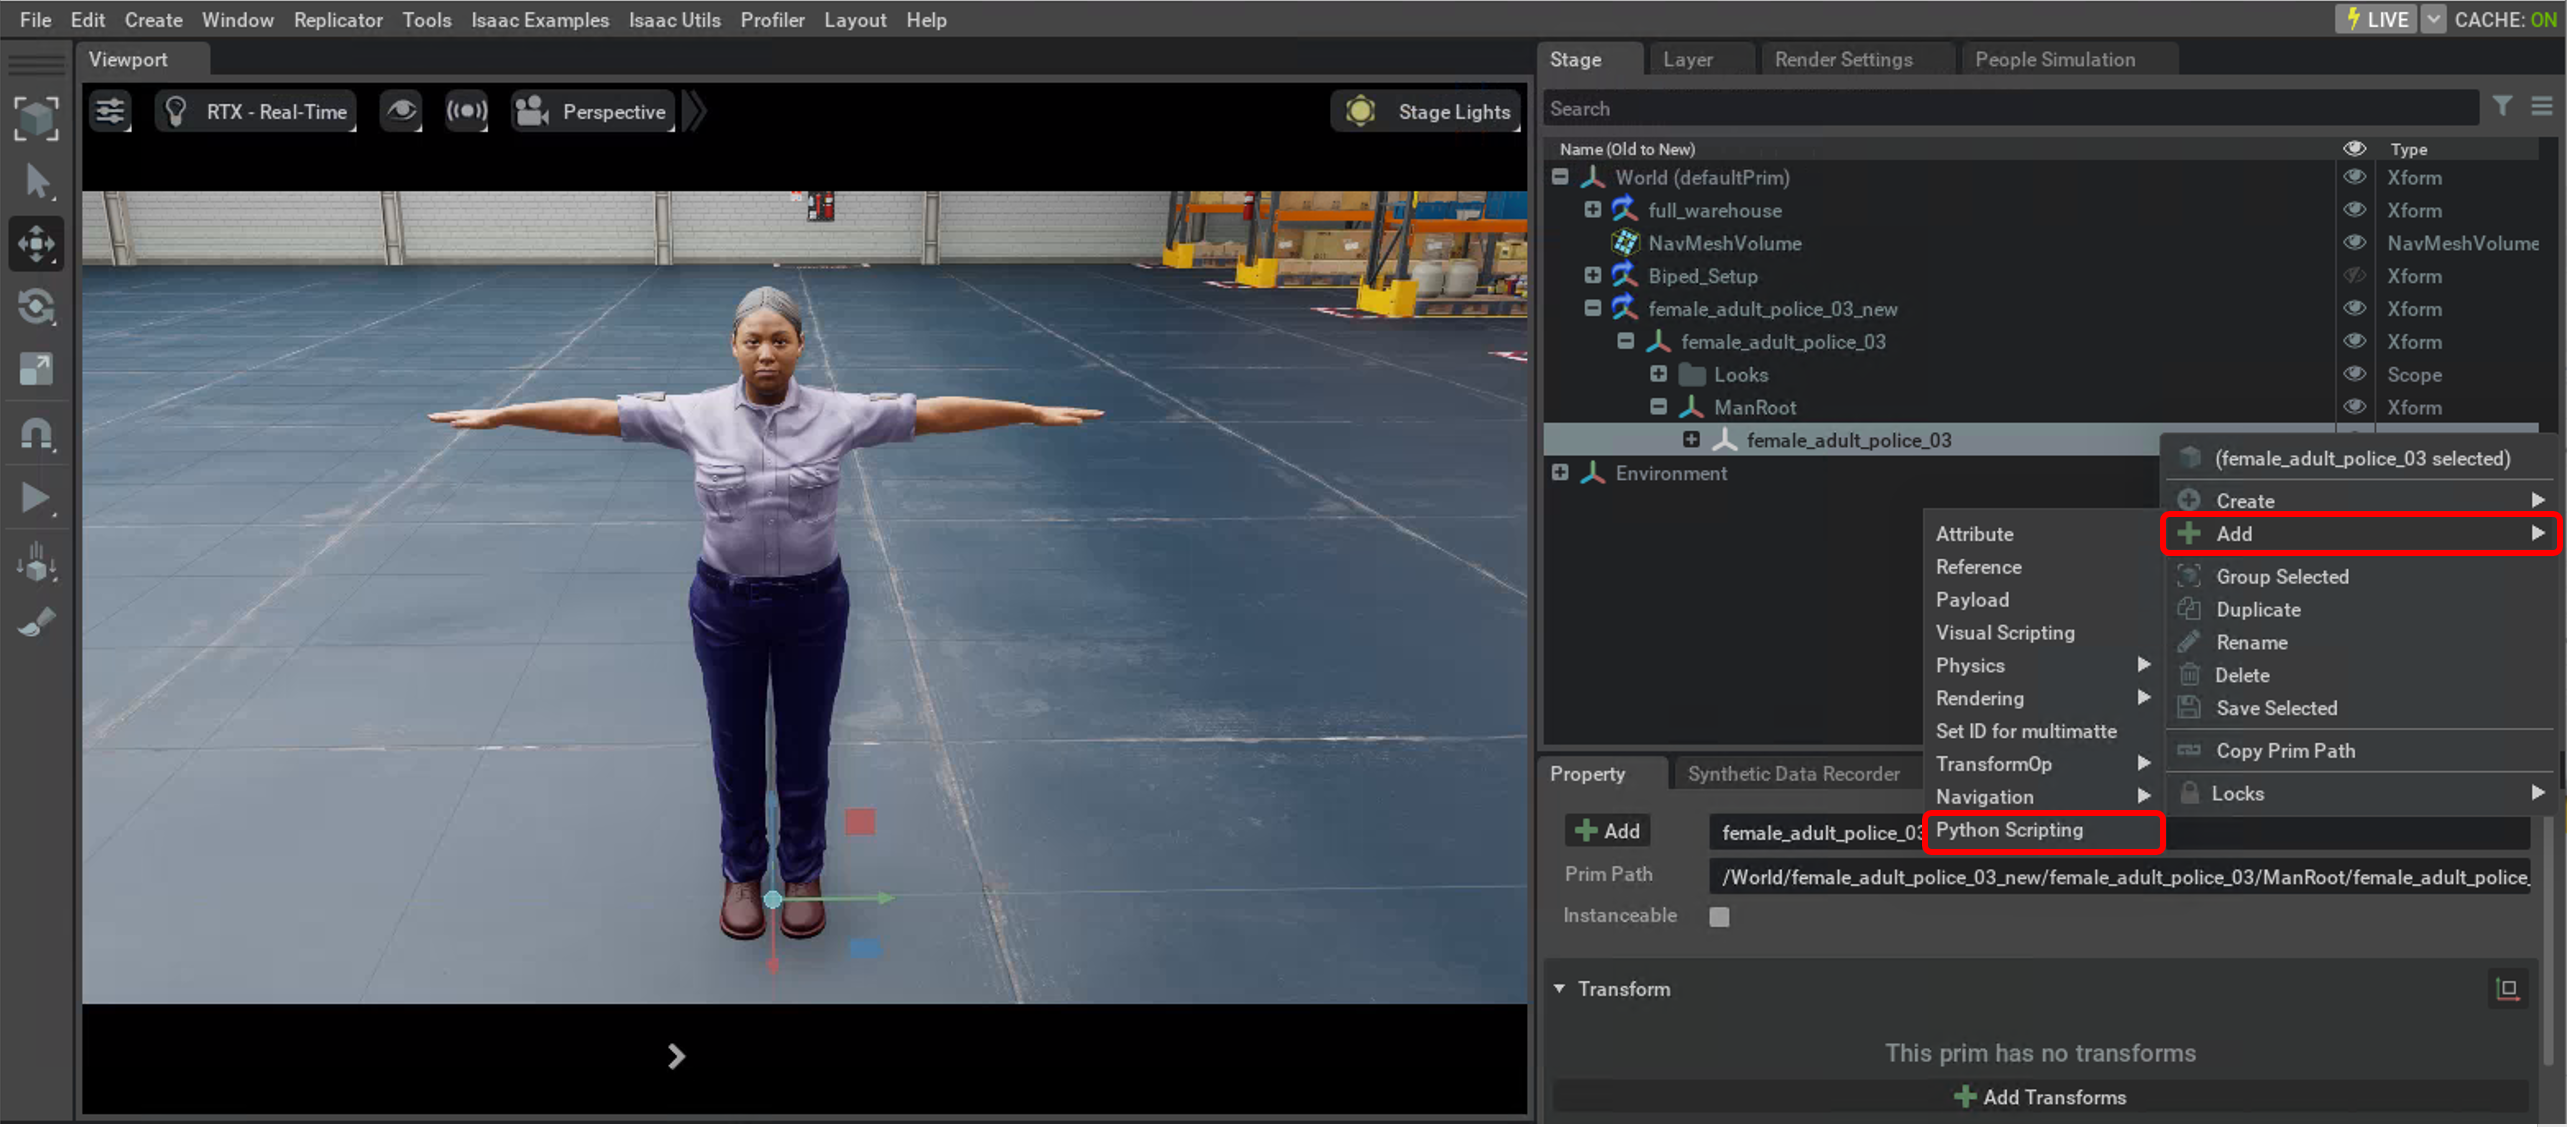
Select the
SkelRootof every character by holding down control and clicking on eachSkelRoot. Select SkelRoot > Right Click > Add > Python Scripting to enable python scripting.
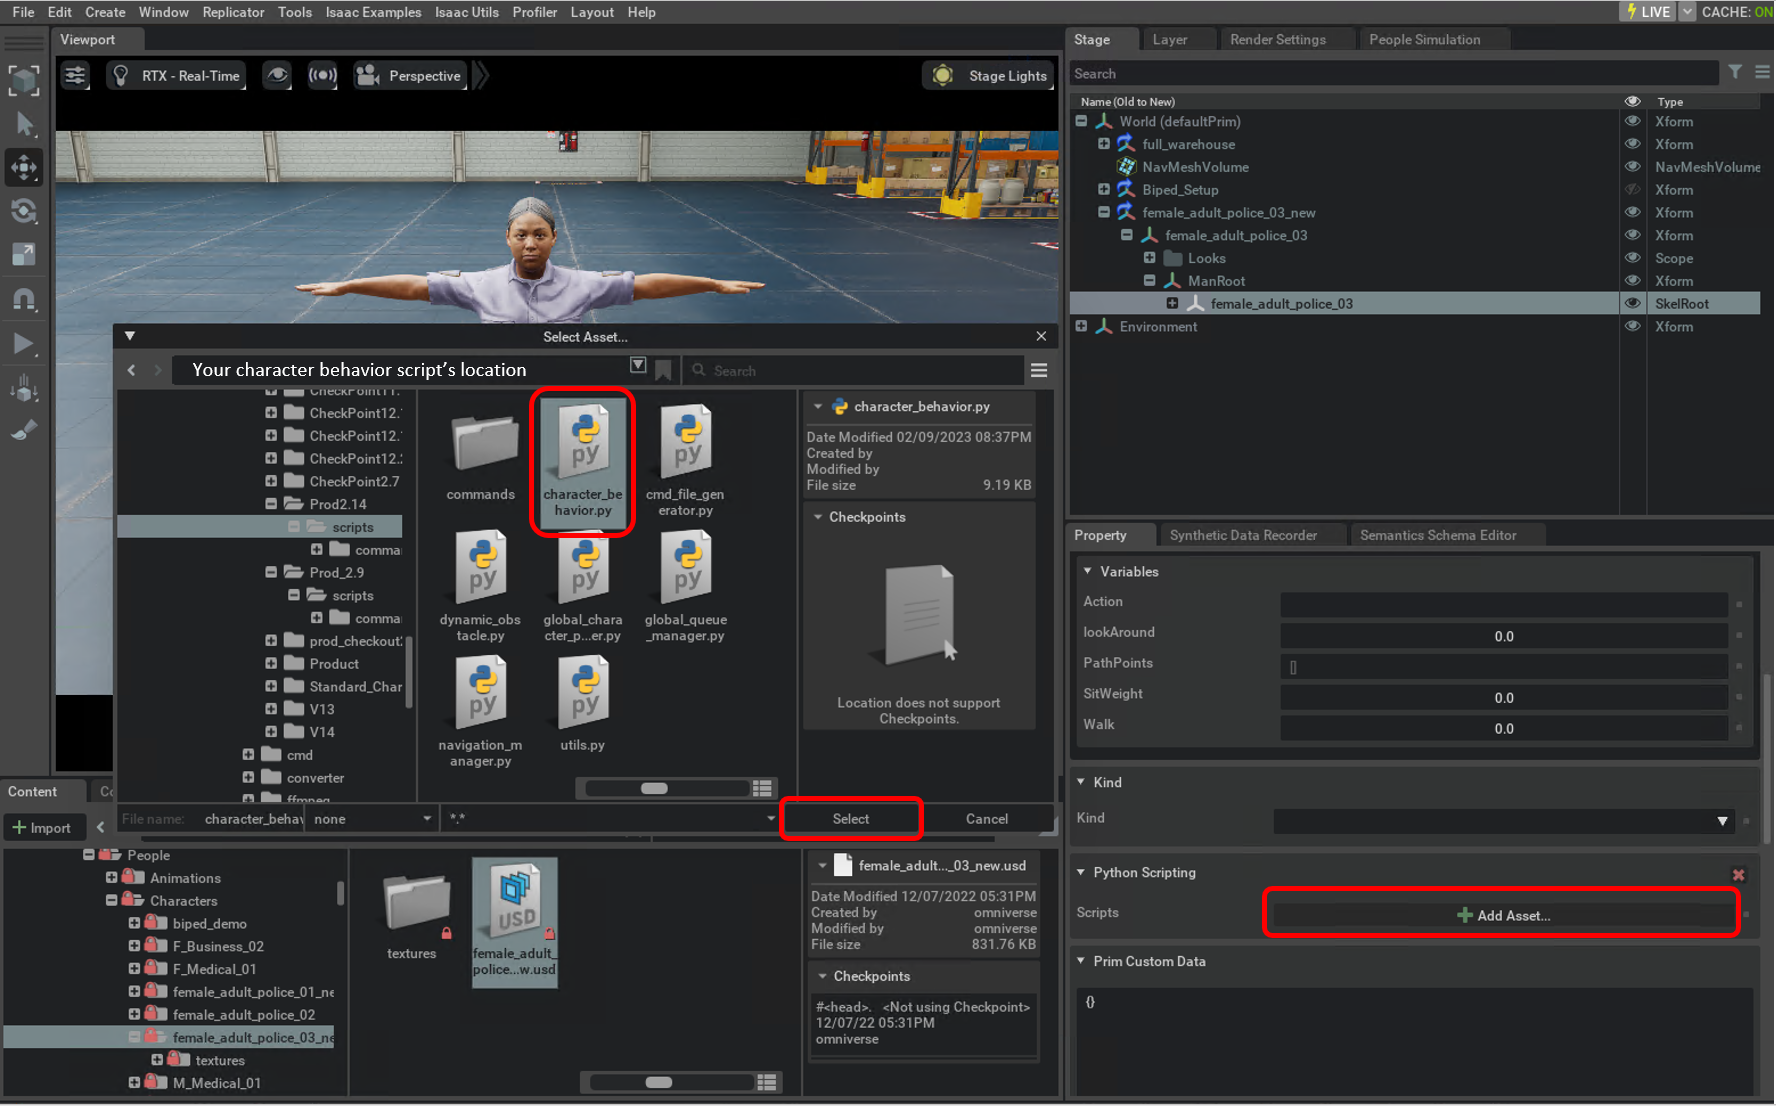
Go to the property window and in the Python Scripting property, select Add Asset and attach the
character_behavior.pyscript.
Next open up a text file and create commands for a simulation using the guide above. For characters that are manually setup, commands must be given using their
Skelrootname. Once the command file is ready, in the People Simulation set the command file in the Command File Path property.
Run the scene by clicking on Play.
Customize Assets and Scripts
Add Custom Behavior Scripts:
Users are encouraged to look at the character behavior scripts and modify them to fit their use case. To locate the Omni.Anim.People behavior scripts:
Select Window > Extensions to open the Extension Manager.
Search for “people”.
Click the folder icon to open the Extension files.
Navigate to
\omni\anim\people\scripts.
To attach the modified scripts or any other character behavior scripts follow the steps below -
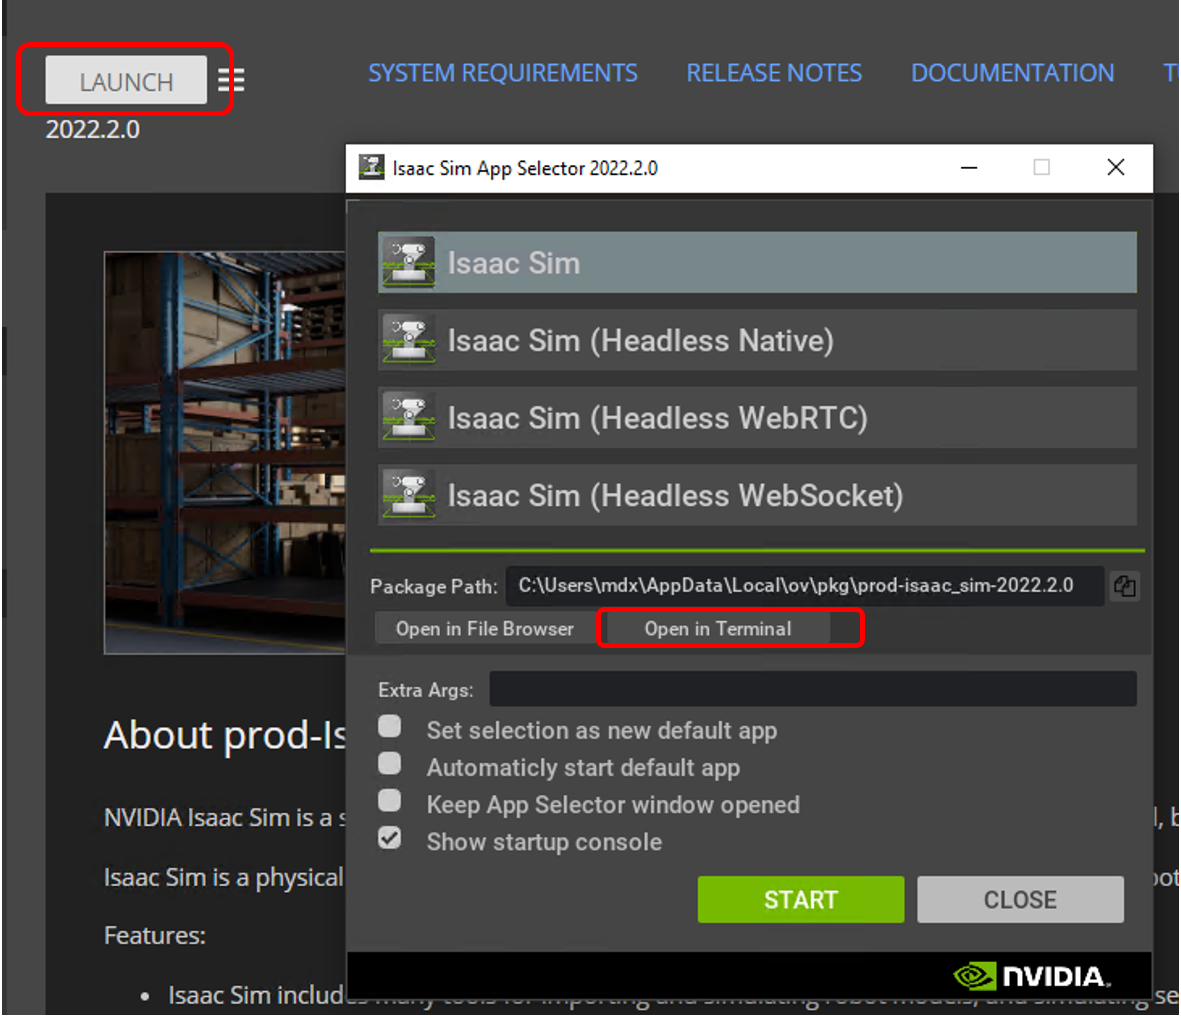
Open Isaac Sim from terminal by click on Open in Terminal Button
In the console input
For Windows -
isaac-sim.bat --/persistent/exts/omni.anim.people/behavior_script_settings/behavior_script_path="path to character behavior scripts"For Linux -
isaac-sim.sh --/persistent/exts/omni.anim.people/behavior_script_settings/behavior_script_path="path to character behavior scripts"
The Setup Characters UI button will now use the provided character behavior scripts.
Adding Custom Character Assets:
Add the new character usd file in the existing character assets folder (omniverse://localhost/NVIDIA/Assets/Isaac/2023.1.1/Isaac/People/Characters), or create a new folder with the following structure -
Next set character_assets_path value to point to the custom/modified character assets location.
Open Isaac Sim from terminal by click on Open in Terminal Button
In the console input
For Windows -
isaac-sim.bat --/persistent/exts/omni.anim.people/asset_settings/character_assets_path="path to character asset root folder"For Linux -
isaac-sim.sh --/persistent/exts/omni.anim.people/asset_settings/character_assets_path="path to character asset root folder"
The Load Characters UI button will now use the provided character asset location.
Note
New characters must be setup using Animation Retargeting.
Avoid Moving Objects
Characters can be made to avoid small and slow moving objects (like robots) by attaching the dynamic_obstacle.py script to the moving object. (Avoidance is best effort and not guaranteed.) Follow these steps -
Find the ‘moving component’ of the object you want to avoid. This is generally the base prim of a physics articulation.
On the prim Right Click > Add > Python Scripting.
In the property window, find the Python Scripting property, click on Select Asset button and select the
dynamic_obstacle.pyscript in the extension files.
Note
Please make sure the dynamic_obstacle.py on obstacle and the character_behavior.py on your characters are in the same folder. In addition, please also make sure the capitalization of your dynamic_obstacle.py file path are the same with the file path of your character_behavior.py.
Adding New Animations
Users can add their own animations/actions to the simulation capabilities with a zero code process. Follow the steps below. -
Open the animation graph, by navigating to Window > Animation > Animation Graph > Edit Animation Graph.
Double-click on the state machine to open it. Create a new state and add your animation in it.
Connect the state to idle state with two transitions, from and to idle. Double click the transition arrows to modify the transitions. Right click and select Condition > ConditionCompareVariable. Attach the variable to the transition.
Open the ConditionCompareVariable in the property window and select the ‘Action’ variable name. For the transition going to the idle node, this value must be ‘None’. For the transition going from the idle node, the value can be anything.
Next go the Script folder in the extension files and use the following command to generate a new python command file. Note that the
cmd_nameshould match the name of the node in the state machine and thetransition_nameshould match the value used in the condition variable.
python cmd_file_generator.py -t .\commands\simple_cmd_template.txt -n cmd_name -tr transition_name
The above command will generate a python file with the name
cmd_name.py. Drag and drop this file into the commands folder.Users can now use the command in the command file as follows -
character_name command duration.
Troubleshooting
In case an error is produced by the behavior scripts, the scripts need to be reinitialized by reloading the characters and setting them up again.
In case a navigation-mesh is not generated after creating a navigation volume, open Window > Navigation > Navmesh. In the NavMesh panel reset the defaults to the values shown below.
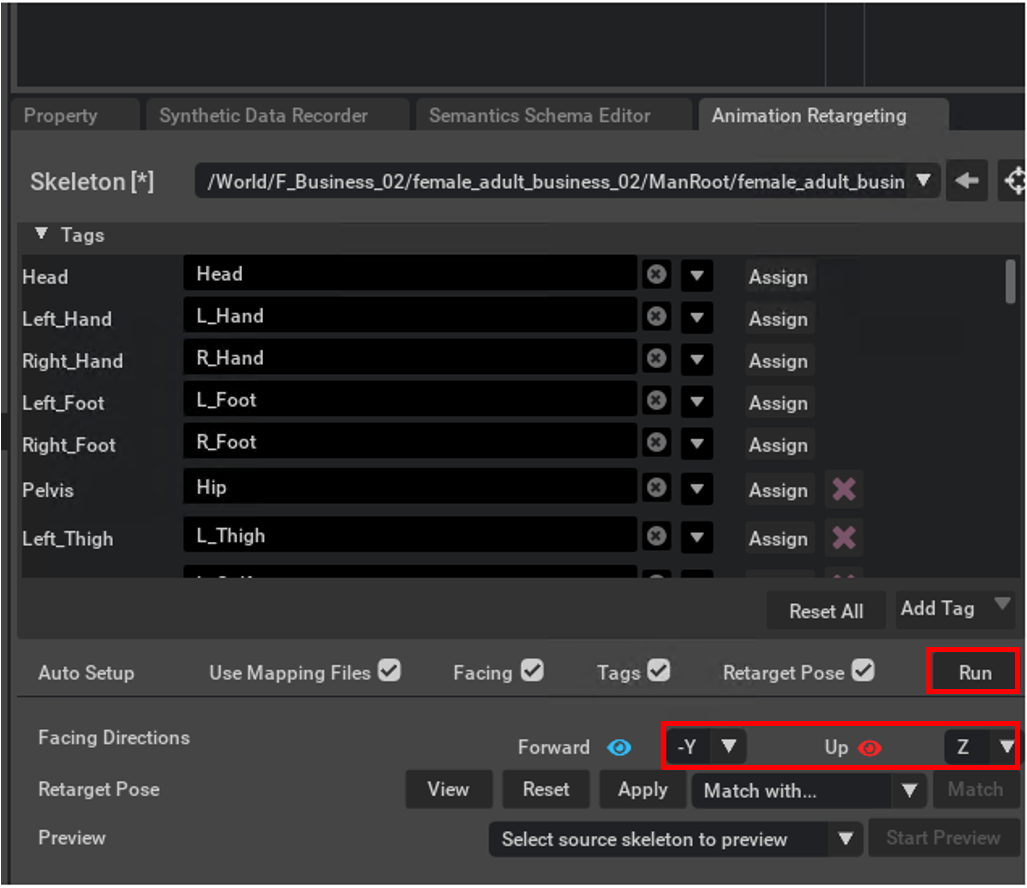
To choose the characters that are loaded by the Omni.Anim.People UI, specify the character’s usd file name after the
Spawncommand. The character assets are present atomniverse://localhost/NVIDIA/Assets/Isaac/2023.1.1/Isaac/People/Characters.If the character does not walk on the ground plane, check the character’s retargeting setup. Adjust the facing direction by opening Window > Animation > Retargeting, and setting the Facing Directions in the Animation Retargeting panel correctly. In Isaac Sim, the value should be Forward: -Y, Up: Z.
Limitations
The extension is being released in its beta version and has some limitations. Below, the currently observed limitations have been listed.
Character dynamic avoidance is best effort and not guaranteed. In some scenarios where static and dynamic obstacles are present together, dynamic avoidance might cause erratic movement leading characters to walk into another character or into a static obstacle.
Depending on the navigation mesh built, characters might go into static obstacles while walking. If this is observed the user should rebuild the navigation mesh with a higher agent radius.
When constructing a queue, each queue spot must be at least 1 meter apart from each other.
Character rotation in a fixed spot is currently done by rotating the whole prim.