Get Started#
Preview via NVIDIA API Catalog#
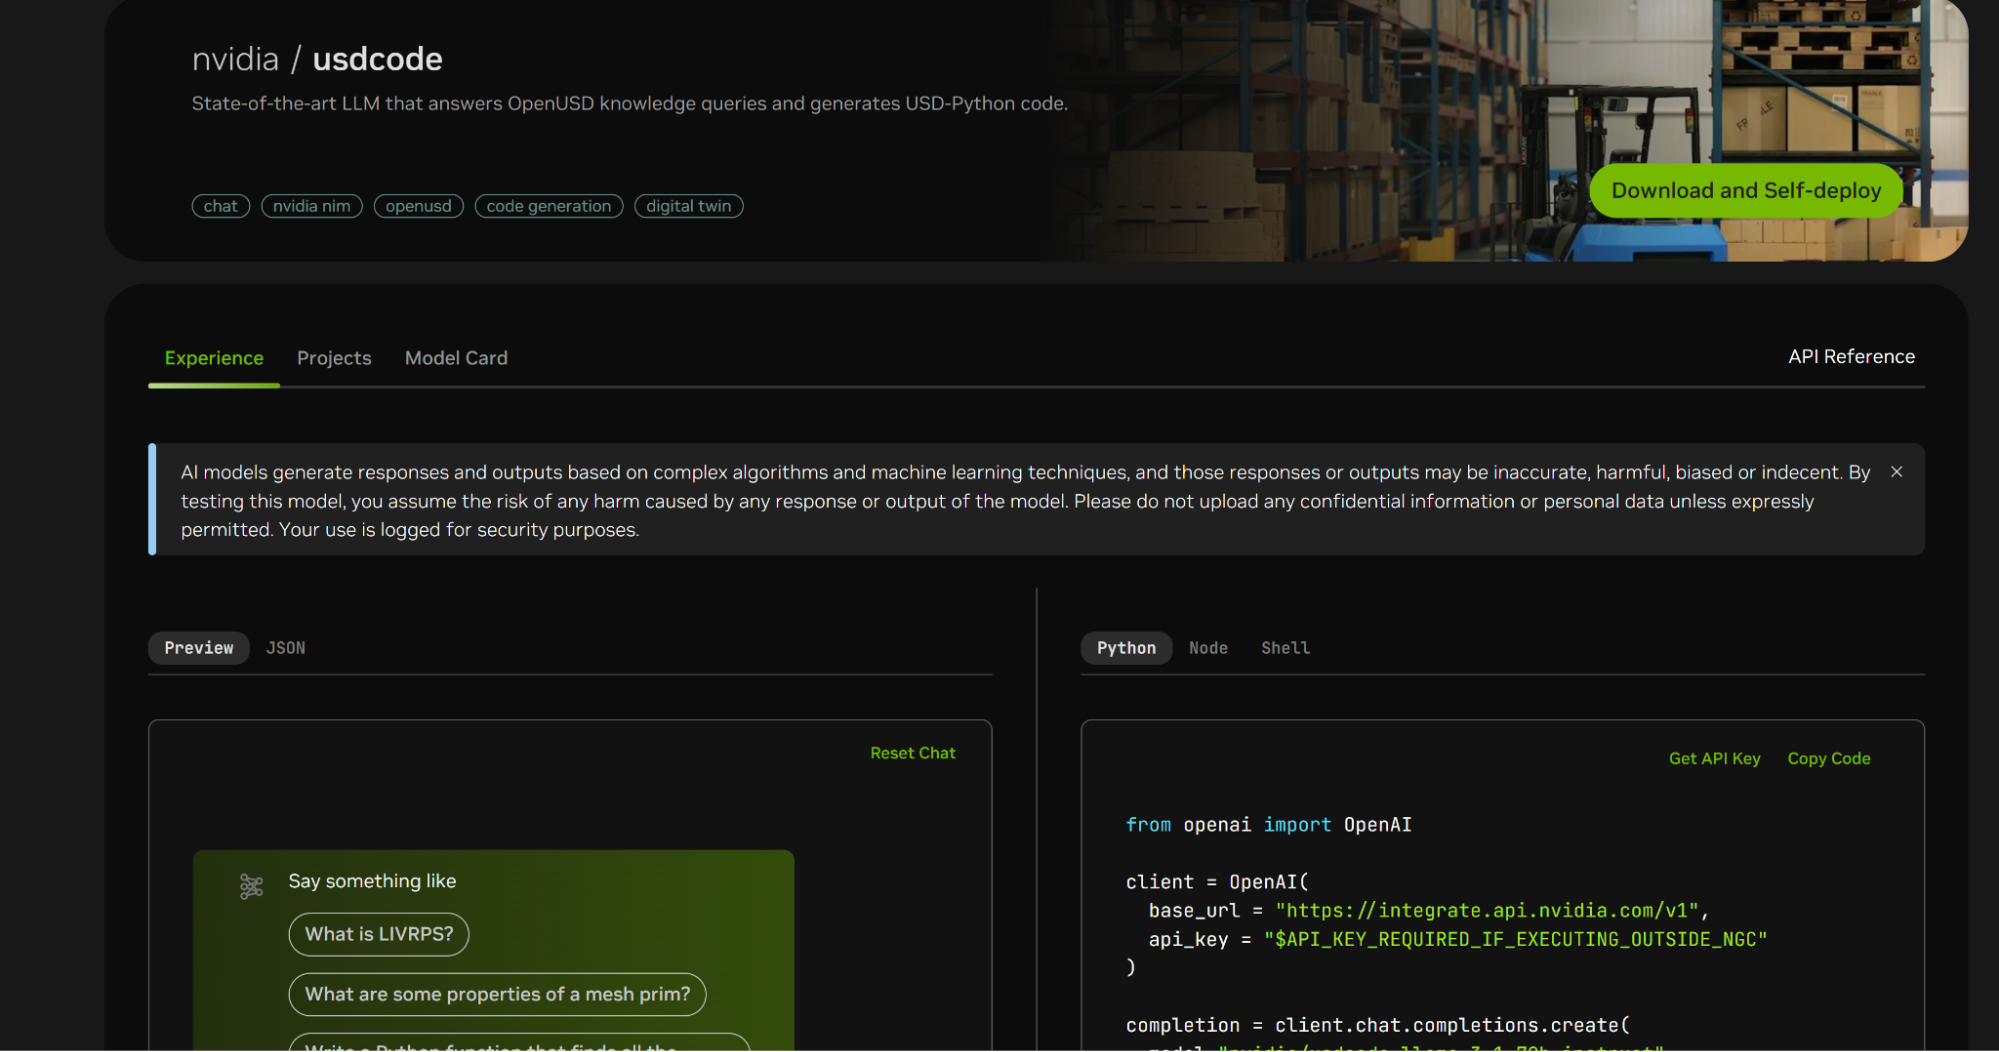
To preview USD Code API, head over to the NVIDIA API catalog. You can preview and test USD Code API in the Preview tab by typing in a prompt and clicking the Send button.
Note
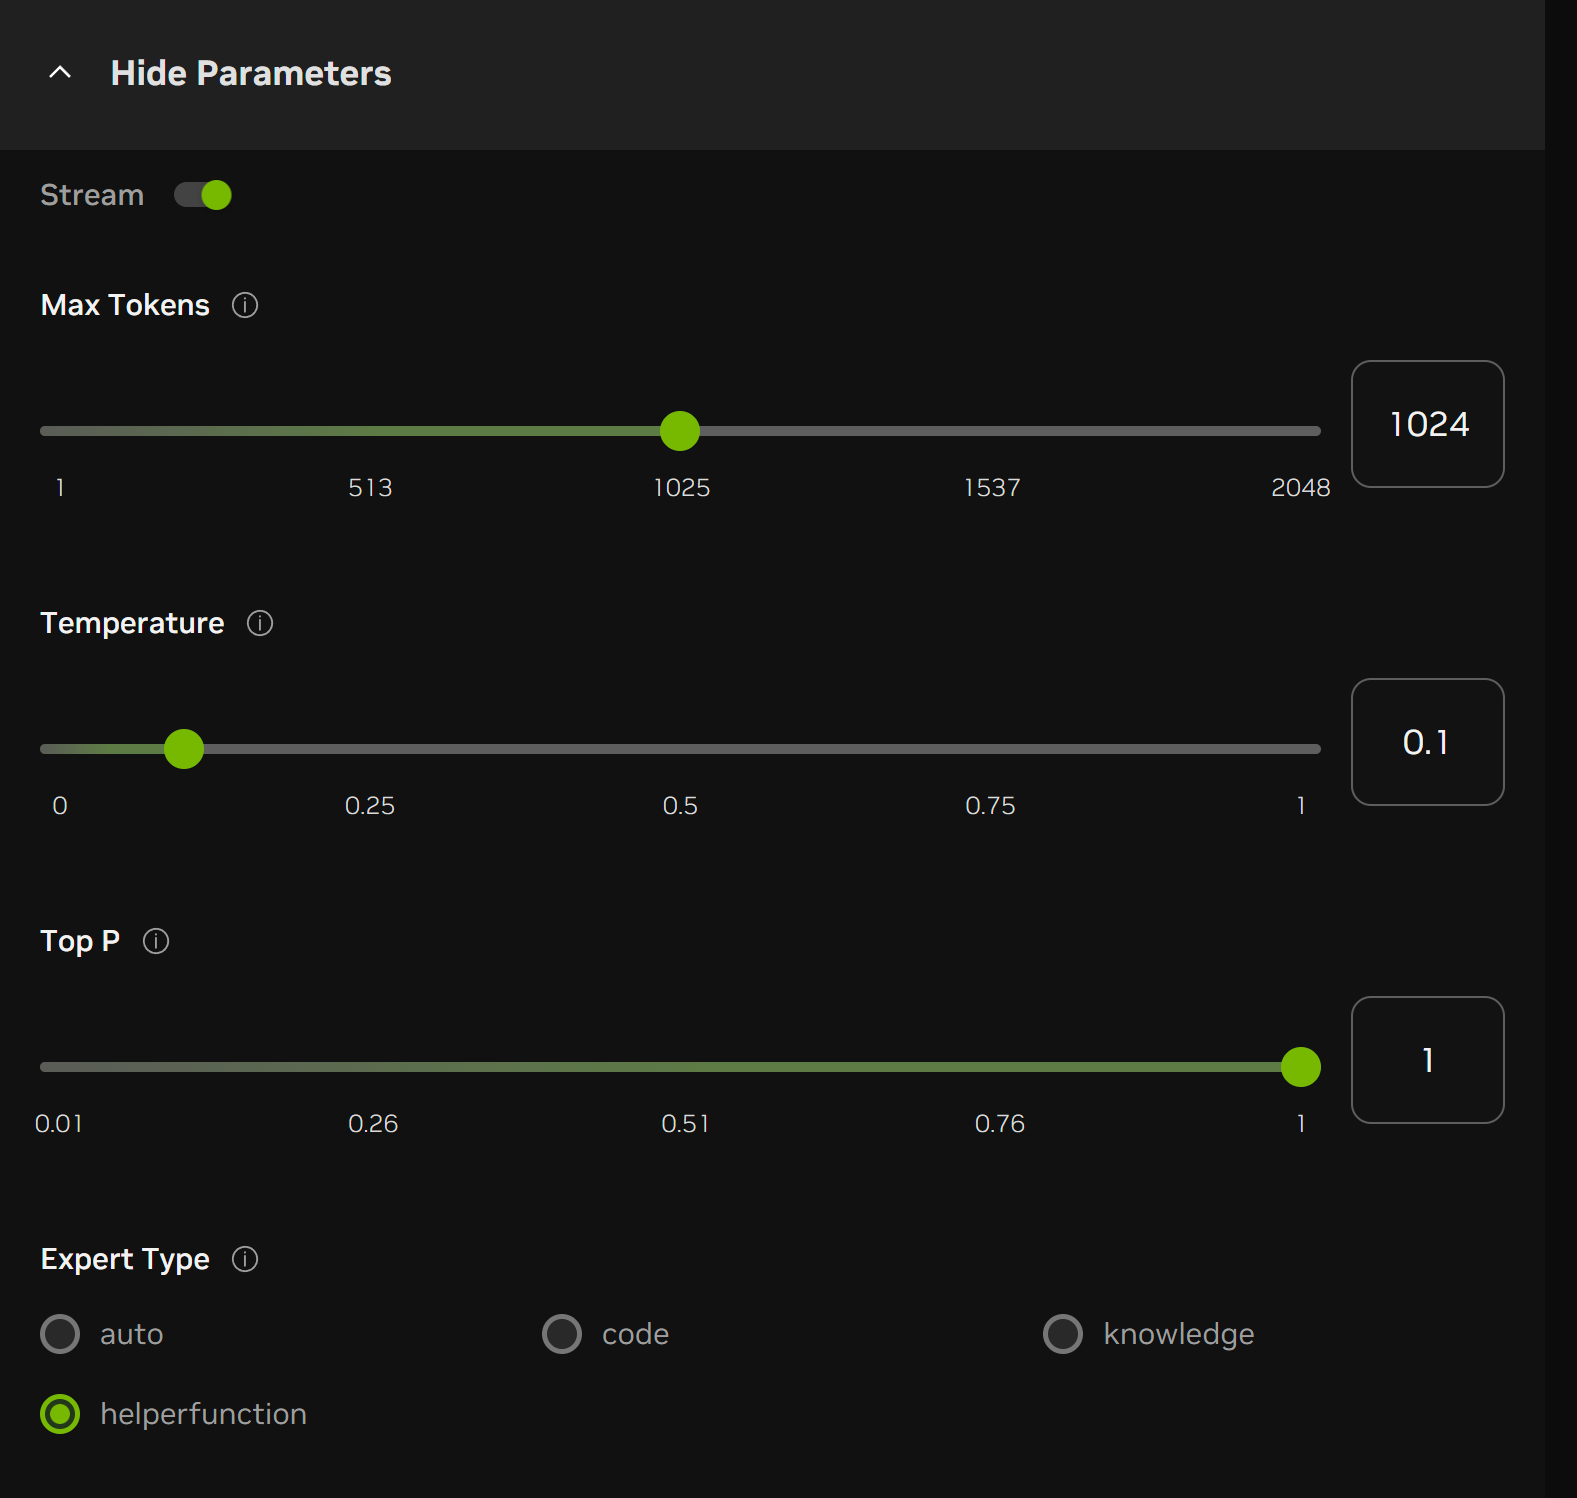
to prompt USD Code Helper Functions, please expand the “View Parameters” Tab, and select the Expert Type as “helper function”. Similarly, you may do the same with selecting Expert Type as code, knowledge if you prefer a specific expert.
Deploy, Configure, and Develop#
Prerequisites#
Generate your NGC Helm and container registry API Key by referring to the onboarding guide provided in the NGC API Key onboarding guide.
Note
If you have already generated the API Key, this step can be skipped.
To ensure a smooth experience, please configure your Kubernetes cluster with the following essential features enabled:
NVIDIA k8s device plugin or NVIDIA GPU-operator: This is a requirement for running internal LLM/embedding models. Please make sure that there is no version mismatch between the driver, CUDA and Fabric Manager if installed.
Please refer to the Kubernetes Setup Documentation or Install a Local Kubernetes with MicroK8s for installation guidance. Below you can find an example of MicroK8s cluster setup on a Bare Metal server.
Note
The following versions are used for testing: MicroK8s: v1.29.10, kubectl: v1.29.10, helm: v3.16.3.
Configure the Kubernetes cluster#
NVIDIA GPU drivers: Make sure you have the latest NVIDIA GPU drivers installed. You can check this by running the nvidia-smi command. If such a command is not found, please go to the NVIDIA driver installation guide for Ubuntu for the driver installation.
Microk8s cluster: Install the microk8s cluster using the following command:
sudo snap install microk8s --classic
sudo usermod -a -G microk8s ${USER}
mkdir -p $HOME/.kube
sudo microk8s config > $HOME/.kube/config
sudo chown $(id -u):$(id -g) $HOME/.kube/config
chmod 0700 ~/.kube
Microk8s add-ons: Install additional microk8s add-ons:
sudo microk8s enable dns
sudo microk8s enable hostpath-storage
Kubectl and helm CLI tools: Install kubectl and helm CLI tools that allow interacting with the created microk8s cluster:
sudo snap install kubectl --classic
sudo snap install helm --classic
GPU operator: Install GPU operator using the official guide.
helm repo add nvidia https://helm.ngc.nvidia.com/nvidia
helm repo update
helm upgrade gpu-operator nvidia/gpu-operator \
--install \
--wait \
--create-namespace \
-n gpu-operator \
--version v23.9.2 \
--set toolkit.env[0].name=CONTAINERD_CONFIG \
--set toolkit.env[0].value=/var/snap/microk8s/current/args/containerd-template.toml \
--set toolkit.env[1].name=CONTAINERD_SOCKET \
--set toolkit.env[1].value=/var/snap/microk8s/common/run/containerd.sock \
--set toolkit.env[2].name=CONTAINERD_RUNTIME_CLASS \
--set toolkit.env[2].value=nvidia \
--set toolkit.env[3].name=CONTAINERD_SET_AS_DEFAULT \
--set-string toolkit.env[3].value=true \
--set driver.enabled=false
Verify installation by running:
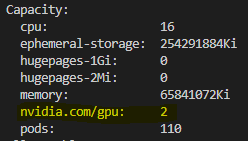
kubectl describe nodes
This command should list all the available nodes and you should be able to see GPU resources.
Here’s what you should see after you’ve completed the above steps:
Deploy Helm Chart#
You can deploy USD Code to the Kubernetes cluster with the following steps.
Set the following environment variables that will be used to fetch the latest helm chart and pull container images from NGC:
export NGC_API_KEY=nvapi-...
export IMAGE_PULL_SECRET=nvcrimagepullsecret
export HELM_RELEASE=usdcode
export HELM_CHART_REPO=https://helm.ngc.nvidia.com/nvidia/omniverse-usdcode/charts/usdcode-1.0.0.tgz
Install the helm chart:
helm install \
--username '$oauthtoken' \
--password $NGC_API_KEY \
$HELM_RELEASE \
$HELM_CHART_REPO \
--set secrets.create.registry=true \
--set ngcImagePullSecretName=$IMAGE_PULL_SECRET \
--set secrets.OMNIVERSE_NGC_API_KEY=$NGC_API_KEY \
-n $HELM_RELEASE \
--create-namespace
Note
Add
--set llm.resources.limits."nvidia\.com/gpu"=8if L40S is used, 4 is default.Once the installation is complete, check if all pods are ready as below:
kubectl get pods -n $HELM_RELEASE
You should see the following:

There will be 3 pods - main, llm (llama3.1-70b), embedding (nv-embed-e5-v5). The embedding pod will take around 3 mins, the llm pod will take around 15 mins, and the main pod will be ready once it confirms both the llm and the embedding pods are ready. In total, it will take around 15-20 mins.
If you still observe any pods in Pending state after 30 min, please refer to the troubleshooting section in Kubernetes documentation. See examples of troubleshooting for helm/kubernetes documented in the Helm/Kubernetes troubleshooting FAQ.
Forward the main service to localhost:8000 for testing purposes
kubectl port-forward svc/main 8000:8000 -n $HELM_RELEASE
Once test is done, you can uninstall the deployment:
helm uninstall $HELM_RELEASE -n $HELM_RELEASE
Test Deployment#
Here, we show you various ways to test a deployed USD Code service. Note that the same endpoint http://localhost:8000 can be used for both integration with an IDE and an Omniverse Kit-based Application.
# Check if the main pod is ready for service:
curl -X GET localhost:8000/v1/health/ready

# To verify the command's functionality, run the following example command:
curl -X POST localhost:8000/v1/chat/completions -H 'Content-Type: application/json' -d '{"messages": [{"role":"user","content":"What is LIVRPS in USD?"}], "stream": false}'
import requests
import json

# Check if the main pod is ready for service:
url = "http://localhost:8000/v1/health/ready"
response = requests.get(url)
print(response.text)

# To verify the command's functionality, run the following example command:
url = "http://localhost:8000/v1/chat/completions"

payload = {
    "messages": [
        {
            "content": "What is LIVRPS in USD?",
            "role": "user"
        }
    ],
    "stream": False,
}
headers = {
    "accept": "application/json",
    "content-type": "application/json"
}

response = requests.post(url, json=payload, headers=headers)
print(json.loads(response.text)["choices"][0]["message"]["content"])
from openai import OpenAI

client = OpenAI(
    base_url="http://localhost:8000/v1",
    api_key="$API_KEY_REQUIRED_IF_EXECUTING_OUTSIDE_NGC",
)

completion = client.chat.completions.create(
    model="model",  # placeholder
    messages=[{"role": "user", "content": "What is LIVRPS in USD?"}],
    stream=False,
)

print(completion.choices[0].message.content)
The commands above should produce output similar to the following:
'LIVRPS stands for "Layer, Inherit, Variant, Reference, Payload, Specialize" '
'and it is a heuristic used in USD (Universal Scene Description) to resolve '
'attribute values and opinions from different sources. It is a way to '
'determine the order in which different sources of data are considered when '
'resolving attribute values.\n'
'\n'
'Here is a breakdown of what each letter in LIVRPS stands for:\n'
'\n'
'* L: Layer - This refers to the layering system in USD, where layers can be '
'stacked on top of each other to create a composition.\n'
'* I: Inherit - This refers to the inheritance of attributes from parent '
'prims to child prims.\n'
'* V: Variant - This refers to the use of variants to create different '
'versions of a prim or a composition.\n'
'* R: Reference - This refers to the use of references to bring in external '
'data or assets.\n'
'* P: Payload - This refers to the actual data or asset that is being '
'referenced or inherited.\n'
'* S: Specialize - This refers to the use of specialization to create a more '
'specific version of a prim or a composition.\n'
'\n'
'The LIVRPS heuristic is used to resolve attribute values by considering the '
'sources of data in the following order:\n'
'\n'
'1. Layer: The layer that is currently being evaluated.\n'
'2. Inherit: The inherited attributes from parent prims.\n'
'3. Variant: The variant that is currently being evaluated.\n'
'4. Reference: The referenced data or assets.\n'
'5. Payload: The actual data or asset that is being referenced or inherited.\n'
'6. Specialize: The specialized version of the prim or composition.\n'
'\n'
'By following this order, the LIVRPS heuristic ensures that attribute values '
'are resolved in a consistent and predictable way, and that the most specific '
'and relevant data is used to determine the final value of an attribute.'
Troubleshoot Deployment#
If the Fabric Manager is installed and does not match with the installed driver, the service will not start, and the CUDA app will be unable to access your GPU(s). This is because the Fabric Manager acts as a coordinator when a CUDA application requires multiple GPUs. Check the status of your Fabric Manager by running the following command:
systemctl status nvidia-fabricmanager.service