Walkthrough - External Python Scripting#
This file contains an example walkthrough for creating a node type definition using an AutoNode definition found in an extension script file and then constructing a graph containing a node of that type using the OmniGraph Python API. For other walkthrough tutorials see Walkthroughs.
This example will create an AutoNode node type definition that takes two vectors as inputs and returns a single output that is the dot product.
The script we will produce here contains the steps necessary to define that node type, construct a graph that contains it, and run a simple test to confirm that it operates as expected.
This walkthrough will assume that the following extensions have been installed and are enabled in your application:
omni.graph for the core AutoNode functionality
omni.kit.window.script_editor for the Python Script Editor
Step 1: Create The Definition#
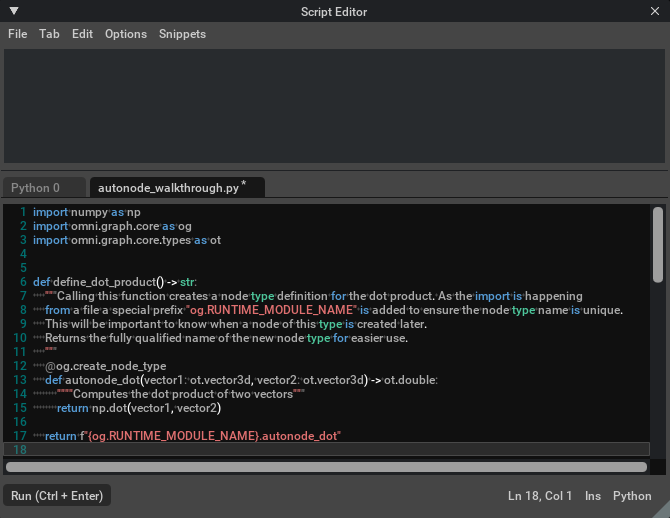
The first part of the script will contain the AutoNode definition of the node type. The definition is enclosed in a function so that it does not activate immediately on import. Instead, creation of the node type will happen when the function is called.
 1import numpy as np
 2import omni.graph.core as og
 3import omni.graph.core.types as ot
 4
 5
 6def define_dot_product() -> str:
 7    """Calling this function creates a node type definition for the dot product. As the import is happening
 8    from a file a special prefix "og.RUNTIME_MODULE_NAME" is added to ensure the node type name is unique.
 9    This will be important to know when a node of this type is created later.
10    Returns the fully qualified name of the new node type for easier use.
11    """
12
13    @og.create_node_type
14    def autonode_dot(vector1: ot.vector3d, vector2: ot.vector3d) -> ot.double:
15        """Computes the dot product of two vectors"""
16        return np.dot(vector1, vector2)
17
18    return f"{og.RUNTIME_MODULE_NAME}.autonode_dot"
19
20
Step 2: Construct The Graph#
The OmniGraph Controller class is the standard method for OmniGraph creation so we will use that. As mentioned above the node type name was made unique be including a special prefix so that must be included when creating nodes of that type.
For the test we will write some constant input nodes are required to those are created here as well.
19def create_graph(node_type_name: str) -> og.Node:
20    """Create the sample graph with a node of the AutoNode type for use in the test"""
21    _, (test_node,), _, _ = og.Controller.edit(
22        "/AutoNodeTestGraph", {og.Controller.Keys.CREATE_NODES: ("TestNode", node_type_name)}
23    )
24    return test_node
25
26
Step 3: Add A Simple Test#
The test will just set some input values, evaluate the graph, and then confirm that the result is what we would expect from the computation.
27def run_test() -> bool:
28    """Tests the AutoNode node type we have defined above. Returns True if the test succeeded, False if not"""
29    # Call the function that defines the node type
30    node_type_name = define_dot_product()
31
32    # Create a graph with a node of the new node type
33    test_node = create_graph(node_type_name)
34
35    # Set some input vectors whose dot product we know
36    input1 = test_node.get_attribute("inputs:vector1")
37    input2 = test_node.get_attribute("inputs:vector2")
38    og.Controller(input1).set([1.0, 2.0, 3.0])
39    og.Controller(input2).set([4.0, 5.0, 6.0])
40    # Evaluate the graph so that the compute runs
41    og.Controller.evaluate_sync()
42
43    # Note the naming of the output attribute, with index starting at 0
44    result = test_node.get_attribute("outputs:out_0")
45    actual_result = og.Controller(result).get()
46
47    # See if the computation produced the expected result
48    success = np.allclose(actual_result, 32.0)
49
50    # Deregister the node type so that it does not continue to exist after the test completes
51    og.deregister_node_type(node_type_name)
52
53    return success
54
55
Note
Once the test completes the deregister_node_type() call will ensure that the definition does not persist beyond the test. In normal operation you would leave it active for as long as you need it, or simply rely on the application exit to remove them all for you.
Step 4: Import The File Through The Script Editor#
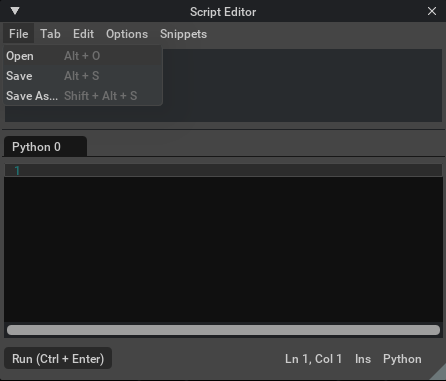
Now that the file contains everything you need in order to create your node type and run a test you can run it by importing it through the script editor.
The script editor File menu has an option to open a script file so use that and navigate to the file you have saved your script in.
Once the file has been read its contents are pasted into the script editor in a new tab but not yet executed. Hit CTL-ENTER in that new tab to run the script. At this point all of the functions are defined but the node type definition has not yet been created.
Now switch to an empty tab to run the run_test() function. It returns a boolean to indicate test success so report that for confirmation.
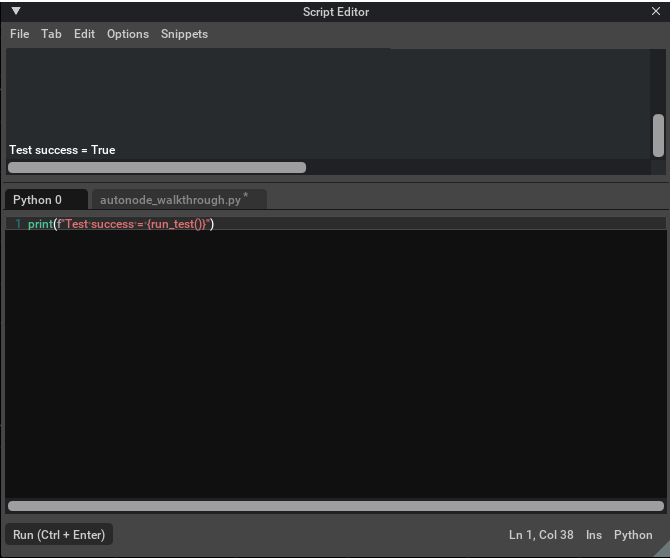
That’s all there is to it for scripting with AutoNode!
Warning
Although you can instantiate this node type any number of times in your scene you should be aware that saving a file with such node types will not work across sessions. In a normal workflow the extension will automatically register the node types it contains but that is not true with AutoNode definitions. To use them in a scene you have loaded you must import and execute the script that defines the node type.