OmniGraph Nodes#
The OmniGraph node provides an encapsulated piece of functionality that is used in a connected graph structure to form larger more complex calculations.
One of the core strengths of the way the nodes are defined is that individual node writers do not have to deal with the complexity of the entire system, while still reaping the benefits of it. Support code is generated for the node type definitions that simplify the code necessary for implementing the algorithm, while also providing support for efficient manipulation of data through the use of Fabric both on the CPU and on the GPU.
The user writes the description and code that define the operation of the node type and OmniGraph provides the interfaces that incorporate it into the Omniverse runtime.
Node Type Implementations#
The node type definition implements the functionality that will be used by the node using two key pieces
The authoring definition, which comes in the form of a JSON format file with the suffix .ogn
The runtime algorithm, which can be implemented in one of several languages.
The actual language of implementation is not important to OmniGraph and can be chosen based on the needs and abilities of the node writer.
A common component of all node type implementations is the presence of a generated structure known as the node type database. The database provides a simplified wrapper around the underlying OmniGraph functionality that hides all of the required boilerplate code that makes the nodes operate so efficiently. You’ll see how its used in the examples below.
OGN Definition#
This .ogn file is required for all of the pregenerated implementations - Python, C++, CUDA, and Warp, as they are all build-time definitions. The Script node, Slang node, and AutoNode by contrast are defined at runtime and use other mechanisms to determine the node and attribute configuration.
This file describes the node configuration for our samples here. The first highlighted line is only present in the Python and Warp implementations as they are both Python-based. The remaining highlighted lines are used only for Warp and CUDA implementations, being used to indicate that the memory for the attributes should be retrieved from the GPU rather than the CPU.
{
   "AddWeightedPoints": {
      "version": 1,
      "language": "python",
      "description": [
         "Add two sets of points together, using an alpha value to determine how much of each point set to",
         "include in the result. The weighting is alpha*firstSet + (1 - alpha)*secondSet.",
         "memoryType": "cuda",
         "cudaPointers": "cpu"
      ],
      "inputs": {
         "alpha": {
            "type": "double",
            "description": "Relative weights to give to each of the two point sets"
            "memoryType": "cpu"
         },
         "firstSet": {
            "type": "pointd[3][]",
            "description": "First set of points to blend together"
         },
         "secondSet": {
            "type": "pointd[3][]",
            "description": "Second set of points to blend together"
         },
      },
      "outputs": {
         "result": {
            "type": "pointd[3][]",
            "description": "Weighted sum of the two sets of input points"
         }
      }
   }
}
You can learn about the authoring description in the .ogn files by perusing the OGN Node Writer Guide, with full details in the OGN Reference Guide, or you can follow along with some of the tutorials or node definitions seen below.
Note
The implementations are not necessarily the most efficient, nor the most appropriate for the type of computation being performed. They are merely meant to be illustrative of the implementation options.
Python Implementation#
The easiest type of node to write is a Python node. You only need implement a class with a static compute(db) method whose parameter is the generated database. The database provides access to the input values your node will use for its computation and the output values you generate as a result of that computation.
class OgnAddWeightedPoints:
   @staticmethod
   def compute(db) -> bool:
      db.outputs.result_size = len(db.inputs.firstSet)
      db.outputs.result = db.inputs.firstSet * db.inputs.alpha + db.inputs.secondSet * (1.0 - db.inputs.alpha)
      return True
For illustration purposes here is the same code but with proper handling of unexpected input values, which is a good practice no matter what the implementation language.
class OgnAddWeightedPoints:
   @staticmethod
   def compute(db) -> bool:
      first_set = db.inputs.firstSet
      second_set = db.inputs.secondSet

      if len(first_set) != len(second_set):
         db.log_error(f"Cannot blend two unequally sized point sets - {len(first_set)} and {len(second_set)}")
         return False

      if not (0.0 <= db.inputs.alpha <= 1.0):
         db.log_error(f"Alpha blend must be in the range [0.0, 1.0], not computing with {db.inputs.alpha})
         return False

      db.outputs.result_size = len(first_set)
      db.outputs.result = first_set * db.inputs.alpha + second_set * (1.0 - db.inputs.alpha)

      return True
To see further examples of the Python implementation code you can peruse the samples used by the user guide or the user guide itself itself.
Script Node Implementation#
For simple nodes you do not intend to share you may not want the added effort of creating an extension and a .ogn file describing your node. Instead you can customize a script node and only write the compute function. See the Script Node documentation for details on how to define the node configuration without the .ogn file. Once you have configured the node the code you write inside the script is pretty much identical to what you would write for a full Python node
def compute(db: og.Database) -> bool:
   first_set = db.inputs.firstSet
   second_set = db.inputs.secondSet

   if len(first_set) != len(second_set):
      db.log_error(f"Cannot blend two unequally sized point sets - {len(first_set)} and {len(second_set)}")
      return False

   if not (0.0 <= db.inputs.alpha <= 1.0):
      db.log_error(f"Alpha blend must be in the range [0.0, 1.0], not computing with {db.inputs.alpha})
      return False

   db.outputs.result_size = len(first_set)
   db.outputs.result = first_set * db.inputs.alpha + second_set * (1.0 - db.inputs.alpha)

   return True
The difference is that this is a freestanding function rather than a class-static method and the database type is a locally defined object, not a pregenerated one.
AutoNode Implementation#
An even easier method of implementing a simple node is to use the AutoNode decorators in Python. AutoNode is a variation of the Python implementation that makes use of the Python AST to combine both the authoring description and the runtime implementation into a single Python class or function. While not yet fully functional, it provides a rapid method of implementing simple node types with minimal overhead.
For this version, as with the Slang version, there is no .ogn file required as the type information is gleaned from
the node type definition. For this example only a single point will be used for inputs and outputs as the arrays are
not yet fully supported. You just execute this code in the script editor or through a file and it will define a node
type my.local.extension.blend_point for you to use as you would any other node.
@og.AutoFunc(pure=True, module_name="my.local.extension")
def blend_point(firstSet: og.Double3, secondSet: og.Double3, alpha: og.Double) -> og.Double3:
   return (
      firstSet[0] * alpha + secondSet[0] * (1.0 - alpha),
      firstSet[1] * alpha + secondSet[1] * (1.0 - alpha),
      firstSet[2] * alpha + secondSet[2] * (1.0 - alpha),
   )
To see further examples of how AutoNode can be used see the AutoNode documentation.
Warp Implementation#
If you don’t know how to write CUDA code but are familiar with Python then you can use the Warp package to accelerate your computations on the GPU as well. NVIDIA Warp is a Python framework for writing high-performance simulation and graphics code in Omniverse, and in particular OmniGraph.
A Warp node is written in exactly the same way as a Python node, except for its compute() it will make use
of the Warp cross-compiler to convert the Python into highly performant CUDA code. You’ll notice that there is more
boilerplate code to write but it is pretty straightforward, mostly wrapping arrays into common types, and the
performance is the result.
import numpy as np
import warp as wp

@wp.kernel
def deform(first_set: wp.array(dtype=wp.vec3),
            second_set: wp.array(dtype=wp.vec3),
            points_out: wp.array(dtype=wp.vec3),
            alpha: float):
   tid = wp.tid()
   points_out[tid] = first_set[tid] * alpha + second_set[tid] * (1.0 - alpha)

class OgnAddWeightedPoints:
   @staticmethod
   def compute(db) -> bool:
      if not db.inputs.points:
         return True

      # ensure that the warp kernel will execute on the same CUDA device as the rest of OmniGraph
      with wp.ScopedDevice(f"cuda:{og.get_compute_cuda_device()}"):
         # Get the inputs
         first_set = wp.array(db.inputs.points, dtype=wp.vec3)
         second_set = wp.array(db.inputs.points, dtype=wp.vec3)
         points_out = wp.zeros_like(first_set)

         # Do the work
         wp.launch(kernel=deform, dim=len(first_set), inputs=[first_set, second_set, points_out, db.inputs.alpha])

         # Set the result
         db.outputs.points = points_out.numpy()
Although the code looks very similar the approach to designing the algorithm should vary a lot when you are using Warp as it makes heavy use of the GPU and it is better at different types of algorithms than the CPU. To see further examples of how Warp can be used see the Warp extension documentation
Slang Implementation#
Moving on to a new language, you can also build nodes using Slang. Slang is a language developed for efficient implementation of shaders, based on years of collaboration between researchers at NVIDIA, Carnegie Mellon University, and Stanford.
To bring the benefits of Slang into Omnigraph an extension was written that allows you to create OmniGraph node implementations in the Slang language. To gain access to it you must enable the omni.slangnode extension, either through the extension window or via the extension manager API
The Slang node type is slightly different from the others in that you do not define the authoring definition through a .ogn file. There is a single .ogn file shared by all Slang node types and you write the implementation of the node type’s algorithm in the inputs:code attribute of an instantiation of that node type. You dynamically add attributes to the node to define the authoring interface and then you can access the attribute data using some generated Slang conventions.
Moreover, the Slang language has the capability of targeting either CPU or GPU when compiled, so once the graph supports it the node will be able to run on either CPU or GPU, depending on which is more efficient on the available resources.
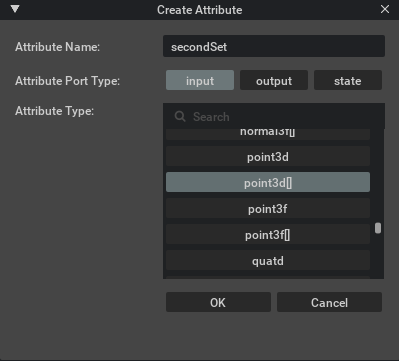
Like the Script Node, Slang implementations are done directly within the application. Once you create a blank Slang node you open up the property panel and use the Add+ button to add the attributes. This is what the attribute definition window will look like for one of the inputs.
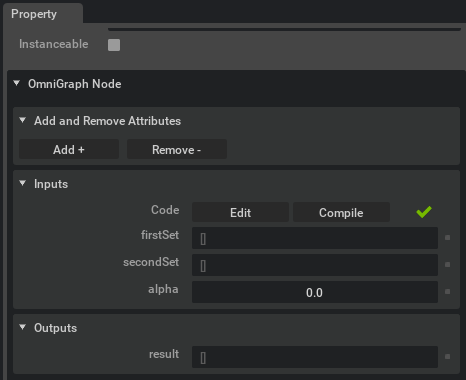
Add the three inputs and one input in this way. In the end the property panel should reflect the addition of the attributes the node will use.
Note
For now the array index is passed through to the Slang compute function as the instanceId as the function
will be called in parallel for each element in the array. The number of elements is reflected in the attribute
inputs:instanceCount as seen in the property panel. In an OmniGraph you can connect either of the input point
arrays through an ArrayGetSize node to that
attribute to correctly size the output array.
void compute(uint instanceId)
{
   double alpha = inputs_alpha_get();
   double[3] v1 = inputs_firstSet_get(instanceId);
   double[3] v2 = inputs_secondSet_get(instanceId);
   double[3] result = {
      v1[0] * alpha + v2[0] * (1.0 - alpha),
      v1[1] * alpha + v2[1] * (1.0 - alpha),
      v1[2] * alpha + v2[2] * (1.0 - alpha)
   };
   outputs_result_set(instanceId, result);
}
To see further examples of how Slang can be used see the Slang extension documentation
C++ Implementation#
While the Python nodes are easier to write they are not particularly efficient, and for some types of nodes performance is critical. These node types can be implemented in C++. There is slightly more code to write, but you gain the performance benefits of compiled code.
#include <OgnAddWeightedPointsDatabase.h>
#include <algorithm>
class OgnAddWeightedPoints
{
public:
   static bool compute(OgnAddWeightedPointsDatabase& db)
   {
      auto const& firstSet = db.inputs.firstSet();
      auto const& secondSet = db.inputs.secondSet();
      auto const& alpha = db.inputs.alpha();
      auto & result = db.outputs.result();

      // Output arrays always have their size set before use, for efficiency
      result.resize(firstSet.size());

      std::transform(firstSet.begin(), firstSet.end(), secondSet.begin(), result.begin(),
                     [alpha](GfVec3d const& firstValue, GfVec3d const& secondValue) -> GfVec3d
                     { return firstValue * alpha + (1.0 - alpha) * secondValue; });
      return true;
   }
};
REGISTER_OGN_NODE()
To see further examples of the C++ implementation code you can peruse the samples used by the user guide or the user guide itself itself.
C++/CUDA Implementation#
Sometimes you want to harness the power of the GPU to do some really complex or data-heavy computations. If you know
how to program in CUDA, NVIDIA’s general purpose GPU computing language, then you can insert CUDA code into your
node’s compute() method to move the computation over to the GPU.
Nodes using CUDA are split into two parts - the .cpp implementation that sets up the CUDA execution, and the .cu
file containing the actual GPU functions.
#include <OgnAddWeightedPointsDatabase.h>

// The generated code gives helper types matching the attribute names to make passing data more intuitive.
// This declares the CUDA function that applies the blend.
extern "C" void applyBlendGPU(inputs::points_t firstSet,
                              inputs::points_t secondSet,
                              inputs::alpha_t alpha,
                              outputs::points_t outputPoints,
                              size_t numberOfPoints);

class OgnAddWeightedPoints
{
public:
   static bool compute(OgnAddWeightedPointsDatabase& db)
   {
      // Output arrays always have their size set before use, for efficiency
      size_t numberOfPoints = db.inputs.firstSet.size();
      db.outputs.result.resize(numberOfPoints);

      if (numberOfPoints > 0)
      {
         auto const& alpha = db.inputs.alpha();
         applyBlendGPU(db.inputs.firstSet(), db.inputs.secondSet(), alpha, db.outputs.result(), numberOfPoints);
      }
      return true;
   }
};

REGISTER_OGN_NODE()
The corresponding .cu implementation is:
// Although it contains unsafe CUDA constructs the generated code has guards to let this inclusion work here too
#include <OgnTutorialCudaDataDatabase.h>

// CUDA compute implementation code will usually have two methods;
//     fooGPU() - Host function to act as an intermediary between CPU and GPU code
//     fooCUDA() - CUDA implementation of the actual node algorithm.

__global__ void applyBlendCUDA(
   inputs::points_t firstSet,
   inputs::points_t secondSet,
   inputs::alpha_t alpha,
   outputs::points_t result,
   size_t numberOfPoints
)
{
   int ptIdx = blockIdx.x * blockDim.x + threadIdx.x;
   if (numberOfPoints <= ptIdx) return;
   (*result)[ptIdx].x = (*firstSet)[ptIdx].x * alpha + (*secondSet)[ptIdx].x * (1.0 - alpha);
   (*result)[ptIdx].y = (*firstSet)[ptIdx].y * alpha + (*secondSet)[ptIdx].y * (1.0 - alpha);
   (*result)[ptIdx].z = (*firstSet)[ptIdx].z * alpha + (*secondSet)[ptIdx].z * (1.0 - alpha);
}

extern "C" void applyBlendGPU(
   inputs::points_t firstSet,
   inputs::points_t secondSet,
   outputs::points_t result,
   inputs::alpha_t& alpha,
   size_t numberOfPoints
)
{
   const int numberOfThreads = 256;
   const int numberOfBlocks = (numberOfPoints + numberOfThreads - 1) / numberOfThreads;
   applyBlendCUDA<<<numberOfBlocks, numberOfThreads>>>(firstSet, secondSet, result, alpha, numberOfPoints);
}
To see further examples of how CUDA compute can be used see the CUDA tutorial node.
Learning By Example#
We have a number of tutorials to help you write nodes in OmniGraph. This set of tutorials will walk you through the node writing process by using examples that build on each other, from the simplest to the most complex nodes. Work your way through each of them or find one that addresses your particular need in the Walkthrough Tutorial Nodes.
In addition, you can look at the global node library reference for a list of all nodes available, both built-in and available through external extensions.