Usage
Save USD
Save USD is intended to accelerate iteration time by only exporting changes that were made to the current USD file, preserving any parts that the user did not modify.
Save USD, similar to Live Link, requires that the USD file is saved on a Nucleus server.
To enable Save USD: * Use Export To USD and export to a Nucleus server. * Use Open USD and open a USD file on a Nucleus server. * In the Omniverse menu, select USD -> Link 3ds Max to USD File and select a USD file on a Nucleus server.
Known Limitations
Original materials may not always be preserved. Some actions trigger material re-export.
Variant Helper
The Variant Helper is a scripted point helper that helps create simple geometry variants. The Variant Helper is supported by Live mode - which will syncronize the current active variant.
The Variant Helper is availble in the Create Panel: Create Panel > Helpers > NVIDIA Omniverse
Note
The Variant Helper is expected to be at scene root level. Nested Variant Helpers is not supported.
Using Variants
Variant Options |
Utility |
|---|---|
Picked Variant |
The top control is a label that provides the user the current variant marked as the
selected variant.
|
Variant List |
|
|
Lists all variants that are to be exported with the USD.
|
|
The selected variant and its children are made visible.
|
|
Makes that selection your current picked variant and adjusts the label as such.
|
Add |
Adds selected object to the variants list.
|
Remove |
Removes the selected item from the variants list. The item below replaces the removed variant
as your selection.
|
Display Controls |
|
|
Displays all variants for the Max user.
|
Creating Variants
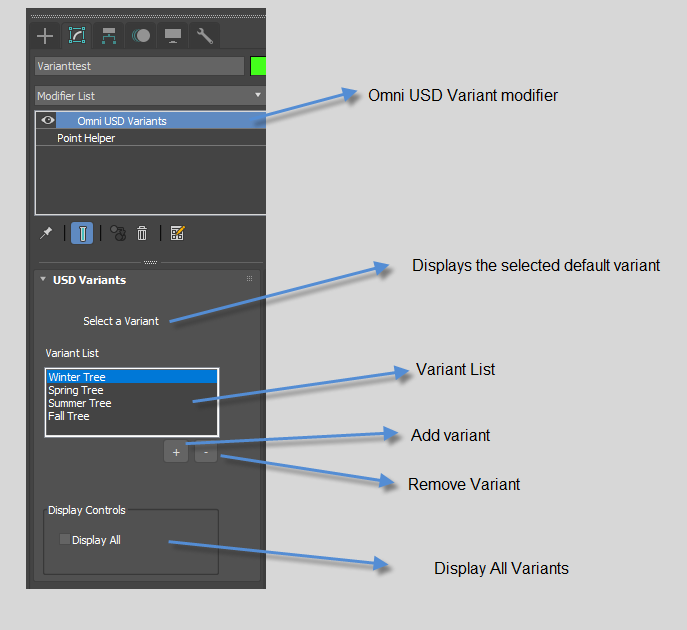
To create a USD Variant in 3ds Max, use the Omniverse USD Variants helper.
Setup
In a new scene, create 3 objects (Sphere, Cube, Cone).
Center them on the world origin (0,0,0)
Creating Omniverse Variant Helpers
Select the OmniVariants helper.
Create Panel > Helpers (tab) > |omni| (Drop Down Menu)Click and drag in the viewport to create a OmniVariants helper.
Adding Variants to the Helper
With the Variant Helper Selected, switch over to the Modify Tab.
In the modifier stack, you should see
OmniVariantsselect it.When Selected, the Modifier should display the USD Variants Panel below the Modifier List.
In the USD Variants panel, select the
+below the List.In the Hierarchy/Layer panel, select the Sphere you created in Setup.
In the USD Variants panel, Select the
+again.In the Hierarchy/Layer panel, select the Cube you created in Setup.
In the USD Variants panel, Select the
+again.In the Hierarchy/Layer panel, select the Cone you created in Setup.
Your Variants List should now contain all 3 objects.
Displaying Variants
In the USD Variants Panel, Select and De-Select the
show allcheck box.Select a variant in the list to display just the variant of your choosing.
Export behavior
When exporting a Prop with variants. The items listed by variants and their children should not be considered as objects themselves because they are part of an object with variants.
Materials
Understanding MDLs
Materials in Omniverse are supported using MDL.
MDLs cannot be directly edited in 3dsMax.
MDL materials have basic distilling for rendering into the 3ds Max viewport however for true material feedback and rendering, view the asset in Omniverse USD Composer.
MDLs and The Material Editor
The Material Editor will be updated with MDL Materials installed with the Connector. From here, a variety of MDL material types are options to assign to objects.

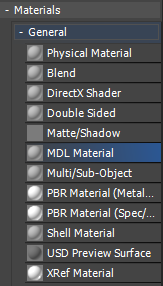
Create an MDL Material
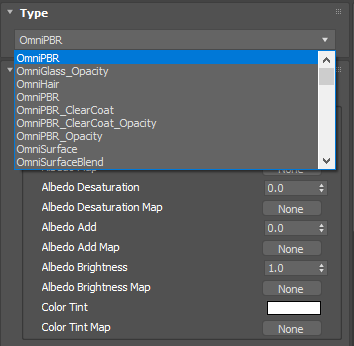
Create an MDL material through the same create menu as Native 3dsmax materials. Then select the MDL Material from the “General” section and then select the type of MDL to be used.
Edit an MDL Material
Selecting an MDL Material will allow you to edit the properties in the properties Panel like any other material in 3ds Max. Only exposed parameters can be edited. Connecting MDL materials in the 3dsMax material graph is not supported.
Note
Known Limitation - Editing a parameter on an MDL material does not refresh the rendering of the material in the viewport.
Note
If you use materials native to 3dsMax, on export, the connector attempts to map it to an OmniPBR MDL. This is not a perfect representation of the source material, if possible using MDL from Omniverse, replicates the best.
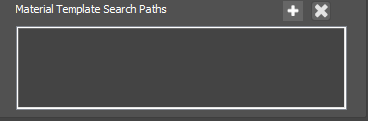
Add Custom MDL search Paths
Sometimes, a user may want to use a custom MDL that is not a part of the default Omniverse set. Users can add custom MDL search paths. This allows Omniverse to look for additional MDl files. These will be co-located with the other MDL files in the Material Editor.
To edit search paths, simply use the UI in the 3dsMax Omniverse settings dialog. You can get to it from the main menu / Omniverse / Settings.
UDIMs
You can set up UDIM textures using the multi tile node connected to your material. Omniverse will then export as UDIM textures correctly. You can use on native 3dsmax materials or on Omniverse MDL materials.
Note
Known Limitation - UDIM texture will not be renderable in the viewport for MDL materials.
Exporting Materials
There is a variety of ways to export a material from 3dsMax to Omniverse.
- Native 3dsmax Materials are mapped to an MDL material on export.
This process looks at attributes on your native materials such as Physical Material and maps the parameters as best as possible to an MDL material such as OmniPBR.
Note that this process will not capture the native 3dsmax Material Graph.
Not all native material types are supported
- Vray Materials will be converted to raw MDL materials on export.
This process attempts to convert the material graph to MDL so that the essence of the original material is maintained. See Vray with 3dsmax Support Documentation on this page for node support.
- MDL Materials
If MDL materials were used for materials assignments in your scene, then these materials will be exported to omniverse as is.
- CSV Mapping
An export option that simple assigns materials already in Omniverse based on how the materials in your scene are named. In this scenario the materials in 3dsMax are simply placeholders for assignment.
- USD Preview Surface
Every exported file has the opportunity to also add a default render context for USD Preview Surface.
Export Native 3dsMax materials as MDL to Omniverse
Lights
Lights are exported and converted to compatible USD Lights. When a USD file is opened, USD Lights are converted to Native 3dsMax Lights
Note
Not all parameters are mapped, only what is compatible with USDlux is converted.
Note
Intensity does not always convert accurately between 3dsMax and USD
Here is the current list of support lights.
Light Group |
Light Type |
USD Light Type |
|---|---|---|
Standard Lights |
Target Directional
Directional
Omni
Target Spotlight
Free Spotlight
|
- PxrDistantLight
- PxrDistantLight
- PxrDistantLight
- PxrSphereLight
- PxrSphereLight
|
Photometric Lights |
LightscapeLight::TARGET_AREA_TYPE
LightscapeLight::AREA_TYPE
LightscapeLight::TARGET_DISC_TYPE
LightscapeLight::DISC_TYPE
LightscapeLight::TARGET_POINT_TYPE
LightscapeLight::POINT_TYPE
LightscapeLight::TARGET_SPHERE_TYPE
LightscapeLight::SPHERE_TYPE
LightscapeLight::TARGET_CYLINDER_TYPE
LightscapeLight::CYLINDER_TYPE
|
- PxrRectLight
- PxrRectLight
- Disc
- Disc
- PxrSphereLight
- PxrSphereLight
- PxrSphereLight
- PxrSphereLight
- UsdLuxGeometryLight
- UsdLuxGeometryLight
|
V-ray Lights |
See V-ray section
|
Animation
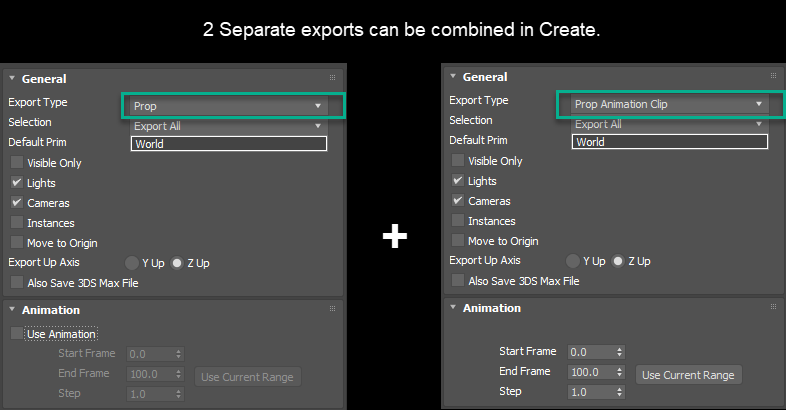
Using Prop Animation
Any supported parameters that map to USD for a Prop export with animation will be exported with baked key frames to the USD the same usd file as the prop asset. To export a prop with animation simple turn on the animation section of the export dialog.

Asset in video was from Turbosquid , see original asset here.
Using Prop Clip Animation
Any supported parameters that map to USD for a Prop export with animation will be exported with baked key frames to a .anim.usd file. This file will only contain animation data. A animation clip file can then be loaded or composed with a Prop file in Create. This allows a user to have multiple small animation clips for a single static prop.
Asset in video was from Turbosquid , see original asset here.
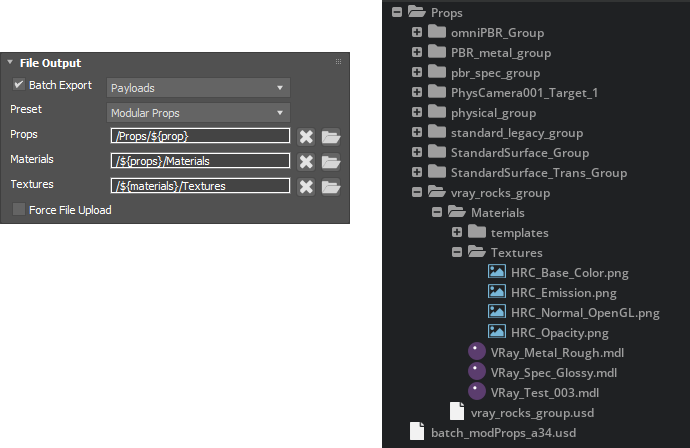
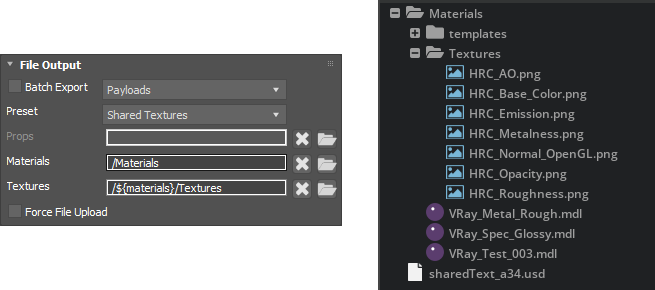
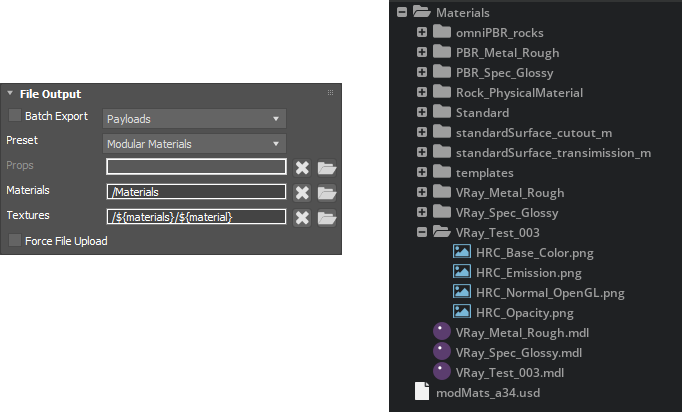
File Output
The File Output Option on the export dialog allow a user to determine where different files go during an export. This includes batch exported usd files, materials and textures.
A variety of included presets allows some common arrangements of files to be generated in a single click. However for power users, we’ve exposed the tokens and path strings so that these can be customized.
Below is some examples of the output that can be expected from each setting. All of the exports are done from the following sample file.

Presets and Tokens
For usage with File Output options and more examples please see link.
File Output Presets - The available presets allows a user to quickly set different file out behaviors.
Tokens - Path token allow users to construct meaningful path behaviors based on other paths. See below for token list.
Defined Tokens
${props} - token for the props path.
${prop} - token for each props path (useful for making a prop self contained)
${materials} - token for the props path.
${material} - token for each material’s path (useful for separating textures by material)
Single File Export
Shared Textures - This option places a Materials folder as a sibling to the Props folder and single Textures folder in the Materials folder.
Materials and textures appear once. most efficient. However if things are not named well, then things could overwrite each other.
This makes all materials and textures shared for maximum efficiency.
Modular Materials - This options places a Materials folder in each prop folder. Each Materials texture set is arranged per Material.
Materials are arranged per prop
Textures are arranged per Material
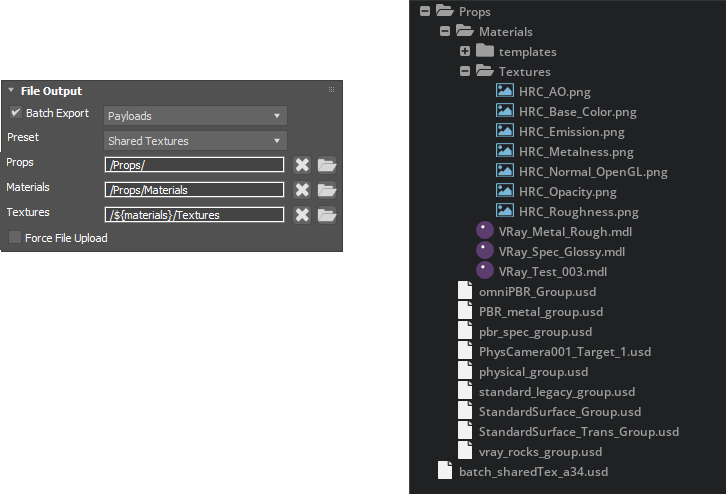
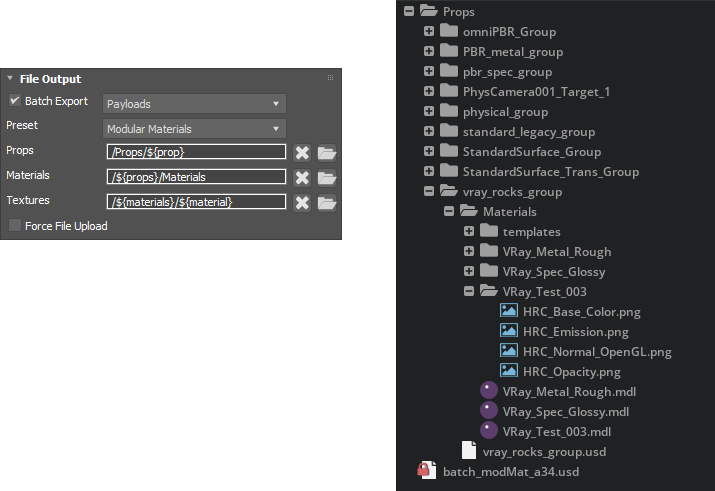
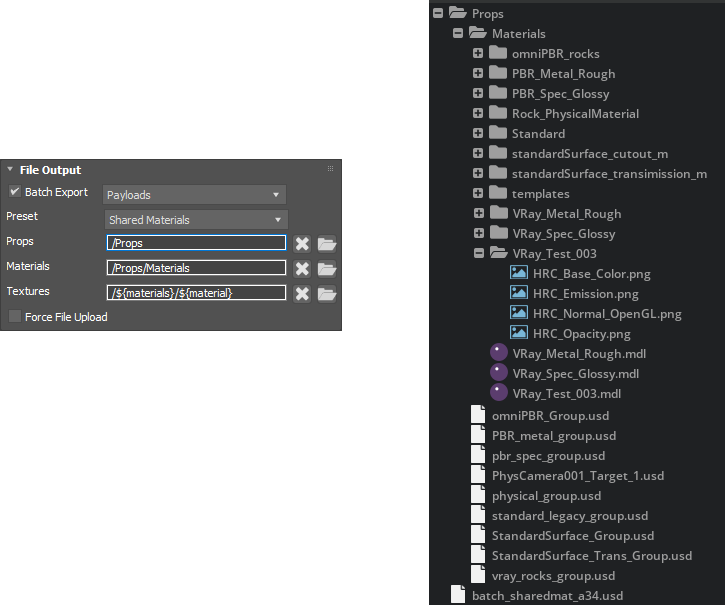
Batch Export
Shared Textures - This option places a Materials folder as a sibling to the Props folder and single Textures folder in the Materials folder.
Materials and textures appear once. most efficient. However if things are not named well, then things could overwrite each other.
This makes all materials and textures shared between props for maximum efficiency.
Modular Materials - This options places a Materials folder in each prop folder. Each Materials texture set is arranged per Material.
Materials are arranged per prop
Textures are arranged per Material
With Batch Export enabled, this makes each prop modular, self contained, and each material contained with in.
Shared Materials - This options places a Materials folder as a sibling to the Props folder. Each Materials Textures are arranged per Material.
Materials are shared between all props therefore only written once. However the textures are unique to each material.
This makes all the materials between props shared, however each material is modular.
Note
This Option can only be used when Batch Export is turned on.
- Modular Props - This options places a Materials folder in each prop folder.
Textures are all placed in the Materials folder.
This keeps the prop modular but shares any textures that are reused.
This is most efficient for a self contained prop.
Note
This Option can only be used when Batch Export is turned on.