10.8. Scene Generation with SceneBlox
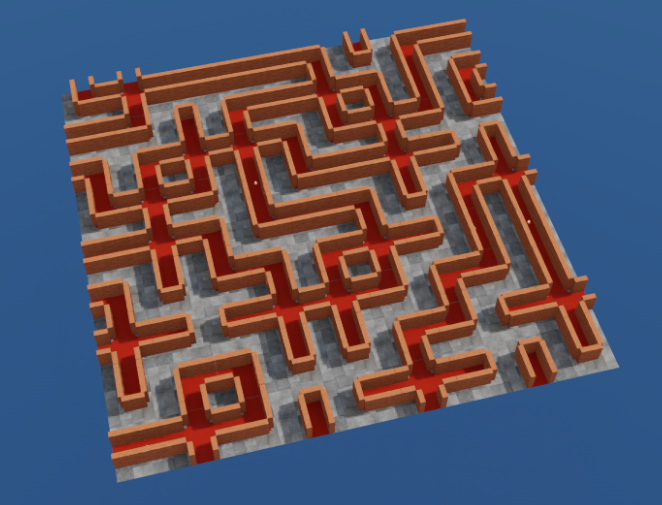
The goal of this tutorial is to give a concrete example of generation with SceneBlox. The application is a toy case of building a labyrinth. The labyrinth consists of 4 kind of pieces : intersections, corridors, corners and dead-ends, which need to connect in a consistent way. The tile randomization spawns some obstacles in certain tiles.
The tutorial usd’s are stored in /Isaac/Samples/Scene_Blox/Tutorial/.
For more details on sceneblox, checkout the manual here.
10.8.1. Predefined example
10.8.1.1. Running your first generation
If you want to see the generation in action without going into the details, try the pre-defined configuration files. From the repository root folder, to generate 5 labyrinths variants of size 9x9, run
./python.sh tools/scene_blox/src/scene_blox/generate_scene.py \
    <omniverse://path/to/generation/folder/> \
    --grid_config tools/scene_blox/parameters/labyrinth/rules.yaml \
    --generation_config tools/scene_blox/parameters/labyrinth/generation.yaml \
    --rows 9 --cols 9 --variants 5 \
    --constraints_config tools/scene_blox/parameters/labyrinth/constraints.yaml \
    --collisions
This will generate usd scenes in the given folder, and display the solving process of the grid.
10.8.1.2. Generation argument description
positional arguments:
save_path: Folder where the scenes will be generated
optional arguments:
–variants Number of variants of the scenes to be generated
–grid_config Path to the yaml containing the combination rules and tile size
–generation_config Path to the yaml containing generation configuration (base tile usd and randomization)
–constraints_config Path to the yaml with the initial grid constraints
–rows Number of rows for the generated grids, should be greater than 3 for best results
–cols Number of cols for the generated grids, should be greater than 3 for best results
–add_outer_boundary Add building border (specific for parking scenes)
–display Add a display showing the grid solving process
–collisions Check for collisions on objects generated that have both collisions and rigid body physics enabled
–units_in_meters Set the scene unit conversion (important for physics scene)
10.8.2. Detailed walkthrough
10.8.2.1. Defining the tiles
First, we need to define the basic of the tiles used: where they are stored and their size. This is done in tools/scene_blox/parameters/labyrinth/generation.yaml. This configuration file lists all tile types with their identifiers, where they are stored and their size.
tile_size: 5.0
fixed_prims:
    - prim_path: /Environment/Sky
        usd: /NVIDIA/Assets/Skies/Dynamic/CumulusHeavy.usd
        semantic: sky
        world_pose:
        position: [0, 0, 0]
        orientation: [90, 0, 0]
cross:
  usd: /Isaac/Samples/Scene_Blox/Tutorial/cross.usd
corridor:
  usd: /Isaac/Samples/Scene_Blox/Tutorial/corridor.usd
corner:
  usd: /Isaac/Samples/Scene_Blox/Tutorial/corner.usd
dead_end:
  usd: /Isaac/Samples/Scene_Blox/Tutorial/dead_end.usd
Note that here we also add a fixed sky, for lighting.
10.8.2.2. Defining the rules
First, we need to define the tile combination rules, which means to know which tile can be
next to which and with what orientation. This would be extremely tedious
and error-prone to list them by hand, so we provide example scenes and generate the
rules from there using a helper script tools/scene_blox/src/scene_blox/rules_builder.py. We also do this is
several example scenes, one per tile type, then combine them with another helper script
tools/scene_blox/src/scene_blox/rules_combiner.py.
A good method to follow is to leverage the fact that the rules are given by pairs. This means that once we have stated the rules for one tile type, it does not need to be mentioned in the next following scenes. This means that for example here, we can start by building an example scene with the rules for the intersection tile, then when building the example scene for corridor we do not need to include intersection and so on.
The scenes for the example, in the order they were built, are here :
/Isaac/Samples/Scene_Blox/Tutorial/labyrinth_example_cross.usd
/Isaac/Samples/Scene_Blox/Tutorial/labyrinth_example_corridor.usd
/Isaac/Samples/Scene_Blox/Tutorial/labyrinth_example_corner.usd
/Isaac/Samples/Scene_Blox/Tutorial/labyrinth_example_dead_end.usd
Notice how the number of tile types decreases as we go, until there is only one tile type for the dead-ends.
To build an example scene for a tile type, the compatible tiles should be placed at the desired spacing (here 5m). If tiles are further apart than the tile size, they are not considered for building the rules. Add new tiles as references by using drag and drop, and do not modify the name as it is used to infer the tile types.
Once the scenes are built, generate the corresponding rules files by running ./python.sh tools/scene_blox/src/scene_blox/rules_builder.py
- usage: rules_builder.py [-h] [–rules_config RULES_CONFIG]
stage save_path tile_size
- positional arguments:
stage Path to the stage used as an example for rule generation save_path Path where the generated yaml will be saved tile_size Size of a tile (in scene units)
- optional arguments:
- --rules_config
If not empty contains tile equivalence
All of the generated rules files can be found in tools/scene_blox/parameters/labyrinth/rules_*.yaml.
Once they are generated, they can be combined into one single rules configuration file
with tools/scene_blox/src/scene_blox/rules_combiner.py
usage: rules_combiner.py [-h] [–config_files CONFIG_FILES [CONFIG_FILES …]] save_path
- positional arguments:
save_path Path to save the combined rules file.
- optional arguments:
–config_files CONFIG_FILES [CONFIG_FILES …] All files to be combined
This method can be long if there are many tile types, but it is the best to make sure that no rules are forgotten.
Now we have a minimum configuration to generate our labyrinths. In the next sections, we describe how to add constraints to the shape and how to add randomization to the tiles.
10.8.2.3. Constraining the labyrinth
The generated labyrinth are always consistent, but we might want to add some constraints to
the generated scenes. In this section, we illustrate how these constraints work. You can
use tools/scene_blox/parameters/labyrinth/constraints.yaml for the full result, comment out sections if
you want to see the progressive effect of the constraints.
Let’s start by saying we want two corners of the labyrinth to be incoming corridors.
# Force corridor on (0, 0)
- type: restrict_type
  identifiers: ["corridor"]
  area:
    rows: [[0, 0]]
    cols: [[0, 0]]
- type: restrict_rotation
  identifier: ["corridor"]
  rotations: [0]
  area:
    rows: [[0, 0]]
    cols: [[0, 0]]
# Force corridor on (-1, -1)
- type: restrict_type
  identifiers: ["corridor"]
  area:
    rows: [[-1, -1]]
    cols: [[-1, -1]]
- type: restrict_rotation
  identifier: ["corridor"]
  rotations: [0]
  area:
    rows: [[-1, -1]]
    cols: [[-1, -1]]
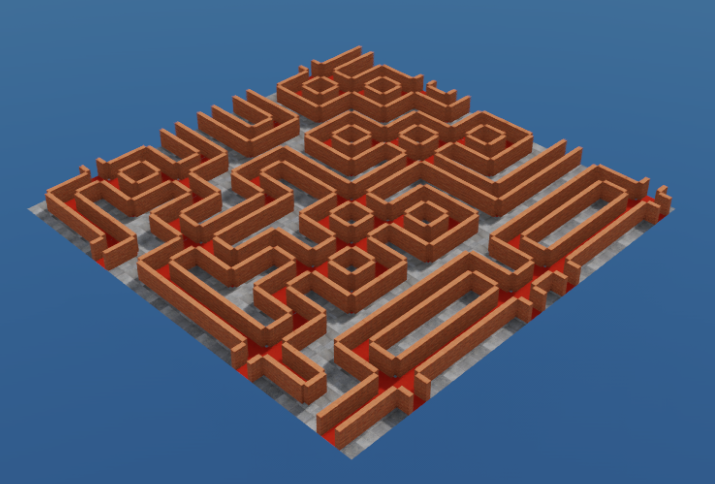
This restricts the two corners to one possibility, they will always be there in all successful generations
Example of generated scene with top and bottom corner constraints
Now we want our labyrinth to be easy enough, so we restrict the number of dead ends to 4.
# No more than 4 dead ends
- type: restrict_count
  identifiers: ["dead_end"]
  max_count: [4]
  area:
    rows: [[0, -1]]
    cols: [[0, -1]]
This will make sure that any generated labyrinth has at most 4 dead ends.
Example of a generated scene with less dead ends
Finally, we might want to make the labyrinth less easy to escape, by making sure no tile on the border except the corner ones allow for an exit. To do so, we can constraint the border tiles rotations of corners and corridors to prevent outgoing tiles, and exclude intersections and dead ends.
# Prevent dead ends and crosses on the borders
- type: exclude_type
  identifiers: ["dead_end", "cross"]
  area:
    rows: [[0, -1], [0, -1], [0, 0], [-1, -1]]
    cols: [[0, 0], [-1, -1], [0, -1], [0, -1]]
# Prevent outgoing corridors
- type: restrict_rotation
  identifier: ["corridor"]
  rotations: [1, 3]
  area:
    rows: [[0, 0]]
    cols: [[1, -2]]
- type: restrict_rotation
  identifier: ["corridor"]
  rotations: [1, 3]
  area:
    rows: [[-1, -1]]
    cols: [[0, -2]]
- type: restrict_rotation
  identifier: ["corridor"]
  rotations: [0, 2]
  area:
    rows: [[0, -1]]
    cols: [[0, 0]]
- type: restrict_rotation
  identifier: ["corridor"]
  rotations: [0, 2]
  area:
    rows: [[0, -1]]
    cols: [[-1, -1]]
# Prevent outgoing corners
- type: restrict_rotation
  identifier: ["corner"]
  rotations: [2, 3]
  area:
    rows: [[0, -1]]
    cols: [[0, 0]]
- type: restrict_rotation
  identifier: ["corner"]
  rotations: [0, 1]
  area:
    rows: [[0, -1]]
    cols: [[-1, -1]]
- type: restrict_rotation
  identifier: ["corner"]
  rotations: [1, 2]
  area:
    rows: [[0, 0]]
    cols: [[0, -1]]
- type: restrict_rotation
  identifier: ["corner"]
  rotations: [0, 3]
  area:
    rows: [[-1, -1]]
    cols: [[0, -1]]
This results in consistent labyrinths with exits only at the corners. Note that the generation handles only local constraints and consistency, so there is no guarantee that there is a path from one corner to another, or that there are no disconnected paths.
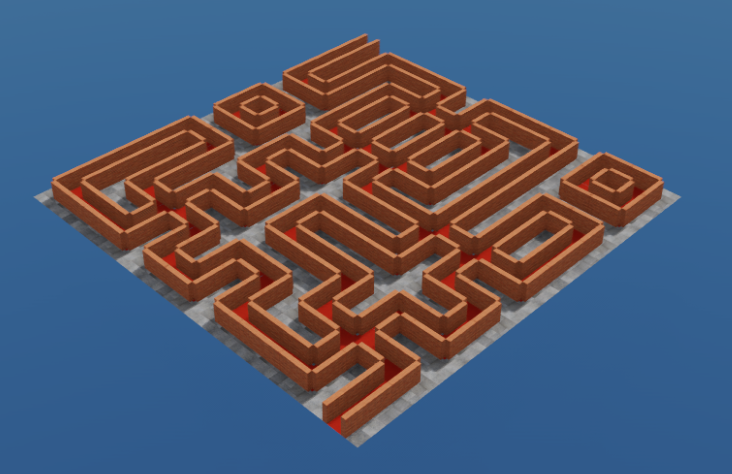
Example of a constrained labyrinth with no exits out of the corners
10.8.2.4. Adding randomization
Finally, we will add some randomization to the scene by spawning obstacles on some tiles.
The final configuration files for generation and for randomization are in tools/scene_blox/parameters/labyrinth.
First, we spawn cones in the corridor tiles. We want to spawn up to 3 cones, each with
a probability of 0.33 to spawn. The configuration file is the following
(tools/scene_blox/parameters/labyrinth/hazards_corridors.yaml):
root_prim: obstacles
generated:
  - name: cone
    path: cone
    semantic: obstacle
    spawn_proba: 0.33
    spawn_count: 3
    usd_config:
      root: /Isaac/Environments/Simple_Warehouse/Props/
      search_depth: 0
      filter: S_TrafficCone.*
    position:
      base: [0, 0, 0]
      noise:
        type: normal
        params:
          mean: [0, 0, 0]
          stddev: [1.0, 0.25, 0]
    orientation:
      base: [0, 0, 0]
      noise:
        type: uniform
        params:
          low: [0, 0, -180]
          high: [0, 0, 180]
    scale: [0.01, 0.01, 0.01]
    physics:
      collision: convexHull
      rigid_body: true
Note that here we are enabling physics collision for the cones. We are also adjusting the scale of the asset, and adding noise both to the position and orientation. If collision check is enabled, the cones will not overlap with anything in collision when they are added to the scene, but if not, there is no guarantee.
Then, we want to add some obstacle piles to the dead ends (relative paths are obstacle_pile_1.yaml and obstacle_pile_2.yaml). Those piles are mutually exclusive, so in the generation file we split the selection between the two
dead_end:
  usd: /Isaac/Samples/Scene_Blox/Tutorial/dead_end.usd
  generation:
    - config: ["obstacle_pile_1.yaml", "obstacle_pile_2.yaml"]
      weights: [0.5, 0.5]
Note that while spawning the obstacle pile, we add collision to the different objects in the pile, and not the pile itself, by using the apply_children boolean.
root_prim: obstacles
generated:
  - name: pile
    path: pile
    semantic: obstacle
    usd_config:
      root: /Isaac/Samples/Scene_Blox/Tutorial/
      search_depth: 0
      filter: obstacle_pile.usd
    position:
      base: [0, 0, 0]
    orientation:
      base: [0, 0, 0]
    physics:
      apply_children: true
      collision: convexHull
The final generation file is the following:
tile_size: 5.0
fixed_prims:
  - prim_path: /Environment/Sky
    usd: /NVIDIA/Assets/Skies/Dynamic/CumulusHeavy.usd
    semantic: sky
    world_pose:
      position: [0, 0, 0]
      orientation: [90, 0, 0]
cross:
  usd: /Isaac/Samples/Scene_Blox/Tutorial/cross.usd
  generation:
    - config: hazards_corridors.yaml
corridor:
  usd: /Isaac/Samples/Scene_Blox/Tutorial/corridor.usd
  generation:
    - config: hazards_corridors.yaml
corner:
  usd: /Isaac/Samples/Scene_Blox/Tutorial/corner.usd
  generation:
    - config: ["None", "obstacle_pile_2.yaml"]
      weights: [0.7, 0.3]
dead_end:
  usd: /Isaac/Samples/Scene_Blox/Tutorial/dead_end.usd
  generation:
    - config: ["obstacle_pile_1.yaml", "obstacle_pile_2.yaml"]
      weights: [0.5, 0.5]
Note how we reuse generation files from one tile to another. Also note the “None” configuration for the corners, so that it is possible to have corners without obstacles while still keeping a spawn probability of 1 for the pile in the configuration file itself.
In the end, we obtain labyrinths with a consistent setup, and with obstacle randomization.
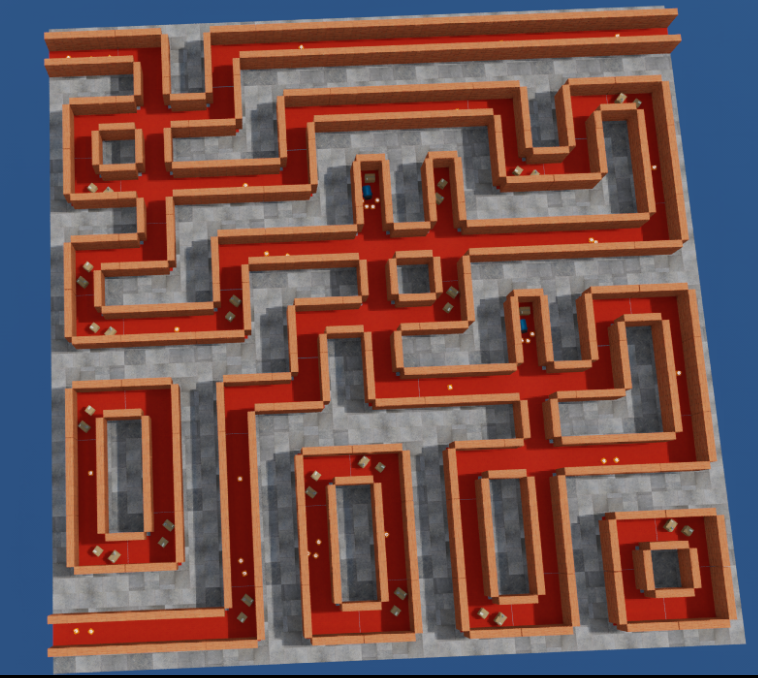
Example of a generated labyrinth with randomization
10.8.3. Warehouse generation example
The tools/scene_blox/parameters directory also contains a set of parameter files for warehouse generation.
./python.sh tools/scene_blox/src/scene_blox/generate_scene.py \
  <omniverse://path/to/generation/folder/> \
  --grid_config tools/scene_blox/parameters/warehouse/tile_config.yaml \
  --generation_config tools/scene_blox/parameters/warehouse/tile_generation.yaml \
  --cols 15 --rows 11 \
  --constraints_config tools/scene_blox/parameters/warehouse/constraints.yaml \
  --variants 1 --units_in_meters 1.0 --collisions
Which will result in the following grid layout (warehouse walls are not shown):
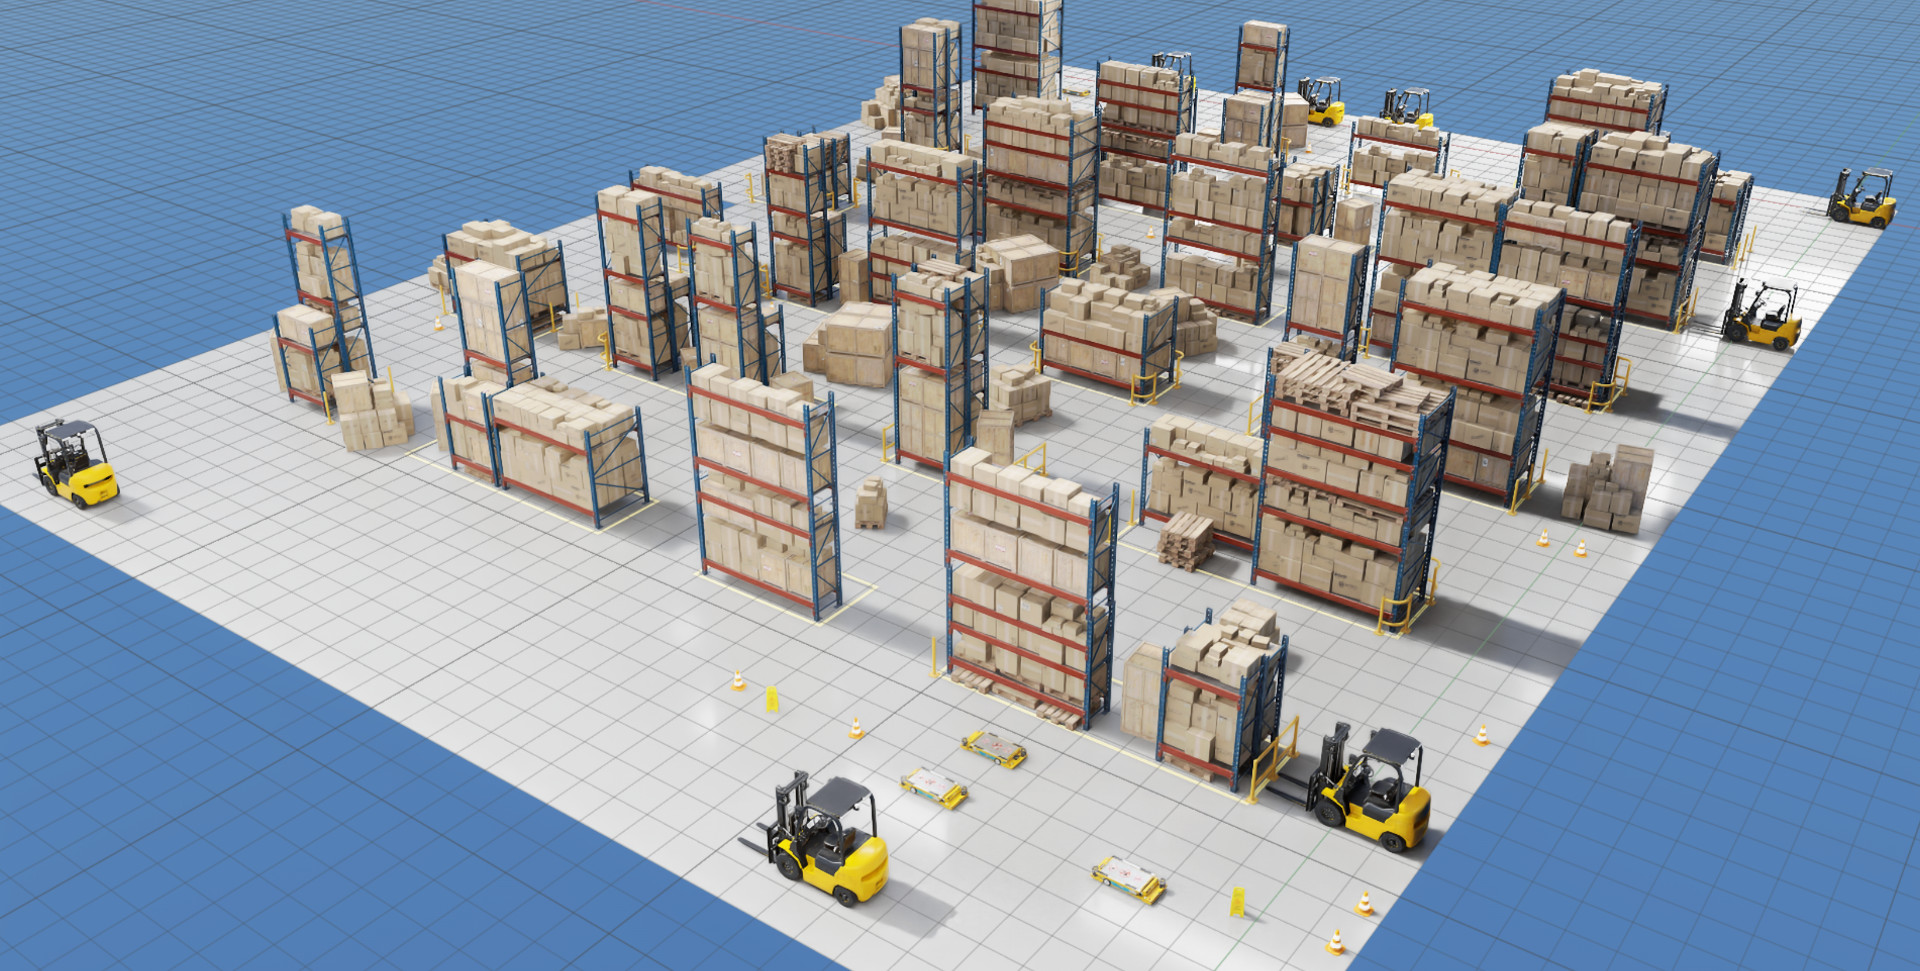
Example of a generated warehouse with randomization
This generates full warehouses with closed-off extremities, containing a set of pre-defined cameras for observing the scenes, and which is generated using individual warehouse kit assets. The warehouse kit contains props like pallets, shelves etc, and also full building pieces that can be kitted together. The generation allows to pick building variants, and fill the building with a consistent set of assets: shelves of varying dimensions, pallets, piles of cardboard, cones and signs, guardrails etc. The constraints ensure that all shelves are aligned in the same direction (parallel to the longitudinal axis of the warehouse) for a more consistent aspect.
Note that the constraints are tuned for this specific number of rows and columns. The number of columns is constrained by the width of a the warehouse building and should always stay at 15 to ensure that the whole width is filled. The numbers of rows is constrained by the width of the warehouse building kit pieces, which is here tailored for two middle pieces and two end pieces, and should stay at 11 for a successful generation. The constraints file ensure that the middle pieces containing the actual building are spawned in the correct place only.
If it is necessary to change the length of the warehouse, take care of updating the constraints file to ensure that the middle and end pieces are spawned correctly. One of the end pieces is actually not part of the wavefunction collapse generation, but rather added at the end so that the generated warehouse can be left with one end open if desired (for better visualization).
It is highly recommended to generate these scenes with collision check enabled, as the scene is quite busy and could result in overlapping props. In some rare cases, some of the props could overlap and cause some unstable physics behavior. In that case, those props can be removed or modified by hand, or a new scene can be generated.