Replicator SceneBlox Manual
The goal of SceneBlox is to help easily generate large and consistent simulation scenes. It creates scenes using individual tiles (the blocks) and combining them in a consistent grid with a set of simple rules (the scene). The generation happens in two steps:
the grid is filled with consistent tiles using an implementation of the wavefunction collapse method (Grid generation)
each tile type is randomized according to user input rules (Tile randomization)
SceneBlox makes several simplifying assumptions:
the generated world will be based on a rectangular grid of square tiles
all tiles have the same size
Grid generation
In the following section, we consider that the scene to be generated is a rectangular grid of size rows x cols.
A tile corresponds to a position on the grid (i, j). Each tile contains a list of possibilities, called a superposition. A possibility is a combination of a tile type (a string) and orientation, a multiple of 90 degrees rotation counterclockwise, (eg: road, orientation at 90 degrees). Each possibility is associated with a weight, which will be used to sample when a tile is collapsed. Each tile has an associated entropy corresponding to the current weights.
Each possibility has a list of other compatible possibilities. The convention followed in SceneBlox to describe them is assuming the neighbor tile is situated to the right of the current tile. In summary, the information is the tile type and rotation, and a neighbor tile type and rotation. See Specifying tile combination rules for more details.
Wavefunction collapse algorithm
For an intuitive description of the original algorithm, refer to this link. The principle is to progressively select possibilities for each tile, and propagate the choice to the rest of the grid by restricting the other tiles with the ones compatible. The process is repeated until a choice has been made for all tiles or a contradiction is reached.
The SceneBlox wavefunction collapse implementation is the following. Start with a grid where all tiles contain all possibilities in each tile superposition (respecting constraints, see Constraints). Then:
select a tile T with minimum entropy at random, and make a choice in the superposition (collapse). The choice is done with the current weighting of possibilities.
for all direct neighbor tiles of T, restrict the superposition to the possibilities compatible with the collapsed one. For each neighbor, if that restriction resulted in a reduction of the superposition, add it to the list of tiles to be updated L
Repeat the following steps on L until L is empty. For each tile listed in L, with the current superposition S, select all direct neighbors:
update their superpositions. Keep only the possibilities that are compatible with at least one possibility of S
if the update resulted in a reduction of the superposition, add the current tile to L
Finally, repeat the collapse step until all tiles have a single possibility or a contradiction is reached (a tile has an empty list of possibilities).
If at any point a contradiction is reached, the collasping backtracks, first by trying other possibilities for the current collapsed tile if possible, then by backtracking the previously collapsed tile until the very first one if necessary.
Specifying tile combination rules
To ensure consistency in the generated grid, each possibility has a series of compatible tile types and orientation. These rules are specified in a .yaml config with following format
adjacencies:
  - id: example_tile
    neighbors:
    - neighbor_id: another_tile
      neighbor_rotation: 1
      self_rotation: 0
    - etc
  - id: another_tile
    ...
When checking for compatibility between possibilities, we need to go beyond the reference case with the reference tile on the left of the neighbor tile. To do so, we assume the compatibility between tiles is independent of the rotation of the tile pair. This means that we can reconstruct all possible neighbor positions from a single compatible adjacency by rotating the pair by 90 degrees increment. This is illustrated with an example in the following figure, where the reference pair is on the left and rotated pairs on the right (where the neighbor tile is respectively on top, left and bottom of the reference one).
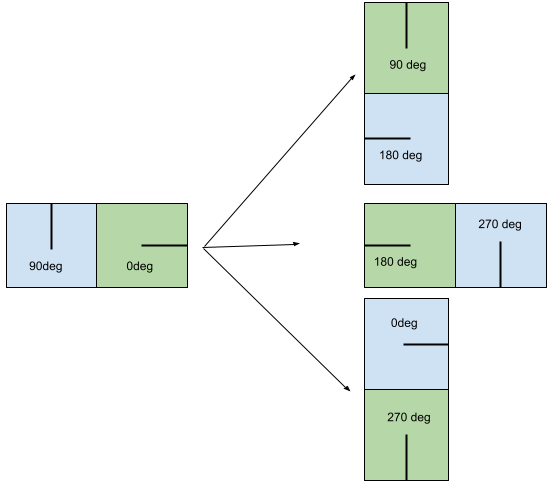
Example of top, left and bottom compatible tiles from a right compatible tile
Specifying these rules by hand can be quite tedious and error prone. For this reason, it is highly recommended to generate them using an example scene. In this scene, the user should provide examples of compatible tiles, not necessarily all connected but locally consistent. A dedicated script will then retrieve the possible pairs and build the rules file.
Constraints
By default, the grid is initialized with all possibilities on each grid cell. However, there are cases where you might want to restrict the initial possibilities. For example, when generating an environment such as a warehouse, the user would want to ensure that border tiles are walls so that the final scene is closed off. Adding constraints to the generation is natural, the only change required is to restrict the superpositions before the collapse starts. Current supported restrictions are:
excluding a list of tile types
restructing to a list of tile types (equivalent to the above but might be easier to write)
restricting to a set of rotations for a certain tile type
restricting the total count of a certain tile type in an area
The constraints are applied to a certain zone in the grid, expressed in row-column ranges. The ranges are inclusive for both start and end, and can be specified in negative from the last row or colum for more genericity (eg -1 means the last row or column). They are stored in a yaml file with the following format. The location format is always the same across restrictions.
- type: restrict_type
  identifiers: ["tile_type_a", "tile_type_b", ...]
  area:
    rows: [[start_row_0, end_row_0], [start_row_1, end_row_1], ...]
    cols: [[start_col_0, end_col_0], [start_col_1, end_col_1], ...]

- type: exclude_type
  identifiers: ["tile_type_a", "tile_type_b", ...]
  area:
    ...

- type: restrict_rotation
  identifier: ["tile_type"]
  rotations: [rotation_0, ...]
  area:
    ...

- type: restrict_count
  identifiers: ["tile_type_a", ...]
  max_count: [N, ...]
  area:
    ...
When constraints are added, the generation takes them into account by restricting the superpositions. The initial changes enforced by the constraints are first applied and propagated to the grid, then the solving simply checks if a constraint is applied to each grid cell.
Omniverse usd scene generation
Once the grid is fully solved, the scene itself must be created for Omniverse. The base hierarchy of the scene will always be the same. All tiles are spawned as direct children of the /World/ prim, and named after their position in the grid /World/tile_row_col. Tiles are created as Xform placed according to their position in the grid, and oriented as solved by the wavefunction collapse. Each XForm is a reference to a base usd file, which contains the base tile without any randomization. During the randomization (see Tile randomization), prims might be added as children to the tile prims. A generated scene is created with a physics scene (respecting the given scene units for gravity) and a ground collision plane.
If specified by the user, additional prims can be added independently of the tiles. This can include for example a sky prim, cameras etc. Prims added this way may have a fixed world pose and a semantic class
The base tile usd paths and the tile size are specified in a configuration file, with the following format
tile_size: T # Size of the prim (in world units)
fixed_prims:
  - prim_path: /Path/To/Prim
    usd: omniverse://full/path/to/added.usd
    semantic: semantic class
    world_pose:
      position: [x, y, z]
      orientation: [rot_x, rot_y, rot_z] # In degrees
  - ...
tile_identifier_0:
  usd: omniverse://full/path/to/tile_0.usd
tile_identifier_1:
  usd: omniverse://full/path/to/tile_1.usd
...
Tile randomization
Once the grid is fully solved, each tile is randomized according to the user configuration. The randomization consists in spawning new assets and making some of their attributes vary. Several randomizations can be applied to a same tile, either in parallel or with a randomly selected choice (with a weighting).
Randomization configuration
A single randomization is able to spawn prims as children of a specific root prim. New prims are spawned as Xform references (pointing to another usd file). For each prim to be spawned, the user must configure:
the name under which the asset will be spawned (which will be automatically indexed by the number of instances of that asset)
the path where the asset will be spawned (relative to the root prim)
a pool of usd files to choose from to be added as a reference. This pool specifies a root folder and search depth in an Omniverse server to query usd files. Then a regex filter is applied to the retrieved usd file names to find a match, and the user can also specify an exclusion list
a position and an orientation (in X-Y-Z axis rotations, in degrees), local to the parent prim. Both have a base value and a relative noise can be applied. Noise types are uniform, gaussian and choice.
Optionally, the user may configure:
the scaling to be applied to the prim, assumed to be 1 if not specified
the probability of spawning that asset (assumed to be 1 if not specified). If the probability is less than 1, then a uniform distribution is sampled to determine if the asset will be spawned or not
the number of assets to be spawned (assumed to be 1 if not specified). If greater than 1, assets will be indexed accordingly as they spawned. If the asset has a spawn probability, the test is applied N times if N is the number of assets to spawn.
a semantic segmentation class
variants to be chosen for a sub-prim with the possibility to restrict to a list of variants
physics. The prim can be spawned with applied collision of the chosen approximation, and with rigid body physics enabled. Optionnally the user might chose to apply the settings to direct child prims of the spawned prims which are also of the type Mesh. In case rigid body physics is desired, the user is advised to enable collision check at generation. If enabled, after the pose has been sampled, a check is performed to verify that the spawned meshes do not enter in collision with any other mesh (except the ground plane). This will ensure that there is no interpenetration or collision which might cause unstable behavior by the physics engine. Note that a known limitation of this is that the check is performed when the prim is added, so there might be another prim added later with only collisions and not rigid body that would interpenetrate, hence causing instability.
A randomization file can contain any number of prims to be spawned.
This configuration is stored in a yaml configuration file. A file will have the following format
root_prim: root_prim_name
generated:
  - name: some_prim
    path: relative/path/to/prim
    usd_config:
      root: omniverse://server/path/to/a/folder
      search_depth: d
      # Optional
      filter: some_regex
      # Optional
      exclude_list: ["some string", "another string"]
    position:
      base: [relative_x, relative_y, relative_z]
      # Optional
      noise:
        type: uniform # Can be either uniform / normal / choice
        params:
          low: [min_noise_x, min_noise_y, min_noise_z]
          max: [max_noise_x, max_noise_y, max_noise_z]
    orientation:
      base: [rot_x_degrees, rot_y_degrees, rot_z_degrees]
      # Noise parameters are the same as position
      type: normal # Can be either uniform / normal / choice
      params:
        mean: [mean_rot_x, mean_rot_y, mean_rot_z]
        stddev: [stddev_rot_x, stddev_rot_y, stddev_rot_z]
    # All following parameters are optional
    scale: [scale_x, scale_y, scale_z] # Assumed to be 1 if not specified
    spawn_proba: p # float between 0 and 1
    spawn_count: n # integer > 1
    semantic: semantic class
    physics:
      collision: convexDecomposition # Can be "none", "convexHull" or "convexDecomposition"
      rigid_body: true # Can be true or false, false if not specified
      apply_children: true # Can be true or false, false if not specified
  - name: some_other prim
    ...
Applying multiple randomizations to the same tile
A tile can be randomized with multiple randomizations. They may either be applied independently (in the order specified by the user), or exclusively. The independent randomizations can help the user regroup the spawns by category (eg: vegetation configuration), and potentially reuse them in different tiles if they have a compatible structure. The exclusive randomizations can be used to create variants of a same tile which are not compatible between themselves. For example, a parking spot tile may have a specific randomization for disabled parking, which would not be compatible with a no-parking zone. In that case, the user can specify a list of randomizations to choose from, with associated weights. It is also possible to skip adding a randomization, by specifying “None”.
To specify randomizations, they should be added to the main generation configuration file (see Omniverse usd scene generation). A configuration file with randomizations will look like the following:
tile_size: T # Size of the prim (in world units)
fixed_prims:
  ...
tile_identifier_0:
  usd: omniverse://full/path/to/tile_0.usd
  generation:
    - config: path/to/config/file_0.yaml
    - config: path/to/config/file_1.yaml
    - config: ["path/to/config/file_a.yaml", "path/to/config/file_b.yaml"]
      weights: [0.7, 0.3]
tile_identifier_1:
  usd: omniverse://full/path/to/tile_1.usd
  generation:
    - config: ["path/to/config/file_a.yaml", "None"]
      weights: [0.1, 0.9]
...