10.4. Online Generation
Example of using Isaac Sim and Replicator for online training of machine learning models by directly feeding the generated training data into the model’s training pipeline from memory, eliminating the need for disk storage.
10.4.1. Learning Objectives
This example uses ground truth visualizations from Isaac Sim to demonstrate how to set up a PyTorch DataLoader and train Deep Neural Networks (DNNs) online (the generated data stays in memory during the training process, without the need of disk storage). The full example can be executed through the Isaac Sim standalone python environment. The tutorial will examine the script section by section and integrate the scene generation and groundtruth collection into a PyTorch dataloader that will be used to train a Mask-RCNN instance segmentation model.
10.4.2. Mesh Converter
Before you can generate data, you need to convert the ShapeNet assets in the database to USD. You will need to first download the ShapeNetCore dataset to a local directory. Then, set a variable to tell the script where to find the ShapeNet dataset locally:
export SHAPENET_LOCAL_DIR=<path/to/shapenet>
You will convert only the geometry to allow for quick loading of assets into the scene.
With the SHAPENET_LOCAL_DIR variable set, run the following script. Note, this will create a new
directory at {SHAPENET_LOCAL_DIR}_nomat where the geometry-only USD files will be stored.
./python.sh standalone_examples/api/omni.isaac.shapenet/usd_convertor.py --categories plane watercraft rocket --max_models 100
The above command tells the script to convert the plane watercraft rocket categories and to convert a maximum of 100 models per category.
Note
Other category examples: table, monitor, phone, chair, bowl, bench, plane, car, microwave, piano, pillow, sofa, bottle, bowl, etc.
10.4.3. DataLoader
To run the example, in Linux use the following command:
./python.sh standalone_examples/replicator/online_generation/generate_shapenet.py \
--root $SHAPENET_LOCAL_DIR'_nomat' \
--categories plane watercraft rocket \
--max_asset_size 50
In windows, use the following command:
python.bat standalone_examples/replicator/online_generation/generate_shapenet.py --root %SHAPENET_LOCAL_DIR%_nomat --categories plane watercraft rocket --max_asset_size 50
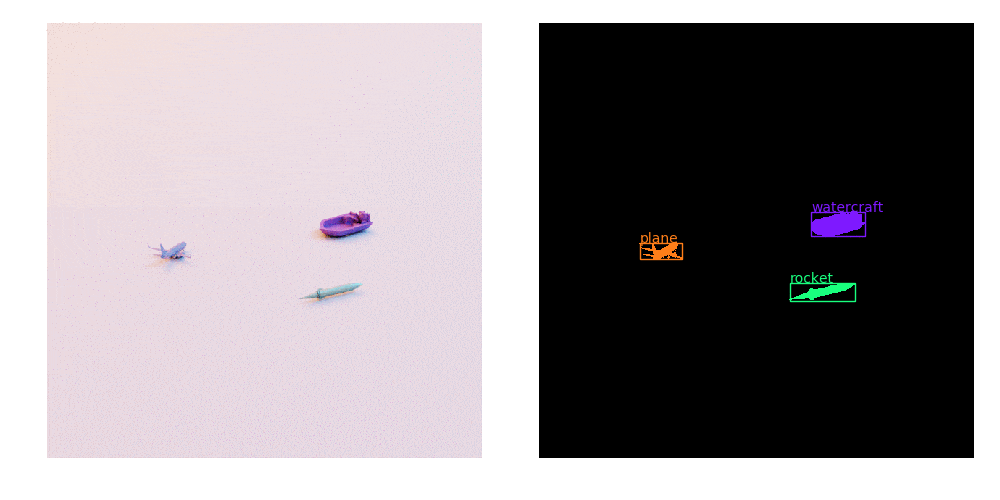
The generate_shapenet.py script will generate an endless stream of randomized data with which to
train. Below is a visualization of the data that the dataset is producing with the plane watercraft rocket
categories selected. Open the _out_gen_imgs/domain_randomization_test_image_*.png locally saved image file to
see the visualization.
10.4.3.1. The Code
10.4.3.1.1. The Dataloader Core
To create a dataloader, you will use the PyTorch torch.utils.data.IterableDataset class, which
will generate an endless stream of random scenes, each with a corresponding groundtruth. The basic
structure for the dataset is shown below:
class MyAwesomeDataset(torch.utils.data.IterableDataset):
    def __init__(self):
        # Setup the scene, lights, walls, camera, etc.
        setup_scene()
        # Setup replicator randomizer graph
        setup_replicator()

    def __next__(self):
        # Trigger a randomization and a render of the scene
        self.rep.orchestrator.step()
        # Collect groundtruth
        gt = {
            "rgb": self.rgb.get_data(device="cuda"),
            "boundingBox2DTight": self.bbox_2d_tight.get_data(device="cpu"),
            "instanceSegmentation": self.instance_seg.get_data(device="cuda"),
        }
        # [..]
        return image, target
Now that you have an outline, assemble your dataset by simply filling in the __next__ method.
You generate and randomize the scene in lines 8-25. The next step is to collect the groundtruth,
as shown in line 35. The code that follows in lines 39-77 consists of preparing the data for the
model to consume; this code will be in large part specific to the model your are using and your
application.
 1def __iter__(self):
 2    return self
 3
 4def __next__(self):
 5    # Step - trigger a randomization and a render
 6    self.rep.orchestrator.step()
 7
 8    # Collect Groundtruth
 9    gt = {
10        "rgb": self.rgb.get_data(device="cuda"),
11        "boundingBox2DTight": self.bbox_2d_tight.get_data(device="cpu"),
12        "instanceSegmentation": self.instance_seg.get_data(device="cuda"),
13    }
14
15    # RGB
16    # Drop alpha channel
17    image = self.wp.to_torch(gt["rgb"])[..., :3]
18
19    # Normalize between 0. and 1. and change order to channel-first.
20    image = image.float() / 255.0
21    image = image.permute(2, 0, 1)
22
23    # Bounding Box
24    gt_bbox = gt["boundingBox2DTight"]["data"]
25
26    # Create mapping from categories to index
27    bboxes = torch.tensor(gt_bbox[["x_min", "y_min", "x_max", "y_max"]].tolist(), device="cuda")
28    id_to_labels = gt["boundingBox2DTight"]["info"]["idToLabels"]
29    prim_paths = gt["boundingBox2DTight"]["info"]["primPaths"]
30
31    # For each bounding box, map semantic label to label index
32    cat_to_id = {cat: i + 1 for i, cat in enumerate(self.categories)}
33    semantic_labels_mapping = {int(k): v.get("class", "") for k, v in id_to_labels.items()}
34    semantic_labels = [cat_to_id[semantic_labels_mapping[i]] for i in gt_bbox["semanticId"]]
35    labels = torch.tensor(semantic_labels, device="cuda")
36
37    # Calculate bounding box area for each area
38    areas = (bboxes[:, 2] - bboxes[:, 0]) * (bboxes[:, 3] - bboxes[:, 1])
39    # Identify invalid bounding boxes to filter final output
40    valid_areas = (areas > 0.0) * (areas < (image.shape[1] * image.shape[2]))
41
42    # Instance Segmentation
43    instance_data = self.wp.to_torch(gt["instanceSegmentation"]["data"]).squeeze()
44    path_to_instance_id = {v: int(k) for k, v in gt["instanceSegmentation"]["info"]["idToLabels"].items()}
45
46    instance_list = [im[0] for im in gt_bbox]
47    masks = torch.zeros((len(instance_list), *instance_data.shape), dtype=bool, device="cuda")
48
49    # Filter for the mask of each object
50    for i, prim_path in enumerate(prim_paths):
51        # Merge child instances of prim_path as one instance
52        for instance in path_to_instance_id:
53            if prim_path in instance:
54                masks[i] += torch.isin(instance_data, path_to_instance_id[instance])
55
56    target = {
57        "boxes": bboxes[valid_areas],
58        "labels": labels[valid_areas],
59        "masks": masks[valid_areas],
60        "image_id": torch.LongTensor([self.cur_idx]),
61        "area": areas[valid_areas],
62        "iscrowd": torch.BoolTensor([False] * len(bboxes[valid_areas])),  # Assume no crowds
63    }
64
65    self.cur_idx += 1
66    return image, target
Details about rest of the dataloader, indcluding the initialization step
and methods specified within __next__, are explained in the below sections.
10.4.3.1.2. Initialization Step
First, launch kit using the SimulationApp and the rendering configurations.
Once the app starts, the default Isaac extensions are hot-loaded so you can import from them.
You then set up replicator and your nucleus server,
which are used in this example to manage the domain randomization assets. Domain
randomization is entirely handled through replicator in this example.
from omni.isaac.kit import SimulationApp

# Setup default variables
RESOLUTION = (1024, 1024)
OBJ_LOC_MIN = (-50, 5, -50)
OBJ_LOC_MAX = (50, 5, 50)
CAM_LOC_MIN = (100, 0, -100)
CAM_LOC_MAX = (100, 100, 100)
SCALE_MIN = 15
SCALE_MAX = 40

# Default rendering parameters
RENDER_CONFIG = {"headless": False}


class RandomObjects(torch.utils.data.IterableDataset):
    def __init__(
        self, root, categories, max_asset_size=None, num_assets_min=3, num_assets_max=5, split=0.7, train=True
    ):
        assert len(categories) > 1
        assert (split > 0) and (split <= 1.0)

        self.kit = SimulationApp(RENDER_CONFIG)
        from omni.isaac.shapenet import utils
        import omni.replicator.core as rep
        import warp as wp

        self.rep = rep
        self.wp = wp

        from omni.isaac.core.utils.nucleus import get_assets_root_path

        self.assets_root_path = get_assets_root_path()
        if self.assets_root_path is None:
            carb.log_error("Could not find Isaac Sim assets folder")
            return
        .
        .
        .
The self._find_usd_assets() method will search the root directory for USD files within the
category directories you’ve specified and return their paths. When you want to add a new asset to
your scene, you will simply pick a path at random and attach it as a reference to a new prim in the
scene. Use split to select a subset of training samples so that you can keep a hold-out set
for validation. Finally, self.setup_scene() creates a room, lights, and a camera.
class RandomObjects(torch.utils.data.IterableDataset):
    def __init__(
        self, root, categories, max_asset_size=None, num_assets_min=3, num_assets_max=5, split=0.7, train=True
    ):
        .
        .
        .
        # If ShapeNet categories are specified with their names, convert to synset ID
        # Remove this if using with a different dataset than ShapeNet
        category_ids = [utils.LABEL_TO_SYNSET.get(c, c) for c in categories]
        self.categories = category_ids
        self.range_num_assets = (num_assets_min, max(num_assets_min, num_assets_max))
        try:
            self.references = self._find_usd_assets(root, category_ids, max_asset_size, split, train)
        except ValueError as err:
            carb.log_error(str(err))
            self.kit.close()
            sys.exit()

        # Setup the scene, lights, walls, camera, etc.
        self.setup_scene()

        # Setup replicator randomizer graph
        self.setup_replicator()

        self.cur_idx = 0
        self.exiting = False

        signal.signal(signal.SIGINT, self._handle_exit)

    def _find_usd_assets(self, root, categories, max_asset_size, split, train=True):
        ... # (see code for implementation details)

    def setup_scene(self):
        ... # (see code for implementation details)
10.4.3.1.3. Setting up a Replicator graph
Now, we want to setup our randomizers to vary the content and appearance of every frame. We do this by leveraging Omni.Replicator. Replicator enables us to creates a randomization graph which will execute our specified randomizations. We’ll start by setting our static components, in this case two sphere lights.
Next, we set a replicator on_frame trigger, which will let us trigger randomization at
each new frame. We then create the randomization components. The first will modify the
color attribute of our two lights.
Next, we randomize the camera position and set its look_at value to the origin so that
the camera always orients itself towards that point.
Finally, we setup our asset randomizers for each asset category and randomize their
position, rotation, scale, and material texture. Using the instantiate method, we
create a prototype of the asset in cache where new instances will reference the created
prototype.
def _instantiate_category(self, category, references):
    with self.rep.randomizer.instantiate(references, size=1, mode="reference"):
        self.rep.modify.semantics([("class", category)])
        self.rep.modify.pose(
            position=self.rep.distribution.uniform(OBJ_LOC_MIN, OBJ_LOC_MAX),
            rotation=self.rep.distribution.uniform((0, -180, 0), (0, 180, 0)),
            scale=self.rep.distribution.uniform(SCALE_MIN, SCALE_MAX),
        )
        self.rep.randomizer.texture(self._get_textures(), project_uvw=True)

def setup_replicator(self):
    """Setup the replicator graph with various attributes."""

    # Create two sphere lights
    light1 = self.rep.create.light(light_type="sphere", position=(-450, 350, 350), scale=100, intensity=30000.0)
    light2 = self.rep.create.light(light_type="sphere", position=(450, 350, 350), scale=100, intensity=30000.0)

    with self.rep.new_layer():
        with self.rep.trigger.on_frame():
            # Randomize light colors
            with self.rep.create.group([light1, light2]):
                self.rep.modify.attribute("color", self.rep.distribution.uniform((0.1, 0.1, 0.1), (1.0, 1.0, 1.0)))

            # Randomize camera position
            with self.camera:
                self.rep.modify.pose(
                    position=self.rep.distribution.uniform((100, 0, -100), (100, 100, 100)), look_at=(0, 0, 0)
                )

            # Randomize asset positions and textures
            for category, references in self.references.items():
                self._instantiate_category(category, references)

    # Run replicator for a single iteration without triggering any writes
    self.rep.orchestrator.preview()
10.4.4. Train
10.4.4.1. Getting Started
Now that you have a dataloader, you can start training. To run the training example, use the following command:
./python.sh standalone_examples/replicator/online_generation/train_shapenet.py \
--root $SHAPENET_LOCAL_DIR'_nomat' \
--categories plane watercraft rocket \
--visualize \
--max_asset_size 50
In windows, use the following command:
python.bat standalone_examples/replicator/online_generation/train_shapenet.py --root %SHAPENET_LOCAL_DIR%_nomat --categories plane watercraft rocket --visualize --max_asset_size 50
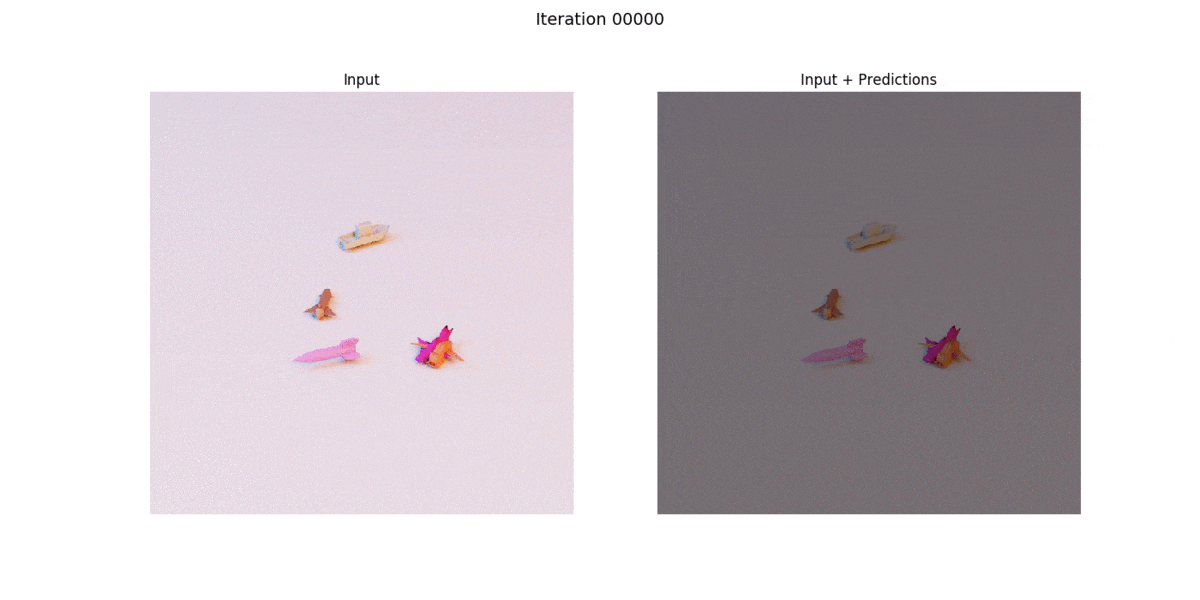
You should see the loss going down in your terminal and, after approximately 100 iterations, start
to see instance segmentation and object detection results being visualized. The max_asset_size 5
argument tells the dataset to skip assets over 5 MB in size. This helps avoid out-of-memory errors
caused by loading larger assets. This value can be increased depending on the capacity of the GPU in
use. The specific optimizer used in this example maintains a gradient history that grows with
iteration number. If you lack VRAM on your hardware, you can adjust the --max_iters command
line argument to address this.
Open the _out_train_imgs/train_*.png locally saved image file to see something like below during training.
10.4.4.2. The Code
First, set up the device, dataset, dataloader, model, and optimizer.
device = "cuda"

# Setup data
train_set = RandomObjects(
    args.root, args.categories, num_assets_min=3, num_assets_max=5, max_asset_size=args.max_asset_size
)
train_loader = DataLoader(train_set, batch_size=2, collate_fn=lambda x: tuple(zip(*x)))

# Setup Model
model = torchvision.models.detection.maskrcnn_resnet50_fpn(pretrained=False, num_classes=1 + len(args.categories))
model = model.to(device)
optimizer = torch.optim.Adam(model.parameters(), lr=args.learning_rate)
Next, set up the training loop. After sending the data to the GPU, perform a forward pass through the model, calculate the loss, and perform a backward pass to update the model weights.
for i, train_batch in enumerate(train_loader):
    if i > args.max_iters:
        break

    model.train()
    images, targets = train_batch
    images = [i.to(device) for i in images]
    targets = [{k: v.to(device) for k, v in t.items()} for t in targets]
    loss_dict = model(images, targets)
    loss = sum(loss for loss in loss_dict.values())

    print(f"ITER {i} | {loss:.6f}")

    optimizer.zero_grad()
    loss.backward()
    optimizer.step()