Create an Omniverse Spatial Application: Build and Launch#
Note
Applies to: Spatial Extensions, Kit 109.0.3+, CloudXR 6
This build-and-launch workflow covers building your Kit XR application, loading a sample scene, configuring the CloudXR runtime, and starting XR streaming.
Build Your Application#
After adding XR extensions to your .kit file (see Create a Kit XR App), build the application.
./repo.sh build
.\repo.bat build
Wait for the build to complete:
BUILD (RELEASE) SUCCEEDED (<time>)
Tip
If you encounter build errors, try a clean build with ./repo.sh build -x (Linux) or .\repo.bat build -x (Windows).
Launch Your Application#
Launch with the Sample Scene#
The USD Viewer template includes sample assets. Load the built-in stage01.usd scene at startup:
./repo.sh launch -- --/app/auto_load_usd='${omni.usd_viewer.samples}/samples_data/stage01.usd'
.\repo.bat launch -- --/app/auto_load_usd='${omni.usd_viewer.samples}/samples_data/stage01.usd'
Select your application when prompted and wait for it to load.
Note
The first launch compiles and caches RTX shaders. This can take 5-8 minutes. Subsequent launches are much faster.
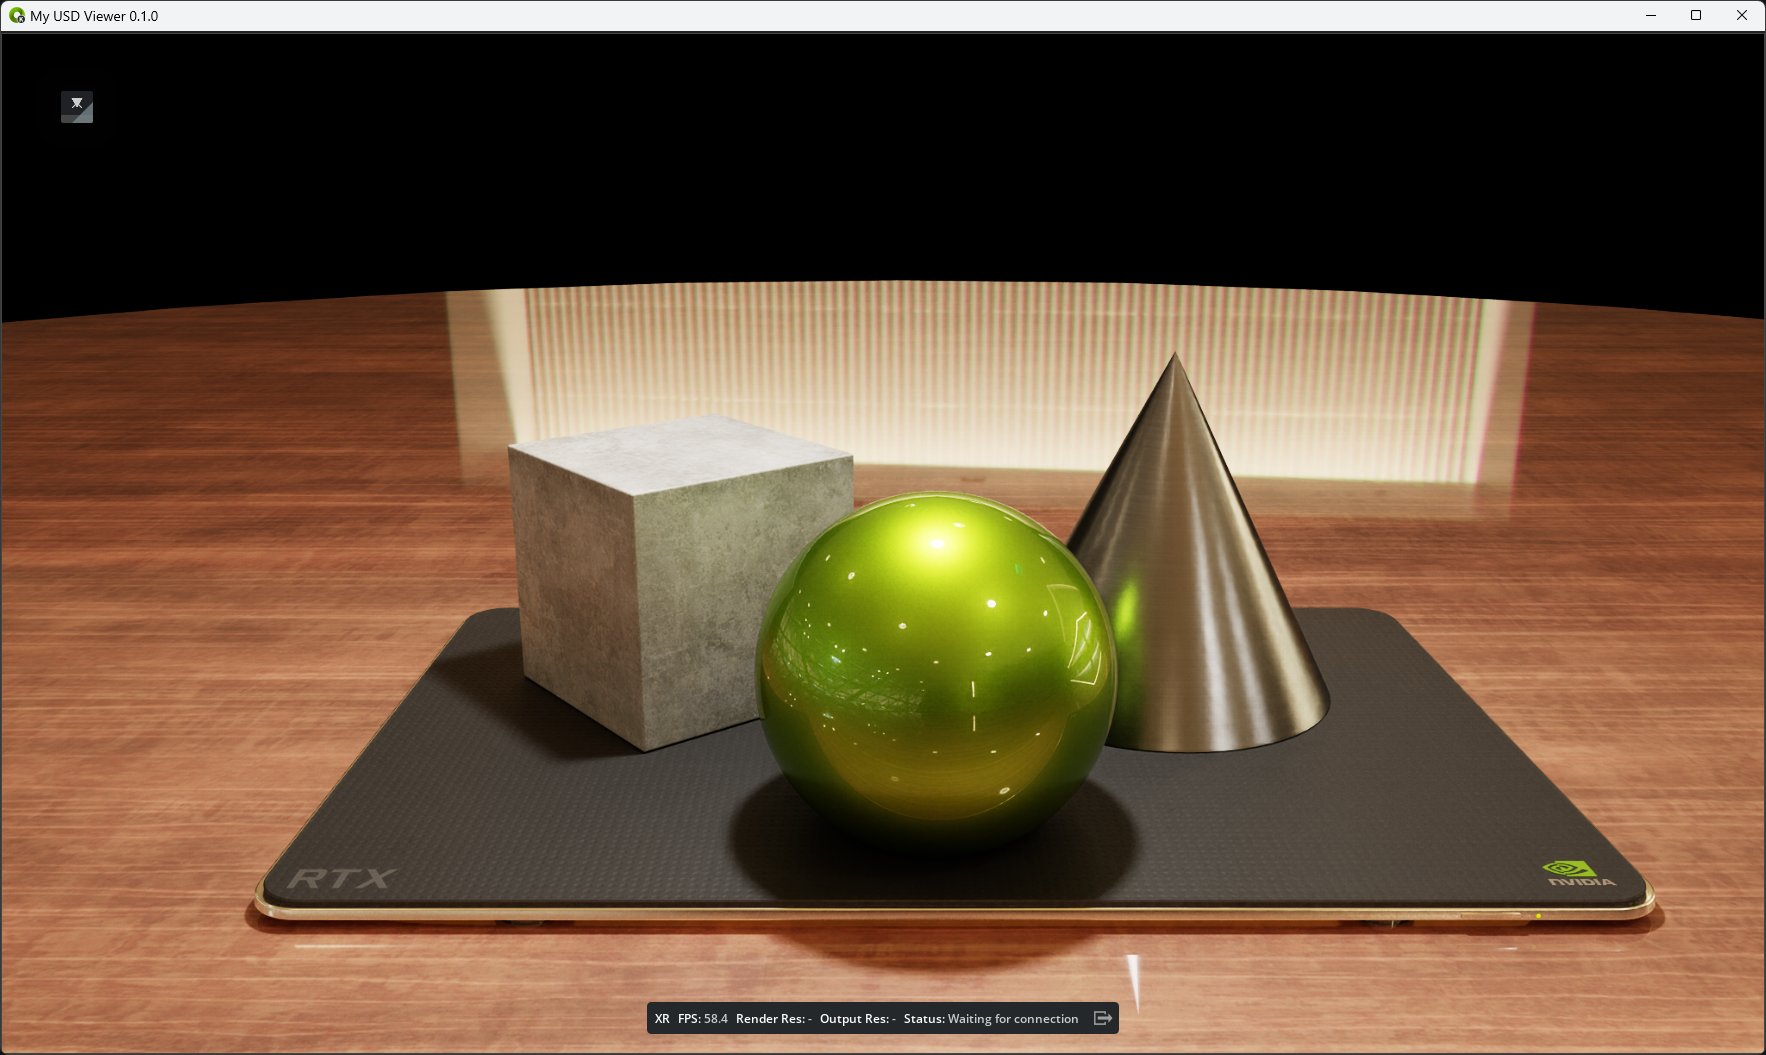
Once the scene finishes loading, the viewport should look like this:
Launch with an Empty Viewport#
To launch without loading a scene (useful if you want to load content programmatically or from a client):
./repo.sh launch
.\repo.bat launch
Reset User Settings#
To launch and have your persistent settings removed, launch with the reset-user flag:
./repo.sh launch -- --reset-user
.\repo.bat launch -- --reset-user
Launch with Your Own USD Scene#
To load a custom USD file, provide its full path:
./repo.sh launch -- --/app/auto_load_usd='/path/to/your/scene.usd'
.\repo.bat launch -- --/app/auto_load_usd='C:\path\to\your\scene.usd'
Configure and Start CloudXR#
After your Kit application is running with a scene loaded:
1. Open the XR Panel#
Locate the XR panel in the Kit UI. If it is not visible, open it from the Window menu and dock it where convenient. The USD Viewer Template does not display UI, or might display the XR panel as a small floating window. Use a different template, such as USD Composer to access more UI during your Kit application development.
2. Select the Output Plugin#
Change the Selected Output Plugin from Simulated XR to OpenXR.
3. Select the CloudXR Runtime#
Choose the runtime that matches your target client device:
Target Client |
OpenXR Runtime Selection |
|---|---|
Apple Vision Pro |
|
iPad |
|
Meta Quest 2/3/3S |
|
Pico 4 Ultra |
|
Important
Only one runtime can be active at a time. If you need to switch between Apple and Meta clients, stop XR, change the runtime, and start again.
4. Start XR#
Click Start XR. You see:
Status: Waiting on Connection
in the viewport. The server is now ready to accept client connections.
5. Find Your Server IP Address#
You will need the server’s IP address to connect from a client.
Windows:
ipconfig
Linux:
ip addr
Note the IPv4 address of your network adapter (typically 192.168.x.x or 10.x.x.x).
Testing with SimulatedXR#
You can test your XR application without a physical device using SimulatedXR. This is useful during development.
Enable SimulatedXR#
In the XR panel:
Set Selected Output Plugin to
Simulated XRClick Start XR
SimulatedXR renders a virtual XR viewport on your desktop, simulating what a headset would see.
Configure SimulatedXR Through Settings#
You can also enable SimulatedXR through settings in your .kit file or at the command line:
# In your .kit file
[settings]
defaults.xr.system.display = "SimulatedXR"
xr.simulatedxr.enabled = true
Or through the command line:
./repo.sh launch -- --/xr/system/display="SimulatedXR" --/xr/simulatedxr/enabled=true
.\repo.bat launch -- --/xr/system/display="SimulatedXR" --/xr/simulatedxr/enabled=true
Managing XR Sessions#
Action |
How |
|---|---|
Start XR |
Click |
Stop XR |
Click |
Switch runtime |
Stop XR, change dropdown, Start XR |
Change profile |
Use XR panel dropdown (VR, AR) |
Headless Omniverse Spatial Server Deployment#
For production or remote server deployments where no desktop window is needed, launch with --no-window. This is the recommended approach for headless XR streaming servers:
./repo.sh launch -- --no-window --/app/auto_load_usd='${omni.usd_viewer.samples}/samples_data/stage01.usd'
.\repo.bat launch -- --no-window --/app/auto_load_usd='${omni.usd_viewer.samples}/samples_data/stage01.usd'
Note
When running headless, you will need to start XR programmatically or configure it to auto-start through settings. See Method B: Custom Extension for an example startup extension that auto-enables XR on launch.
Next Steps#
Set up your client:
Apple Client Setup – Connect from Vision Pro or iPad
Meta Client Setup – Connect from Quest 2/3/3S or Pico 4 Ultra
See also:
XR Settings Reference – Tune quality, profiles, and rendering
Scene Integration and Messaging – Bidirectional communication with clients