Omniverse Spatial Networking: Firewall, WiFi, and Port Configuration for CloudXR#
Note
Applies to: Spatial Extensions, Kit 109.0.3+, CloudXR 6
This networking reference covers network configuration for CloudXR streaming between your Kit XR server and client devices. Proper network setup is critical for low-latency, high-quality XR streaming.
Network Requirements#
Requirement |
Recommended |
Minimum |
|---|---|---|
Downstream Bandwidth |
200 Mbps |
100 Mbps |
Pose to Frame Received Latency |
30 ms |
100 ms |
Downstream/Upstream Jitter |
1 ms |
4 ms |
Downstream Packet Loss |
0% |
1% |
WiFi Standard |
WiFi 6E |
WiFi 6 (802.11ax) |
WiFi Band |
5 GHz or 6 GHz |
5 GHz |
WiFi Channel Width |
80 MHz |
40 MHz |
Network Topology#
The recommended setup for local streaming:

Key principles:
Connect the server to the router using wired Ethernet
The client connects over WiFi (5 GHz or 6 GHz band)
At most one WiFi hop between server and client
Server and client must be on the same subnet
Avoid client isolation policies on the router (these block peer-to-peer traffic)
Capacity and placement:
Due to the bandwidth requirements for streaming high-quality world-locked XR content, it is ideal to dedicate the WiFi network to XR client devices and have other devices connect over Ethernet. If that is not possible, use the 6 GHz channel for any other devices. Ensure the router is in the same room as the client device with a clear line of sight. Recommended maximums per router:
Apple Vision Pro: No more than 2 devices, especially if screen mirroring is active
iPad: No more than 4 devices
Note
Only one CloudXR connection per running Kit instance is supported. Each concurrent user requires a separate Kit application instance.
Windows Mobile Hotspot (corporate or locked networks):
If you are doing local streaming and do not control your router settings — for example on a corporate WiFi network that blocks certain ports — you can use Windows Mobile Hotspot to broadcast a WiFi network directly from your workstation to the client device. Select 5 GHz for the band.
Firewall Configuration#
Apple Client Path (CloudXR Native)#
The CloudXR server attempts to open the required ports on the workstation firewall automatically when it starts, which triggers an elevated permission prompt on Windows. If that prompt cannot be answered, configure the ports manually as described below.
Open these ports on the server’s firewall:
Channel |
Protocol |
Server Port(s) |
Client Port(s) |
|---|---|---|---|
Connect |
TCP |
48010 |
49007 |
Video |
UDP |
47998, 48005, 48008, 48012 |
49005, 50000–55000 |
Input |
UDP |
47999 |
49006 |
Audio |
UDP |
48000 |
49003 |
Mic |
UDP |
48002 |
49004 |
For convenience, the full set of server-side ports to open:
Port |
Protocol |
Purpose |
|---|---|---|
47995 |
TCP |
CloudXR signaling |
47998 |
TCP/UDP |
CloudXR media |
47999 |
TCP/UDP |
CloudXR control |
48000 |
TCP/UDP |
CloudXR audio |
48001 |
TCP/UDP |
CloudXR data |
48002 |
TCP/UDP |
CloudXR mic |
48005 |
TCP/UDP |
CloudXR data |
48008 |
TCP/UDP |
CloudXR data |
48010 |
TCP/UDP |
CloudXR data |
48012 |
TCP/UDP |
CloudXR data |
sudo ufw allow 47995/tcp
sudo ufw allow 47998:48002/tcp
sudo ufw allow 47998:48002/udp
sudo ufw allow 48005/tcp
sudo ufw allow 48005/udp
sudo ufw allow 48008/tcp
sudo ufw allow 48008/udp
sudo ufw allow 48010/tcp
sudo ufw allow 48010/udp
sudo ufw allow 48012/tcp
sudo ufw allow 48012/udp
Run PowerShell as administrator:
# Inbound rules for CloudXR Native
New-NetFirewallRule -DisplayName "CloudXR Native TCP" -Direction Inbound -Protocol TCP -LocalPort 47995,47998-48002,48005,48008,48010,48012 -Action Allow
New-NetFirewallRule -DisplayName "CloudXR Native UDP" -Direction Inbound -Protocol UDP -LocalPort 47998-48002,48005,48008,48010,48012 -Action Allow
Web Client Path (CloudXR WebRTC)#
Port |
Protocol |
Purpose |
|---|---|---|
49100 |
TCP |
CloudXR Runtime signaling (WebSocket) |
47998 |
UDP |
CloudXR Runtime media (WebRTC) |
48322 |
TCP |
WebSocket proxy (for HTTPS mode) |
8080 |
TCP |
Web application server (configurable) |
sudo ufw allow 49100/tcp
sudo ufw allow 47998/udp
sudo ufw allow 48322/tcp
sudo ufw allow 8080/tcp
Run PowerShell as administrator:
# Inbound rules for CloudXR WebRTC
New-NetFirewallRule -DisplayName "CloudXR WebRTC Signaling" -Direction Inbound -Protocol TCP -LocalPort 49100 -Action Allow
New-NetFirewallRule -DisplayName "CloudXR WebRTC Media" -Direction Inbound -Protocol UDP -LocalPort 47998 -Action Allow
New-NetFirewallRule -DisplayName "CloudXR WSS Proxy" -Direction Inbound -Protocol TCP -LocalPort 48322 -Action Allow
New-NetFirewallRule -DisplayName "CloudXR Web Server" -Direction Inbound -Protocol TCP -LocalPort 8080 -Action Allow
WiFi Configuration#
Channel Selection#
For best performance, use uncongested WiFi channels:
Band |
Recommended Channels |
Notes |
|---|---|---|
5 GHz |
44, 149 |
DFS-free, wide availability. Also the channels Apple devices use for AWDL device discovery — using other channels can cause frequency hopping that degrades streaming quality. |
6 GHz |
Any |
Less congestion overall; WiFi 6E only. Recommended for iPad clients. |
Apple Vision Pro and AWDL: Apple devices use channels 44 and 149 for Wireless Direct Link (AWDL), which enables AirDrop, AirPlay, and related features. If your router is configured to use a different channel, the Vision Pro may hop between channels to satisfy AWDL, causing periodic latency spikes. Configure your router to use channel 44 or 149 to prevent this.
Router Settings#
Band steering: Prefer 5 GHz or 6 GHz for XR clients; disable the 2.4 GHz band or assign it a separate SSID
Channel width: 80 MHz or 160 MHz (wider = more bandwidth)
Client isolation: Disable: clients must be able to reach the server
QoS: Prioritize UDP traffic if available
Power saving: Disable WiFi power saving on the client if possible
SSID per band: Assign a distinct SSID to each band and configure each device to connect only to the correct one to prevent band hopping
A good router candidate is the Acer Predator Connect W6 Wi-Fi 6E Gaming Router, which is also a GeForce NOW certified router.
Device-Specific WiFi Notes#
Device |
WiFi Support |
Notes |
|---|---|---|
Apple Vision Pro |
WiFi 6 (5 GHz) |
Use channels 44 or 149; 5 GHz band required |
iPad Pro |
WiFi 6 / 6E |
6 GHz supported on newer models; recommended for iPad |
Meta Quest 3 |
WiFi 6E |
Best on 5 GHz or 6 GHz |
Pico 4 Ultra |
WiFi 6 |
5 GHz recommended |
WebSocket Proxy (HTTPS Mode: Meta/Web Path)#
When hosting the CloudXR.js web application over HTTPS, browsers enforce mixed content policies that block insecure ws:// WebSocket connections. A WebSocket proxy converts wss:// connections to ws:// for the CloudXR Runtime.
Why a Proxy Is Needed#
Without the proxy, the browser blocks the ws:// connection to port 49100 because the page was loaded over https://.
Setting Up a Proxy#
You can use any WebSocket proxy. Here is an example using websockify:
# Install websockify
pip install websockify

# Run the proxy (forwards wss://0.0.0.0:48322 to ws://localhost:49100)
websockify --cert=cert.pem --key=key.pem 48322 localhost:49100
Use the same SSL certificate and key as your HTTPS web server for consistency. The proxy must be running before clients attempt to connect.
Client Configuration#
When using HTTPS mode, configure the client to use the proxy port:
Port:
48322(not49100)Proxy URL: If the web app has a proxy URL field, enter
wss://<server-ip>:48322
Bandwidth and Latency Monitoring#
CloudXR HUD#
The CloudXR client for Apple Vision Pro and iPad provides a real-time HUD overlay with streaming statistics. Enable it from the viewer app to monitor the quality of your connection.
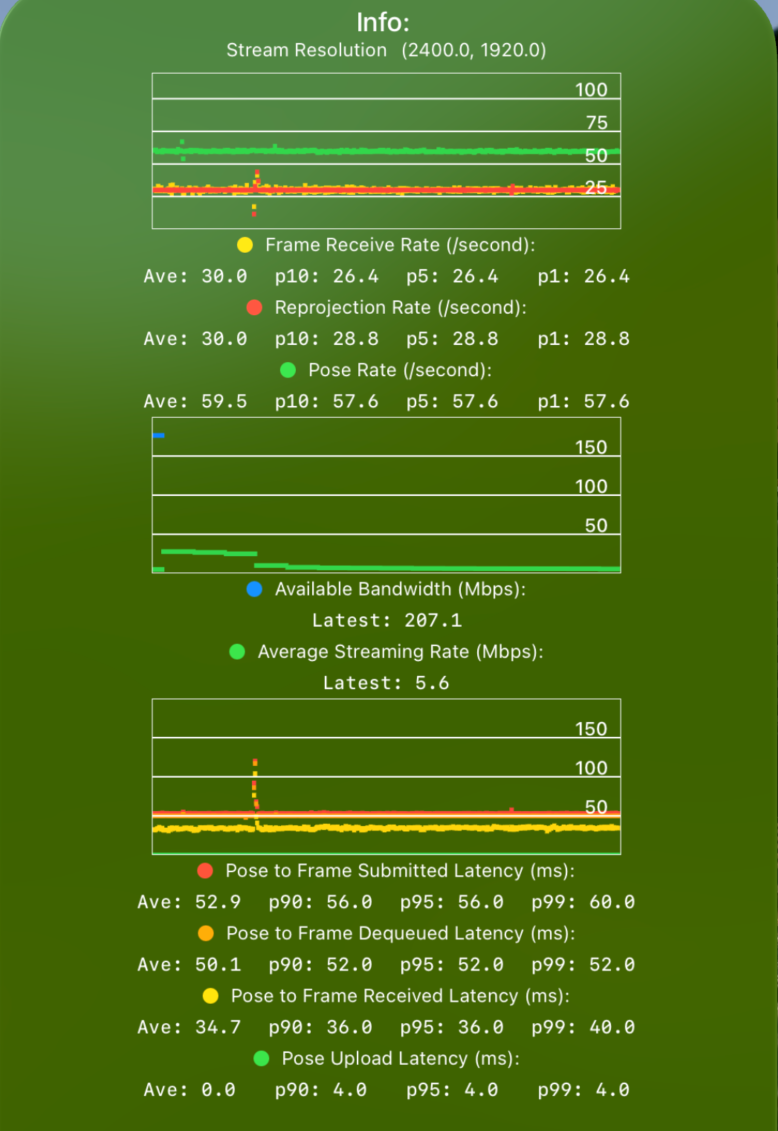
The HUD displays three charts:
1. FPS — Shows Pose (green), Frame (yellow), and Reprojection (red) rates in Hz.
Pose Rate: How often the device sends poses to the server. Should be a solid 90 Hz for Apple Vision Pro and 60 Hz for iPad or simulators.
Frame Rate: How often the server sends rendered frames back. The server renders at most one frame per received pose, so Frame Rate is at most Pose Rate — specifically, Pose Rate divided by an integer (e.g. a 90 Hz pose rate yields 90/45/30/22.5/15 Hz frame rates).
Reprojection Rate: How often the device updates RealityKit with those frames. Typically matches Frame Rate unless the device is dropping frames.
High variation in Pose or Reprojection rate indicates a performance issue on the client. Some variation in Frame Rate is expected and is absorbed by the dejitter buffer; excessive variation causes frame skips. Check the p10/p5/p1 values to identify these conditions.
2. Bandwidth — Shows Average Streaming Rate (green) and Available Bandwidth (blue) in Mbps.
These show how much of the available bandwidth is being used for CloudXR streaming.
A minimum Available Bandwidth of 100 Mbps is required to maintain a high-quality stream. The utilized bandwidth is content-dependent and may be lower, but a lower available bandwidth does not guarantee an acceptable experience.
3. Latency — Shows Pose Sent to Pose Received (green), Frame Received (yellow), Frame Dequeued (orange), and Frame Submitted (red) in ms.
These show durations between a pose being sent and received at the server, a rendered frame arriving at the client, being dequeued from the dejitter buffer, and being submitted to the display.
A Pose to Frame Received latency of 30 ms is ideal. Values up to 100 ms can still be usable if network jitter is low, but higher latencies are not recommended. The more interactive the content, the lower the tolerance. Check p90/p95/p99 values of Pose Upload and Pose to Frame Received to measure jitter.
If any values are outside these ranges, consult the troubleshooting steps below.
Kit-Side Monitoring#
The CloudXR runtime also provides a HUD overlay in the Kit viewport with server-side connection statistics. Check the XR panel in Kit for:
Frame rate
Latency (motion-to-photon)
Bandwidth usage
Dropped frames
Network Tools#
Tool |
Platform |
Use |
|---|---|---|
|
All |
Measure raw bandwidth between server and client |
|
All |
Measure round-trip latency |
Any browser |
Packet loss, latency, and jitter test |
|
Any browser |
Internet bandwidth test (GDN streaming) |
|
Any browser |
Internet bandwidth test (GDN streaming) |
|
Network Analyzer |
iOS/iPadOS/visionOS |
WiFi signal strength, port reachability, LAN scan |
macOS |
Channel congestion and interference analysis |
|
WiFi Analyzer |
Android/Windows |
Channel congestion analysis |
Quick Bandwidth Test#
# On the server
iperf3 -s

# On a client (or another machine on the same WiFi)
iperf3 -c <server-ip> -t 10
Target: > 200 Mbps throughput with < 20 ms latency.
For local streaming, an iPerf client is available on the App Store (iPad version). It can also be installed on Apple Vision Pro — it appears under Compatible Apps on the visionOS home screen.
Network Troubleshooting#
Quick Reference#
Issue |
Cause |
Solution |
|---|---|---|
Cannot connect |
Firewall blocking ports |
Open required ports (see tables above) |
High latency |
WiFi congestion or long hops |
Use 5 GHz band, reduce WiFi hops to one |
Dropped frames |
Insufficient bandwidth |
Use wired Ethernet for server, check WiFi bandwidth |
Connection refused |
Wrong port or runtime not started |
Verify port number and that XR is running in Kit |
Mixed content blocked |
HTTPS page using ws:// |
Set up WebSocket proxy (see above) |
Client isolation |
Router blocks client-to-server traffic |
Disable client isolation in router settings |
Periodic latency spikes |
AWDL channel hopping |
Configure router to use channel 44 or 149 |
Detailed Steps#
1. Verify the server is reachable from your client network
Network Analyzer is an iOS/iPadOS/visionOS app that lets you validate network info, scan for local servers, and check whether addresses and ports are reachable. Connect your client device to the streaming network and check the three tabs:
Information |
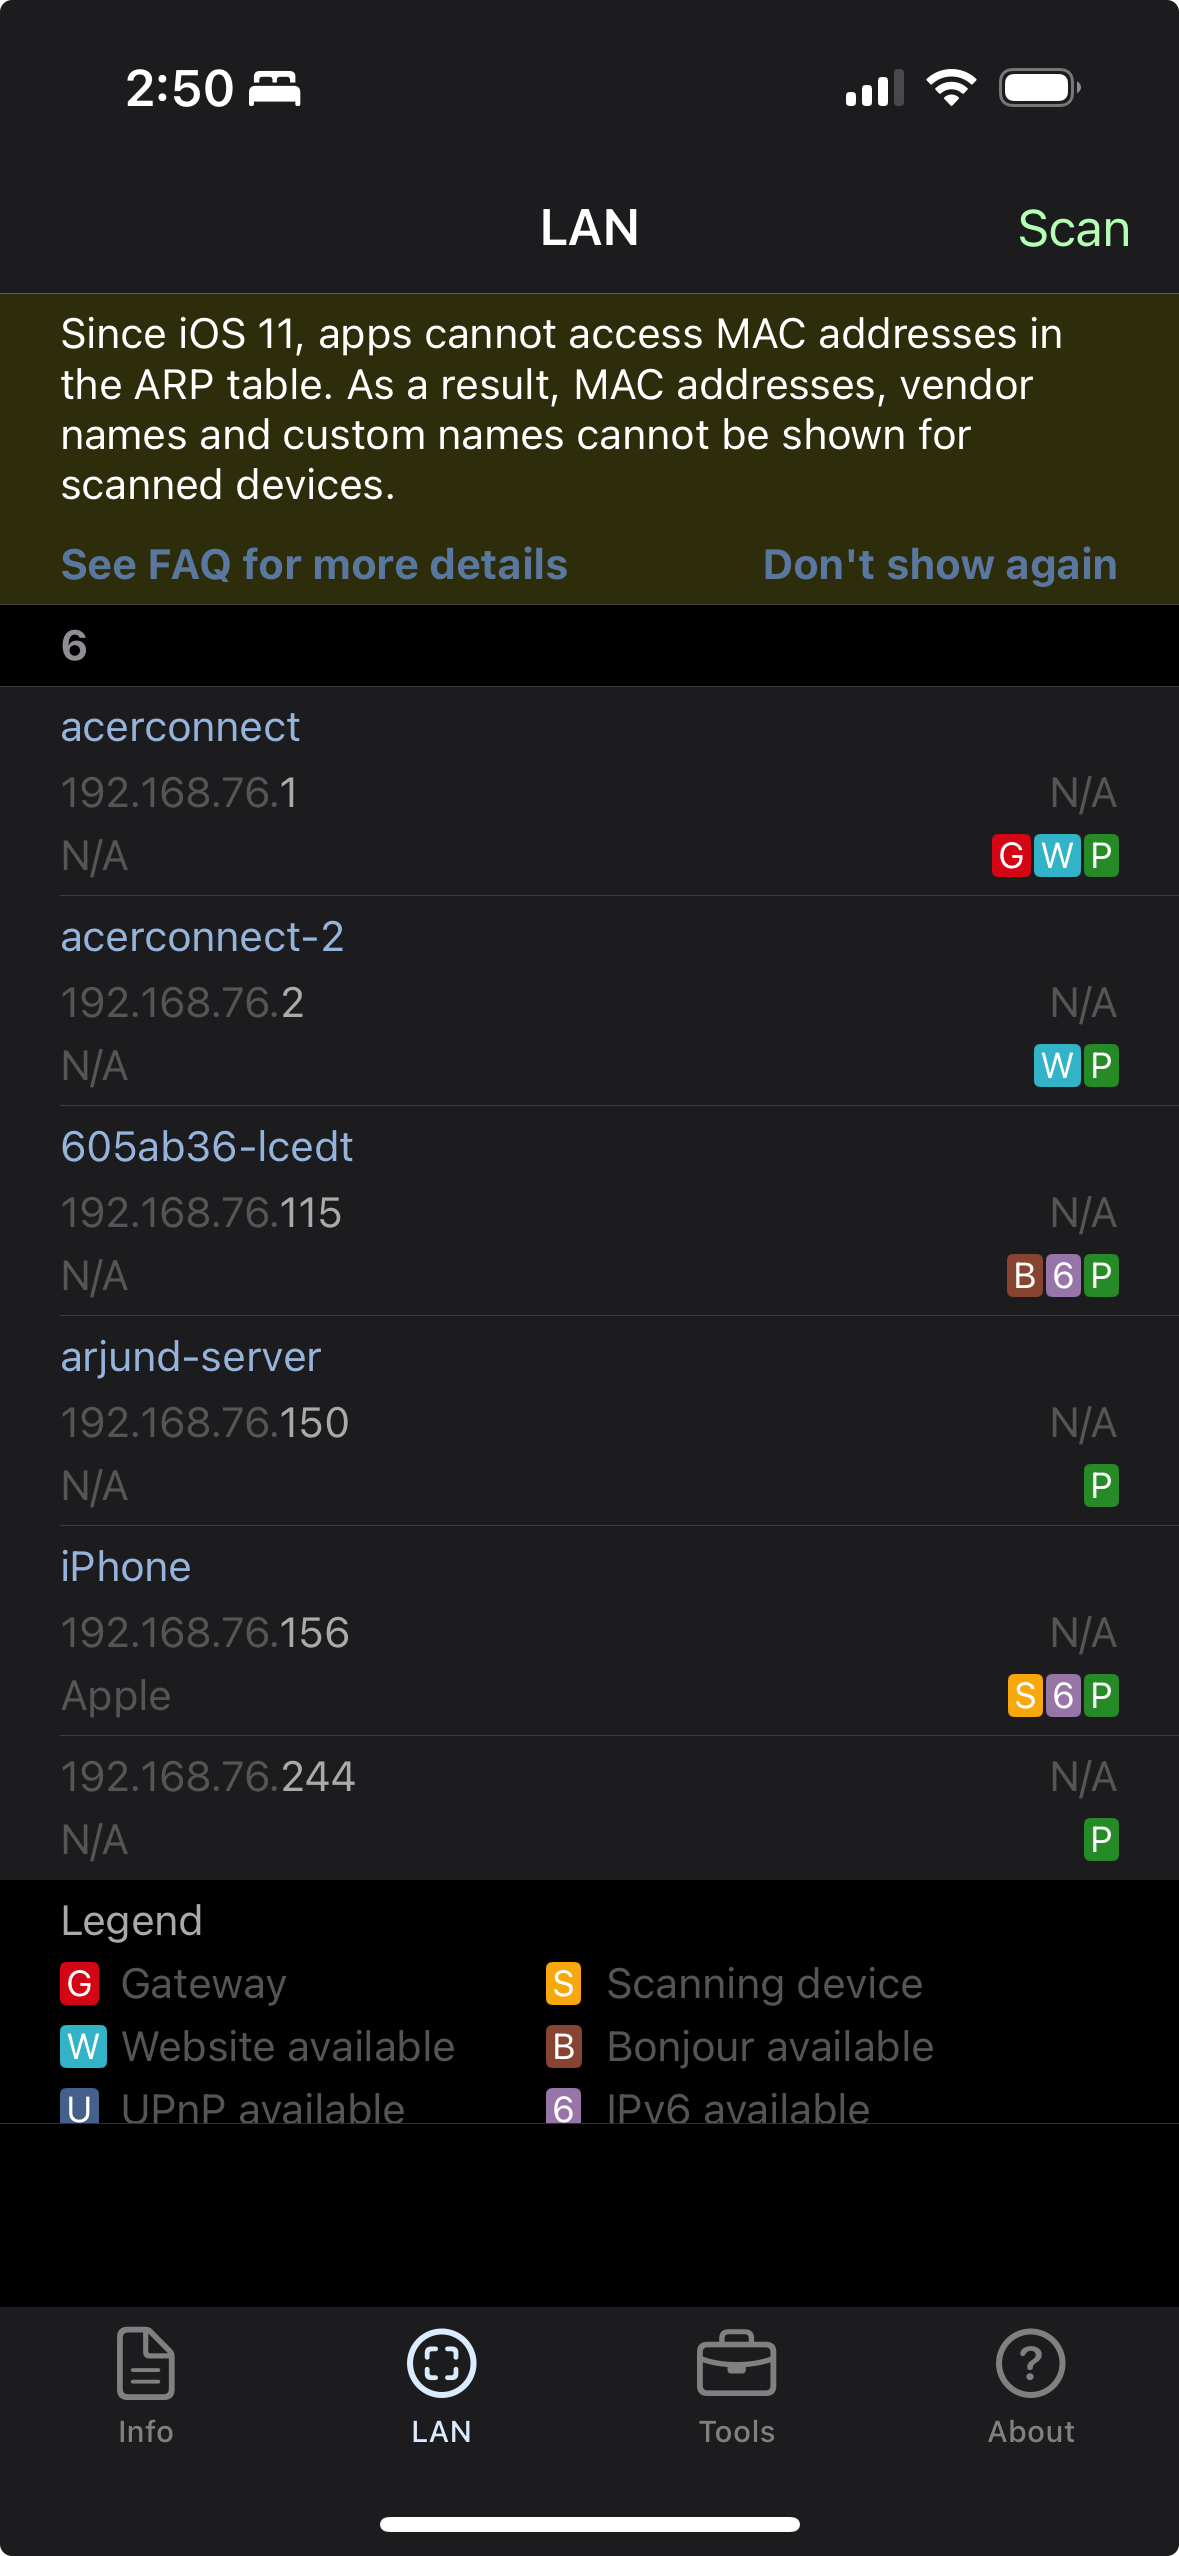
LAN |
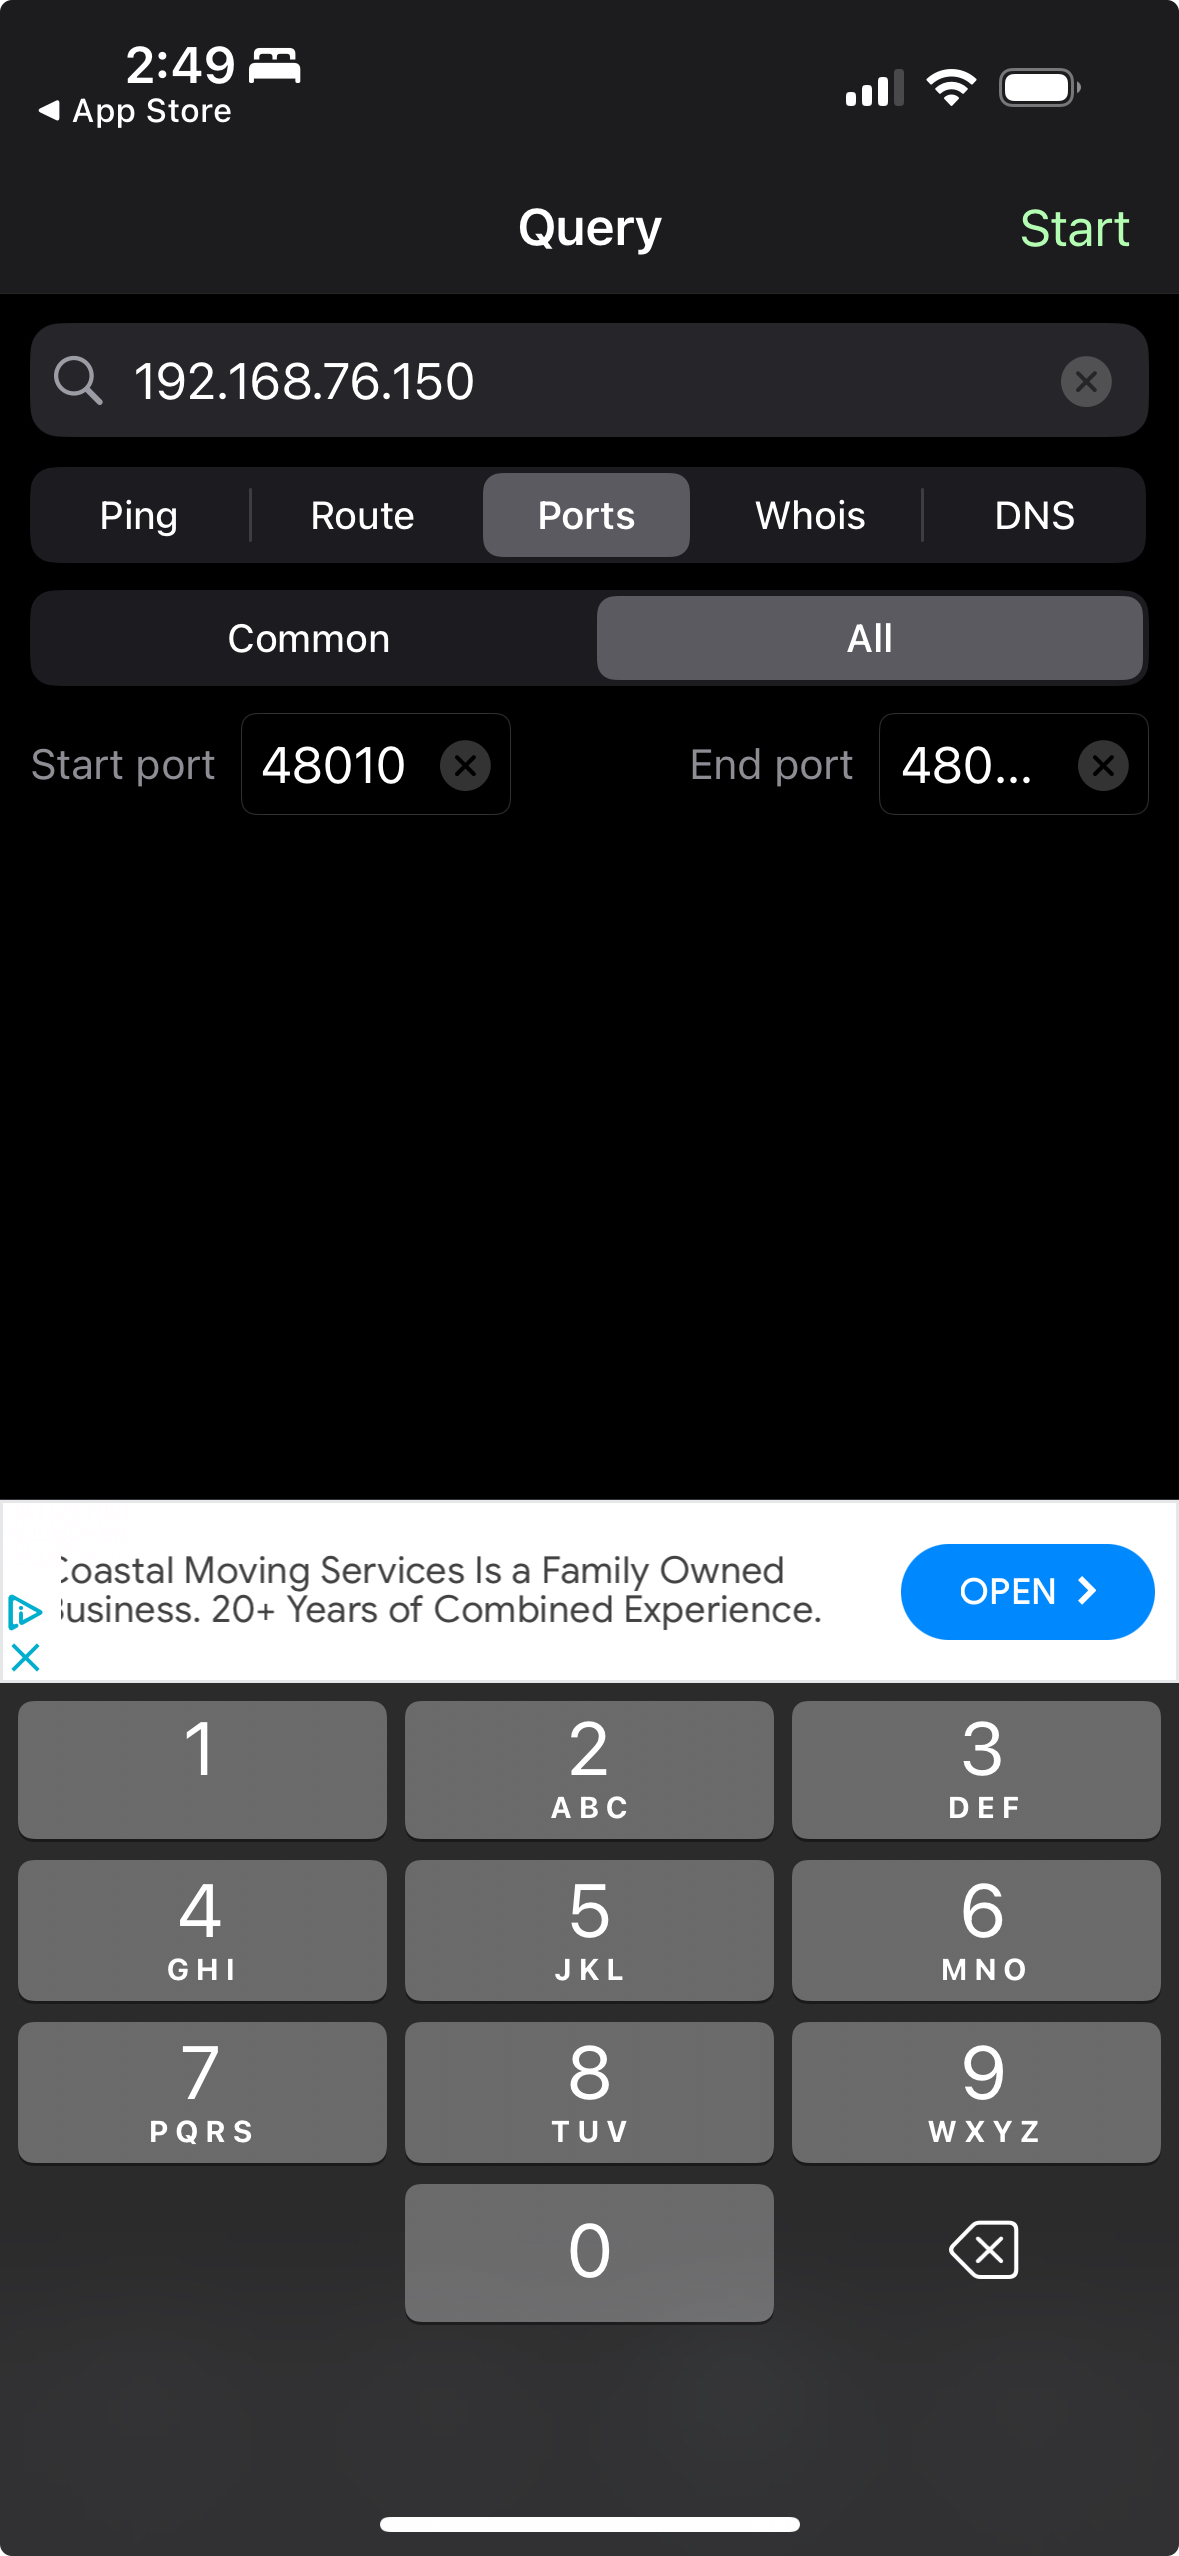
Tools |
|---|---|---|
|
|
|
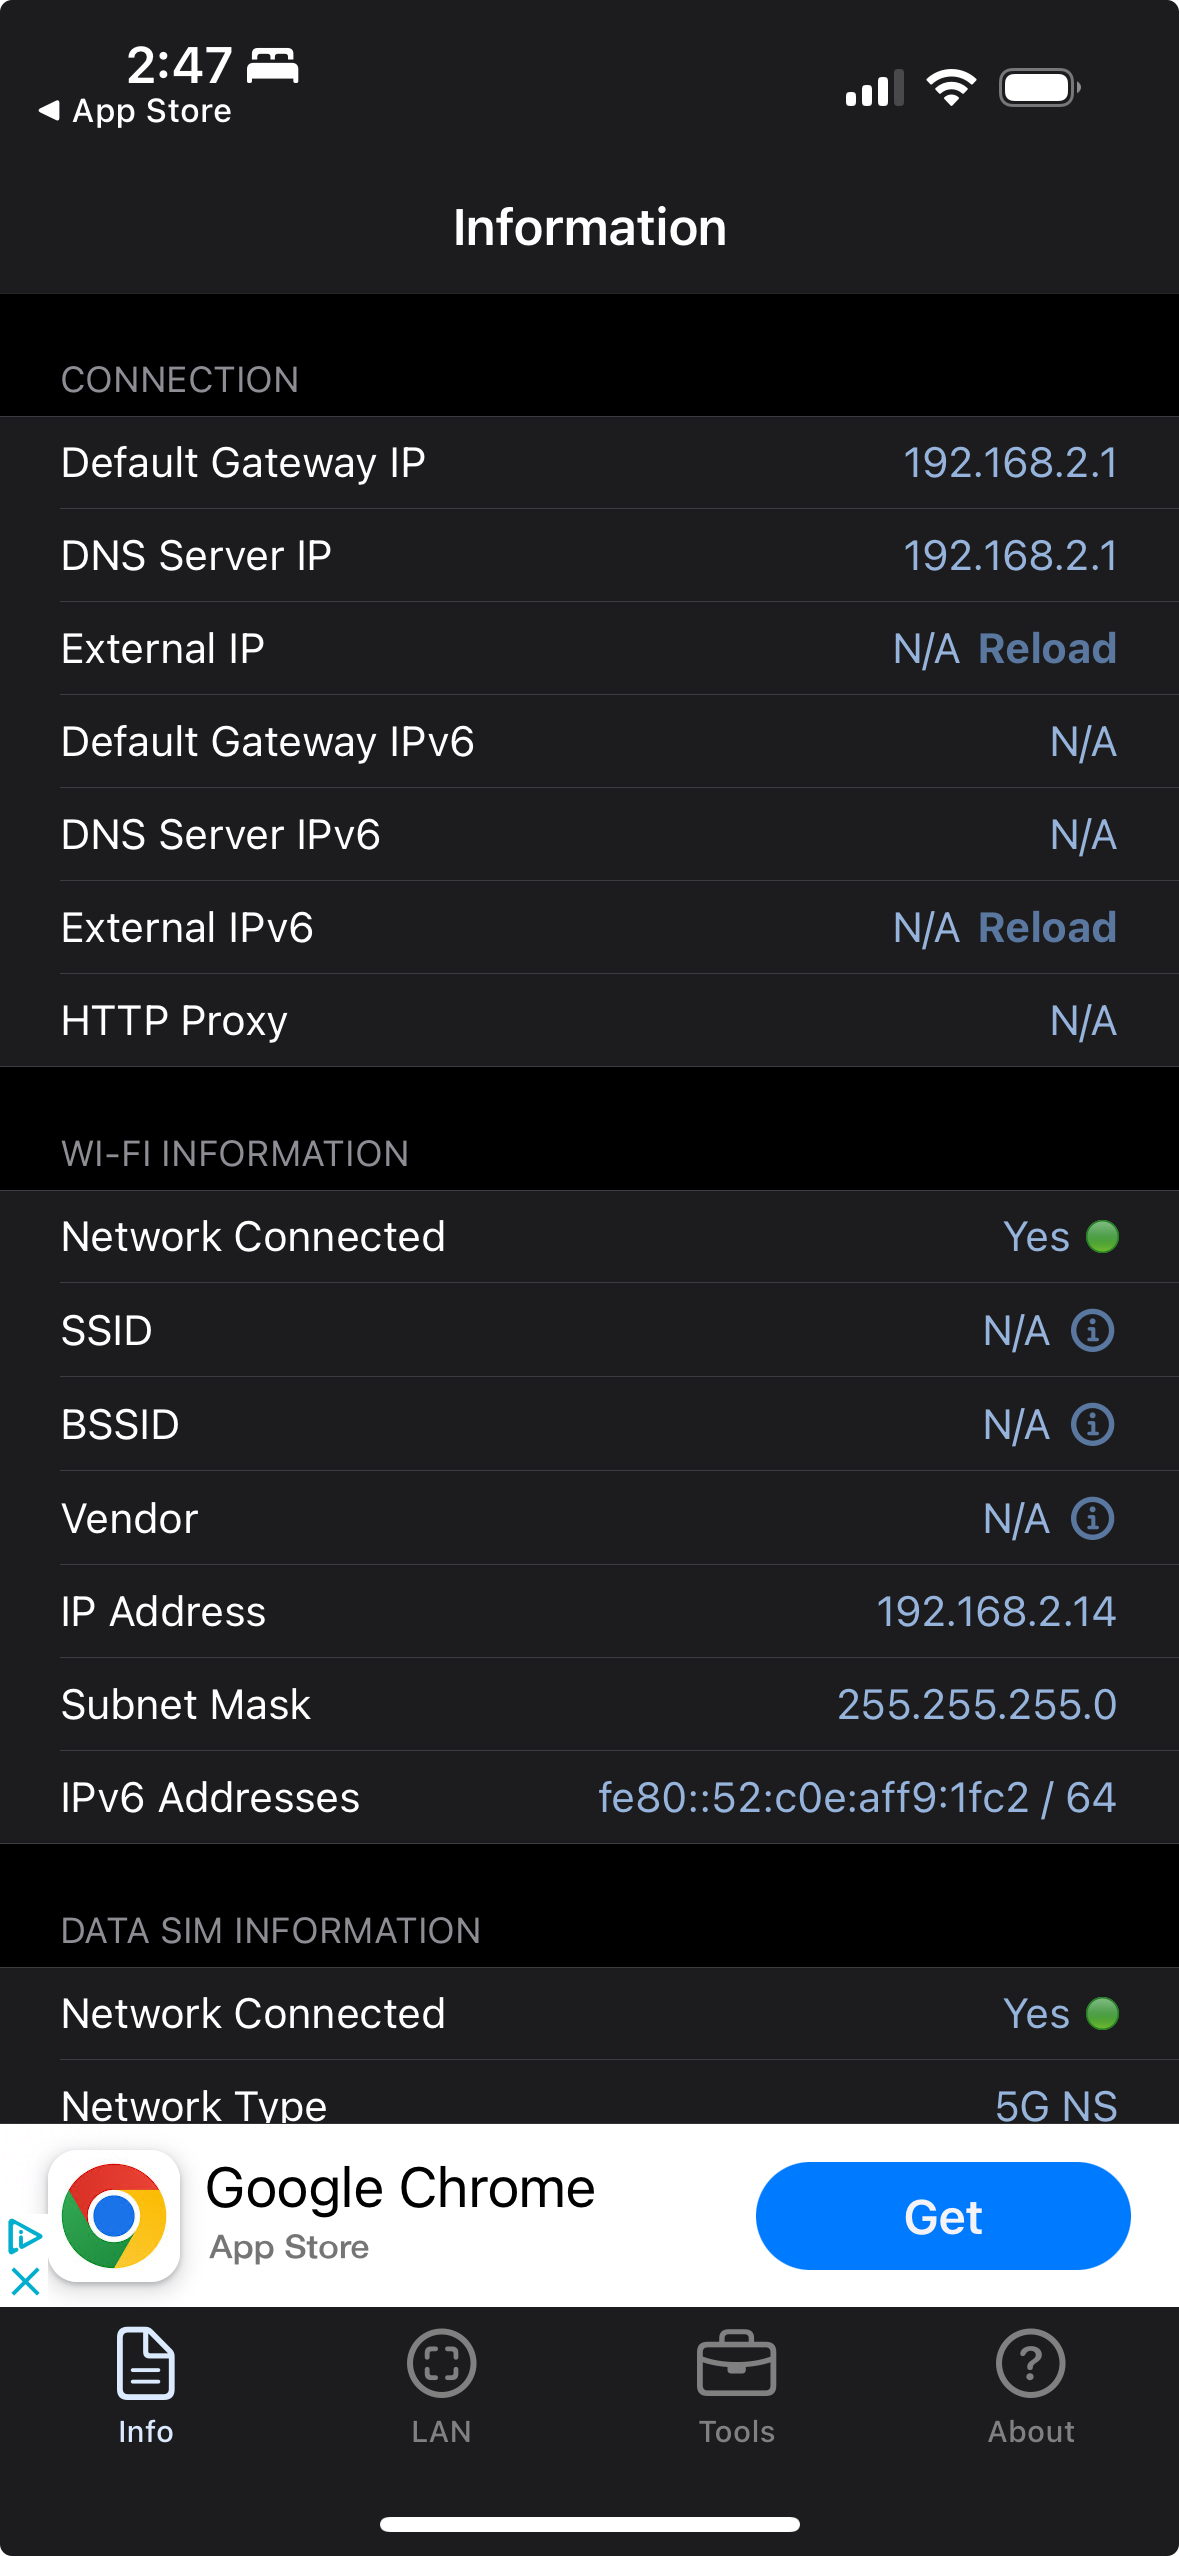
Information tab: General info about the current network connection.
LAN tab: Scan for local servers on the network.
Tools tab: Ping the server and verify that its port (e.g. 48010) is reachable.
Note
For an iPad or Vision Pro app to access a server on the local network, iOS/visionOS displays a permissions prompt on the first connection attempt. If the prompt is dismissed or never shown, the app cannot connect. Go to app settings to grant the local network permission manually, or reinstall the app to trigger the prompt again.
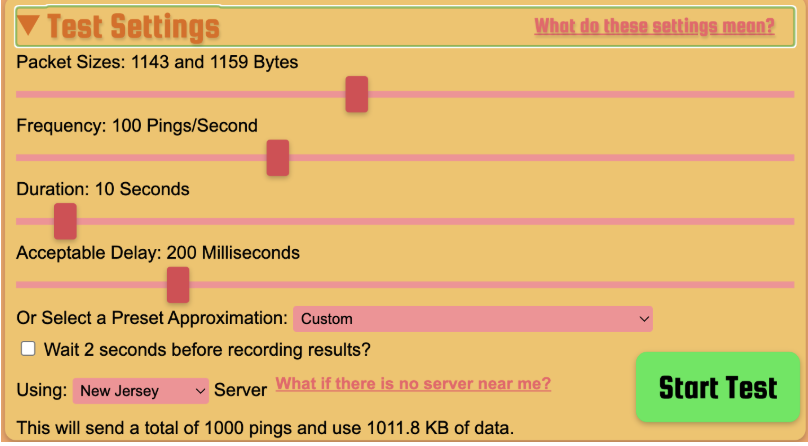
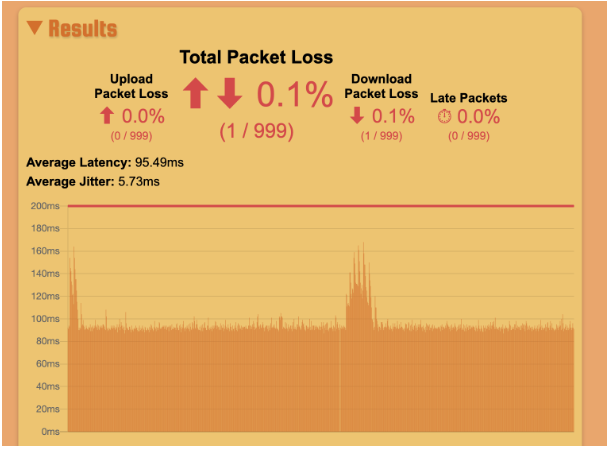
2. Run a packet loss, latency, and jitter test
Run packetlosstest.com from both the Apple Vision Pro and a device wired to the network. Use the settings shown below. The latency chart should be mostly flat — occasional spikes are acceptable but will cause streaming hiccups.
Settings |
Results |
|---|---|
|
|
If results look good from Vision Pro but streaming quality is poor, bandwidth may be insufficient. Continue to step 3.
If the wired connection results are good but Vision Pro results are bad, there may be a wireless issue. Continue to steps 4–6.
If results are bad even over the wired connection, contact your ISP.
For GDN streaming, a networking issue upstream (ISP transit, data center) may cause loss that generic speed tests do not capture. Submit a feedback report in that case.
3. Run a bandwidth test
GDN streaming: Use speedtest.net or speed.cloudflare.com from both the Vision Pro and a wired device. A minimum of 100 Mbps downstream is required; 200 Mbps downstream and 20 Mbps upstream is recommended. Note that GDN and generic speed tests may use partially disjoint network paths, so results may differ from actual streaming performance.
Local streaming: Use iPerf (see Quick Bandwidth Test above) to measure bandwidth directly between the workstation and client device.
If the wired connection test passes but the Vision Pro test fails, there is a wireless issue — continue to steps 4–6.
4. Check for channel interference
Other nearby routers on the same WiFi channel will degrade performance. Use WiFi Explorer on a MacBook connected to the same network to identify conflicting routers.
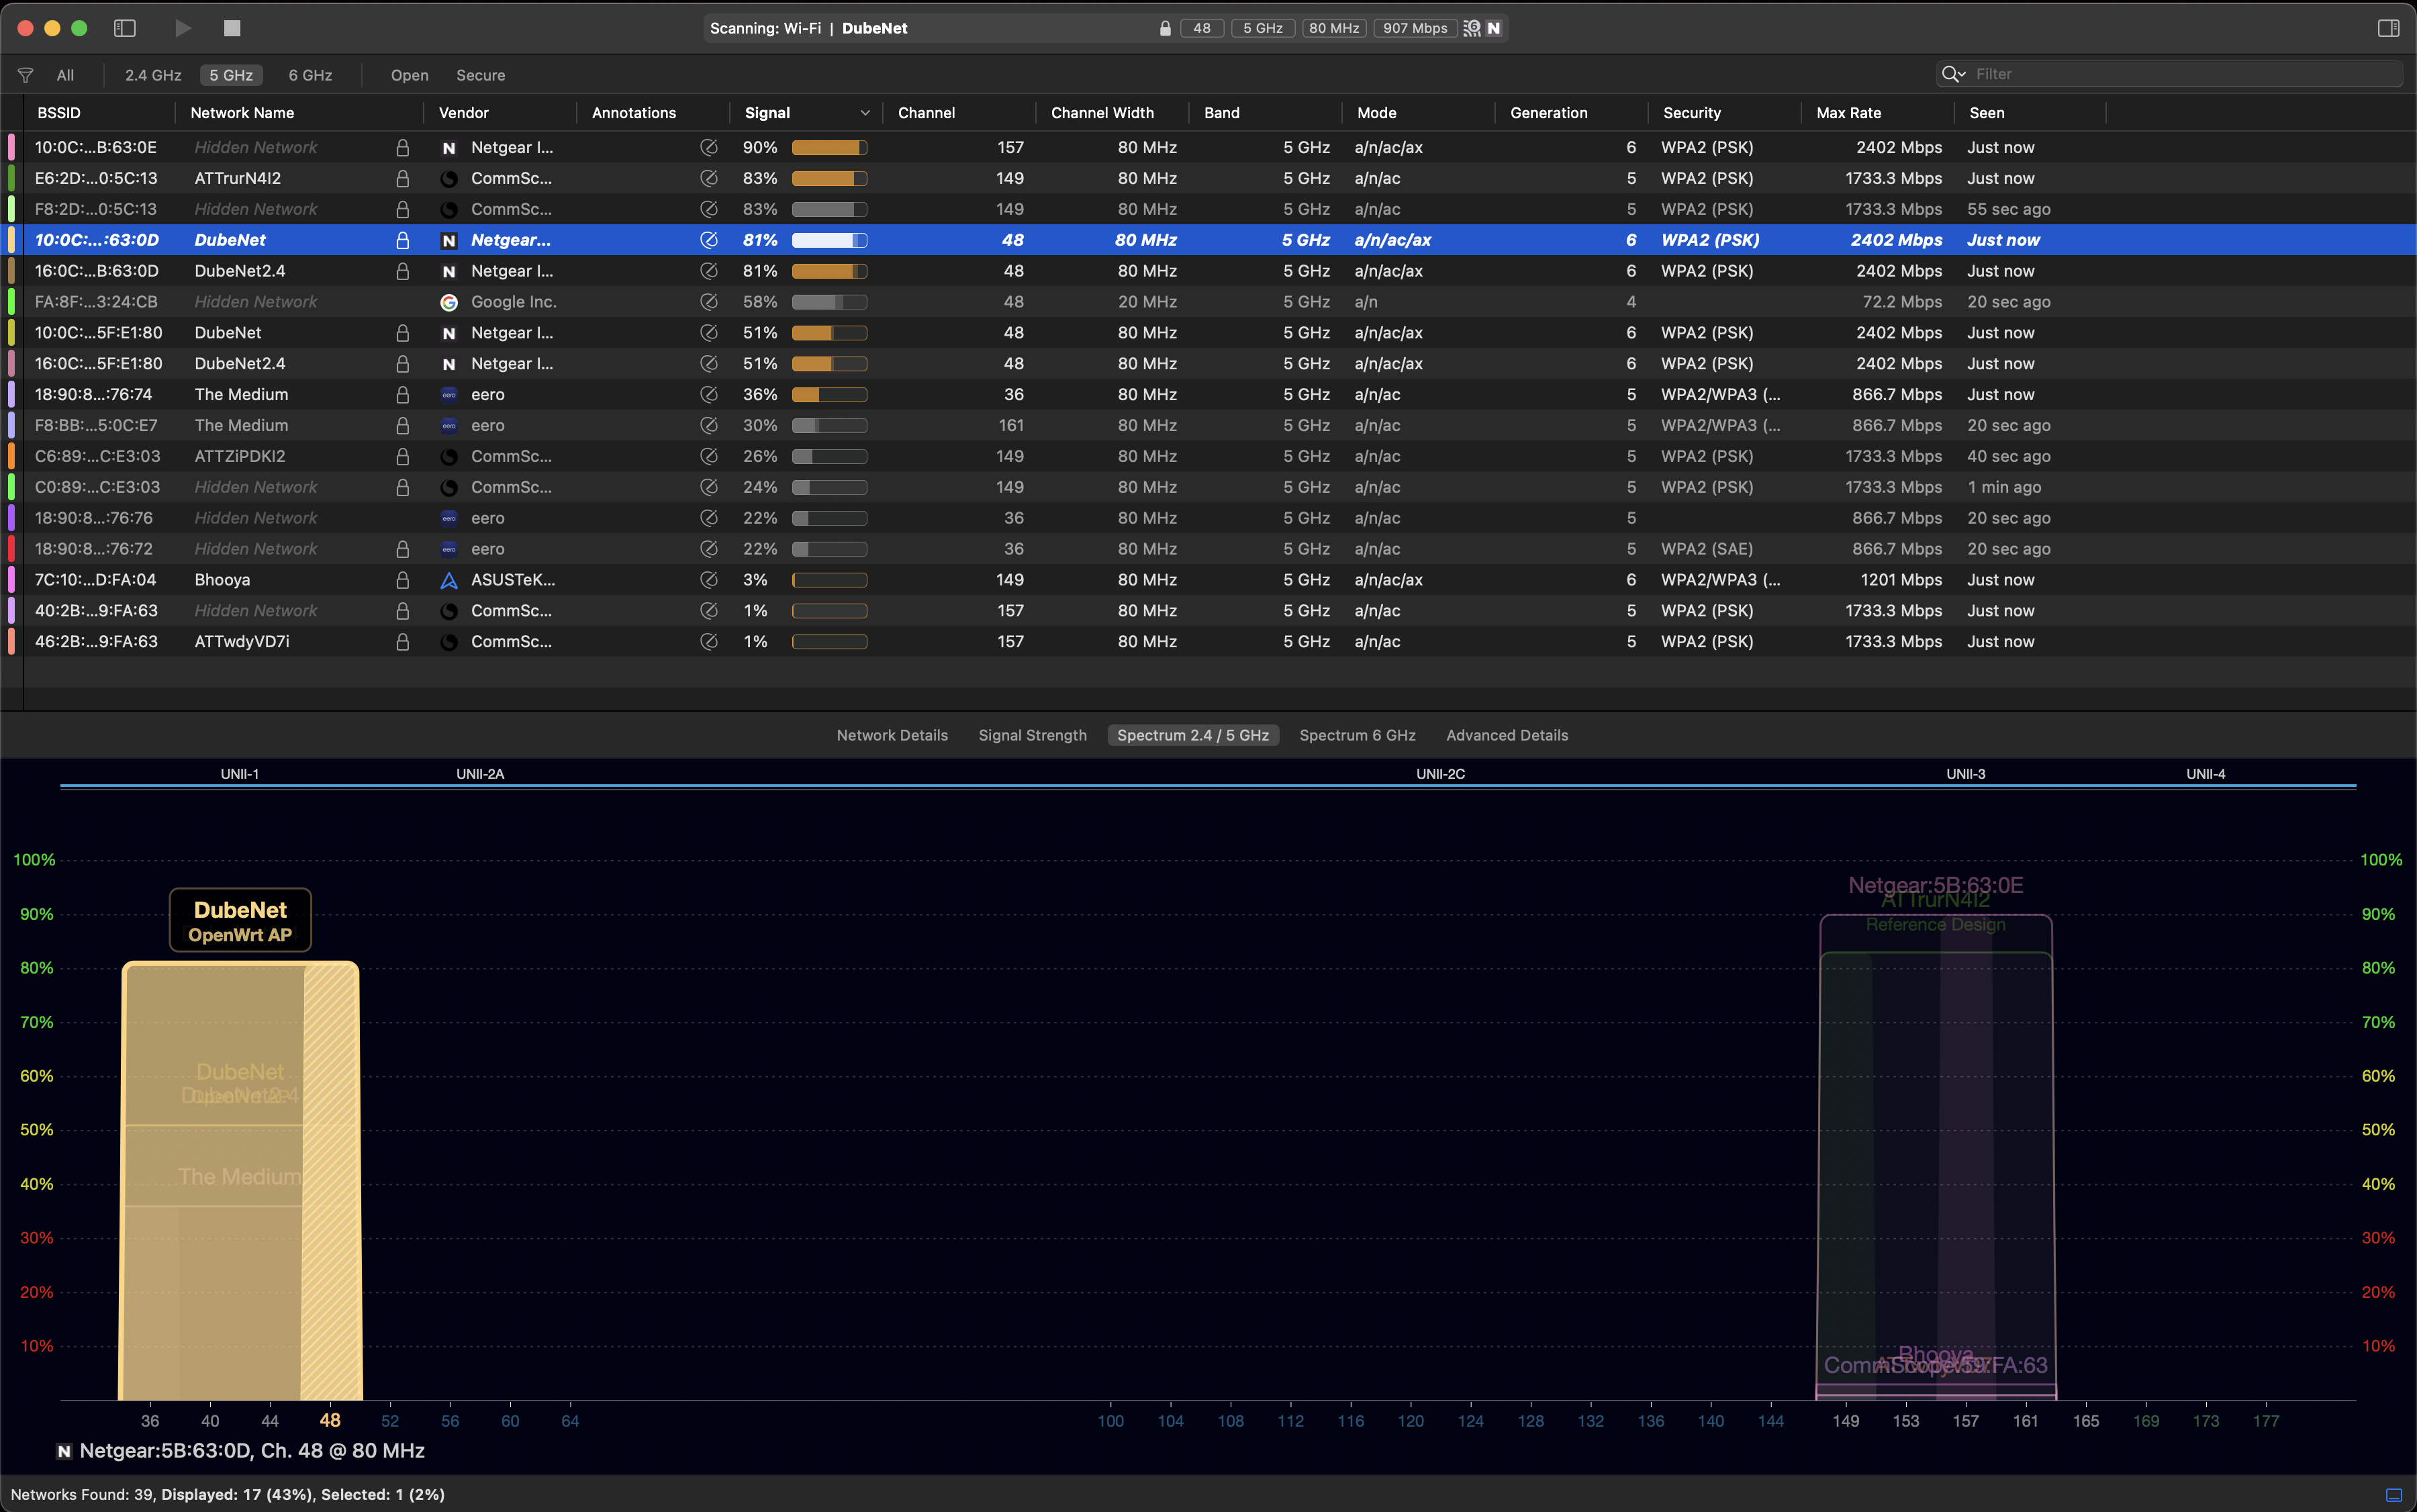
If there are interfering routers, change your router’s channel to a less congested one. If interference cannot be avoided, try closing doors and windows to reduce signal bleed from neighbouring networks.
5. Verify the channel and channel width
Confirm your router is using a recommended channel (44 or 149 for 5 GHz) and an adequate channel width (80 MHz minimum). You can check this using:
WiFi Explorer (macOS) — shows channel and width for all visible networks
Your router’s web admin page under wireless settings
macOS: hold Option and click the WiFi menu bar icon to see the current channel and bandwidth
See the Channel Selection section for recommendations.
6. AWDL-related latency spikes
If you see high, periodic network latency spikes like those shown below, Apple’s Wireless Direct Link (AWDL) protocol may be causing the device to hop between channels.
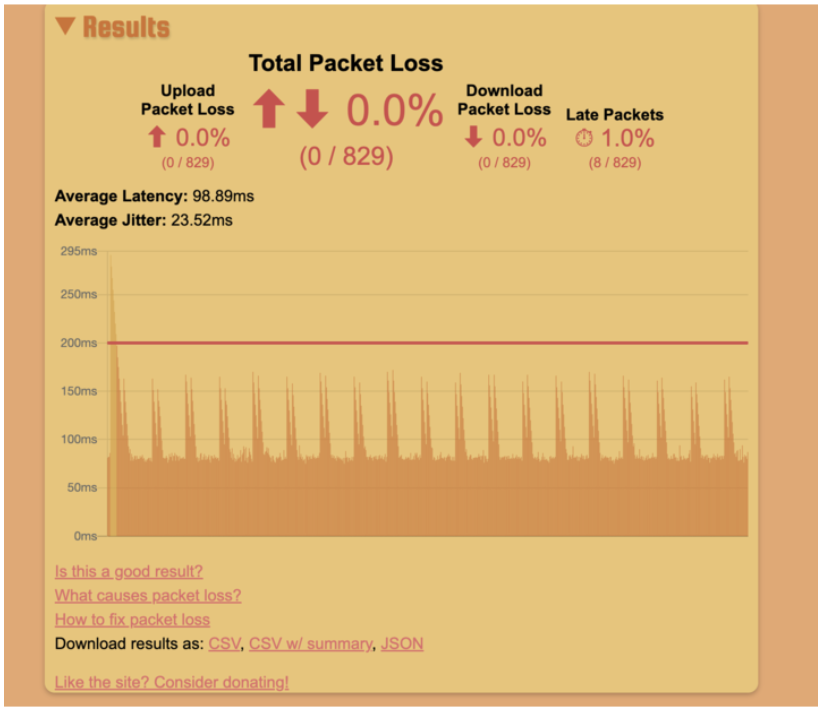
AWDL cannot be disabled, but you can mitigate its impact:
Configure your router to use channel 44 or 149 — these are the channels AWDL operates on, so the device will not need to hop away from your streaming channel.
If you cannot change the router channel, reduce how often the device activates AWDL by disabling AirPlay, Bluetooth, Handoff (Universal Clipboard), and Location Services on the client device.
See Also#
Quick Start – Get connected end-to-end
Troubleshooting – Detailed troubleshooting guide
System Architecture – Full pipeline overview