11.6. ROS Synchronization (Linux Only)
This tutorial covers the use of the ROS synchronization tools constituting the communication to and from the purple layers (perception and control) in the Cortex pipeline.
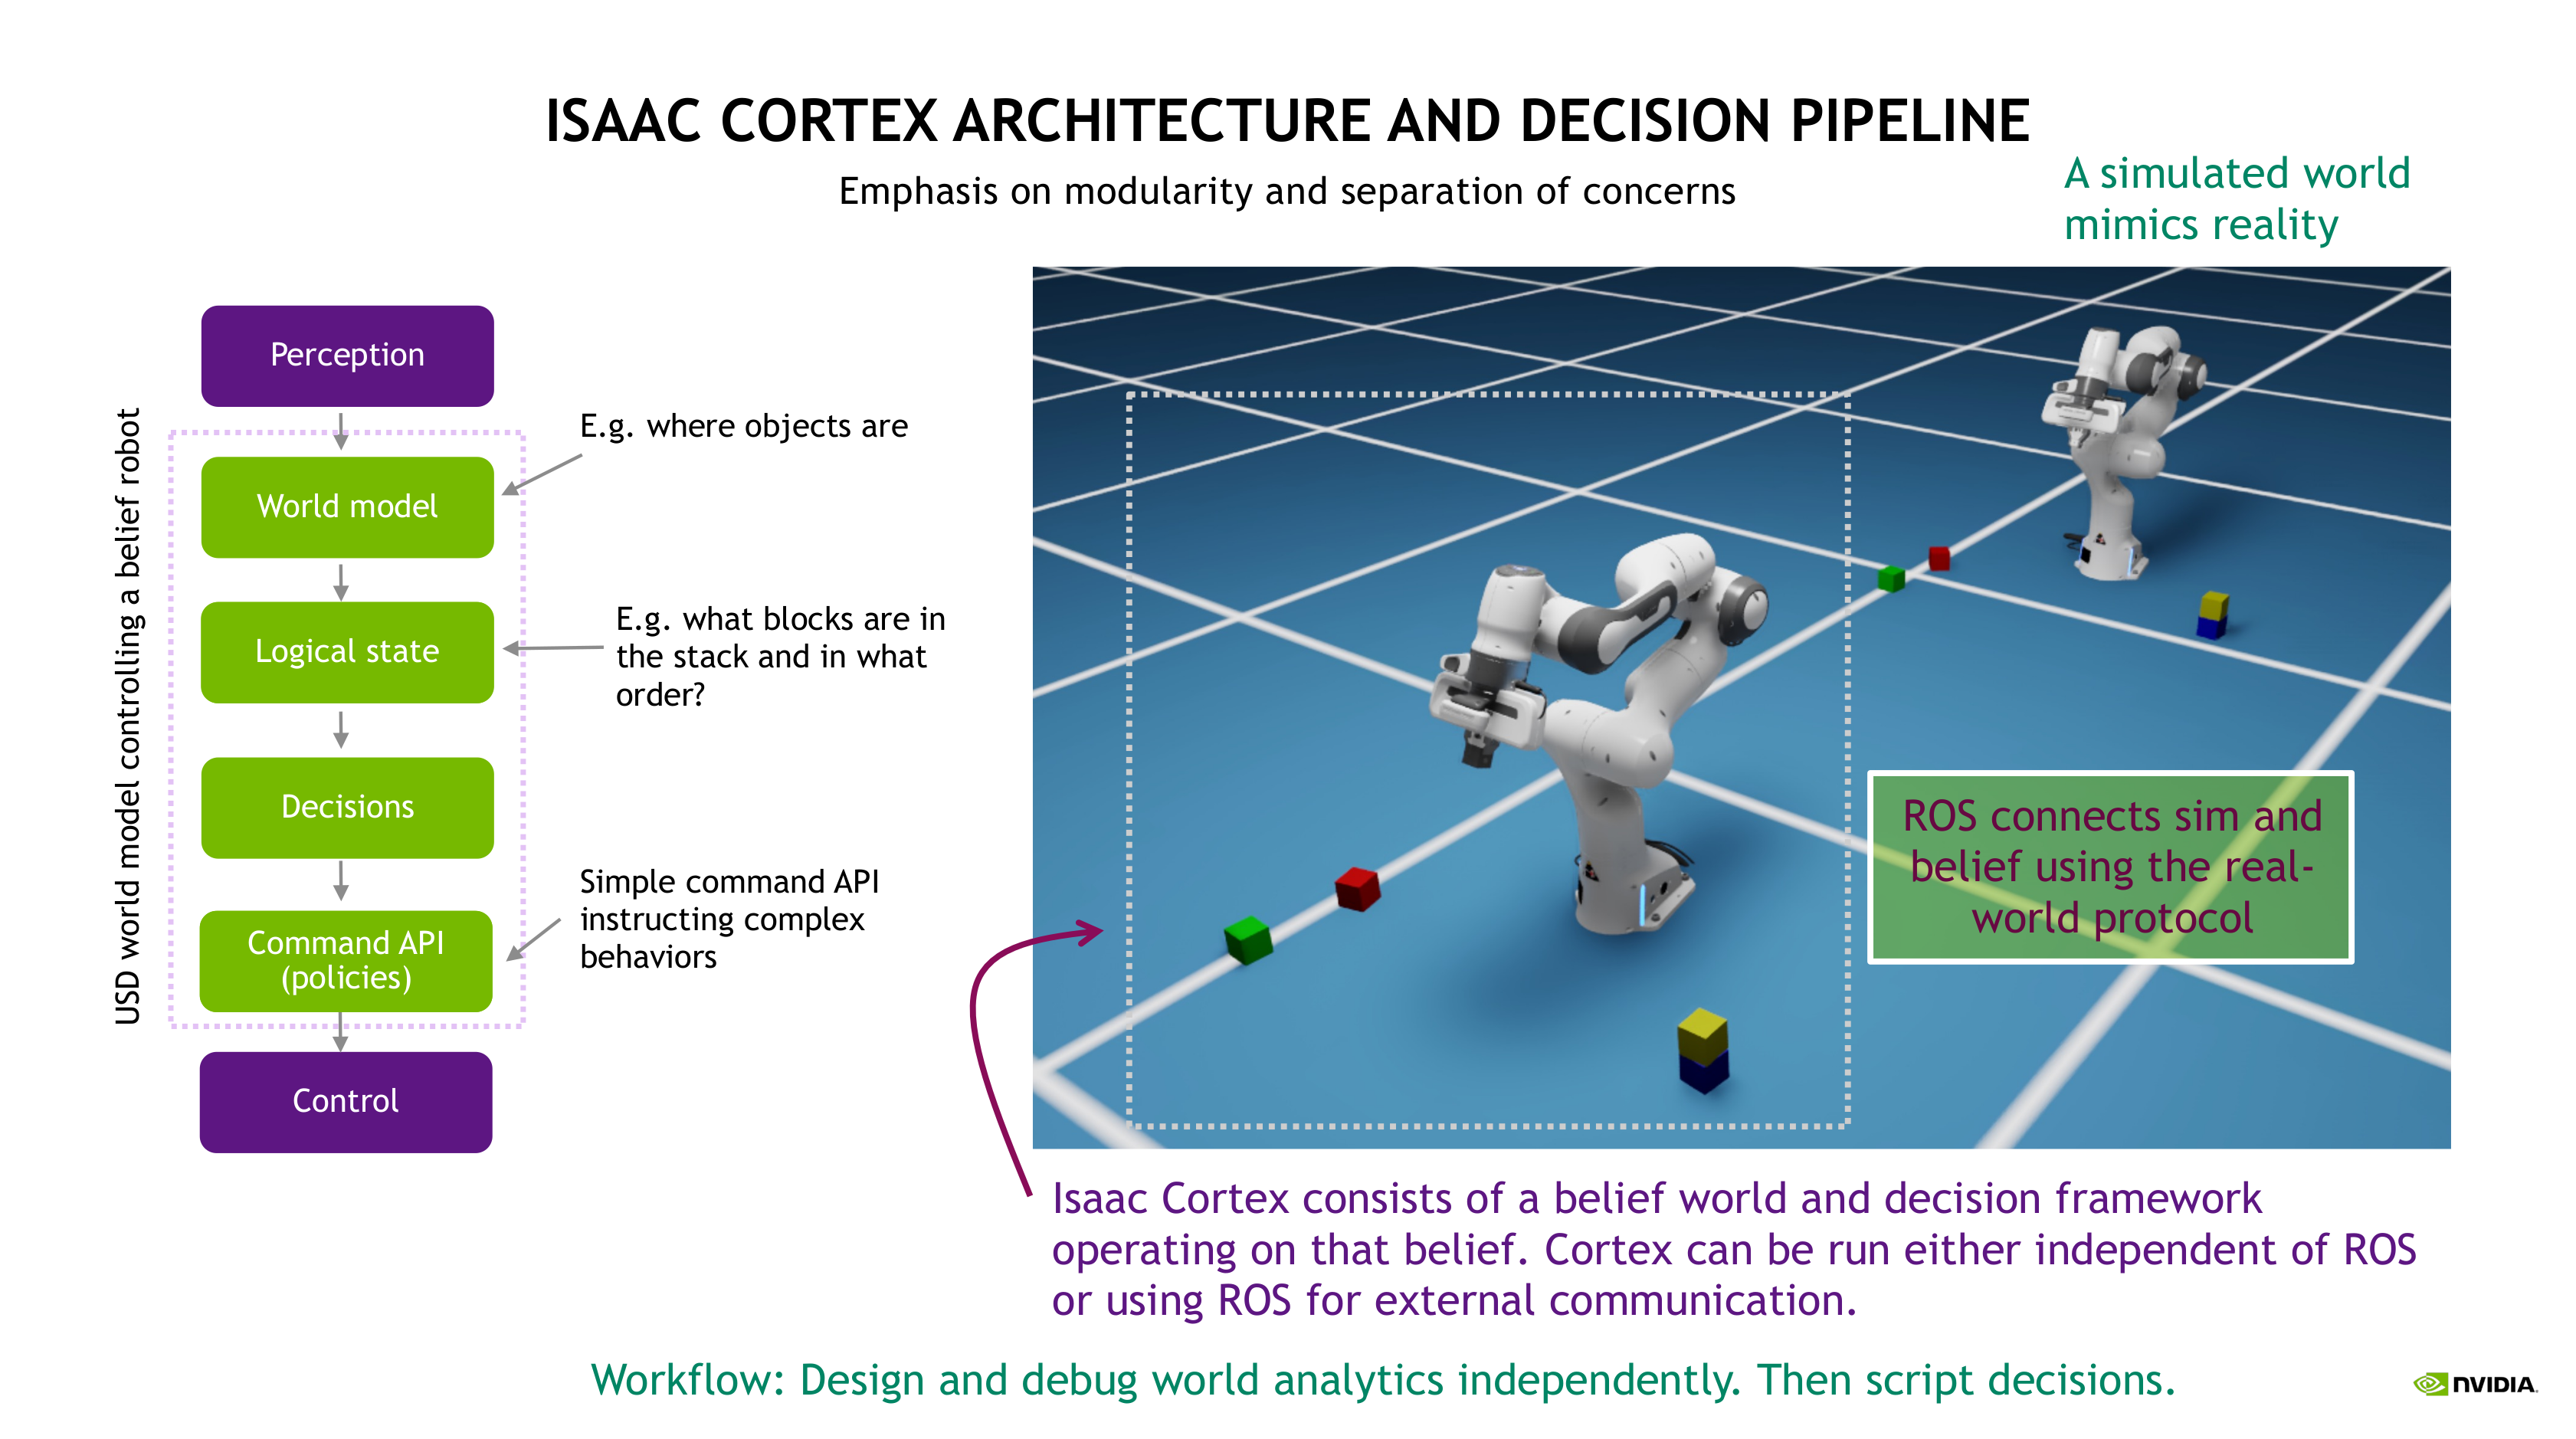
See Isaac Cortex: Overview for more detail on the Cortex pipeline. The
setup of the Cortex world and behaviors is largely the same with and without ROS communication, we
just need to create some ROS-specific objects that handle communication in the background. We’ll
see in the final section that all Franka behaviors can be run with the
example_cortex_sync_main.py example similar to franka_examples_main.py.
In all command line examples, we use the abbreviation isaac_python for the Isaac Sim python
script (<isaac_sim_root>/python.sh on Linux and <isaac_sim_root>\python.bat on Windows).
The command lines are written relative to the working directory
standalone_examples/api/omni.isaac.cortex.
Each example will launch Isaac Sim without playing the simulation. Press play to run the simulation and behavior.
11.6.1. Preliminaries: Build the Cortex control ROS package
For this tutorial, we need to build the cortex_control ROS package. We’ll give instructions here
for building the complete noetic_ws that comes with Isaac Sim ROS repository, but for a minimal workspace,
you can create your own (or use an existing workspace) and simply copy or symlink cortex_control
into it.
Building cortex_control:
source /opt/ros/noetic/setup.bash

cd <noetic_ws> # <noetic_ws> stands for the system path where the Isaac Sim ROS workspaces were cloned into
catkin_make

source devel/setup.bash
roscd cortex_control  # This should get you into the package directory.
11.6.2. Block stacking with ROS synchronization
You will need Three Terminal windows to run the sample.
In the First terminal window start a roscore:
source /opt/ros/noetic/setup.bash
roscore
In the second Terminal, run the following demo:
isaac_python example_cortex_sync_main.py
Note
Be sure that in the terminal that you run Isaac Sim that no version of ROS is sourced, otherwise you may encounter linker errors that will cause it to break.
The example will launch a Franka scene with colored blocks off to the side and the block stacking behavior. There will be two Frankas, one in front and one in back. The Franka scene in front represents the mind of the robot, its belief. The one in back is a simulated version of reality. See Isaac Cortex: Overview for details on the separation between belief and simulated reality.
We will refer to the robot in front as the belief robot and the robot in back as the sim robot.
Press play.
You will see the belief robot attempt to pick up a block, but fail. The belief robot moves but the sim robot does not because the two aren’t connected by a controller. The blocks are being synchronized since perception is simulated with ground truth transforms. Try moving the sim blocks (in the back). The blocks in the front move as well. Note that the block updates are throttled in this example so you’ll see the blocks synchronize only at 4hz (every 25 ms). When the belief attempts to pick a block, it’ll think it’s successful for around a quarter of a second, then realize the “real” block in the sim environment hasn’t moved and synchronize the belief back to the sim “reality”.
In the third terminal, start the sim controller:
source /opt/ros/noetic/setup.bash

cd <noetic_ws>

source devel/setup.bash
rosrun cortex_control sim_controller
You’ll see the belief robot synchronize with the sim robot’s configuration and start controlling it. The sim robot will move along with the belief robot and successfully accomplish the block stacking task in the sim world. You can interact with the system similar to the non-synchronized block stacking example by interacting with the sim world in back.
With the simulated controller running it’s safe to pause or stop (reset) the simulation. The controller will automatically re-connect when necessary.
11.6.3. Details
Take a look at the code for the sync example in
standalone_examples/api/omni.isaac.cortex/example_cortex_sync_main.py. It’s very similar to the
code in the non-synchronized example
standalone_examples/api/omni.isaac.cortex/franka_examples_main.py. The main differences are
three-fold:
We create a second robot and set of blocks (the sim environment). You can think of the single environment in the non-synchronized example as a belief environment.
The belief objects are wrapped as
CortexObjectobjects. This class has a member that will store the measured object poses and methods that facilitate synchronizing the object’s pose with the measured pose.We create a collection of four communication objects (described below).
Other than that, the setup of the CortexWorld and the behavior is the same.
The communication objects are:
cortex_sim = CortexSimRobotRos(sim_robot)
cortex_sim_objects_ros = CortexSimObjectsRos(sim_objects)
cortex_control = CortexControlRos(robot)
cortex_objects_ros = CortexObjectsRos(cortex_objects, auto_sync_objects=args.auto_sync_objects)
These objects do the following:
CortexSimRobotRoscreates a ROS interface to the simulated robot. It handles listening to low-level commanded joint values simulating low-level control. These low-level commands will be sent by the simulated controller. It also handles receiving and processing gripper commands.CortexSimObjectsRoshandles publishing the “measured” object poses simulating perception.CortexControlRoshandles sending commands to the sim robot. Note that gripper commands go directly to the sim robot ROS node, but arm commands are sent to the controller which handles the synchronization handshake and then then relays interpolated versions of the commands to the sim robot’s ROS interface.CortexObjectsRoshandles listening to the measured object poses and recording them in theCortexObjectobjects.
The CortexControlRos and CortexObjectsRos objects are agnostic to whether they’re talking to
the simulated ROS interface (using CortexSimRobotRos and CortexSimObjectsRos) or to the same
ROS interface on the real robot.
11.6.4. Running the other behaviors using ROS synchronization
By default, the CortexObject objects record the measured poses but don’t automatically
synchronize the object poses to those measured poses. Instead, the user or behavior should decide
how and when that synchronization should take place based on the needs of the behavior and the
characteristics of the perception module.
The block stacking behavior gives an example of handling that synchronization in the behavior.
Specifically, it’s handled in the BuildTowerContex.monitor_perception monitor.
Alternatively, the CortexObjectsRos object can be configured to automatically synchronize the
belief blocks every cycle to their measured poses on construction:
cortex_objects_ros = CortexObjectsRos(cortex_objects, auto_sync_objects=True)
In the example standalone_examples/api/omni.isaac.cortex/example_cortex_sync_main.py, that
setting is activated using the flag --auto_sync_objects.
Any of the behaviors in omni.isaac.cortex.sample_behaviors/omni/isaac/cortex/sample_behaviors/franka can be
loaded with this example. With all examples except the block stacking behavior the flag
--auto_sync_objects should be used.
The full commandline is
isaac_python example_cortex_sync_main.py --behavior=<behavior_name>
with <behavior_name> set to any of the following
block_stacking_behavior
peck_state_machine
peck_decider_network
peck_game
simple_state_machine
simple_decider_network
Alternatively, you can load behaviors directly from their python module:
isaac_python example_cortex_sync_main.py --behavior=<path_to_behavior>
Note that the block stacking behavior block_stacking_behavior (which the
flat --behavior defaults to) is left off the list because it shouldn’t use the
--auto_sync_objects flag.
11.6.4.1. Interacting with the sim env
When the --auto_sync_objects flag is used, the belief objects (in front) will be synchronized
with the sim objects (in back) every step, therefore you won’t be able to manually move them.
Instead, move the sim objects in back and you’ll see the belief objects in front move.
Try zooming in to the sim scene by clicking on the base of the back robot and pressing f to
focus the camera there. Adjust the scene by holding down Alt, dragging the mouse and using the
scrollwheel to zoom as needed. This perspective, showing only the sim robot, mimics what you’d
experience in the real world. The belief robot is making decisions, but you’re watching the sim
robot and interacting with the sim environment.
11.6.5. Controlling physical robots
Controlling a physical robot requires that you have a controller implementing the connection and
communication protocol required for syncing with Cortex. The cortex_control ROS package provides
a reference implementation of the protocol in a command stream interpolation tool used inside the
sim_controller described above. This tool can be used inside real controllers to handle
synchronizing Cortex with the physical robot and smoothly controlling the robot.
The header and implementation files
cortex_control/src/cortex/control/command_stream_interpolator.h
cortex_control/src/cortex/control/command_stream_interpolator.cpp
contain a class CommandStreamInterpolator that encapsulates an interpolator that can connect
with Cortex via ROS following the required connection and synchronization protocol. The
file
cortex_control/src/cortex/control/command_stream_interpolator_main.cpp
implements the sim_controller and demonstrates how to use those tools. The ROS package
cortex_control_franka provides a reference implementation of a real-world Franka controller
using the CommandStreamInterpolator class.
Warning
To run Cortex to control a physical Franka you need a physical Franka robot with Franka Control Interface (FCI) and franka_ros. See:
along with a real-time control workstation setup as described here:
Without that setup, the cortex_control_franka commands will error.
To launch the system for controlling a physical robot you’ll launch a single Franka environment as
you usually would, but create ROS communication objects for the belief robot as shown in the
example_cortex_sync_belief_main.py example:
cortex_control = CortexControlRos(robot)
cortex_objects_ros = CortexObjectsRos(cortex_objects, auto_sync_objects=args.auto_sync_objects)
Note that you don’t need to create the simulated robot and objects or
the CortexSimRobotRos and CortexSimObjectsRos objects. The physical robot, an external
perception module, and the physical robot’s controller (described below) play those roles.
11.6.5.1. Starting the Franka controllers
We describe here how to start up the Franka controllers which play the role of the real-world
variant of the sim_controller.
Note that, in the instructions below, at the point were we launch the joint position controller in Terminal 3 below, you should see the Cortex belief robot synchronize with the physical robot. It will engage the physical robot at that point, so you may see some slight movement, but it shouldn’t be much since the belief has synchronized with the physical robot’s configuration. However, make sure you have the e-stop ready in case anything goes wrong.
Warning
Make sure you have the e-stop in hand when running the following commands in case anything goes wrong. In particular, the command in Terminal 3 (starting the position controller) will engage the physical robot.
# Terminal 1: Start the Franka controller manager
roslaunch cortex_control_franka franka_control_cortex.launch

# Terminal 2: Set high torque thresholds for Franka
rosrun cortex_control_franka set_high_collision_thresholds

# Terminal 3: Startup the position controller -- launching this controller syncs the belief with the physical robot.
roslaunch cortex_control_franka joint_position_controller.launch

# Terminal 4: Start the gripper commander listener
rosrun cortex_control_franka franka_gripper_command_relay.py
Note
You will have to source the appropriate ROS workspace to run the above commands.
You can run the behaviors you ran in simulation in this way on the physical robot. The simplest
version for testing is to load no behavior and simply manually control the end-effector using the
/World/motion_commander_target prim.
11.6.5.2. Simple simulated demo
We don’t give a full demo of launching the physical robot controllers, but we mimic it using the simulated setup used above. Here, rather than launching both the belief and sim robots / environments in the same instance of Isaac Sim, we use two separate instances of Isaac Sim, one for the belief world and one for the sim world. This is analogous to the setup you’d use for a physical robot. The main difference in a physical setup is, rather than launch a separate instance of Isaac Sim to represent the sim world, we’d use the physical world and robot.
Launch an instance of Isaac Sim to represent the simulated reality (sim world):
isaac_python example_cortex_sync_sim_main.py
There’s no behavior associated with the sim world since it represents the real world. Now launch the belief world:
isaac_python example_cortex_sync_belief_main.py
By default, it launches no behavior (we’ll manually control the end-effector). Launch the
sim_controller as before using
rosrun cortex_control sim_controller
With the sim_controller running, the two robots should be synchronized and connected, although
you might not see either move since they both launch into the same configuration. Try manually
controlling the belief robot using the /World/motion_commander_target prim.
Behaviors can be added to the belief robot as usual.
This demo can be run with the separate instances of Isaac Sim running on separate machines. Simply
setup ROS to communicate between the machines and follow the instructions above. Run the
sim_controller from the machine running the sim world.