Animation Timeline and key frames#
Overview#
The Time line is the primary control for playback in omniverse. Within the Timeline preferences you can optimize your playback settings for the needs of your project. Providing better and more predictable workflows for use cases utilizing both animations and simulation. The Timeline is also the place to begin the creation of keyframe animation. On any selected prim you can animate the transforms, property values and token attributes.
User Manual#

HotKey |
Result |
|---|---|
ALT-S |
Key all transforms.
|
CTRL-C |
Copies the selected key frames.
|
CTRL-V |
Pastes the keyframes.
|
DEL |
Deletes the Selected key(s).
|
Middle mouse click |
Middle mouse clicking on the timeline - will update the playheads position to that frame - but will not update the stage time. (allows for a quick duplication of a previous pose)
|
FPS#
Allows the user to set the Framerate for the current stage and the animation you create. Determines how many frames per second will be played.

Playback Controls#
Allows the user to control the current position in time.

1 |
Move Playhead to first frame. |
2 |
Step back to previous frame. |
3 |
Step back to previous keyframe |
4 |
Play |
5 |
Step forward to next keyframe |
6 |
Step forward to next frame |
7 |
Move Playhead to Last frame. |
8 |
Loop |
Key all#
The Key all button will create a key on all transforms and the visibility channel of the selected Prim.
Multiple prims can be keyed simultaneously.
This action can also be performed with the Hotkey (ALT-S).

Autokey#
Activate autokey to automatically generate keys when you change parameters that have curves. Note: Autokey will only work if an initial key has been created by the user for the specific channel being animated. Autokey requires a curve to exist in order to create a key.
A Grey Autokey Icon indicates that autokey is turned off.

A yellow Icon indicates that there is no curve present on the selected prim - Create a key on the prim to enable autokey.

A Red Autokey Icon indicates that Autokey is active on the currently selected prim.

Movie Player#
Provides a quick link to the movie render options.
Stage Recorder#
Access the stage recorder to capture the motion in a stage.
Creating and Editing Keys#
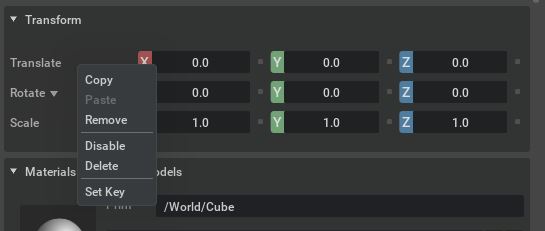
To get Started, with a Prim selected you can create keys in a number of Ways. Using the key all (alt S) and Autokey options mentioned above or for more explicit control of individual channels. You can also go to the property panel and right click on the transform or property value channel to “set key”. Once the first key is created you can then use autokey. (note: a curve must be created on a channel before autokey will create keys for that curve. Do this by creating the first key with either option described above.)
Setting keys in property panel#
Right Click over Translate Rotate or Scale to key all three axis of the selected transform type. Right Click over an individual axis channel - to key ONLY that channel.
Key Selection in Timeline#

Allows the user to select a key or group of keys on the timeline to change the frame on which they reside.
Selecting an individual frame#
Holding down the “Shift” modifier key.
Left Click a frame to select that frame.
Selecting a range of frames#
Hold down the “Shift” modifier key.
left Click and hold the first frame you want to select.
Then drag the mouse to the last frame you wish to select.
Release to select.
Moving a selection on timeline#
Click and hold the selected area to move the selected key or keys.
Deselecting a selected range on timeline#
left click anywhere on the timeline outside of the selection range to remove the selection.
Timeline options menu#
The settings available in the timeline Menu - are also available as preferences in the Preference Editor.
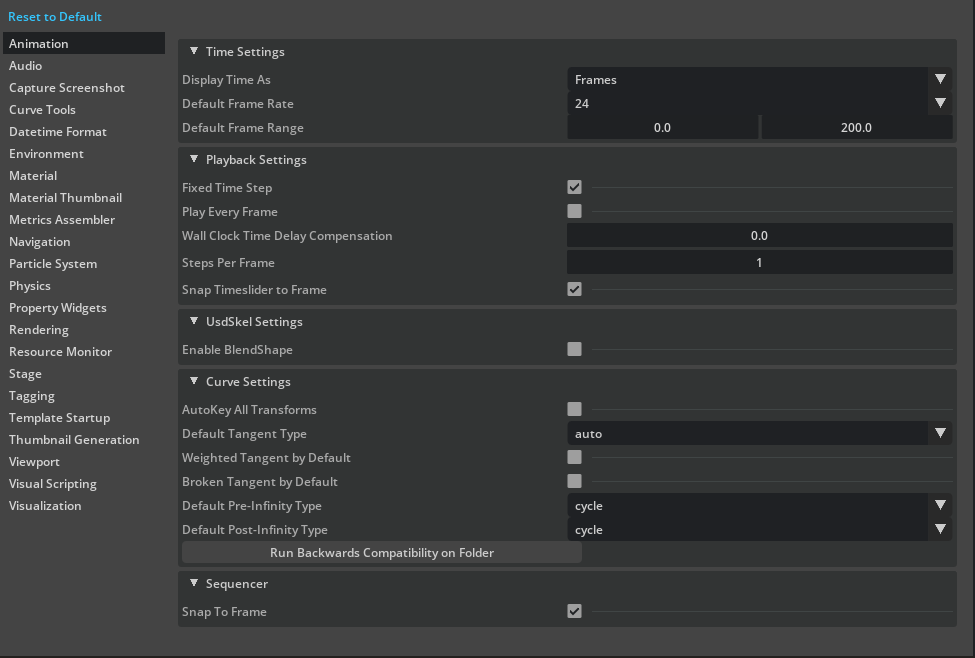
Snap TimeSlider to Frames#
During playback and scrubbing the playhead will always land on frame ticks.
Autokey ALL transforms#
By default Autokey will only update channels that have changed. EG. if trans X Y and Z have keys on frame one and you move the object on the Y axis,then only the Y channel will be keyed.
Selecting this option will set autokey to key ALL transforms and Visibility if any channel is updated on a given frame. Effectively autokey executes the Key All command when a change occurs to the objects transform values.
Playback Settings and preferences#
Fixed time step#
If the frame duration (the time it takes to complete all computation tasks for it, such as animation curves, deformers, dynamic solvers, etc.) is smaller than the time duration matching the established frames per second value (1 / FPS), the timeline will wait until that expected time duration is reached. Effectively ensuring consistent play rate.
If the frame duration is bigger than the expected one (1 / FPS), the timeline will wait on all computation tasks to complete entirely before moving to the next frame. This will slow-down the animation play rate, but will ensure consistency for systems, such as dynamic solvers, that heavily rely on previous state.
Wall Clock Time Delay compensation#
Accommodates for frame duration fluctuations to maintain the overall duration of the animation.
If for part of the timeline frames took 2-3 more times than expected other parts of the timeline where computation can be faster (shorter frames) the timeline will run faster. It will try to preserve the expected overall frame range duration.
So if you have 240 frames and your fps is set to 24 it will try to reach the last frame for 10 sends, even some of the frames took longer than that.
Steps per frame - Sub-Stepping#
Sub-Stepping allows to maintain the current stage FPS while executing additional ticks per frame in between. Enable this option where it is beneficial for a simulation to have a higher sample rate than the production FPS.
Eg. If set to 4. Four additional frames will be executed between each frame number increment.