Omniverse Materials

Materials in Omniverse are supported using MDL.

The NVIDIA Material Definition Language (MDL) is a shading language specifically designed for defining and describing the appearance of materials in computer graphics. It allows artists and developers to create highly realistic materials by specifying their physical properties, surface characteristics, and how they interact with light.

Key Features

  • Physically Based: MDL is based on the principles of physically based rendering, which aims to simulate the behavior of light in a physically accurate manner. This enables the creation of materials that closely resemble real-world substances.

  • Modularity: MDL supports a modular approach to material creation, allowing users to define reusable building blocks called material components. These components can be combined and layered to create complex materials with different properties.

  • Procedural Texture Generation: MDL includes a rich set of procedural texture functions that can be used to generate textures based on mathematical algorithms. This enables the creation of textures with intricate patterns and variations.

  • Scalability: MDL materials are designed to be scalable, meaning they can adapt to different levels of detail and performance requirements. This allows materials to be used in a variety of contexts, from real-time rendering in games to high-quality rendering in film and visual effects.

  • Interoperability: MDL is designed to be compatible with various rendering engines and applications. It provides a standard format for material exchange, allowing materials to be shared and used across different software and hardware platforms.

For more information on MDL.

Asset Validation for Materials

Asset Validation in Omniverse refers to the process of verifying the integrity and correctness of assets within the USD ecosystem. Asset validation ensures that the USD files adhere to the required standards, have valid data structures, and are compatible with the supported features and functionalities.

Attention

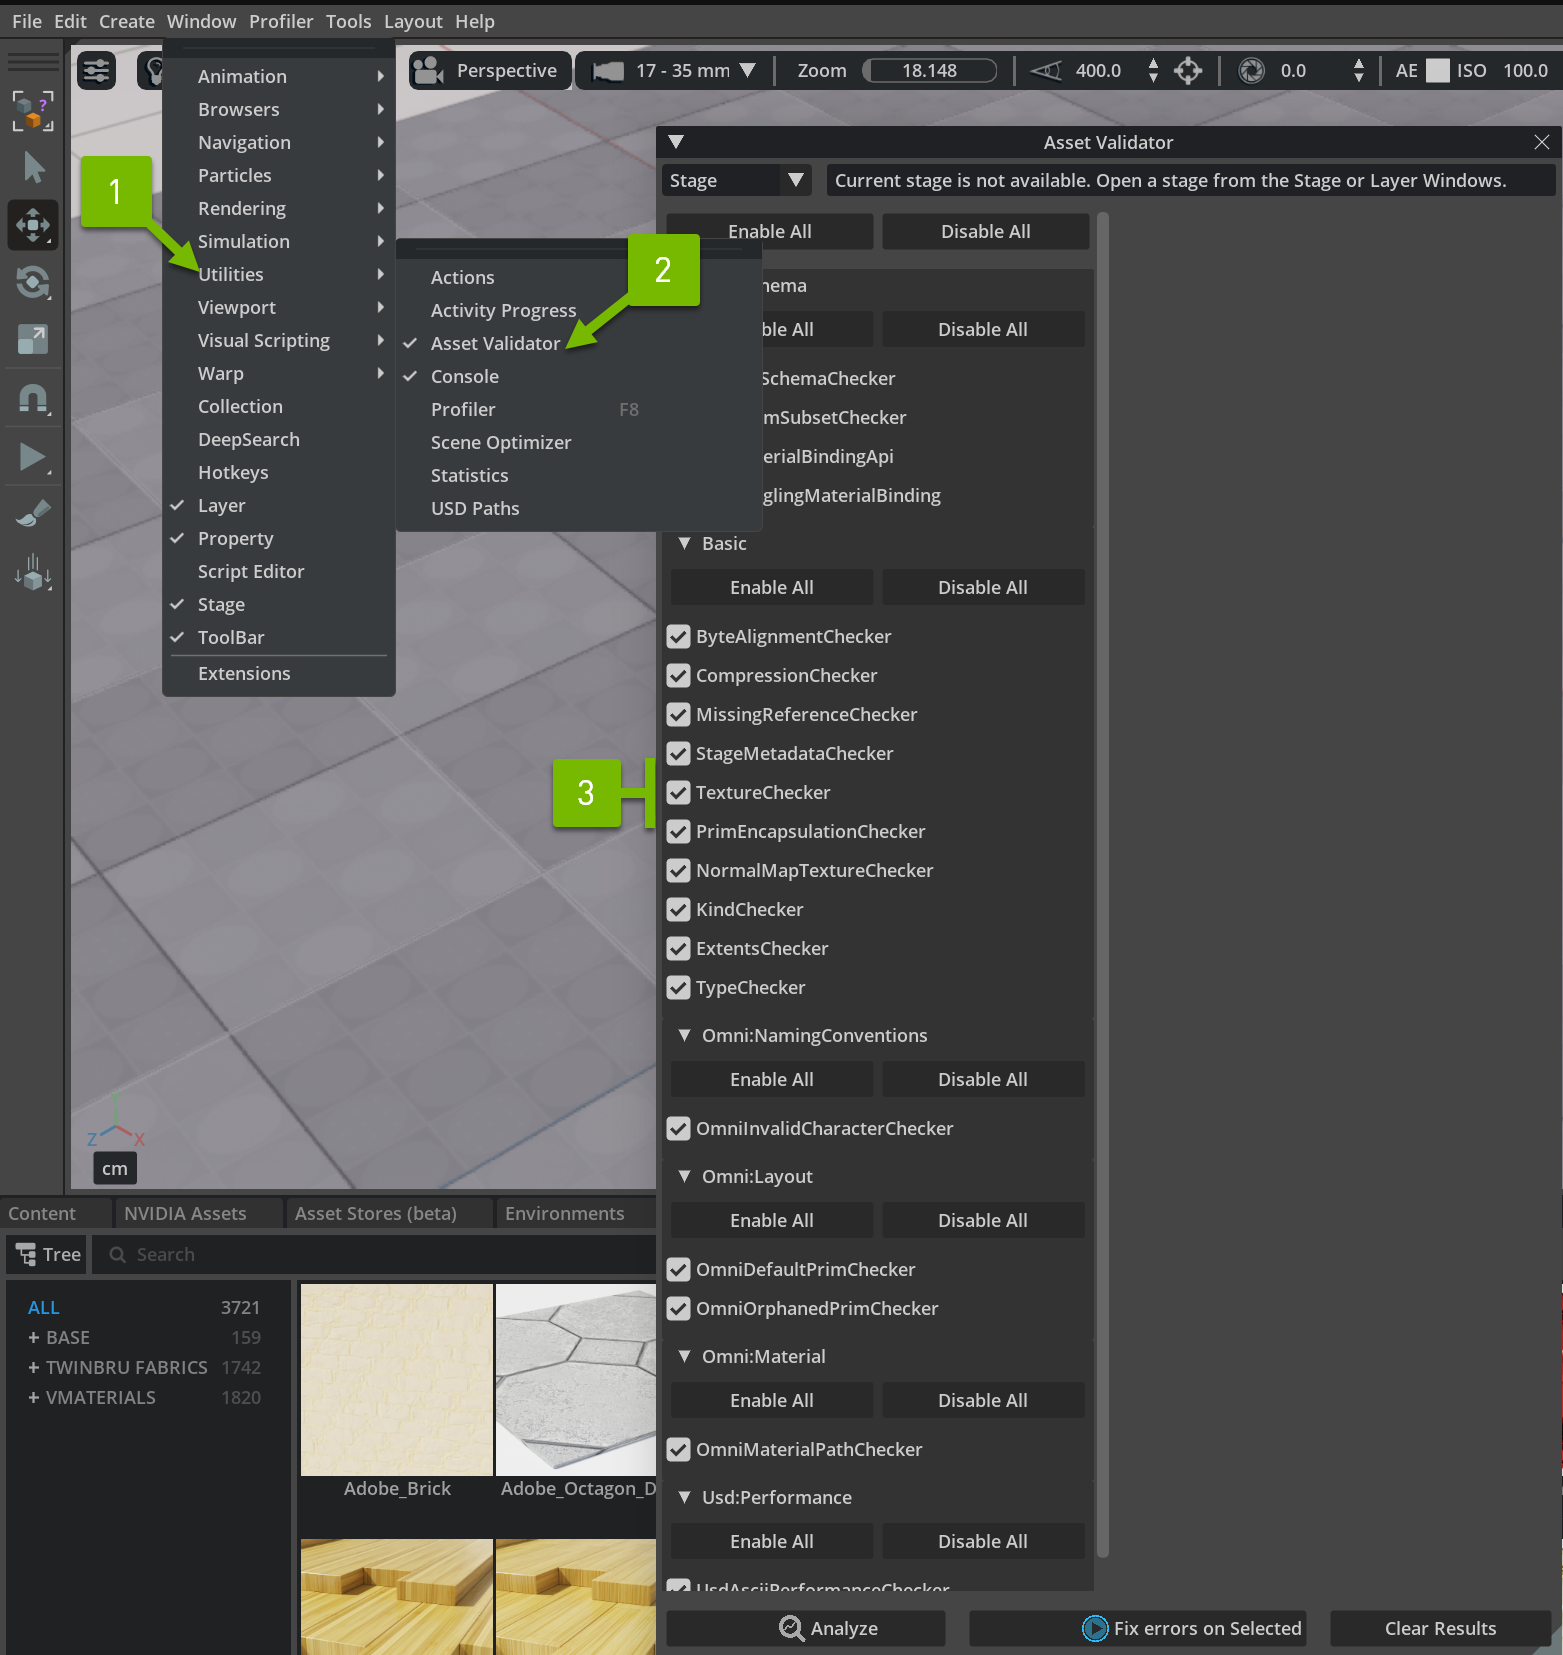
The USD ecosystem is becoming more strict in enforcing standards. In some cases this can break older assets authored previous to these changes. We have introduced an Asset Validator Extension to help fix these issues and create more robust assets. If you suspect something is wrong when you load an asset or you see a warning, please run the extension which can be found under the :menuselection: Windows > Utilities > Asset Validator sub menu. Refer to the Asset Validator Documentation for more info.

Asset Validator Menu

Material rules

Rule

Result

Missing Material Binding API

Ensures the MaterialBindingAPI is applied to on prims with bound materials

Dangling Material Bindings

Ensures that the bound material exists in the scene

Material path verification

MDL assets require absolute paths or relative paths prefixed with ./ to resolve properly. This Rule suggests to prefix ambiguous MDL asset path(s) with a ./ to enforce that it is a relative path (i.e ./M_PlantSet_A13.mdl).

Texture Checker

A RuleChecker which handles locating texture files automatically.

Normal Map Texture Checker

UsdUVTexture nodes that feed the inputs:normals of a UsdPreviewSurface must ensure that the data is encoded and scaled properly

The full set of Asset Validation Rules

Overview

Material Templates

Omniverse comes with several template materials(1), including a physically based glass; several general purpose multi-lobed materials useful for dielectric and non-dielectric materials, skin, hair, liquids and other materials requiring subsurface scattering or transmissive effects; and USD’s UsdPreviewSurface.

Material List


#

Template Name

General Use Case

1

UsdPreviewSurface

Native MDL material based on Pixar’s UsdPreviewSurface Specification

2

OmniPBR

Multi-lobed physically based material for dielectric and non-dielectric materials

3

OmniPBR_Base

A Material Graph friendly version of OmniPBR for use in building custom shading networks

4

OmniPBR_ClearCoat

Adds second glossy Bsdf to simulate a thin clear coating

5

OmniGlass

Transmissive, reflective, and refractive material

6

OmniPBR_Opacity 1

Adds opacity controls to OmniPBR

7

OmniPBR_ClearCoat_Opacity 1

Adds opacity controls to OmniPBR_ClearCoat

8

OmniGlass_Opacity 1

Adds opacity controls to OmniGlass

9

OmniSurface

Multi-lobed physical material for modeling a wide variety of materials

9

OmniSurfaceBase

A Material Graph friendly version of OmniSurface for use in building custom shading networks

10

OmniSurfaceLite

Contains subset of OmniSurface and is designed to be more performant than the full implementation

11

OmniSurfaceLiteBase

A Material Graph friendly version of OmniSurfaceLite for use in building custom shading networks

12

OmniHair

Hair material based on Disney’s Hair and Fur

12

OmniHairBase

A Material Graph friendly version of OmniSurfaceHair for use in building custom shading networks
1(1,2,3)

Dedicated Opacity materials are no longer necessary for objects with cutout or fractional opacity. With similar performance we recommend you use the base form of each material template. For legacy, Opacity based materials are still include in Omniverse.

UsdPreviewSurface

Note

In order to be compliant with Pixar’s UsdPreviewSurface Specification, we have refactored the native Omniverse representation. Workflows can now include a multi-node approach to define a surface. We now support the relevant nodes from the specification.

Overview

The UsdPreviewSurface shading model aims to provide a simple and intuitive set of parameters for defining a surface appearance. It is part of the larger USD ecosystem and provides a standard way to describe surface appearances in USD files. It facilitates interoperability and asset exchange between different software tools and rendering engines, making it easier to share and collaborate on 3D scenes and assets, and as such does not require MDL.

The USD Preview Surface shading model supports various features listed below. These parameters can be defined and adjusted within a USD file, allowing for consistent material representation across different applications and renderers that support USD.

Parameters

Description

diffuseColor

The color of the material

emissiveColor

The emissive color of the material

useSpecularWorkflow

Uses Specular workflow instead of Physical workflow

specularColor

Tint color for specular reflections

metallic

A range from 0-1 describing whether the surface is Dielectric or Conductive
0 is Dielectric (non metal)
1 is Conductive (metallic)

roughness

The amount of reflectivity a surface has. Range is 0-1
0 = perfectly reflective surface
1 = no reflectivity

clearcoat

Adjusts how “thick” the clearcoat is.

clearcoatRoughness

The amount of reflectivity a surface has. Range is 0-1
0 = perfectly reflective surface
1 = no reflectivity

opacity

The opacity of the surface in a range from 0-1
0 = No Opacity or “See Through”
1 = Fully Opaque

opacityThreshold

The opacity threshold is a clamp that cuts opacity to 0 if opacity is below the threshold amount

ior

Incidence of Refraction controls how much the light is “bent” when passing through a surface

normal

Sets the normal of the surface

displacement

Shifts the rendered surface by the displacement amount

occlusion

Artificially adds shading to the surface

UsdPreviewSurface Nodes

The material graph now allows you to author a shading graph composed of multiple nodes to represent a UsdPreviewSurface. You will need supply a simple graph for compliance with USD standards that must include a UsdPrimvarReader_float2(1) set to “st” to look up UV coordinates, that plugs into the “st” port on a UsdUVTexture(2) node which then plugs into the corresponding texture port on the UsdPreviewSurface(3) node per the following example.

Note

Older scenes containing UsdPreviewSurfaces may not display correctly. If this is the case then you will need to add a UsdPrimvar_float2(1) and UsdUVTexture(2).

UsdPreviewSurface Graph

Node

Description

UsdPreviewSurface

Base Defintion of UsdPreviewSurface

UsdUVTexture

Node that can be used to read UV textures, including tiled textures such as Mari UDIM’s

UsdTransform2d

Node that takes a 2d input and applies an affine transformation to it

UsdPrimvarReader_float

Node that provides the ability for shading networks to consume surface-varying data defined on geometry of type float

UsdPrimvarReader_float2

Node that provides the ability for shading networks to consume surface-varying data defined on geometry of type float 2

UsdPrimvarReader_float3

Node that provides the ability for shading networks to consume surface-varying data defined on geometry of type float 3

UsdPrimvarReader_float4

Node that provides the ability for shading networks to consume surface-varying data defined on geometry of type float 4

UsdPrimvarReader_int

Node that provides the ability for shading networks to consume surface-varying data defined on geometry of type integer

UsdPrimvarReader_normal

Node that provides the ability for shading networks to consume surface-varying data defined on geometry of vector type normal

UsdPrimvarReader_point

Node that provides the ability for shading networks to consume surface-varying data defined on geometry of type point

UsdPrimvarReader_vector

Node that provides the ability for shading networks to consume surface-varying data defined on geometry of type vector

Unsupported Nodes

The following nodes are provided as null objects until they are fully supported.
  • UsdPrimvarReader_string

  • UsdPrimvarReader_matrix

OmniPBR

Overview

OmniPBR is the default Physically based material available in Omniverse USD Composer. This material can describe most opaque dielectric or non-dielectric material.

OmniPBR consists of the following sections:

OmniPBR ClearCoat

Overview

OmniPBR_ClearCoat is similar to OmniPBR but with an additional glossy bsdf layer. Ideal for car paint or any surface with a thin clear finish.

OmniPBR_ClearCoat consists of the following sections:

Parameters

Albedo

Display Name

Name

Type

Default

Base Color

diffuse_color_constant

color

0.2, 0.2, 0.2

Albedo Map

diffuse_texture

asset

Albedo Map Color Space

Albedo Desaturation

albedo_desaturation

float

0.0

Albedo Add

albedo_add

float

0.0

Albedo Brightness

albedo_brightness

float

1.0

Color Tint

diffuse_tint

color

1.0, 1.0, 1.0

Base Color

This parameter sets the diffuse color or tint of the material.

OmniPBR Base Color

Base Color: 0.1, 0.27, 0.17

Albedo Map

Allows use of a texture file for use in color. Should be an albedo map for best results.

OmniPBR Albedo Map

Albedo Map: inner_checker.png

Albedo Map Color Space

Texture Gamma indicating the color space in which the source texture is encoded.

Possible Values:
  • raw : Use texture data as it was read from the texture and do not mark it as using a specific color space.

  • sRGB : Mark texture as sRGB when reading.

  • auto : Check for gamma/color space metadata in the texture file itself; if metadata is indicative of sRGB, mark texture as sRGB. If no relevant metadata is found, mark texture as sRGB if it is either 8-bit and has 3 channels or if it is 8-bit and has 4 channels. Otherwise, do not mark texture as sRGB and use texture data as it was read from the texture.

Albedo Map Raw

8 bit 3-channel inner_checker.png

Texture Gamma: raw

Albedo Map RGB

8 bit 3-channel inner_checker.png

Texture Gamma: sRGB

Albedo Desaturation

Removes color saturation values through a range from 0-1. 0 is unaffected, 1 is black and white.

Albedo Map DeSat-0

Albedo Desaturation: 0.0

Albedo Map DeSat-p5

Albedo Desaturation: 0.5

Albedo Map DeSat-1

Albedo Desaturation: 1.0

Albedo Add

Add (or subtract with negative values) the Base Color to the Albedo Map.

Albedo Map Add

Albedo Add: 0.15

Albedo Brightness

Adjusts the brightness of the albedo map.

Albedo Map Brightness

Albedo Brightness: 2.0

Color Tint

Color multiplier to Albedo Map.

Color Tint

Color Tint: 0.37, 0.3, 0.22

Reflectivity

Display Name

Name

Type

Default

Roughness Amount

reflection_roughness_constant

float

0.5

Roughness Map Influence

reflection_roughness_texture_influence

float

0.0

Roughness Map

reflectionroughness_texture

asset

Roughness Map Color Space

Metallic amount

metallic_constant

float

0.0

Metallic Map Influence

metallic_texture_influence

float

0.0

Metallic Map

metallic_texture

asset

Metallic Map Color Space

Specular

specular_level

float

0.5

Enable ORM texture

enable_ORM_texture

bool

false

ORM Map

ORM_texture

asset

ORM Map Color Space

Roughness Amount

Isotropic roughness of the surface.
  • Range is 0-1, 0 = perfectly reflective surface, 1 = no reflectivity

Roughness0

Roughness Amount: 0.0

Roughness25

Roughness Amount: 0.25

Roughness5

Roughness Amount: 0.5

Roughness Map Influence

Range from 0-1 mixes roughness map power over roughness value.
  • 0 uses Pure Roughness Value

  • 1 uses only Roughness Map

Roughness Influence 1

Roughness Map Influence: 0.0

Roughness Influence .5

Roughness Map Influence: 0.5

Roughness Influence .5

Roughness Map Influence: 0.0

Roughness Map

Allows use of a texture file for use in roughness.

Roughness Map

Roughness Map: = inner_checker.png

Roughness Map Color Space

Texture Gamma indicating the color space in which the source texture is encoded.

Possible Values:
  • raw : Use texture data as it was read from the texture and do not mark it as using a specific color space.

  • sRGB : Mark texture as sRGB when reading.

  • auto : Check for gamma/color space metadata in the texture file itself; if metadata is indicative of sRGB, mark texture as sRGB. If no relevant metadata is found, mark texture as sRGB if it is either 8-bit and has 3 channels or if it is 8-bit and has 4 channels. Otherwise, do not mark texture as sRGB and use texture data as it was read from the texture.

Metallic Amount

A range from 0-1 describing whether the surface is Dielectric or Conductive.
  • 0 is Dielectric (non metal)

  • 1 is Conductive (metallic)

Metallic 0

Metallic Amount: 0.0

Metallic 0.5

Metallic Amount: 0.5

Metallic 1

Metallic Amount: 1.0

Metallic Map Influence

Range from 0-1 mixes metallic map power over metallic amount.

MetallicMap 0

Roughness: 0.25

Metallic Map: inner_checker.png

Metallic Map Influence: 0.0

MetallicMap 0.5

Roughness: 0.25

Metallic Map: inner_checker.png

Metallic Map Influence: 0.5

MetallicMap 1

Roughness: 0.25

Metallic Map: inner_checker.png

Metallic Map Influence: 1.0

Metallic Map

Allows use of a texture file for use in metallic surface designation.

Metallic Map Color Space

Texture Gamma indicating the color space in which the source texture is encoded.

Possible Values:
  • raw : Use texture data as it was read from the texture and do not mark it as using a specific color space.

  • sRGB : Mark texture as sRGB when reading.

  • auto : Check for gamma/color space metadata in the texture file itself; if metadata is indicative of sRGB, mark texture as sRGB. If no relevant metadata is found, mark texture as sRGB if it is either 8-bit and has 3 channels or if it is 8-bit and has 4 channels. Otherwise, do not mark texture as sRGB and use texture data as it was read from the texture.

Specular

The specular reflectivity of the material.

Specular 0

Specular: 0.0

Specular 0.5

Specular: 0.5

Enable ORM Texture

Allows use of a “packed” Occlusion, Roughness and Metallic map instead of separate maps for each.

ORM Map

“Packed” ORM map texture input.

EnableORM 0

ORM Map: inner_checker_ORM.exr

Enable ORM Texture: false

Roughness Map Influence: 1.0

Metallic Map Influence: 1.0

EnableORM 1

ORM Map: inner_checker_ORM.exr

Enable ORM Texture: true

Roughness Map Influence: 1.0

Metallic Map Influence: 1.0

ORM Map Color Space

Texture Gamma indicating the color space in which the source texture is encoded.

Possible Values:
  • raw : Use texture data as it was read from the texture and do not mark it as using a specific color space.

  • sRGB : Mark texture as sRGB when reading.

  • auto : Check for gamma/color space metadata in the texture file itself; if metadata is indicative of sRGB, mark texture as sRGB. If no relevant metadata is found, mark texture as sRGB if it is either 8-bit and has 3 channels or if it is 8-bit and has 4 channels. Otherwise, do not mark texture as sRGB and use texture data as it was read from the texture.

AO

Display Name

Name

Type

Default

Ambient Occlusion to Diffuse

ao_to_diffuse

float

0.0

Ambient Occlusion Map

ao_texture

asset

Ambient Occlusion Map Color Space

Ambient Occlusion to Diffuse

How much ambient occlusion influences the diffuse map in a range of 0-1.
  • 0 is unaffected, 1 is full effect.

Ambient Occlusion Map

Allows use of a texture file for use in Ambient Occlusion.

Ambient Occlusion Map Color Space

Texture Gamma indicating the color space in which the source texture is encoded.

Possible Values:
  • raw : Use texture data as it was read from the texture and do not mark it as using a specific color space.

  • sRGB : Mark texture as sRGB when reading.

  • auto : Check for gamma/color space metadata in the texture file itself; if metadata is indicative of sRGB, mark texture as sRGB. If no relevant metadata is found, mark texture as sRGB if it is either 8-bit and has 3 channels or if it is 8-bit and has 4 channels. Otherwise, do not mark texture as sRGB and use texture data as it was read from the texture.

Emissive

Display Name

Name

Type

Default

Enable Emission

enable_emission

bool

false

Emissive Color

emissive_color

color

1.0, 1.0, 0.1

Emissive Color Map

emissive_color_texture

asset

Emissive Color Map Color Space

Emissive Mask Map

emissive_mask_texture

asset

Emissive Mask Map Color Space

Emissive Intensity

emissive_intensity

float

1.0

Enable Emission

Toggles Emission on and off.

EnableEmissive 0

Enable Emission: false

EnableEmissive 1

Enable Emission: true

Emissive Color

Color to emit.

EmissiveColor

Emission Color: .94, .89, .65

Emissive Color Map

Allows use of texture file for use in emission color.

EmissiveColorMap

Emission Color Map: 4K-abstract_3-diffuse.jpg

Emissive Map Color Space

Texture Gamma indicating the color space in which the source texture is encoded.

Possible Values:
  • raw : Use texture data as it was read from the texture and do not mark it as using a specific color space.

  • sRGB : Mark texture as sRGB when reading.

  • auto : Check for gamma/color space metadata in the texture file itself; if metadata is indicative of sRGB, mark texture as sRGB. If no relevant metadata is found, mark texture as sRGB if it is either 8-bit and has 3 channels or if it is 8-bit and has 4 channels. Otherwise, do not mark texture as sRGB and use texture data as it was read from the texture.

Emissive Mask Map

Allows use of a texture file for use in masking out emissive areas.

Emissive Mask Map

Emission Mask Map: PaintedMetal02_4K_Metallic.png

Emissive Mask Map Color Space

Texture Gamma indicating the color space in which the source texture is encoded.

Possible Values:
  • raw : Use texture data as it was read from the texture and do not mark it as using a specific color space.

  • sRGB : Mark texture as sRGB when reading.

  • auto : Check for gamma/color space metadata in the texture file itself; if metadata is indicative of sRGB, mark texture as sRGB. If no relevant metadata is found, mark texture as sRGB if it is either 8-bit and has 3 channels or if it is 8-bit and has 4 channels. Otherwise, do not mark texture as sRGB and use texture data as it was read from the texture.

Emissive Intensity

How bright is the emissive color.

Emissive Intensity 0

Emissive Intensity: 0.0

Emissive Intensity 800

Emissive Intensity: 800

Emissive Intensity 5000

Emissive Intensity: 5000

Opacity

Display Name

Name

Type

Default

Enable Opacity

enable_opacity

bool

false

Enable Opacity Texture

enable_opacity_texture

bool

false

Opacity Amount

opacity_constant

float

1.0

Opacity Map

opacity_texture

asset

Opacity Map Color Space

Opacity Map Mono Source

opacity_mode

enum

mono_average

Opacity Threshold

opacity_threshold

float

0.0

OmniPBR Enable Opacity

Enable overall opacity

Opacity True

Enable Opacity: true

Opacity Amount: 0.5

Opacity False

Enable Opacity: false

Opacity Amount: 0.5

OmniPBR Enable Opacity Texture

Enables Opacity Map

Enable Opacity Map 1

Enable Opacity: true

Enable Opacity Texture: true

Opacity Map: PaintedMetal02_4K_Metallic.png

Enable Opacity Map 0

Enable Opacity: true

Enable Opacity Texture: false

Opacity Map: PaintedMetal02_4K_Metallic.png

OmniPBR Opacity Amount

Opacity value of material. Works in conjunction with Opacity Threshold and Fractional Cutout Opacity

Opacity Amount 1

Enable Opacity: true

Opacity Amount: 1.0

Opacity Amount 0.5

Enable Opacity: true

Opacity Amount: 0.5

Opacity Amount 0.1

Enable Opacity: true

Opacity Amount: 0.1

OmniPBR Opacity Map

Allows mapping of opacity to a texture file.

Enable Opacity Map 1

Enable Opacity: true

Enable Opacity Texture: true

Opacity Map: PaintedMetal02_4K_Metallic.png

OmniPBR Opacity Map Color Space

Texture Gamma indicating the color space in which the source texture is encoded.

Possible Values:
  • raw : Use texture data as it was read from the texture and do not mark it as using a specific color space.

  • sRGB : Mark texture as sRGB when reading.

  • auto : Check for gamma/color space metadata in the texture file itself; if metadata is indicative of sRGB, mark texture as sRGB. If no relevant metadata is found, mark texture as sRGB if it is either 8-bit and has 3 channels or if it is 8-bit and has 4 channels. Otherwise, do not mark texture as sRGB and use texture data as it was read from the texture.

OmniPBR Opacity Map Mono Source

Specifies opacity channel or evaluation of the map for opacity.
  • mono_alpha : Uses the alpha channel of the image as the source for evaluation.

  • mono_average : Uses the average of the RGB channels as the source for evaluation.

  • mono_luminance : Uses the luminance of the image as the source for evaluation.

  • mono_maximum : Uses the max value of the RGB channels as the source for evaluation.

OmniPBR Opacity Threshold

Cutoff for determining object cutout opacity. If threshold is equal to 0, then use fractional opacity. If threshold is greater than 0, then object is opaque when opacity is greater than threshold.

Opacity Threshold 0.2

Enable Opacity: true

Enable Opacity Texture: true

Opacity Map: PaintedMetal02_4K_Roughness.png

Opacity Threshold: 0.2

Opacity Threshold 0.3

Enable Opacity: true

Enable Opacity Texture: true

Opacity Map: PaintedMetal02_4K_Roughness.png

Opacity Threshold: 0.3

Opacity Threshold 0.35

Enable Opacity: true

Enable Opacity Texture: true

Opacity Map: PaintedMetal02_4K_Roughness.png

Opacity Threshold: 0.35

Clearcoat

Display Name

Name

Type

Default

Enable Clearcoat Layer

enable_clearcoat

bool

false

Clearcoat Tint

clearcoat_tint

color

1.0, 1.0, 1.0

Clearcoat Transparency

clearcoat_transparency

float

1.0

Clearcoat Roughness

clearcoat_reflection_roughness

float

0.0

Clearcoat Weight

clearcoat_weight

float

1.0

Clearcoat Flatten

clearcoat_flatten

float

1.0

Clearcoat IOR

clearcoat_ior

float

1.56

Clearcoat Normal Map Strength

clearcoat_bump_factor

float

1.0

Clearcoat Normal Map

clearcoat_normalmap_texture

asset

Clearcoat Normal Map Color Space

OmniPBR Enable Clearcoat Layer

Enables clear coat layer.

Enable Clearcoat 0

Enable Clearcoat Layer: false

Enable Clearcoat 1

Enable Clearcoat Layer: true

OmniPBR Clearcoat Tint

Base color of the clearcoat layer.

Enable Clearcoat 1

Enable Clearcoat Layer: true

Clearcoat Tint: 1.0, 1.0, 1.0

Clearcoat Tint

Enable Clearcoat Layer: true

Clearcoat Tint: 0.3, 0.16, 0.16

OmniPBR Clearcoat Transparency

Weighted blend between the material and the clearcoat.
  • 0 is clearcoat

  • 1 is base material with clearcoat on top

Clearcoat Tint

Base Color: 0.05, 0.1, 0.24

Enable Clearcoat Layer: true

Clearcoat Tint: 0.3, 0.16, 0.16

Clearcoat Transparency: 1.0

Clearcoat Transp 0.5

Base Color: 0.05, 0.1, 0.24

Enable Clearcoat Layer: true

Clearcoat Tint: 0.3, 0.16, 0.16

Clearcoat Transparency: 0.5

Clearcoat Transp 0

Base Color: 0.05, 0.1, 0.24

Enable Clearcoat Layer: true

Clearcoat Tint: 0.3, 0.16, 0.16

Clearcoat Transparency: 0.0

OmniPBR Clearcoat Roughness

Isotropic roughness of the clearcoat. Usually 0.

Clearcoat Tint

Base Color: 0.05, 0.1, 0.24

Enable Clearcoat Layer: true

Clearcoat Roughness: 0.0

Clearcoat Transparency: 1.0

Clearcoat Roughness 0.1

Base Color: 0.05, 0.1, 0.24

Enable Clearcoat Layer: true

Clearcoat Roughness: 0.1

Clearcoat Transparency: 0.5

Clearcoat Roughness 0.2

Base Color: 0.05, 0.1, 0.24

Enable Clearcoat Layer: true

Clearcoat Roughness: 0.2

Clearcoat Transparency: 0.0

OmniPBR Clearcoat Weight

The specular reflectivity of the clearcoat layer.

Enable Clearcoat 1

Base Color: 0.05, 0.1, 0.24

Enable Clearcoat Layer: true

Clearcoat Weight: 1.0

Clearcoat Weight 0.5

Base Color: 0.05, 0.1, 0.24

Enable Clearcoat Layer: true

Clearcoat Weight: 0.5

Clearcoat Weight 0.2

Base Color: 0.05, 0.1, 0.24

Enable Clearcoat Layer: true

Clearcoat Weight: 0.2

OmniPBR Clearcoat Flatten

Blends between the smooth normal and the bumped base normal.

_images/OmniPBR_ClearcoatFlatten1.png

Base Color: 0.05, 0.1, 0.24

Enable Clearcoat Layer: true

Clearcoat Flatten: 1.0

Normal Map: PaintedMetal02_4K_Normal.png

_images/OmniPBR_ClearcoatFlatten0.5.png

Base Color: 0.05, 0.1, 0.24

Enable Clearcoat Layer: true

Clearcoat Flatten: 0.5

Normal Map: PaintedMetal02_4K_Normal.png

_images/OmniPBR_ClearcoatFlatten0.0.png

Base Color: 0.05, 0.1, 0.24

Enable Clearcoat Layer: true

Clearcoat Flatten: 0.0

Normal Map: PaintedMetal02_4K_Normal.png

OmniPBR Clearcoat IOR

Index of Refraction of the clearcoat layer.

_images/OmniPBR_ClearcoatIOR1.png

Clearcoat IOR: 1.0

_images/OmniPBR_EnableClearcoat1.png

Clearcoat IOR: 1.56

_images/OmniPBR_ClearcoatIOR2.5.png

Clearcoat IOR: 2.5

OmniPBR Clearcoat Normal Map Strength

Scalar multiplier of the Clearcoat Normal Map.

_images/OmniPBR_EnableClearcoat1.png

Clearcoat Normal Map Strength: 0.0

Clearcoat Normal Map: PaintedMetal02_4K_Normal.png

_images/OmniPBR_ClearcoatNMStrength0.5.png

Clearcoat Normal Map Strength: 0.5

Clearcoat Normal Map: PaintedMetal02_4K_Normal.png

_images/OmniPBR_ClearcoatNMStrength1.png

Clearcoat Normal Map Strength: 1.0

Clearcoat Normal Map: PaintedMetal02_4K_Normal.png

OmniPBR Clearcoat Normal Map

Normal map for the clearcoat layer.

_images/OmniPBR_ClearcoatNMStrength1.png

Clearcoat Normal Map: PaintedMetal02_4K_Normal.png

OmniPBR Clearcoat Normal Map Color Space

Texture Gamma indicating the color space in which the source texture is encoded.

Possible Values:
  • raw : Use texture data as it was read from the texture and do not mark it as using a specific color space.

  • sRGB : Mark texture as sRGB when reading.

  • auto : Check for gamma/color space metadata in the texture file itself; if metadata is indicative of sRGB, mark texture as sRGB. If no relevant metadata is found, mark texture as sRGB if it is either 8-bit and has 3 channels or if it is 8-bit and has 4 channels. Otherwise, do not mark texture as sRGB and use texture data as it was read from the texture.

Normal

Display Name

Name

Type

Default

Normal Map Strength

bump_factor

float

1.0

Normal Map

normalmap_texture

asset

Normal Map Color Space

Detail Normal Strength

detail_bump_factor

float

0.3

Detail Normal Map

detail_normalmap_texture

asset

Detail Normal Map Color Space

Normal Map Flip U Tangent

flip_tangent_u

bool

false

Normal Map Flip V Tangent

flip_tangent_v

bool

true

OmniPBR Normal Map Strength

Adjusts intensity of the normal map.

_images/OmniPBR_NMStrength0.png

Normal Map Strength: 0.0

Normal Map: PaintedMetal02_4K_Normal.png

_images/OmniPBR_NMStrength0.5.png

Normal Map Strength: 0.5

Normal Map: PaintedMetal02_4K_Normal.png

_images/OmniPBR_NMStrength1.5.png

Normal Map Strength: 1.5

Normal Map: PaintedMetal02_4K_Normal.png

OmniPBR Normal Map

Allows use of a texture file for use in surface bumps. For best results use the Direct X normal format.

_images/OmniPBR_NMStrength0.png

Normal Map:

_images/OmniPBR_NMStrength1.png

Normal Map: PaintedMetal02_4K_Normal.png

OmniPBR Normal Map Color Space

Texture Gamma indicating the color space in which the source texture is encoded.

Possible Values:
  • raw : Use texture data as it was read from the texture and do not mark it as using a specific color space.

  • sRGB : Mark texture as sRGB when reading.

  • auto : Check for gamma/color space metadata in the texture file itself; if metadata is indicative of sRGB, mark texture as sRGB. If no relevant metadata is found, mark texture as sRGB if it is either 8-bit and has 3 channels or if it is 8-bit and has 4 channels. Otherwise, do not mark texture as sRGB and use texture data as it was read from the texture.

OmniPBR Detail Normal Strength

Adjusts intensity of small surface detail.

_images/OmniPBR_DetailNMStrength.png

Normal Map Strength: 1.0

Normal Map: PaintedMetal02_4K_Normal.png

Detailed Normal Map Strength: 0.3

Detail Normal Map: GalvanizedSteel02_1K_Normal.png

OmniPBR Detail Normal Map

Allows use of a texture file for use in small surface detail. For best results use the Direct X normal format.

_images/OmniPBR_DetailNM.png

Detailed Normal Map Strength: 0.3

Detail Normal Map: GalvanizedSteel02_1K_Normal.png

OmniPBR Detail Normal Map Color Space

Texture Gamma indicating the color space in which the source texture is encoded.

Possible Values:
  • raw : Use texture data as it was read from the texture and do not mark it as using a specific color space.

  • sRGB : Mark texture as sRGB when reading.

  • auto : Check for gamma/color space metadata in the texture file itself; if metadata is indicative of sRGB, mark texture as sRGB. If no relevant metadata is found, mark texture as sRGB if it is either 8-bit and has 3 channels or if it is 8-bit and has 4 channels. Otherwise, do not mark texture as sRGB and use texture data as it was read from the texture.

OmniPBR Normal Map Flip U Tangent

Flips the U Tangent vector.

OmniPBR Normal Map Flip V Tangent

Flips the V Tangent vector. By Default, OmniPBR materials setup for DirectX normal maps. Set Normal Map Flip V = false for OpenGL.

_images/DX_Normal.png
_images/OpenGL_Normal.png
_images/OmniPBR_DX.png

Normal Map Flip U Tangent: false

Normal Map Flip V Tangent: true

_images/OmniPBR_OpenGL.png

Normal Map Flip U Tangent: false

Normal Map Flip V Tangent: false

UV

Display Name

Name

Type

Default

Enable Project UVW Coordinates

project_uvw

bool

false

Enable World Space

world_or_object

bool

false

UV Space Index

uv_space_index

int

0

Texture Translate

texture_translate

float2

0.0, 0.0

Texture Rotate

texture_rotate

float

0.0

Texture Scale

texture_scale

float2

1.0, 1.0

Detail Texture Translate

detail_texture_translate

float2

0.0, 0.0

Detail Texture Rotate

detail_texture_rotate

float

0.0

Detail Texture Scale

detail_texture_scale

float2

1.0, 1.0

OmniPBR Enable Project UVW Coordinates

Enables Projection.

_images/OmniPBR_EnableProjUVW0.png

Enable Project UVW Coordinates: false

_images/OmniPBR_EnableProjUVW1.png

Enable Project UVW Coordinates: true

OmniPBR Enable World Space

Toggles World or Object based projection.

_images/OmniPBR_EnableWS1.png

Enable World Space: true

_images/OmniPBR_EnableProjUVW1.png

Enable World Space: false

OmniPBR UV Space Index

Allows selection of UV coordinate space to be used for mapping the material.

_images/OmniPBR_EnableProjUVW0.png

UV Space Index: 0

_images/OmniPBR_UVSet1.png

UV Space Index: 1

_images/OmniPBR_UVSet2.png

UV Space Index: 2

OmniPBR Texture Translate

Allows offsetting the position of the material.

_images/OmniPBR_EnableProjUVW0.png

Texture Translate: 0.0, 0.0

_images/OmniPBR_UVTranslate.png

Texture Translate: 0.73, 1.55

OmniPBR Texture Rotate

Allows texture rotation.

_images/OmniPBR_EnableProjUVW0.png

Texture Rotate: 0.0

_images/OmniPBR_UVRotate100.png

Texture Rotate: 100.0

OmniPBR Texture Scale

Adjusts the scale of the texture.

_images/OmniPBR_EnableProjUVW0.png

Texture Scale: 1.0, 1.0

_images/OmniPBR_UVScale.png

Texture Scale: 4.0, 0.5

OmniPBR Detail Texture Translate

Allows detail texture offset.

OmniPBR Detail Texture Rotate

Allows detail texture rotation.

OmniPBR Detail Texture Scale

Allows detail texture scale.

OmniGlass

Overview

OmniGlass is an improved physical glass model that simulates light transmission through thin walled and transmissive surfaces.

OmniGlass consists of the following sections:

Parameters

Color

Display Name

Name

Type

Default

Glass Color

glass_color

color

1.0, 1.0, 1.0

Glass Color Texture

glass_color_texture

asset

Glass Color Texture Color Space

Volume Absorption Scale

depth

float

0.001

Glass Color

The color or tint of the glass.

_images/OmniGlass_Color1.png

Glass Color: 1.0, 1.0, 1.0

_images/OmniGlass_Color2.png

Glass Color: 0.17, 0.72, 0.12

Glass Color Texture

Texture File input to drive color.

_images/OmniGlass_ColorTx1.png

Glass Color Texture: color_grid.jpg

Glass Color Texture Color Space

Texture Gamma indicating the color space in which the source texture is encoded.

Possible Values:
  • raw : Use texture data as it was read from the texture and do not mark it as using a specific color space.

  • sRGB : Mark texture as sRGB when reading.

  • auto : Check for gamma/color space metadata in the texture file itself; if metadata is indicative of sRGB, mark texture as sRGB. If no relevant metadata is found, mark texture as sRGB if it is either 8-bit and has 3 channels or if it is 8-bit and has 4 channels. Otherwise, do not mark texture as sRGB and use texture data as it was read from the texture.

Volume Absorption Scale

Controls how much light is absorbed through the surface.

_images/OmniGlass_AbsScale50.png

Volume Absorption Scale: 50

_images/OmniGlass_AbsScale100.png

Volume Absorption Scale: 100

_images/OmniGlass_AbsScale500.png

Volume Absorption Scale: 500

Roughness

Display Name

Name

Type

Default

Glass Roughness

frosting_roughness

float

0.0

Roughness Texture Influence

roughness_texture_influence

float

1.0

Roughness Texture

roughness_texture

asset

Roughness Texture Color Space

Glass Roughness

The amount of reflectivity a surface has. Range is 0-1
  • 0 = perfectly reflective

  • 1 = no reflectivity

_images/OmniGlass_Color1.png

Glass Roughness: 0.0

_images/OmniGlass_Roughness.25.png

Glass Roughness: 0.25

_images/OmniGlass_Roughness.5.png

Glass Roughness: 0.5

Roughness Texture Influence

Range from 0-1 mixes roughness map power over roughness value.
  • 0 uses Pure Roughness Value

  • 1 uses only Roughness Map

_images/OmniGlass_Color1.png

Roughness Texture Influence: 0.0

_images/OmniGlass_RoughnessTxInfluence.51.png

Roughness Texture Influence: 0.5

_images/OmniGlass_RoughnessTx1.png

Roughness Texture Influence: 1.0

Roughness Texture

Allows use of a texture file for use in roughness.

_images/OmniGlass_RoughnessTx1.png

Roughness Texture: inner_checker_dark.png

Roughness Texture Color Space

Texture Gamma indicating the color space in which the source texture is encoded.

Possible Values:
  • raw : Use texture data as it was read from the texture and do not mark it as using a specific color space.

  • sRGB : Mark texture as sRGB when reading.

  • auto : Check for gamma/color space metadata in the texture file itself; if metadata is indicative of sRGB, mark texture as sRGB. If no relevant metadata is found, mark texture as sRGB if it is either 8-bit and has 3 channels or if it is 8-bit and has 4 channels. Otherwise, do not mark texture as sRGB and use texture data as it was read from the texture.

Refraction

Display Name

Name

Type

Default

Glass IOR

glass_ior

float

1.491

Thin Walled

thin_walled

bool

false

Glass IOR

Incidence of Refraction controls how much the light is “bent” when passing through a surface.

_images/OmniGlass_IOR1.png

Glass IOR: 1.0

_images/OmniGlass_IOR2.png

Glass IOR: 1.1

_images/OmniGlass_Color1.png

Glass IOR: 1.491

Thin Walled

Toggles thin glass adjustments on and off.

_images/OmniGlass_ThinWalled1.png

Thin Walled: true

Reflection

Display Name

Name

Type

Default

Reflection Color Texture

reflection_color_texture

asset

Reflection Color Texture Color Space

Reflection Color

reflection_color

color

1.0, 1.0, 1.0

Reflection Color Texture

Allows use of a texture to map the reflection color of the glass.

_images/OmniGlass_ReflectionColorTx.png

Reflection Color Texture: color_grid.jpg

Reflection Color Texture Color Space

Texture Gamma indicating the color space in which the source texture is encoded.

Possible Values:
  • raw : Use texture data as it was read from the texture and do not mark it as using a specific color space.

  • sRGB : Mark texture as sRGB when reading.

  • auto : Check for gamma/color space metadata in the texture file itself; if metadata is indicative of sRGB, mark texture as sRGB. If no relevant metadata is found, mark texture as sRGB if it is either 8-bit and has 3 channels or if it is 8-bit and has 4 channels. Otherwise, do not mark texture as sRGB and use texture data as it was read from the texture.

Reflection Color

The reflected color of the glass.

_images/OmniGlass_ReflectionColor.png

Reflection Color: 0.08, 0.38, 0.8

Normal

Display Name

Name

Type

Default

Normal Map Texture

normalmap_texture

asset

Normal Map Texture Color Space

Normal Map Strength

bump_factor

float

1.0

Normal Map Flip U Tangent

flip_tangent_u

bool

false

Normal Map Flip V Tangent

flip_tangent_v

bool

true

Normal Map Texture

Allows use of a texture file for use in surface bumps. For best results use the Direct X normal format.

_images/OmniGlass_Color1.png

Normal Map:

_images/OmniGlass_NormalMapTx1.png

Normal Map: PaintedMetal02_4K_Normal.png

Normal Map Texture Color Space

Texture Gamma indicating the color space in which the source texture is encoded.

Possible Values:
  • raw : Use texture data as it was read from the texture and do not mark it as using a specific color space.

  • sRGB : Mark texture as sRGB when reading.

  • auto : Check for gamma/color space metadata in the texture file itself; if metadata is indicative of sRGB, mark texture as sRGB. If no relevant metadata is found, mark texture as sRGB if it is either 8-bit and has 3 channels or if it is 8-bit and has 4 channels. Otherwise, do not mark texture as sRGB and use texture data as it was read from the texture.

OmniGlass Normal Map Strength

Adjusts intensity of the normal map.

_images/OmniGlass_Color1.png

Normal Map Strength: 0.0

Normal Map: PaintedMetal02_4K_Normal.png

_images/OmniGlass_NormalMapTx.3.png

Normal Map Strength: 0.3

Normal Map: PaintedMetal02_4K_Normal.png

_images/OmniGlass_NormalMapTx1.png

Normal Map Strength: 1.0

Normal Map: PaintedMetal02_4K_Normal.png

Normal Map Flip U Tangent

Flips the U Tangent vector.

Normal Map Flip V Tangent

Flips the V Tangent vector. By Default, OmniPBR materials setup for DirectX normal maps. Set Normal Map Flip V = false for OpenGL.

_images/DX_Normal.png
_images/OpenGL_Normal.png
_images/OmniGlass_DX.png

Normal Map Flip U Tangent: false

Normal Map Flip V Tangent: true

_images/OmniGlass_OpenGL.png

Normal Map Flip U Tangent: false

Normal Map Flip V Tangent: false

Opacity

Display Name

Name

Type

Default

Enable Opacity

enable_opacity

bool

false

Opacity Amount

opacity_constant

float

1.0

Opacity Map

opacity_texture

asset

Opacity Map Color Space

Opacity Map Mono Source

opacity_mode

enum

mono_average

Opacity Threshold

opacity_threshold

float

0.0

OmniGlass Enable Opacity

Enable overall opacity.

_images/OmniGlass_Opac.5.png

Enable Opacity: true

Opacity Amount: 0.5

_images/OmniGlass_Color1.png

Enable Opacity: false

Opacity Amount: 0.5

OmniGlass Opacity Amount

Opacity value of material. Works in conjunction with Opacity Threshold and Fractional Cutout Opacity.

_images/OmniGlass_Color1.png

Enable Opacity: true

Opacity Amount: 1.0

_images/OmniGlass_Opac.5.png

Enable Opacity: true

Opacity Amount: 0.5

_images/OmniGlass_Opac.1.png

Enable Opacity: true

Opacity Amount: 0.1

OmniGlass Opacity Map

Allows mapping of opacity to a texture file.

_images/OmniGlass_OpacityMap.png

Enable Opacity: true

Glass Roughness: 0.5

Opacity Map: PaintedMetal02_4K_Metallic.png

OmniGlass Opacity Map Color Space

Texture Gamma indicating the color space in which the source texture is encoded.

Possible Values:
  • raw : Use texture data as it was read from the texture and do not mark it as using a specific color space.

  • sRGB : Mark texture as sRGB when reading.

  • auto : Check for gamma/color space metadata in the texture file itself; if metadata is indicative of sRGB, mark texture as sRGB. If no relevant metadata is found, mark texture as sRGB if it is either 8-bit and has 3 channels or if it is 8-bit and has 4 channels. Otherwise, do not mark texture as sRGB and use texture data as it was read from the texture.

OmniGlass Opacity Map Mono Source

Specifies opacity channel or evaluation of the map for opacity.
  • mono_alpha : Uses the alpha channel of the image as the source for evaluation.

  • mono_average : Uses the average of the RGB channels as the source for evaluation.

  • mono_luminance : Uses the luminance of the image as the source for evaluation.

  • mono_maximum : Uses the max value of the RGB channels as the source for evaluation.

OmniGlass Opacity Threshold

Cutoff for determining object cutout opacity. If threshold is equal to 0, then use fractional opacity. If threshold is greater than 0, then object is opaque when opacity is greater than threshold.

_images/OmniGlass_OpacityTh0.png

Enable Opacity: true

Opacity Map: PaintedMetal02_4K_Roughness.png

Opacity Threshold: 0.0

_images/OmniGlass_OpacityTh.8.png

Enable Opacity: true

Opacity Map: PaintedMetal02_4K_Roughness.png

Opacity Threshold: 0.8

UV

Display Name

Name

Type

Default

Enable Project UVW Coordinates

project_uvw

bool

false

Enable World Space

world_or_object

bool

false

UV Space Index

uv_space_index

int

0

Texture Translate

texture_translate

float2

0.0, 0.0

Texture Rotate

texture_rotate

float

0.0

Texture Scale

texture_scale

float2

1.0, 1.0

OmniPBR_Opacity

See OmniPBR.

Note

OmniPBR_Opacity was similar to OmniPBR but with the added support of opacity and opacity mapping. It is no longer needed and we recommend you use OmniPBR.

OmniPBR ClearCoat Opacity

See OmniPBR ClearCoat.

Note

OmniPBR_Clearcoat_Opacity was similar to OmniPBR_ClearCoat but with the added support of opacity and opacity mapping. It is no longer needed and we recommend you use OmniPBR_Clearcoat.

OmniGlass Opacity

See OmniGlass.

Note

OmniGlass_Opacity was similar to OmniGlass but with the added support of opacity and opacity mapping. It is no longer needed and we recommend you use OmniGlass.

OmniSurfaceBase and OmniSurfaceLiteBase

Overview

OmniSurfaceBase and OmniSurfaceLiteBase are physically-based materials designed based Autodesk® Standard Surface 2, capable of modeling a wide variety of surface appearances, including plastic, concrete, water, car paint, skin, foliage, foam, wax, wood, velvet, etc.

OmniSurfaceBase and OmniSurfaceLiteBase come with a small set of parameters with intuitive meanings, ranges, and predictable results.

Note

For creating simple materials, the use of OmniSurfaceLiteBase is encouraged. In general, OmniSurfaceLiteBase renders faster.

Note

OmniSurfaceBase is not fully supported in RTX - Real-Time mode yet.

OmniSurfaceBase consists of the following sections:

OmniSurfaceLiteBase is a subset of OmniSurfaceBase and consists of the following sections:

Parameters

Base (Diffuse reflection, Metal)

Display Name

Name

Type

Default

Weight

diffuse_reflection_weight

float

0.8

Color

diffuse_reflection_color

color

1.0, 1.0, 1.0

Diffuse Roughness

diffuse_reflection_roughness

float

0.0

Metalness

metalness

float

0.0

This layer models the base layer, a statistical mix between diffuse reflection and diffuse transmission components.

Weight

This parameter sets the weight of diffused reflection or metallic reflectance.

rtx_material_omnisurfacebase_diffuse_reflection_weight_0p0

Weight: 0.0 Base Color: 0.35, 0.55, 0.0

rtx_material_omnisurfacebase_diffuse_reflection_weight_1p0

Weight: 1.0 Base Color: 0.35, 0.55, 0.0

Color

This parameter sets diffuse reflection color of the dielectric surface or reflectance value of metallic surface by the probability that light is reflected or transmitted for each wavelength.

rtx_material_omnisurfacebase_diffuse_reflection_color_0p95_0p55_0p0

Base Color: 0.95, 0.55, 0.0

rtx_material_omnisurfacebase_diffuse_reflection_color_wood

Base Color: Texture

Diffuse Roughness

Oren-Nayar surface roughness coefficient, simulating view-dependent diffuse reflection. At 0.0, the surface behaves similarly to a fully Lambertian reflection. Higher values are suitable for powdery surfaces like dust, sand, dried clay, concrete, etc.

rtx_material_omnisurfacebase_diffuse_reflection_roughness_0p0

Diffuse Roughness: 0.0

rtx_material_omnisurfacebase_diffuse_reflection_roughness_0p5

Diffuse Roughness: 0.5

rtx_material_omnisurfacebase_diffuse_reflection_roughness_1p0

Diffuse Roughness: 1.0

Metalness

At 0.0, the material consists of a diffuse or transmissive base layer, with a specular reflection layer on top. When set to 1.0, the surface behaves like a metallic surface. For fully reflective metal, one can set the base weight and metalness to 1.0 and decrease specular reflection roughness to 0.0. Metalness values between 0.0 and 1.0 can create surfaces like oxidized copper when some surface areas are reflective, and some areas are not.

rtx_material_omnisurfacebase_metalness_0p0_scuffed_platinum

Metalness: 0.0

rtx_material_omnisurfacebase_metalness_0p5_scuffed_platinum

Metalness: 0.5

rtx_material_omnisurfacebase_metalness_1p0_scuffed_platinum

Metalness: 1.0

rtx_material_omnisurfacebase_metalness_1p0_painted_metal

Metalness: Texture

The metallic reflection is modeled as a GGX microfacet conductor BRDF. The absorption coefficient and complex index of refraction are computed from the base color and the specular reflection color. The base color controls the metallic surface appearance, and specular reflection weight and specular reflection color parameters only affect the edge tint.

See Thin Film section for more information.

rtx_material_omnisurfacebase_metalness_nickel

Nickel

Metalness: 1.0

Base Color: 0.649, 0.610, 0.541

Specular Color: 0.797, 0.801, 0.789

rtx_material_omnisurfacebase_metalness_gold

Gold

Metalness: 1.0

Base Color: 0.944, 0.776, 0.373

Specular Color: 0.998, 0.981, 0.751

rtx_material_omnisurfacebase_metalness_copper

Copper

Metalness: 1.0

Base Color: 0.926, 0.721, 0.504

Specular Color: 0.996, 0.957, 0.823

Specular (Specular reflection)

Display Name

Name

Type

Default

Weight

specular_reflection_weight

float

1.0

Color

specular_reflection_color

color

1.0, 1.0, 1.0

Roughness

specular_reflection_roughness

float

0.2

IOR Preset

specular_reflection_ior_preset

enum

ior_custom

IOR

specular_reflection_ior

float

1.5

Anisotropy

specular_reflection_anisotropy

float

0.0

Rotation (rad)

specular_reflection_anisotropy_rotation

float

0.0

This layer models a GGX microfacet dielectric BRDF under the coating layer. Due to Fresnel, this layer is not energy conversing. Thus the energy that is not reflected is transmitted to the underlying layers.

Weight

This parameter sets the amount of the specular reflection. Lowering this value increases light transmission through the object’s volume.

rtx_material_omnisurfacebase_specular_reflection_weight_0p0

Specular Reflection Weight: 0.0

rtx_material_omnisurfacebase_specular_reflection_weight_0p5

Specular Reflection Weight: 0.5

rtx_material_omnisurfacebase_specular_reflection_weight_1p0

Specular Reflection Weight: 1.0

rtx_material_omnisurfacebase_specular_reflection_weight_1p0

Specular Reflection Weight: Texture

The effect of skin oil residue on the surface

When metalness is greater than 0.0, this parameter sets the edge tint weight for the metal surface.

rtx_material_omnisurfacebase_specular_reflection_weight_0p0_metalness_edge_tint

Specular Reflection Weight: 0.0

Metalness: 1.0

Specular Color: 0.1, 1.0, 0.72

rtx_material_omnisurfacebase_specular_reflection_weight_0p5_metalness_edge_tint

Specular Reflection Weight: 0.5

Metalness: 1.0

Specular Color: 0.1, 1.0, 0.72

rtx_material_omnisurfacebase_specular_reflection_weight_1p0_metalness_edge_tint

Specular Reflection Weight: 1.0

Metalness: 1.0

Specular Color: 0.1, 1.0, 0.72

Color

This parameter sets the color of the specular reflection. While some metallic (conductor) surfaces have colored specular reflections, dielectric surfaces have only achromatic specular reflections.

rtx_material_omnisurfacebase_specular_reflection_color_1p0_1p0_1p0

Specular Reflection Color: 1.0, 1.0, 1.0

Specular Reflection Weight: 1.0

rtx_material_omnisurfacebase_specular_reflection_color_0p0_0p7_1p0

Specular Reflection Color: 0.0, 0.7, 1.0

Specular Reflection Weight: 1.0

Tip

Setting the specular reflection color for dielectric surfaces other than white is not physically correct.

When metalness is greater than 0.0, this parameter sets the edge tint color.

rtx_material_omnisurfacebase_specular_reflection_color_1p0_1p0_1p0_metalness

Specular Reflection Color: 1.0, 1.0, 1.0

Specular Reflection Weight: 1.0

Metalness: 1.0

rtx_material_omnisurfacebase_specular_reflection_color_0p0_0p7_1p0_metalness

Specular Reflection Color: 0.0, 0.7, 1.0

Specular Reflection Weight: 1.0

Metalness: 1.0

Roughness

This parameter sets the surface microfacet’s irregularities that cause light diffusion. At 0.0 simulates a perfect and smooth reflective surface, while increasing the value causes reflective highlights to diverge or appear blurred.

rtx_material_omnisurfacebase_specular_reflection_roughness_0p0

Specular Reflection Roughness: 0.0

Specular Reflection Weight: 1.0

rtx_material_omnisurfacebase_specular_reflection_roughness_0p25

Specular Reflection Roughness: 0.25

Specular Reflection Weight: 1.0

rtx_material_omnisurfacebase_specular_reflection_roughness_0p5

Specular Reflection Roughness: 0.5

Specular Reflection Weight: 1.0

rtx_material_omnisurfacebase_specular_reflection_roughness_1p0

Specular Reflection Roughness: 1.0

Specular Reflection Weight: 1.0

Roughness affects both specular reflection and specular transmission.

rtx_material_omnisurfacebase_specular_reflection_roughness_0p0_refraction

Specular Reflection Roughness: 0.0

Specular Reflection Weight: 1.0

Specular Transmission Weight: 1.0

rtx_material_omnisurfacebase_specular_reflection_roughness_0p25_refraction

Specular Reflection Roughness: 0.25

Specular Reflection Weight: 1.0

Specular Transmission Weight: 1.0

rtx_material_omnisurfacebase_specular_reflection_roughness_0p5_refraction

Specular Reflection Roughness: 0.5

Specular Reflection Weight: 1.0

Specular Transmission Weight: 1.0

rtx_material_omnisurfacebase_specular_reflection_roughness_1p0_refraction

Specular Reflection Roughness: 1.0

Specular Reflection Weight: 1.0

Specular Transmission Weight: 1.0

Tip

Roughness can create effects like torn surfaces, galvanized metal, or surfaces with fingerprints and smudges.

rtx_material_omnisurfacebase_specular_reflection_roughness_clay

Smudges on Clay

rtx_material_omnisurfacebase_specular_reflection_roughness_galvanized

Galvanized Metal

IOR Preset

This parameter presents a list of known IORs (index of refractions) for various materials, including glass, ice, diamond, skin. One can use custom IOR by setting this parameter to ior_custom and a value for the specular reflection’s IOR parameter.

IOR

This parameter sets IOR (index of refraction), which affects surface Fresnel reflectivity. The IOR defines the ratio between reflection on the surface front, facing the viewer, and the surface edges, facing away the viewer.

At values above 1.0, the reflection appears stronger on the surface edges and weaker on the surface front. At values less than 1.0, the Fresnel is disabled, and the specular reflection appears as a uniform highlight over the surface.

Tip

At high values, the surface will look similar to a metallic surface. If a metallic look is desired, the metalness parameter is encouraged instead since the range [0, 1] can be easily mapped with an input texture.

rtx_material_omnisurfacebase_specular_reflection_ior_1p0

Specular Reflection IOR: 1.0

Specular Reflection Weight: 1.0

rtx_material_omnisurfacebase_specular_reflection_ior_2p5

Specular Reflection IOR: 2.5

Specular Reflection Weight: 1.0

rtx_material_omnisurfacebase_specular_reflection_ior_5p0

Specular Reflection IOR: 5.0

Specular Reflection Weight: 1.0

IOR affects both the specular reflection and the specular transmission.

rtx_material_omnisurfacebase_specular_reflection_ior_1p0_refraction

Specular Reflection IOR: 1.0

Specular Reflection Weight: 1.0

Specular Transmission Weight: 1.0

rtx_material_omnisurfacebase_specular_reflection_ior_1p5_refraction

Specular Reflection IOR: 1.5

Specular Reflection Weight: 1.0

Specular Transmission Weight: 1.0

rtx_material_omnisurfacebase_specular_reflection_ior_2p5_refraction

Specular Reflection IOR: 2.5

Specular Reflection Weight: 1.0

Specular Transmission Weight: 1.0

rtx_material_omnisurfacebase_specular_reflection_ior_5p0_refraction

Specular Reflection IOR: 5.0

Specular Reflection Weight: 1.0

Specular Transmission Weight: 1.0

Anisotropy

This parameter sets the specular reflection anisotropy. Reflectance changes based on the surface orientation are called anisotropic. If the reflectance is uniform in all directions and does not change based on the surface’s rotation or orientation, it is isotropic.

At values above 0.0, the surface transmits and reflects incoming light with a directional bias. Thus it appears rougher in a specific direction.

rtx_material_omnisurfacebase_specular_reflection_anisotropy_0p0

Specular Reflection Anisotropy: 0.0

rtx_material_omnisurfacebase_specular_reflection_anisotropy_0p5

Specular Reflection Anisotropy: 0.5

rtx_material_omnisurfacebase_specular_reflection_anisotropy_1p0

Specular Reflection Anisotropy: 1.0

rtx_material_omnisurfacebase_specular_reflection_anisotropy_pattern

Specular Reflection Anisotropy: Texture

Rotation (radians)

This parameter sets the orientation of the anisotropic effect in radians. At 1.0, the anisotropic effect is rotated by 180 degrees. For brushed metallic surfaces, the anisotropic effect should stretch out in a direction perpendicular to the brushing direction.

rtx_material_omnisurfacebase_specular_reflection_anisotropy_rotation_0p0

Specular Reflection Anisotropy Rotation: 0.0

rtx_material_omnisurfacebase_specular_reflection_anisotropy_rotation_0p5

Specular Reflection Rotation: 0.5

rtx_material_omnisurfacebase_specular_reflection_anisotropy_rotation_0p75

Specular Reflection Rotation: 0.75

rtx_material_omnisurfacebase_specular_reflection_anisotropy_rotation_1p0

Specular Reflection Rotation: 1.0

Transmission (Specular transmission)

Display Name

Name

Type

Default

Enable Transmission

enable_specular_transmission

bool

false

Weight

specular_transmission_weight

float

0.0

Color

specular_transmission_color

color

1.0, 1.0, 1.0

Depth

specular_transmission_scattering_depth

float

0.0

Scatter

specular_transmission_scattering_color

color

0.0, 0.0, 0.0

Scatter Anisotropy

specular_transmission_scatter_anisotropy

float

0.0

Dispersion Abbe

specular_transmission_dispersion_abbe

float

0.0

This layer models a GGX microfacet BTDF within a homogeneous medium interior to the object, under the specular reflection layer. It shares a few key parameters with the Specular reflection layer, including Roughness, IOR, Anisotropy, and Anisotropy Rotation.

If thin-walled enabled, the surface appears double-sided, represented as an infinitely thin shell. Upon specular transmission, the incoming light is not refracted to the opposite side. The refraction index sets to the surrounding medium.

If thin-walled disabled, the surface is considered to be a boundary of a finite-sized solid object. And according to the specular reflection layer, the incoming light refracts when entering and leaving the object.

rtx_material_omnisurfacebase_specular_transmission_volume

Thin Walled: Disabled

rtx_material_omnisurfacebase_specular_transmission_thin_walled

Thin Walled: Enabled

Note

Specular Transmission vs. Geometry Opacity

Specular transmission controls the surface transparency, while geometry opacity controls the surface visibility. One can use the specular transmission to create a glass surface and then use the opacity to cut the surface.

Note

In the RTX – Interactive (Path Tracing) mode, if refraction appears black, one may need to increase Max Bounces Specular/Transmission and Max Bounces in the render settings panel.

Please see RTX Interactive (Path Tracing) mode render settings for more information.

rtx_material_omnisurfacebase_specular_transmission_4_transmission_bounces

Max Specular and Transmission Bounces: 4

Max Bounces: 8

rtx_material_omnisurfacebase_specular_transmission_8_transmission_bounces

Max Specular and Transmission Bounces: 8

Max Bounces: 8

rtx_material_omnisurfacebase_specular_transmission_16_transmission_bounces

Max Specular and Transmission Bounces: 16

Max Bounces: 8

rtx_material_omnisurfacebase_specular_transmission_16_transmission_bounces_64_max_bounces

Max Specular and Transmission Bounces: 16

Max Bounces: 64

Enable Specular Transmission

Enables specular transmission layer

Weight

This parameter sets the amount of light to pass and scatter through the surface. At 0.0, the surface is completely opaque, while at 1.0, the surface is fully transparent.

rtx_material_omnisurfacebase_specular_transmission_weight_0p0

Specular Transmission Weight: 0.0

rtx_material_omnisurfacebase_specular_transmission_weight_0p5

Specular Transmission Weight: 0.5

rtx_material_omnisurfacebase_specular_transmission_weight_0p75

Specular Transmission Weight: 0.75

rtx_material_omnisurfacebase_specular_transmission_weight_1p0

Specular Transmission Weight: 1.0

Color

This parameter sets the transmission color, which affects the travel of refracted rays in the volume using Beer’s law. Therefore red colored glass gets a deeper red as refracted rays travel deeper in the volume. A transmission color close to black makes the interior of the volume very dense. A darker transmission color can be used to render deep-ocean water, orange juice, and similar materials. Color and Depth’s positive values are used together to set the extinction coefficient (sigma_t) of the interior volume to the object.

Tip

For a realistic result, specular transmission color should not be set to saturated colors, i.e., pure red (1.0, 0.0, 0.0).

rtx_material_omnisurfacebase_specular_transmission_color_light_red

Specular Transmission Color: 0.95, 0.35, 0.035

rtx_material_omnisurfacebase_specular_transmission_color_dark_red

Specular Transmission Color: 0.65, 0.25, 0.025

rtx_material_omnisurfacebase_specular_transmission_color_rainbow

Specular Transmission Color: Texture

Depth

This parameter sets the distance traveled by refracted white rays before their colors turned into the transmission color by Beer’s law. At 0.0, the interior medium to the object is null, and transmission color tints the material’s refraction. Decreasing the depth increases the volume absorption and scattering, which makes the volume more opaque.

The effect of depth depends on the absolute size of the objects, and hence depth is a scene scale-dependent parameter.

Tip

For a realistic result, one should model to a real-world scale and set the depth to 1.0.

rtx_material_omnisurfacebase_specular_transmission_depth_0p0

Specular Transmission Depth: 0.0

rtx_material_omnisurfacebase_specular_transmission_depth_0p1

Specular Transmission Depth: 0.1

rtx_material_omnisurfacebase_specular_transmission_depth_0p5

Specular Transmission Depth: 0.5

rtx_material_omnisurfacebase_specular_transmission_depth_1p0

Specular Transmission Depth: 1.0

Scatter

This parameter sets the scattering coefficient (sigma_s) of the interior medium to the object. The scattering color describes how much “refracted rays” are scattered while traveling inside the medium. The light’s red, green, and blue components are scattered by different amounts when the scattering color sets to a non-grey hue.

Ice, opalescent glass, and honey are a few examples of materials with a high scattering coefficient.

rtx_material_omnisurfacebase_specular_transmission_scatter_0p0_0p00_0p0

Specular Transmission Color: 0.0, 0.0, 0.0

rtx_material_omnisurfacebase_specular_transmission_scatter_0p3_0p05_0p0

Specular Transmission Color: 0.3, 0.05, 0.0

Scatter Anisotropy

This parameter sets the scattering directionality or anisotropy of the “Henyey-Greenstein” phase function of the interior medium to the object. At 0.0, scattering sets to isotropic, and light is scattered uniformly in all directions. Values above 0.0 biases the scattering effect forward in the direction of the light, while values below 0.0 biases the scattering effect backward in the opposite direction of the light.

rtx_material_omnisurfacebase_specular_transmission_anisotropy_N1p0

Specular Transmission Scatter Anisotropy: -1.0

rtx_material_omnisurfacebase_specular_transmission_anisotropy_0p0

Specular Transmission Scatter Anisotropy: 0.0

rtx_material_omnisurfacebase_specular_transmission_anisotropy_0p0

Specular Transmission Scatter Anisotropy: 1.0

Dispersion Abbe

This parameter sets how much the index of refraction varies across wavelengths. Lowering the abbe number increases the effect of dispersion. When thin-walled enabled, dispersion has no effects.

rtx_material_omnisurfacebase_specular_transmission_abbe_0

Specular Transmission Dispersion Abbe: 0

rtx_material_omnisurfacebase_specular_transmission_abbe_0

Specular Transmission Dispersion Abbe: 1

rtx_material_omnisurfacebase_specular_transmission_abbe_5

Specular Transmission Dispersion Abbe: 5

rtx_material_omnisurfacebase_specular_transmission_abbe_10

Specular Transmission Dispersion Abbe: 10

Subsurface (Subsurface scattering, Diffuse transmission)

Display Name

Name

Type

Default

Enable Subsurface

enable_diffuse_transmission

bool

false

Weight

subsurface_weight

float

0.0

Scattering Presets

subsurface_scattering_colors_preset

enum

scattering_colors_custom

Color

subsurface_transmission_color

color

1.0, 1.0, 1.0

Radius (mfp)

subsurface_scattering_color

color

1.0, 1.0, 1.0

Scale

subsurface_scale

float

1.0

Anisotropy

subsurface_anisotropy

float

0.0

This layer models the effect of light absorption and scattering within a homogeneous medium interior to the object, where the exiting rays leave at a different surface location than the incident rays.

Subsurface can be used to create materials like plastic, marble, skin, wax, milk, and leaf.

In the path-tracer mode, the subsurface component is calculated using the “Random Walk” technique. The Random Walk uses a stochastic or random process to trace the effect of light scattering through an object, with no assumption about geometric features of the object, i.e., local surface flatness, concavities.

In the real-time mode, the subsurface component is calculated by combining the diffusion profile and path tracing techniques. The diffusion profile is based on the Monte Carlo simulation result that describes the distribution of energy coming out of a semi-infinite flat surface of the scattering medium.

If thin-walled enabled, the subsurface represented as the diffuse transmission of light through an infinitely thin shell.

rtx_material_omnisurfacebase_subsurface_no_thin_walled

Thin Walled: Disabled

rtx_material_omnisurfacebase_subsurface_thin_walled

Thin Walled: Enabled

Note

For a correct result, properly constructed geometry is required, i.e., no self-intersections, closed or geometry with thickness, proper normal directions.

Note

If subsurface appears black in the path-tracer mode, one may need to increase Max Volume Scattering Bounces in the render settings panel. In practice, 32 bounces would be a good starting number.

Please see Render Settings for more information.

rtx_material_omnisurfacebase_subsurface_max_volume_bounces_1

Max Volume Scattering Bounces: 1

Max Bounces: 64

rtx_material_omnisurfacebase_subsurface_max_volume_bounces_2

Max Volume Scattering Bounces: 4

Max Bounces: 64

rtx_material_omnisurfacebase_subsurface_max_volume_bounces_8

Max Volume Scattering Bounces: 8

Max Bounces: 64

rtx_material_omnisurfacebase_subsurface_max_volume_bounces_32

Max Volume Scattering Bounces: 32

Max Bounces: 64

Enable Subsurface

Enables diffuse transmission and subsurface layer

Weight

This parameter sets the amount of diffuse transmission and subsurface scattering. At 0.0, the surface is represented as diffuse only surface, and a higher value increases the visibility of diffuse transmission and subsurface scattering.

rtx_material_omnisurfacebase_subsurface_weight_0p0

Subsurface Weight: 0.0

rtx_material_omnisurfacebase_subsurface_weight_0p5

Subsurface Weight: 0.5

rtx_material_omnisurfacebase_subsurface_weight_1p0

Subsurface Weight: 1.0

Scattering Presets

This parameter presents a list of known subsurface scattering colors and radiuses for various materials, including apple, milk, ketchup, skin. One can use custom values by setting this parameter to scattering_colors_custom and set a value for color and radius parameters.

Color

This parameter sets the color of the subsurface scattering effects. When incoming rays reach the surface, they will get tinted by the subsurface color. The subsurface color and radius parameters determine the absorption and scattering within the medium interior to the object.

rtx_material_omnisurfacebase_subsurface_color_whole_milk

Whole Milk

Subsurface Color: 0.950, 0.930, 0.850

rtx_material_omnisurfacebase_subsurface_color_skin

Skin

Subsurface Color: 0.999, 0.615, 0.521

rtx_material_omnisurfacebase_subsurface_color_leather

Leather

Subsurface Color: Texture

rtx_material_omnisurfacebase_subsurface_color_gem

Gem

Subsurface Color: Texture

Radius (mfp)

This parameter sets the scattering radius, which describes as the mean free path (mfp). The mean free path is the average distance that rays travel before scattering below the surface and within the volume.

As the rays travel through the volume, they bounce around and emerge from the surface at different locations. This value corresponds to the average length the ray travels between each bounce. The higher the path length is, the further the ray is allowed to scatter within the volume.

At 0.0, there will be no scattering effect. Lower values mean scattered light is absorbed quicker, resulting in a more opaque look. At higher values, the surface appears more translucent.

rtx_material_omnisurfacebase_subsurface_radius_0p01

Subsurface Radius: 0.01, 0.01, 0.01

rtx_material_omnisurfacebase_subsurface_radius_0p1

Subsurface Radius: 0.1, 0.1, 0.1

rtx_material_omnisurfacebase_subsurface_radius_1p0

Subsurface Radius: 1.0, 1.0, 1.0

The scattering radius can be different per spectra.

rtx_material_omnisurfacebase_subsurface_radius_red

Subsurface Radius: 1.0, 0.0, 0.0

Subsurface Color: 0.5, 0.5, 0.5

rtx_material_omnisurfacebase_subsurface_radius_green

Subsurface Radius: 0.0, 1.0, 0.0

Subsurface Color: 0.5, 0.5, 0.5

rtx_material_omnisurfacebase_subsurface_radius_blue

Subsurface Radius: 0.0, 0.0, 1.0

Subsurface Color: 0.5, 0.5, 0.5

For example, skin material would have a higher red value in the radius since red light (620-670nm) penetrates and scatter deepest into the skin compared to green and blue lights.

rtx_material_omnisurfacebase_subsurface_radius_skin_r0p5_g0p3_b0p2

Human Skin

Subsurface Radius: 0.5, 0.3, 0.2

rtx_material_omnisurfacebase_subsurface_radius_skin_r2p0_g0p3_b0p2

Human Skin

Subsurface Radius: 2.0, 0.3, 0.2

The effect of radius depends on the absolute size of the objects, and hence radius is a scene scale-dependent parameter.

Scale

This parameter scales the effect of scattering radius or the mean free path distance. If the scene is not modeled to scale, the scale parameter can be used to adjust the scattering effect. Lowering this value makes the object more diffuse, while at a higher value, it becomes more translucent.

The Scale parameter is adjusted based on the scene unit; if the scene scale is in meter, the scale of 1.0 corresponds to 1.0 meter.

rtx_material_omnisurfacebase_subsurface_scale_0p001

Subsurface Scale: 0.001

Subsurface Radius: 1.0, 1.0, 1.0

rtx_material_omnisurfacebase_subsurface_scale_0p01

Subsurface Scale: 0.01

Subsurface Radius: 1.0, 1.0, 1.0

rtx_material_omnisurfacebase_subsurface_scale_0p1

Subsurface Scale: 0.1

Subsurface Radius: 1.0, 1.0, 1.0

Anisotropy

This parameter sets the scattering directionality or anisotropy of the “Henyey-Greenstein” phase function of the interior medium to the object. At 0.0, scattering sets to isotropic, and light is scattered uniformly in all directions. Values above 0.0 biases the scattering effect forward in the direction of the light, while values below 0.0 biases the scattering effect backward in the opposite direction of the light.

Tip

Unlike hard materials, i.e., jade and marble, water-based materials, i.e., orange juice, ketchup, and skin, exhibit strong forward scattering.

rtx_material_omnisurfacebase_subsurface_anisotropy_N0p8

Grape

Subsurface Anisotropy: -0.8

rtx_material_omnisurfacebase_subsurface_anisotropy_0p0

Grape

Subsurface Anisotropy: 0.0

rtx_material_omnisurfacebase_subsurface_anisotropy_0p8

Grape

Subsurface Anisotropy: 0.8

Coat (Specular reflection thin-shell)

Display Name

Name

Type

Default

Weight

coat_weight

float

0.0

Color

coat_color

color

1.0, 1.0, 1.0

Roughness

coat_roughness

float

0.1

IOR Preset

coat_ior_preset

enum

ior_custom

IOR

coat_ior

float

1.5

Anisotropy

coat_anisotropy

float

0.0

Rotation (rad)

coat_anisotropy_rotation

float

0.0

Affect Color

coat_affect_color

float

0.0

Affect Roughness

coat_affect_roughness

float

0.0

Normal

coat_normal

float3

state::normal()

This layer models GGX microfacet dielectric BRDF top coating. Due to Fresnel, this layer is not energy conserving. Thus the energy that is not reflected is transmitted to the underlying layers.

The coating simulates an infinitely thin shell dielectric layer, i.e., glass, enamel, lacquer, over the surface. It can create materials like metallic car paint, carbon fiber, oily skin, and wet asphalt.

Weight

This parameter sets the amount of surface coating. Lowering this value increases light transmission through the object’s volume.

Tip

For a realistic result, this parameter should be set to less than 1.0.

rtx_material_omnisurfacebase_coat_weight_0p0

Coat Weight: 0.0

rtx_material_omnisurfacebase_coat_weight_0p5

Coat Weight: 0.5

rtx_material_omnisurfacebase_coat_weight_1p0

Coat Weight: 1.0

Color

This parameter tints all layers below the coating layer. In the real world, lights scattered by underlying layers are tinted when transmitted through the colored coating.

rtx_material_omnisurfacebase_coat_color_no_coat

Coat Color: None

Coat Weight: 0.0

Specular Reflection Weight: 1.0

Specular Reflection Roughness: 0.35

rtx_material_omnisurfacebase_coat_color_white

Coat Color: 1.0, 1.0, 1.0

Coat Weight: 1.0

Specular Reflection Weight: 1.0

Specular Reflection Roughness: 0.35

rtx_material_omnisurfacebase_coat_color_green

Coat Color: 0.0, 1.0, 0.0

Coat Weight: 1.0

Specular Reflection Weight: 1.0

Specular Reflection Roughness: 0.35

This parameter emulates the effect of absorption within the coating medium.

rtx_material_omnisurfacebase_coat_color_white_base_no_coat

Without Coat

Base Color: White

rtx_material_omnisurfacebase_coat_color_white_base_cyan_coat

Coat Color: Cyan

Base Color: White

rtx_material_omnisurfacebase_coat_color_yellow_base_no_coat

Without Coat

Base Color: Yellow

rtx_material_omnisurfacebase_coat_color_yellow_base_cyan_coat

Coat Color: Cyan

Base Color: Yellow

Note

The reflection color is set to white for this layer.

Roughness

This parameter sets the surface microfacet’s irregularities that cause light diffusion. At 0.0 simulates a perfect and smooth reflective surface, while increasing the value causes reflective highlights to diverge or appear blurred.

Tip

Roughness can be used to create effects like torn surfaces or surfaces with fingerprints and smudges.

rtx_material_omnisurfacebase_coat_roughness_0p0

Coat Roughness: 0.0

rtx_material_omnisurfacebase_coat_roughness_0p5

Coat Roughness: 0.5

rtx_material_omnisurfacebase_coat_roughness_0p75

Coat Roughness: 0.75

rtx_material_omnisurfacebase_coat_roughness_texture

Coat Roughness: Texture

IOR Preset

This parameter presents a list of known IORs (index of refractions) for various materials, including glass, ice, diamond, skin. One can use custom IOR by setting this parameter to ior_custom and a value for the specular reflection’s IOR parameter.

IOR

This parameter sets IOR (index of refraction), which affects surface Fresnel reflectivity. The IOR defines the ratio between reflection on the surface front, facing the viewer, and the surface edges, facing away the viewer.

At values above 1.0, the reflection appears stronger on the surface edges and weaker on the surface front. At values less than 1.0, the Fresnel is disabled, and the coating appears as a uniform highlight over the surface.

rtx_material_omnisurfacebase_coat_ior_1p0

Coat IOR: 1.0

Coat Weight: 1.0

rtx_material_omnisurfacebase_coat_ior_1p52

Coat IOR: 1.52

Coat Weight: 1.0

rtx_material_omnisurfacebase_coat_ior_5p0

Coat IOR: 5.0

Coat Weight: 1.0

Anisotropy

his parameter sets the specular reflection anisotropy. Reflectance changes based on the surface orientation are called anisotropic. If the reflectance is uniform in all directions and does not change based on the surface’s rotation or orientation, it is isotropic.

At values above 0.0, the surface transmits and reflects incoming light with a directional bias. Thus it appears rougher in a specific direction.

rtx_material_omnisurfacebase_coat_anisotropy_0p0

Coat Anisotropy: 0.0

rtx_material_omnisurfacebase_coat_anisotropy_0p5

Coat Anisotropy: 0.5

rtx_material_omnisurfacebase_coat_anisotropy_1p0

Coat Anisotropy: 1.0

Rotation (radian)

This parameter sets the orientation of the anisotropic effect in radians. At 1.0, the anisotropic effect is rotated by 180 degrees. For brushed surfaces, the anisotropic effect should stretch out in a direction perpendicular to the brushing direction.

rtx_material_omnisurfacebase_coat_anisotropy_rotation_0p5

Coat Anisotropy Rotation: 0.5

rtx_material_omnisurfacebase_coat_anisotropy_rotation_0p65

Coat Anisotropy Rotation: 0.65

rtx_material_omnisurfacebase_coat_anisotropy_rotation_0p75

Coat Anisotropy Rotation: 0.75

Affect Color

This parameter controls the saturation of diffuse reflection and subsurface under the coating layer.

In the real world, refracted rays exhibit internal reflection within the coating medium, which can go back down to the underlying surface to reflect again, thus making the surface more saturated and darker. Affect Color can be used to emulate this effect. At 0.0, this parameter has no effects.

rtx_material_omnisurfacebase_coat_affect_color_no_coat

No Coat

rtx_material_omnisurfacebase_coat_affect_color_0p0

Coat Affect Color: 0.0

Coat Weight: 1.0

rtx_material_omnisurfacebase_coat_affect_color_1p0

Coat Affect Color: 1.0

Coat Weight: 1.0

Affect Roughness

This parameter controls the roughness of the specular reflection, and specular transmission under the coating layer.

In the real world, refracted rays exhibit internal reflection within the coating medium, which can go back down to the underlying surface, which may scatter due to the roughness of the undercoating surface. Affect Roughness can be used to emulate this effect. At 0.0, this parameter has no effects.

rtx_material_omnisurfacebase_coat_affect_roughness_base

Base Layer Only

Specular Reflection Weight: 1.0

Specular Reflection Roughness: 0.0

rtx_material_omnisurfacebase_coat_affect_roughness_coat

Coat Layer Only

Coat Weight: 1.0

Coat Roughness: 0.5

rtx_material_omnisurfacebase_coat_affect_roughness_0p0

Base and Coat Layer

Coat Affect Roughness: 0.0

rtx_material_omnisurfacebase_coat_affect_roughness_1p0

Base and Coat Layer

Coat Affect Roughness: 1.0

rtx_material_omnisurfacebase_coat_affect_roughness_specular_transmission_base

Base Layer Only

rtx_material_omnisurfacebase_coat_affect_roughness_coat

Coat Layer Only

rtx_material_omnisurfacebase_coat_affect_roughness_1p0_specular_transmission

Base and Coat Layer

Coat Affect Roughness: 1.0

Normal

This parameter sets the “normal direction” for the coating layer, which affects the Fresnel blending of the coating layer over the surface. The coat normal can create surface effects like raindrops, imperfections in car paint, or glazing on the food.

Note

The “coat normal” only affects the coating layer and has no effects on the underlying surface normal.

rtx_material_omnisurfacebase_coat_normal_droplets

Droplets

rtx_material_omnisurfacebase_coat_normal_scratches

Scratches

Sheen (Specular retro-reflection)

Display Name

Name

Type

Default

Weight

specular_retro_reflection_weight

float

0.0

Color

specular_retro_reflection_color

color

1.0, 1.0, 1.0

Roughness

specular_retro_reflection_roughness

float

0.3

This layer creates an energy-conserving retro-reflective sheen BRDF. Sheen simulates surface micro-fibers, with axes oriented parallel to the surface normal, creating specular highlights at grazing angles.

Sheen can create soft backscattering materials like fine powder, dust, satin, leaf, and peach fuzz on the skin.

Weight

This parameter sets the density and length of micro-fibers. At 0.0, sheen has no effects.

rtx_material_omnisurfacebase_sheen_weight_0p0

Sheen Weight: 0.0

rtx_material_omnisurfacebase_sheen_weight_1p0

Sheen Weight: 1.0

Color

This parameter tints the color of the sheen, i.e., micro-fibers.

rtx_material_omnisurfacebase_sheen_color_0p0_0p0_0p0

Sheen Color: 1.0, 1.0, 1.0

rtx_material_omnisurfacebase_sheen_color_0p75_0p07_0p45

Sheen Color: 0.75, 0.07, 0.45

Roughness

This parameter sets the sheen effect roughness. Micro-fibers diverge more from the “surface normal” direction at a higher value, resulting in a softer look.

rtx_material_omnisurfacebase_sheen_roughness_0p0

Sheen Roughness: 0.0

rtx_material_omnisurfacebase_sheen_roughness_0p15

Sheen Roughness: 0.15

rtx_material_omnisurfacebase_sheen_roughness_0p25

Sheen Roughness: 0.25

rtx_material_omnisurfacebase_sheen_roughness_0p5

Sheen Roughness: 1.0

Emission

Display Name

Name

Type

Default

Weight

emission_weight

float

0.0

Emission Mode

emission_mode

enum

emission_lx

Intensity

emission_intensity

float

1.0

Color

emission_color

color

1.0, 1.0, 1.0

Use Temperature

emission_use_temperature

bool

false

Temperature

emission_temperature

float

6500.0

This layer adds directionally uniform EDF under the coating layer, which describes the light-emitting properties of the surface.

It can create materials like an incandescent light-bulb, glowing lava, and LED panel.

Note

In the RTX – Interactive (Path Tracing) mode, to reduce the noise in the indirectly lit area using emissive materials, one may need to increase the Total Samples per Pixel.

Please see RTX Interactive (Path Tracing) mode render settings for more information.

rtx_material_omnisurfacebase_emission_tspp_8

Total Samples per Pixel: 8

rtx_material_omnisurfacebase_emission_tspp_32

Total Samples per Pixel: 32

rtx_material_omnisurfacebase_emission_tspp_128

Total Samples per Pixel: 128

rtx_material_omnisurfacebase_emission_tspp_512

Total Samples per Pixel: 512

Weight

This parameter sets the amount of light emission from the surface.

rtx_material_omnisurfacebase_emission_weight_0p0

Emission Weight: 0.0

rtx_material_omnisurfacebase_emission_weight_0p5

Emission Weight: 0.5

rtx_material_omnisurfacebase_emission_weight_0p75

Emission Weight: 0.75

rtx_material_omnisurfacebase_emission_weight_1p0

Emission Weight: 1.0

Emission Mode

This parameter specifies the physical units to use for the emission intensity.

1. “Nit” is the unit of luminance and describes the surface power of a visible light source. The overall illumination of the scene changes depends on the size of the light source.

One nit is equal to one candela per square meter. 1 nit = 1 cd/m^2

The candela per square meter is the base unit of luminance. Candela is the base unit for luminous intensity.

A light source that emits one candela of luminous intensity onto an area of one square meter has a luminance of one candela per square meter or one nit. As an example, a calibrated monitor has a brightness of 120 cd/m^2 or 120 nits.

2. “Lux” is the unit of illuminance and describes the total amount of visible light that a light source emits. The overall illumination of the scene does not change depending on the size of the light source.

One lux is equal to one lumen per square meter. 1 lux = 1 lm/m^2

A light source that emits one candela of luminous intensity from an area of one steradian has a luminous flux of one lumen.

A light source that emits one lumen of luminous flux onto an area of one square meter has an illuminance of one lux. As an example, very bright sunlight has a brightness of 120,000 lux.

Intensity

This parameter sets the emission intensity. The emission mode parameter sets the physical unit for this parameter.

A few examples of illuminance under various lighting conditions:

Lighting Condition

Illuminance (lx)

Sunlight

100,000 - 120,000

Daylight

10,000 - 25,000

Overcast

1000

Twilight

10

Full moon

0.05 – 0.3

Ceiling lamp

400 - 800

Table lamp

200 - 300

Candle light

12.57

Color

This parameter sets the emission color.

rtx_material_omnisurfacebase_emission_color_rainbow

Emission Color: Rainbow

rtx_material_omnisurfacebase_emission_color_lava

Emission Color: Lava

Use Temperature

Enable the use of color temperature value instead of color.

Note

This parameter will override the default emission color, including any textures assigned to the emission color parameter.

Temperature (Kelvin)

This parameter specifies emission color using a color temperature in the Kelvin unit. Lower values are warmer, i.e., redder, while higher values are cooler, i.e., bluer. The default value of 6500K is close to D65 illuminant, the white point in sRGB and Rec. 709 color spaces.

rtx_material_omnisurfacebase_emission_color_temp_3200

Emission Temperature: 3200.0

Use Temperature: Enabled

rtx_material_omnisurfacebase_emission_color_temp_5000

Emission Temperature: 5000.0

Use Temperature: Enabled

rtx_material_omnisurfacebase_emission_color_temp_6500

Emission Temperature: 6500.0

Use Temperature: Enabled

Thin Film

Display Name

Name

Type

Default

Enable Thin Film

enable_thin_film

bool

false

Thickness (nm)

thin_film_thickness

float

400.0

IOR Preset

thin_film_ior_preset

enum

ior_custom

IOR

thin_film_ior

float

1.52

This layer models a reflective thin film when a metal and or specular reflection layer presents. Due to interference, a view-dependent iridescence effect occurs when the thin film layer thickness is close to the visible spectrum.

It can create materials like a peacock feather, burnt metal, soap bubble, and car paint.

Enable Thin Film

Enables thin film layer

Thickness (nm)

This parameter sets the thickness of the thin film layer in nanometers. At 0.0, the iridescence effect is disabled.

Tip

A typical soap bubble thickness is about 250 - 600 nanometers. By contrast, human hair thickness is in the range of 40,000 - 100,000 nanometers wide.

rtx_material_omnisurfacebase_thin_film_thickness_200nm

Thin Film Thickness: 200nm

rtx_material_omnisurfacebase_thin_film_thickness_400nm

Thin Film Thickness: 300nm

rtx_material_omnisurfacebase_thin_film_thickness_400nm

Thin Film Thickness: 400nm

rtx_material_omnisurfacebase_thin_film_thickness_500nm

Thin Film Thickness: 500nm

IOR Preset

This parameter presents a list of known IORs (index of refractions) for various materials, including glass, soap bubble, diamond. One can use custom IOR by setting this parameter to ior_custom and a value for the specular reflection’s IOR parameter.

IOR

This parameter sets the refractive index of the thin film layer.

Tip

The refractive index of water is 1.33, and a typical soap is 1.5. For a realistic result, the refractive index of the thin film should be less than soap and greater than water, i.e., 1.34 - 1.49.

rtx_material_omnisurfacebase_thin_film_ior_1p33

Thin Film IOR: 1.33

rtx_material_omnisurfacebase_thin_film_ior_1p5

Thin Film IOR: 1.5

rtx_material_omnisurfacebase_thin_film_ior_2p0

Thin Film IOR: 2.0

rtx_material_omnisurfacebase_thin_film_ior_2p5

Thin Film IOR: 2.5

Geometry Section (Opacity, Geometry normal, Displacement)

Display Name

Name

Type

Default

Thin Walled

thin_walled

bool

false

Enable Opacity

enable_opacity

bool

false

Opacity

geometry_opacity

float

1.0

Opacity Threshold

geometry_opacity_threshold

float

0.0

Geometry Normal

geometry_normal

float3

state::normal()

Displacement

geometry_displacement

float3

0.0, 0.0, 0.0

Thin Walled

This parameter sets the surface as an infinitely thin double-sided shell with a refraction index of the surrounding medium, so refracted rays exit immediately instead of entering the medium.

Thin-walled is ideal for geometrically thin objects, like a sheet of paper, soap bubble, and leaves.

Note

“Dispersion” has no effects when Thin-Walled enabled.

rtx_material_omnisurfacebase_thin_walled_disabled_bubble

Thin Walled: Disabled

rtx_material_omnisurfacebase_thin_walled_enabled_bubble

Thin Walled: Enabled

Tip

When Thin-Walled is enabled, “subsurface” is represented as the diffuse transmission of the light through an infinitely thin shell, i.e., translucence.

rtx_material_omnisurfacebase_geometry_thin_walled_disabled

Thin Walled: Disabled

rtx_material_omnisurfacebase_geometry_thin_walled_enabled

Thin Walled: Enabled

Enable Opacity

Enables the use of opacity

Opacity

This parameter controls the travel of rays through the surface. At 0.0, the surface is invisible to the cameras, while at 1.0, it is completely opaque.

It can create render-time geometric detail on low-resolution and thin geometries.

Tip

Unlike transmission, renderers are optimized to use opacity to quickly skip over empty parts of a surface with a few operations.

rtx_material_omnisurfacebase_geometry_opacity_0p75

Opacity: 0.75

rtx_material_omnisurfacebase_geometry_opacity_0p5

Opacity: 0.5

rtx_material_omnisurfacebase_geometry_opacity_0p25

Opacity: 0.25

rtx_material_omnisurfacebase_geometry_opacity_wicker

Opacity: Texture

Opacity Threshold

This parameter controls the opacity threshold. At a value lower or equal to the opacity map, the surface renders completely transparent. At a value greater than the opacity, the surface renders fully opaque.

Geometry Normal

This parameter replaces the surface geometric normal with the one evaluated from a map. “Geometry Normal” has no effects on the coating layer.

rtx_material_omnisurfacebase_geometry_normal_foil

Aluminum Foil

rtx_material_omnisurfacebase_geometry_normal_gravel

Beach Gravel

Displacement

This parameter sets the direction and distance of position modification of the surface.

Important

This feature is not supported yet.

Presets

Base comes with an existing library of presets. These presets can be used as a starting point for creating new materials.

rtx_material_omnisurfacebase_presets_incandescent_bulb

Incandescent Bulb

rtx_material_omnisurfacebase_presets_brushed_metal

Brushed Metal

rtx_material_omnisurfacebase_presets_chrome

Chrome

rtx_material_omnisurfacebase_presets_copper

Copper

rtx_material_omnisurfacebase_presets_gold

Gold

rtx_material_omnisurfacebase_presets_foam

Foam

rtx_material_omnisurfacebase_presets_rubber

Rubber

rtx_material_omnisurfacebase_presets_jade

Jade

rtx_material_omnisurfacebase_presets_carpaint

Car-Paint

rtx_material_omnisurfacebase_presets_carpaint_metallic

Car-Paint Metallic

rtx_material_omnisurfacebase_presets_glossy_paint

Glossy Paint

rtx_material_omnisurfacebase_presets_two_tone_carpaint

Two-tone Car-Paint

rtx_material_omnisurfacebase_presets_peanut_butter

Peanut Butter

rtx_material_omnisurfacebase_presets_skim_milk

Skim Milk

rtx_material_omnisurfacebase_presets_whole_milk

Whole Milk

rtx_material_omnisurfacebase_presets_glossy_paint

Glossy Paint

rtx_material_omnisurfacebase_presets_two_tone_carpaint

Two-tone Car-Paint

rtx_material_omnisurfacebase_presets_chrome

Chrome

rtx_material_omnisurfacebase_presets_ceramic

Ceramic

rtx_material_omnisurfacebase_presets_clay

Clay

rtx_material_omnisurfacebase_presets_plastic

Plastic

rtx_material_omnisurfacebase_presets_skin_1

Skin 1

rtx_material_omnisurfacebase_presets_skin_2

Skin 2

rtx_material_omnisurfacebase_presets_skin_3

Skin 3

rtx_material_omnisurfacebase_presets_skin_4

Skin 4

rtx_material_omnisurfacebase_presets_velvet

Velvet

rtx_material_omnisurfacebase_presets_honey

Honey

rtx_material_omnisurfacebase_presets_maple_syrup

Maple Syrup

rtx_material_omnisurfacebase_presets_orange_juice

Orange Juice

rtx_material_omnisurfacebase_presets_dusted_glass

Dusted Glass

rtx_material_omnisurfacebase_presets_frosted_glass

Frosted Glass

rtx_material_omnisurfacebase_presets_glass

Glass

rtx_material_omnisurfacebase_presets_blood

Blood

rtx_material_omnisurfacebase_presets_bubble

Bubble

rtx_material_omnisurfacebase_presets_wax

Wax

rtx_material_omnisurfacebase_presets_polyethylene

Polyethylene

rtx_material_omnisurfacebase_presets_diamond

Diamond

rtx_material_omnisurfacebase_presets_clear_water

Clear Water

rtx_material_omnisurfacebase_presets_deep_water

Deep Water

OmniHairBase

Overview

OmniHairBase is a physically-based material designed base on Walt Disney’s Hair and Fur Model 3, capable of modeling near-field stylistic and realistic hair, fur, and fiber.

OmniHairBase comes with a small set of parameters with intuitive meanings, ranges and predictable results.

It consists of the following sections:

Parameters

Color

Display Name

Name

Type

Default

Base

base_color_weight

float

1.0

Color

base_color

color

1.0, 1.0, 1.0

Melanin Presets

melanin_concentration_preset

enum

melanin_concentration_custom

Melanin

melanin_concentration

float

1.0

Melanin Redness

melanin_redness

float

0.5

Melanin Randomize

melanin_concentration_randomize

float

0.0

The hair fiber absorption can be controlled by setting the color parameter or adjusting the melanin concentration parameter.

Note

In the path-tracer mode, overlapping hair fibers with low melanin concentration or light-color dye may appear dark. To reduce the darkening, one may need to increase the Max Bounces setting.

Please see Render Settings for more information.

rtx_material_omnihairbase_color_max_bounces_4

Flamingo Hair Dye

Max Bounces: 4

rtx_material_omnihairbase_color_max_bounces_256

Flamingo Hair Dye

Max Bounces: 256

Note

In the RTX – Interactive (Path Tracing) mode, to reduce the noise within hair fibers with low melanin concentration or light dye color, one may need to increase the Total Samples per Pixel setting.

Please see RTX Interactive (Path Tracing) mode render settings for more information.

rtx_material_omnihairbase_color_tspp_8

Icy Light Blue Hair Dye

Total Samples per Pixel: 8

rtx_material_omnihairbase_color_tspp_32

Icy Light Blue Hair Dye

Total Samples per Pixel: 32

rtx_material_omnihairbase_color_tspp_64

Icy Light Blue Hair Dye

Total Samples per Pixel: 64

rtx_material_omnihairbase_color_tspp_256

Icy Light Blue Hair Dye

Total Samples per Pixel: 256

Base

This parameter sets the brightness of the hair fiber color.

rtx_material_omnihairbase_base_w0p1

Green Ombre Dye

Base: 0.1

rtx_material_omnihairbase_base_w0p25

Green Ombre Dye

Base: 0.25

rtx_material_omnihairbase_base_w0p5

Green Ombre Dye

Base: 0.5

rtx_material_omnihairbase_base_w1p0

Green Ombre Dye

Base: 1.0

Color

This parameter sets the hair fiber color by adjusting the absorption within the hair fiber volume. The color parameter can create a dyed or art-directed hair look.

rtx_material_omnihairbase_color_pretty_purple

Pretty Purple

rtx_material_omnihairbase_color_rainbow

Rainbow

Note

For dyed hair, one should set the melanin concentration parameter to 0.0; otherwise, melanin and pheomelanin will darken the dye color.

Tip

For realistic hair color, set this parameter to white, and adjust the melanin concentration parameter instead.

Melanin Presets

This parameter presents a list of known melanin concentration values for different hair types. One can use a custom melanin concentration by setting this parameter to melanin_concentration_custom and enter a value for the melanin concentration parameter.

Melanin concentration “presets” are including:

Fiber Color

Melanin Concentration

White

0.0

Platinum Blond

0.0025

Light Blonde

0.10

Dark Blonde

0.30

Dark Brown

0.65

Black

1.0

Melanin

This parameter sets the melanin concentration, which controls the hair fiber’s primary color. At 0.0, hair fiber appears completely translucent, while at 1.0, pigments blocking refracted rays. Thus the hair fiber becomes black.

rtx_material_omnihairbase_color_melanin_0p025

Platinum Blonde / Silver

Melanin Concentration: 0.025

rtx_material_omnihairbase_color_melanin_0p05

Shimmering Sands Light Blonde

Melanin Concentration: 0.05

rtx_material_omnihairbase_color_melanin_0p1

Sun-Kissed Light Blonde

Melanin Concentration: 0.1

rtx_material_omnihairbase_color_melanin_0p2

Blonde

Melanin Concentration: 0.2

rtx_material_omnihairbase_color_melanin_0p35

Light Brown

Melanin Concentration: 0.35

rtx_material_omnihairbase_color_melanin_0p5

Brown

Melanin Concentration: 0.5

rtx_material_omnihairbase_color_melanin_0p75

Dark Brown

Melanin Concentration: 0.75

rtx_material_omnihairbase_color_melanin_1p0

The Crow - Black

Melanin Concentration: 1.0

Melanin Redness (Pheomelanin)

This parameter sets the melanin redness, which is the ratio between brown eumelanin and red pheomelanin. At higher values, the hair fiber becomes redder. The melanin redness has no effects when the melanin concentration parameter is 0.0.

rtx_material_omnihairbase_color_melanin_redness_0p0

Melanin Redness (Pheomelanin): 0.0

rtx_material_omnihairbase_color_melanin_redness_0p5

Melanin Redness (Pheomelanin): 0.5

rtx_material_omnihairbase_color_melanin_redness_0p75

Melanin Redness (Pheomelanin): 0.75

rtx_material_omnihairbase_color_melanin_redness_1p0

Melanin Redness (Pheomelanin): 1.0

Melanin Randomize

This parameter randomizes the amount of melanin concentration within hair fibers.

Note

The melanin randomization is not supported yet, one may map a texture noise to the melanin concentration parameter instead.

rtx_material_omnihairbase_color_melanin_randomization_0p0

Melanin Randomization: 0.0

rtx_material_omnihairbase_color_melanin_randomization_1p0

Melanin Randomization: 1.0

Specular (Specular reflection)

Display Name

Name

Type

Default

Roughness

specular_reflection_roughness

float

0.2

Anisotropic Roughness

specular_reflection_anisotropic_roughness

bool

false

Azimuthal Roughness

specular_reflection_azimuthal_roughness

float

0.2

IOR Preset

specular_reflection_ior_preset

enum

ior_custom

IOR

specular_reflection_ior

float

1.55

Shift (deg)

specular_reflection_shift

float

3.0

This hair model classifies light paths based on the number of internal reflections. Light paths are named after their event type. The first three light paths are R, TT, and TRT, where R indicates a reflection and T a transmission event.

These primary light paths are modeled as separate lobes with a dedicated longitudinal and azimuthal roughness. In contrast, longer light paths are implicitly accounted for a fourth lobe without additional parameters.

While the fourth lobe needs no azimuthal roughness, the longitudinal roughness of the fourth lobe is set to longitudinal roughness of the “third lobe”.

Roughness

This parameter sets the longitudinal roughness of the reflection along the hair fiber. At 0.0, reflection becomes sharp and bright, while at 1.0, a deviation based on specular_reflection_shift in degrees, for a very rough reflection.

rtx_material_omnihairbase_specular_reflection_roughness_w0p2

Roughness: 0.2

rtx_material_omnihairbase_specular_reflection_roughness_w0p3

Roughness: 0.3

rtx_material_omnihairbase_specular_reflection_roughness_w0p4

Roughness: 0.4

rtx_material_omnihairbase_specular_reflection_roughness_w0p5

Roughness: 0.5

Anisotropic Roughness

This parameter enables the use of the azimuthal roughness parameter. When disabled, the roughness parameter controls both longitudinal and azimuthal roughness.

Azimuthal Roughness

This parameter sets the azimuthal roughness of the reflection in the hair fiber’s tangent direction when the anisotropic roughness parameter is enabled. At a lower value, the reflection looks sharp, while at a higher value, reflection wraps around the hair fiber, giving a smoother look.

One could consider azimuthal roughness as a phase function of the hair fiber’s volume, which changes the translucency and affects the multiple scattering albedo.

rtx_material_omnihairbase_specular_reflection_azimuthal_roughness_w0p0

Azimuthal Roughness: 0.0

Anisotropic Roughness: Disabled

Roughness: 0.2

rtx_material_omnihairbase_specular_reflection_azimuthal_roughness_w0p1

Azimuthal Roughness: 0.1

Anisotropic Roughness: Enabled

Roughness: 0.2

rtx_material_omnihairbase_specular_reflection_azimuthal_roughness_w0p3

Azimuthal Roughness: 0.3

Anisotropic Roughness: Enabled

Roughness: 0.2

rtx_material_omnihairbase_specular_reflection_azimuthal_roughness_w0p5

Azimuthal Roughness: 0.5

Anisotropic Roughness: Enabled

Roughness: 0.2

IOR Preset

This parameter presents a list of known IORs (index of refractions) for various materials, including hair and wet hair. One can use custom IOR by setting this parameter to ior_custom and a value for the specular reflection’s IOR parameter.

IOR

This parameter sets the index of refraction. Individual hair fibers are modeled as dielectric cylinders, with hair fiber reflecting off and transmitting into the fiber depending on the IOR.

At a lower IOR value, hair fibers exhibit strong forward scattering, while at a higher IOR value, stronger reflection.

Tip

The IOR for typical human hair is about 1.55. A lower value can give hair fibers a muted look, while a higher value gives a wet look.

rtx_material_omnihairbase_specular_reflection_ior_muted

Muted and thick hair

IOR: 1.2

rtx_material_omnihairbase_specular_reflection_ior_wet

Wet hair

IOR: 1.8

Shift (degree)

This parameter sets the angle of the hair fiber’s scales. values above 0.0 shift the primary and the secondary specular reflections away from the hair fiber’s root, while values less than 0.0 shift the specular reflection toward the root.

Recommended values for human hair 4 :

Hair Origin

Scale angle (degrees)

Piedmont

2.8 ± 0.2

Light brown European

2.9 ± 0.3

Dark brown European

3.0 ± 0.2

Indian

3.7 ± 0.3

Japanese

3.6 ± 0.3

Chinese

3.6 ± 0.4

African-American

2.3 ± 0.4

rtx_material_omnihairbase_specular_reflection_shift_05

Shift (degree): 5.0

rtx_material_omnihairbase_specular_reflection_shift_10

Shift (degree): 10.0

rtx_material_omnihairbase_specular_reflection_shift_15

Shift (degree): 15.0

rtx_material_omnihairbase_specular_reflection_shift_20

Shift (degree): 20.0

Diffuse (Diffuse Scattering)

Display Name

Name

Type

Default

Weight

diffuse_reflection_weight

float

0.0

Color

diffuse_reflection_color

color

1.0, 1.0, 1.0

It adds a Lambertian diffuse component for greater control over the look of hair fibers.

Weight

This parameter sets the weight of the additional diffuse reflection component. At 0.0, the hair fiber exhibits specular scattering, while at 1.0, completely diffuse scattering.

Note

A healthy-looking human hair fiber does not have any diffuse component. However, the diffuse component can create effects such as makeup, dirty or damaged hair, and fabric threads.

rtx_material_omnihairbase_diffuse_scattering_w0p1

Weight: 0.1

rtx_material_omnihairbase_diffuse_scattering_w1p0

Weight: 1.0

Color

This parameter sets the color of the diffuse scattering component.

rtx_material_omnihairbase_diffuse_scattering_color

Color: Texture

rtx_material_omnihairbase_diffuse_scattering_color_animal

Color: Texture

Emission

Display Name

Name

Type

Default

Weight

emission_weight

float

0.0

Emission Mode

emission_mode

enum

emission_lx

Intensity

emission_intensity

float

1.0

Color

emission_color

color

1.0, 1.0, 1.0

Use Temperature

emission_use_temperature

bool

false

Temperature

emission_temperature

float

6500.0

This layer adds an additional directionally uniform EDF, which describes the light-emitting properties of the surface.

Note

Realistic hair fibers do not have any emissive property, and these are just for artistic control.

Note

In the RTX – Interactive (Path Tracing) mode, to reduce the noise in the indirectly lit area using emissive materials, one may need to increase the Total Samples per Pixel.

Please see RTX Interactive (Path Tracing) mode render settings for more information.

Weight

This parameter sets the amount of light emission from the surface.

rtx_material_omnihairbase_emission_weight_0p1

Weight: 0.1

rtx_material_omnihairbase_emission_weight_0p6

Weight: 0.6

Emission Mode

This parameter specifies the physical units to use for the emission intensity.

1. “Nit” is the unit of luminance and describes the surface power of a visible light source. The overall illumination of the scene changes depends on the size of the light source.

One nit is equal to one candela per square meter. 1 nit = 1 cd/m^2

The candela per square meter is the base unit of luminance. Candela is the base unit for luminous intensity.

A light source that emits one candela of luminous intensity onto an area of one square meter has a luminance of one candela per square meter or one nit. As an example, a calibrated monitor has a brightness of 120 cd/m^2 or 120 nits.

2. “Lux” is the unit of illuminance and describes the total amount of visible light that a light source emits. The overall illumination of the scene does not change depending on the size of the light source.

One lux is equal to one lumen per square meter. 1 lux = 1 lm/m^2

A light source that emits one candela of luminous intensity from an area of one steradian has a luminous flux of one lumen.

A light source that emits one lumen of luminous flux onto an area of one square meter has an illuminance of one lux. As an example, very bright sunlight has a brightness of 120,000 lux.

Intensity

This parameter sets the emission intensity. The emission mode parameter sets the physical unit for this parameter.

A few examples of illuminance under various lighting conditions:

Lighting Condition

Illuminance (lx)

Sunlight

100,000 - 120,000

Daylight

10,000 - 25,000

Overcast

1000

Twilight

10

Full moon

0.05 – 0.3

Ceiling lamp

400 - 800

Table lamp

200 - 300

Candle light

12.57

Color

This parameter sets the emission color.

rtx_material_omnihairbase_emission_color_rainbow

Color: Texture

rtx_material_omnihairbase_emission_color_pattern

Color: Texture

Use Temperature

Enable the use of color temperature value instead of color.

Note

This parameter will override the default emission color, including any textures assigned to the emission color parameter.

Temperature

This parameter specifies emission color using a color temperature in the Kelvin unit. Lower values are warmer, i.e., redder, while higher values are cooler, i.e., bluer. The default value of 6500K is close to D65 illuminant, the white point in sRGB and Rec. 709 color spaces.

rtx_material_omnihairbase_emission_temperature_2700

Emission Temperature: 2700.0

Use Temperature: Enabled

rtx_material_omnihairbase_emission_temperature_4000

Emission Temperature: 4000.0

Use Temperature: Enabled

rtx_material_omnihairbase_emission_temperature_6500

Emission Temperature: 6500.0

Use Temperature: Enabled

Geometry (Opacity, Geometry normal, Displacement)

Display Name

Name

Type

Default

Enable Opacity

enable_opacity

bool

false

Opacity

geometry_opacity

float

1.0

Opacity Threshold

geometry_opacity_threshold

float

0.0

Geometry Normal

geometry_normal

float3

state::normal()

Displacement

geometry_displacement

float3

0.0, 0.0, 0.0

Enable Opacity

Enables the use of opacity

Opacity

This parameter controls the travel of rays through the surface. At 0.0, the surface is invisible to the cameras, while at 1.0, it is completely opaque.

Note

Although it is not physically correct, one may reduce the opacity to create softer-looking hair fibers at the cost of increased render time.

rtx_material_omnihairbase_geometry_opacity_1p0

Full Look

Opacity: 1.0

rtx_material_omnihairbase_geometry_opacity_0p5

50% Hair-Thinning

Opacity: 0.5

rtx_material_omnihairbase_geometry_opacity_0p25

75% Hair-Thinning

Opacity: 0.25

rtx_material_omnihairbase_geometry_opacity_haircut

Haircut

Opacity: Texture

Opacity Threshold

This parameter controls the opacity threshold. At a value lower or equal to the opacity map, the surface renders completely transparent. At a value greater than the opacity, the surface renders fully opaque.

Geometry Normal

This parameter replaces the surface geometric normal with the one evaluated from a map.

Displacement

This parameter sets the direction and distance of position modification of the surface.

Important

This feature is not supported yet.

Presets

OmniHarBase comes with an existing library of presets. These presets can be used as a starting point for creating a new hair look.

rtx_material_omnihairbase_presets_black

Black

rtx_material_omnihairbase_presets_auburn

Auburn

rtx_material_omnihairbase_presets_brown

Brown

rtx_material_omnihairbase_presets_blonde

Blonde

References

2

Georgiev, I, Portsmouth, J., Zap, A., Herubel, A., King, A., Ogaki, S. and Servant, F. (2019), Autodesk Standard Surface. Autodesk White Paper.

3

Chiang, M. J., Bitterli, B., Tappan, C. and Burley, B. (2016), A Practical and Controllable Hair and Fur Model for Production Path Tracing. Computer Graphics Forum, 35: 275-283.

4

Keis, K., Ramaprasad, K.R. and Kamath, Y.K. (2004), Studies of light scattering from ethnic hair fibers. J Cosmet Sci. 55(1): 49-63. PMID: 15037920.

Color Space

Texture Slots in Omniverse Apps contain a dropdown allowing the selection of color-space. Choosing the correct color space is critical to correct visual output and should be set to match the Color Space of the image being used. As a general rule, data images like Normal, Roughness, Metallic, etc. are best using RAW while full color images like Base/Diffuse Color should be set to sRGB. Auto can be used to help guess the color space but should be used cautiously as it can guess incorrectly based on several factors.

Color Space

Result

Auto

Assigns the Color Space based on metadata or bit depth of the image.
Checks for gamma or color space metadata in the texture file. If the
texture is 8-bit or has 3 channels or if it is 8-bit and has 4
channels, the image is read in sRGB. Otherwise read the image in RAW.

sRGB

Applies sRGB to Linear color transformation.

RAW

Uses texture data as it’s read from the file.

Applying Materials

In order to assign a material to an object, the material must be added to your stage. This can be accomplished several ways. Using drag and drop, you can drag your material to an empty part of the Viewport or to the Stage panel. If you wish to use one our the Omniverse materials, you can use the Create menu.

Material List


Once a material is in the scene, the material can be assigned to any location. With your object or scene location selected, you can assign the material by going to the Details panel and selecting your material in the dropdown under Materials on selected models. If an scene has multiple material, a searchable list box will open so you can select the appropriate material to assign. You can scroll through the list of materials or type the name or partial name of your material.

Apply a Material to a Mesh

  1. Select the mesh you want to apply a material to.

  2. In the details panel look for the heading “Materials on selected models”

  3. In the dropdown under that heading select the material you wish to apply.

  4. At this point your material is applied to the selected mesh and adjustment of the material inputs should present themselves as changes occur.

Search Material List

Sometimes the dropdown list can become exhaustive in length, a search widget found at the top of the dropdown can help alleviate this issue.

_images/materials-ui-search.gif

While menu dropped down:

  1. Select Search bar at top top of drop-down panel.

  2. Type character string in material name.

  3. Select appropriate material.

Drag and Drop Assignment

In Omniverse USD Composer, materials can be dragged from the stage and dropped onto assets or prims based on the selection mode you are in.

  • If you have Object Selection Mode enabled, dragging a material from the stage onto an object will replace the material of ALL prims that make up the selected asset.

  • If you have Prim Selection Mode, dragging a material from the stage to an object will replace the prim where the material is dropped.

Creating Materials

Materials can be easily created in Omniverse USD Composer using the Create > Materials menu.

Creating materials can be done in 2 common ways. #. Create a material on a mesh : This method is when you want to create a material in your scene AND apply it to selected meshe(s). #. Create a Material in a scene : This method simply creates a material inside the scene’s look folder but does NOT apply it to a mesh.

Note

IF your model does not have UVs, you will need to enable “World Space UV” to display textures.

Create Material on Mesh

For a quick easy way to apply a new material to your mesh you can create and automatically apply the material by simply selecting a mesh or several meshes before creating a new material.

  1. Select the mesh you want to apply a material to.

  2. Select Create > Material > Omni PBR, Omni Glass, etc.

  3. In the status bar (bottom right of screen), you will likely see a 0% bar for a few moments. Wait until it completes and disappears to confirm it is fully loaded.

  4. In the Stage window, Select the Looks folder and Find the shader you selected (ie: Omni PBR). Feel free to rename this as desired.

  5. If the material is fully loaded, you should see inputs for the material in the Details panel.

  6. At this point your material is applied to the selected mesh and adjustment of the inputs should present themselves as changes occur.

Create Material in Scene

There are times when you may want to pre-build a series of MDL’s and you do not want to select the meshes each time as a needed step. In this case, you can simply create the materials first, fill them in, and later apply the materials to selected objects.

  1. Deselect all by left clicking a blank area in either the Stage or the Viewport.

  2. Select Create > Material > Omni PBR

  3. In the status bar (bottom right of screen), you will likely see a 0% bar for a few moments. Wait until it completes and disappears to confirm it is fully loaded.

  4. In the Stage window, Select the Looks folder and Find the shader you selected (ie: Omni PBR). Feel free to rename this as desired.

  5. If the material is fully loaded, you should see inputs for the material in the Details panel.

  6. You can now fill in the materials input properties as needed to set it to your desired materials look however it has not been applied yet and will not display.

Material Selection

As materials are an intricate part of the visual process, Omniverse USD Composer has several selection methods for working with Materials.

Looks

Whenever a material is added to a scene, it will be stored in a “looks” directory in your Stage. This is where all material references are shown and managed.

Note

When a USD is nested, it will carry its looks folder with it. Therefore it is possible to have several looks folders in the appearing in stage, one for each imported USD is possible.

Scene Material Quick Linking

_images/materials-locate-material.png

With an asset selected, Click the arrow to right of material input to “jump” to the bound material.

Tip

You can use click the shader ball in lieu of the Arrow for quicker clicking!

_images/materials-locate-material-02.png

Users now can easily edit the attached material.

Locate MDLs on your Nucleus

Floating MDLs (MDLs existing in a reachable Nucleus Path) can be quickly located from the stage.

Select a Shader in the scene and locate the Details panel.

_images/materials-find-mdl.png

Select the Right Arrow next to the module will quickly jump the Content Browser to the MDLs location on the nucleus.

_images/materials-find-mdl-02.png


Tip

Using the Folder icon will allow reassignment to a different MDL.

Note

Locating MDLs with this method only works if your material exists on the Nucleus, therefore materials generated from the “Create” panel will not by located by this method as they exist as direct system references and not a particular location.

Finding Objects attached to a Material

Selecting all objects bound with a specific material in your current scene can be quite useful at times.

_images/materials-locate-objects-from-material.png

In the Stage, Right Click on a material and choose “Select Bound Objects”.

_images/materials-locate-objects-from-material-02.png

Material Swap

Allows you quickly swap one material for another while maintaining any USD connections for the target material.

Omniverse Web Layout

Choose a Target Material

To use the material swap tool, simply select a material you wish to replace in your content browser, then while highlighted, select “User Selected”. The Material to replace input window should now reflect the path to the material you expect to replace.

Choose a Source Material

Next, choose a material in your browser you wish to use to replace. Press User Selected again to populate the input with the path to the source material.

Swap

Once swapped, the target material should now have the same properties and settings as the source material. Any assets using this material will be updated.

UDIM Support

Overview

Omniverse USD Composer has UDIM support done in a way that is both convenient and powerful. By using the standard naming conventions used in a typical UDIM scenario, you simply replace the UDIM number with <UDIM> on ANY texture file input to invoke UDIM support.

Using UDIM’s in Omniverse USD Composer (Video)

Drag and Drop assignment of UDIM sequences

By default, file sequences of UDIM textures are displayed in the Content Browser as discreet file names and thumbnails. UDIM sequences can be displayed compactly through the Options dialog. Enabling Display UDIM Sequence displays the sequence as a single file name with the UDIM tile numbers replaced with the UDIM token. Dragging and dropping the sequence to a texture parameter on a material inserts the sequence into the material.

_images/udim_display_ON.png

To open Options, click the 3 lines in the upper right of the Content Browser. Display UDIM Sequence is persistant and will save with your configuration.

Manually replacing the UDIM frame number with the UDIM token is still applicable to any MDL parameter texture input.

Example UDIM Sequence

If you have a sequence of textures slated for use in a UDIM prepared mesh like this…

my_texture.1001.png

my_texture.1002.png

my_texture.1003.png

Simply replace the number with <UDIM> in any MDL texture input dialogue.

my_texture.<UDIM>.png

Note

Using UDIMs instead of multiple material assignments can benefit larger scenes/meshes by easing the assignment of a multitude of textures by its naturally automated process.

Primvars

_images/primvars.png

Primvars are additional data attached to a geometric object. The data is defined as a USD token and value pair and can be accessed using an MDL data_lookup node in the Material Editor. The data can then be used to drive shading parameters for rendering.

Expanding Your Library

You can expand your library of MDLs by writing your own custom MDLs and importing them. You can also use Substance Designer to develop MDLs using a visual interface.

For more information on Writing your Own MDLs

NVIDIA MDL Language Specification

For more information on Substance Designer and MDL

Substance & MDL

MDL in Substance (Video)

These videos show how to begin your journey into creating MDL files in Substance Designer. Once created they can then be used in Omniverse USD Composer by copying the created MDL into your Omniverse Server.

Part 1

Part 2