Kit Development#

Developing a Omniverse Kit App to be deployed to an Omniverse Kit App Streaming instance for on-demand streaming is largely the same as for other streaming environments.
You get the same streaming extensions and container workflow, with added steps to register images and application metadata on your cluster.
In this guide, you learn the streaming and container requirements for Omniverse Kit App Streaming, how shared shader caching works, and how to deploy a container as an ApplicationVersion.
New to Kit App development?
If you are new to Kit App development, the Kit App Template Tutorial is a great starting point. It provides step-by-step instructions and various templates to help you quickly create your own applications. You will be guided through key processes, like enabling streaming and containerization, with the USD Viewer template as a recommended first project.
After you have walked through creating a container of a streamable Kit App, come back here to dive into the specifics of creating Omniverse Kit Apps to be deployed to an Omniverse Kit App Streaming instance.
Before going, review the Overview to provide a bit of context while you are learning.
For more detailed guidance, explore the Omniverse Kit App Development Guide, which offers comprehensive documentation to support your development journey.
Overview#
This section summarizes the full workflow before the detailed sections that follow.
In short, the process can be divided into two major areas:
- Creating your Kit App
This starts with creating your application, whether from a template or a blank screen, and includes everything until you have a tested containerized streamable Kit App.
Basic steps
Creating your Kit App
The basic steps are:
Create your Kit App
Enable streaming using the NVIDIA Omniverse™ Kit App Streaming extensions.
Locally test your streamable Kit App
Package and Containerize your Kit App
Test your Kit App container
After you have confirmed that your Kit App is containerized and streaming properly, you are ready for deployment.
- Deploying to your instance.
This involves everything required to make your containerized Kit App available for streaming on your deployment environment, an Omniverse Kit App Streaming instance in this case.
Basic steps
Deploying your Kit App
Deploying to an Omniverse Kit App Streaming instance involves the following steps:
Register your Kit App container with an image registry accessible by your cluster, such as NVIDIA NGC™.
Register your application with your Omniverse Kit App Streaming instance.
Creating your Kit App#
This guide only covers specific information required to successfully deploy a Kit App to an Omniverse Kit App Streaming instance. If you are new to Kit App development, review the New to Omniverse Kit Application development dropdown, above, or use the Kit App Template Tutorial and Omniverse Kit App Development Guide.
Required knowledge:
Kit App development
Kit App Streaming
Containerizing Kit Apps
Kit Streaming requirements#
There are no special requirements for creating your Kit App to be deployed to an Omniverse Kit App Streaming instance, other than ensuring it meets the basic requirements for Kit App Streaming, in general:
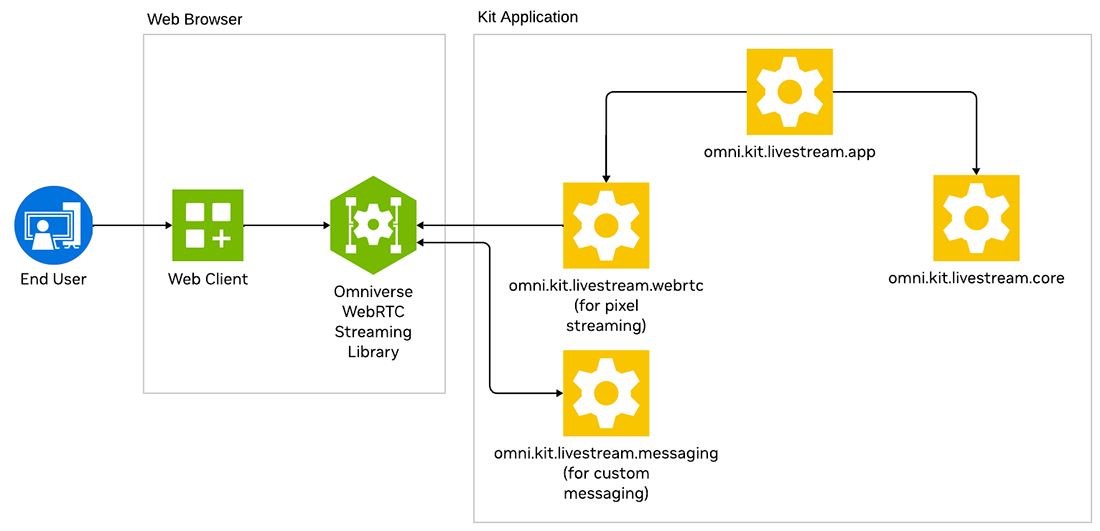
Kit App Streaming developer architecture#
omni.kit.livestream.appto enable WebRTC streaming. Declaring this as a dependency in your.streaming.kitfile is sufficient; it pulls inomni.kit.livestream.coreandomni.kit.livestream.webrtcautomatically.omni.kit.livestream.messagingif your app requires bidirectional messaging with the web client. This is optional and not needed for basic streaming.The application configured properly for its intended use:
Minimal UI suitable for streaming, especially if being embedded into a web client’s interface.
Resolution no greater than 1920x1080.
Render rate set to 30 fps.
Streaming-specific configuration options in a [my-app].streaming.kit file.
Container requirements#
There are no specific requirements, other than ensuring the Kit application successfully runs and streams when containerized.
Shader Cache support#
To minimize start-up latency, Omniverse Kit App Streaming instances have a shared shader cache service that all of the GPU Worker Nodes can access. Shared shader caching is critical to minimizing Kit start-up latency as shader compilation can take 5-10 minutes.
Why Shared Shader Caching is important.
Shader caching is a performance optimization technique used in GPU rendering to store the results of shader compilation for reuse in future sessions. Shaders are programs that run on the GPU to handle graphical tasks like lighting, shading, and other visual effects. These shaders must be compiled from source code into executable instructions before they can be run on the GPU, and this process can be time-consuming. Shader caching addresses this issue by storing the compiled shaders, significantly reducing the need for recompilation and improving performance.
Setting the AUTO_ENABLE_DRIVER_SHADER_CACHE_WRAPPER envar#
Your application’s container can pick up this variable automatically when the pod starts, as part of the container sidecar’s environment variable configuration. Refer to Install Memcached Service.
What you need to do#
For Kit 105.1, you only need to ensure that the omni.hssc Kit extension is being loaded. For Kit 106+, in most situations, nothing. As long as the AUTO_ENABLE_DRIVER_SHADER_CACHE_WRAPPER is set automatically by the instance, shared shader caching should work.
Alternatively, you can hard-code the AUTO_ENABLE_DRIVER_SHADER_CACHE_WRAPPER envar in the start-up script of your Kit App. This is not preferred, as any changes will require recreating your Kit App container.
Deploying your Kit App#
After you have a containerized Kit App that you have tested to ensure it streams properly, you are ready to begin the deployment process. This typically requires elevated privileges, which you may not have. A common workflow involves developers collaborating with cluster administrators for the deployment of applications. Confirm the deployment process for your instance and whether you have the requisite permissions.
Requisite Knowledge and Permissions#
Familiarity with image repositories and authorization to push images
Cluster access and the ability to modify and push Kubernetes CRDs, or:
Access to optionally exposed Application management endpoints.
Deploying a Kit Application Container#
You have successfully created a container of your Kit Application and now want to deploy it to your instance. Before doing so, consider one key point about your container: your container represents a “version” of your application. It is not your application, only one version of your application. Every container you create of your application is a “version” of it.
This is exactly the model that Omniverse Kit App Streaming uses with Application and ApplicationVersion, the two representations you need to create and manage when deploying a Omniverse Kit App to your instance.
Before diving deeper, review the two overarching steps required to deploy your container image.
1. Register your container image#
The first step is pushing your container image to an image repository, which the services and Worker Nodes have access to. Ensure you choose a clear name for your image. Also, follow best practices when choosing your label, use semver, and potentially stages when doing so. This can help when registering your container image with your instance, in the next step.
You will need the URI to the container image in the next step.
2. Adding the Image to your instance#
This is the step where you inform your instance that there is a new ApplicationVersion that can be streamed using the container image you registered. There must also be a valid ApplicationProfile compatible with your Application and ApplicationVersion.
There are two methods for registering a Omniverse Kit App with your instance. The default is to use standard methods for managing resources on a Kubernetes cluster. This requires administrative access to your cluster and familiarity with Kubernetes CRDs and Helm charts.
See Manage Kit applications in the cluster for how
ApplicationsandApplicationVersionsare managed.
Optionally, you can create and delete Application and ApplicationVersion by enabling management endpoints of the Application service. This has security implications, so may not be available.
See Application service management endpoints for security considerations and how to enable the endpoints.
Summary#
You now understand how to prepare a streamable Kit App for Omniverse Kit App Streaming, configure shared shader caching where applicable, and register container images as Application and ApplicationVersion resources. For day-to-day deployment tasks in Kubernetes, see Manage Kit applications in the cluster. If your site exposes optional HTTP APIs for application lifecycle, review Application service management endpoints.