Client/Server Overview#
This section is a general overview of some of the basic client and server functionality we’ve built for the Purse Configurator. Use it as reference for building your own application, and to establish best practices for maintaining client and server session synchronization.
Client Session Functions#
Clients use CloudXRSession to configure, initiate, pause, resume, and end a session with the server. In addition, it maintains the current session state for the client.
Session life cycle:#
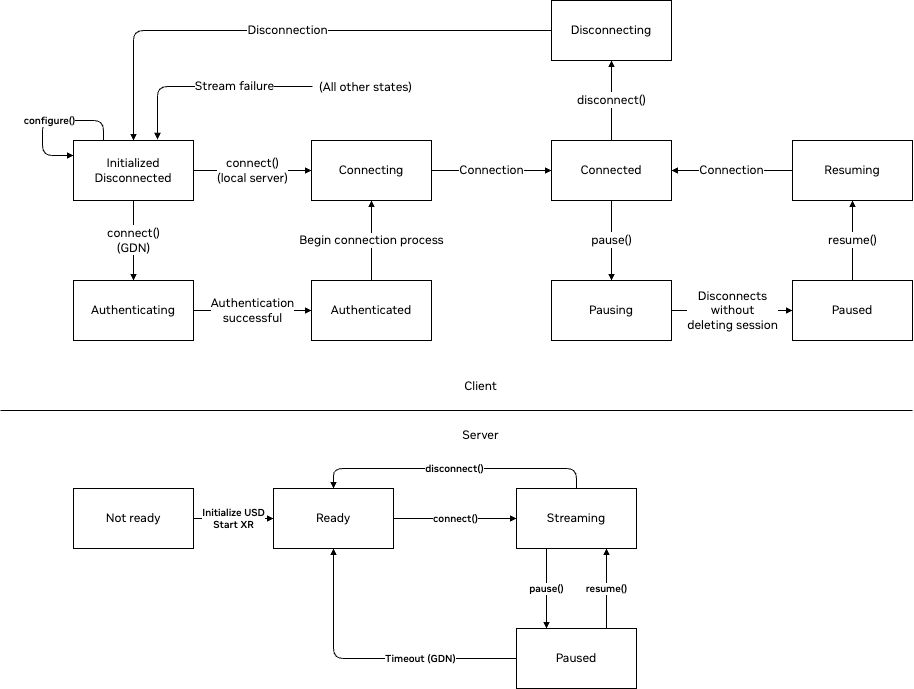
The following flowchart shows the life cycle of a streaming session.

As the above diagram illustrates, there are a few operations clients can perform to manage a streaming session:
configure()
The session needs to be configured before it can begin. The client first defines the configuration (i.e., local server ip or GDN zone with authentication method). It then provides the configuration to CloudXRSession in the constructor, and optionally it can update it later by calling configure() with a different configuration. Any prior sessions must be disconnected before calling configure().
connect()
The client calls connect() to start the session. This first performs any authentication steps that may be needed for GDN, and then initiates the connection. It is asynchronous and returns when the session reaches the connecting state.
disconnect()
This ends and deletes a session, as opposed to the pause() described below.
pause()
This disconnects a session without deleting it (e.g. to keep using the same GDN host when resuming). Clients can call pause() to disconnect without deleting the session. Note that GDN will time out after 180 seconds of being paused if the client does not reconnect.
resume()
This reconnects to a previously paused session.
Omniverse ActionGraph Logic#
Now that you’re familiar with the client, the next step is for you to see how those commands are intercepted by Omniverse and how you use those messages to update the data in your stage. To accomplish this, you’ll use ActionGraph. You can learn more about ActionGraph here.
Remote Scene State with Messaging and Events#
Next you’ll send messages back to the client using ActionGraph with the latentLoadComplete graph. It’s important for both the client and the server to be aware of each other’s current state. You can use ActionGraph to let your client know when data is loaded, or a variant change is complete by sending a message back to the client. You manage this with a series of events:
ack Events#
In Omniverse development, acknowledgment (ack) events are essential for indicating the completion of actions like changing a variant. You can incorporate a sendMessagebusEvent node at the end of your graph to dispatch an ack event. For instance, in the styleController graph, this event might carry the variantSetName handle. The ackController graph then listens for these events and uses a ScriptNode to convert them into a message.
def setup(db: og.Database):
    pass
def cleanup(db: og.Database):
    pass
def compute(db: og.Database):
    import json
    message_dict = {
        "Type": "switchVariantComplete",
        "variantSetName": db.inputs.variantSetName,
        "variantName": db.inputs.variantName
    }
    db.outputs.message = json.dumps(message_dict)
    return True  # Indicates the function executed successfully
We then send the result of this message composition to the latentLoadingComplete graph via the omni.graph.action.queue_loading_message event.
Loading Complete Messages#
The latentLoadingComplete graph contains all the logic for managing the messaging of these events. First, you need a location to accumulate these messages as they are generated by the stage. You do this with a Write node that takes messages sent to omni.graph.action.queue_loading_message and adds them to an array.

As this array is filled with messages, we use another portion of the graph to determine if loading is complete with a ScriptNode:

import omni
from omni.graph.action_core import get_interface
def setup(db: og.Database):
    pass
def cleanup(db: og.Database):
    pass
def compute(db: og.Database):
    _, files_loaded, total_files = omni.usd.get_context().get_stage_loading_status()
    db.outputs.is_loading = files_loaded or total_files
    return True
This graph detects if any messages have been queued, checks to see if the loading associated with those events is complete, and if so, a Send Custom Event is triggered for send_queued_messages. This event is what finally sends your message back to the client with the event name omni.kit.cloudxr.send_message containing the message that you generated with ackController, queued for sending with queue_loading_message, and executed with send_queued_messages

Loading Complete Events#
Messages are sent back to the client, but events are what you send to other ActionGraph logic. Alongside the logic for generating, queuing, and sending messages is the same logic for events. This way, you could trigger a different portion of ActionGraph when a specific piece of login is finished loading. You can find this logic next to the messaging logic in the latentLoadingComplete graph.
Portal Camera Setup#
Let’s cover how we use cameras in your scene to help establish predetermined locations a user can teleport their view to in the client. You can see in our stage that we’ve set up a couple of example cameras under Cameras Scope called Front and Front_Left_Quarter.
Note: To approximate the user’s field of view inside >the headset, the camera’s focal length is set to 70 and the aperture to 100.
Position your cameras to frame the desired area of the stage.
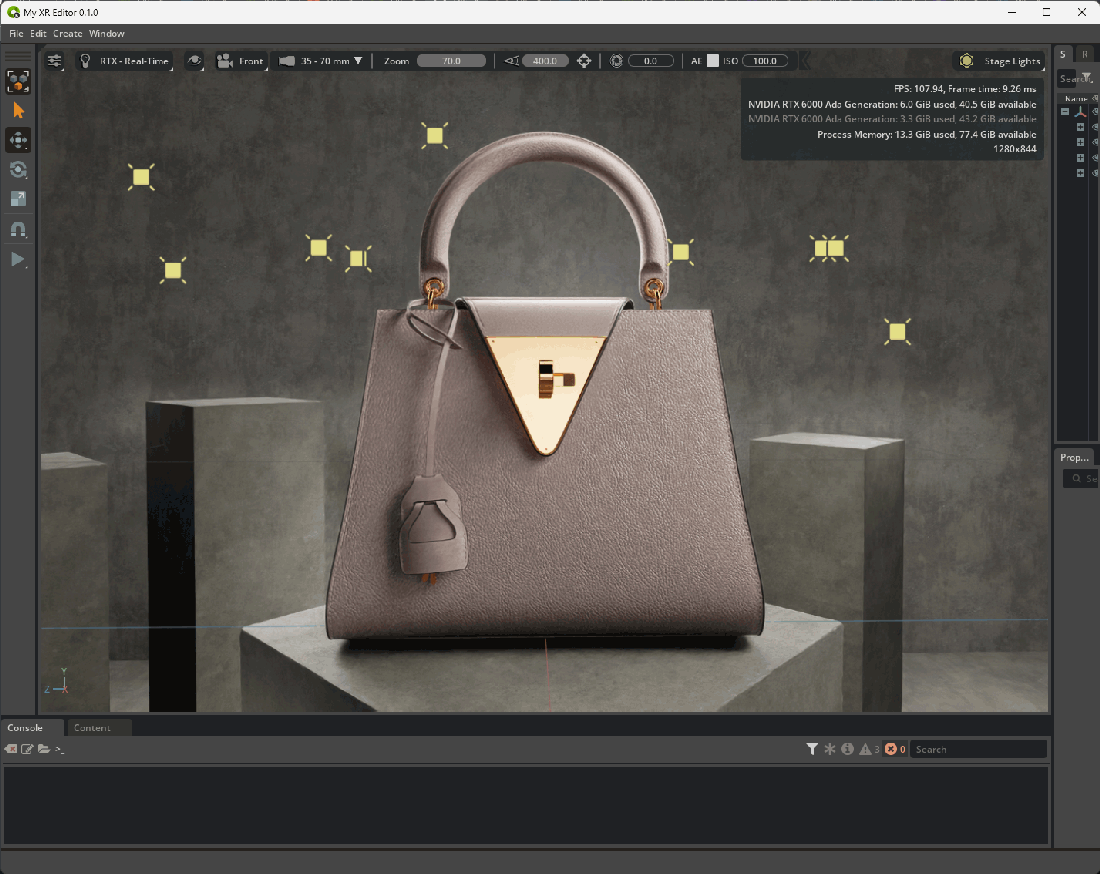
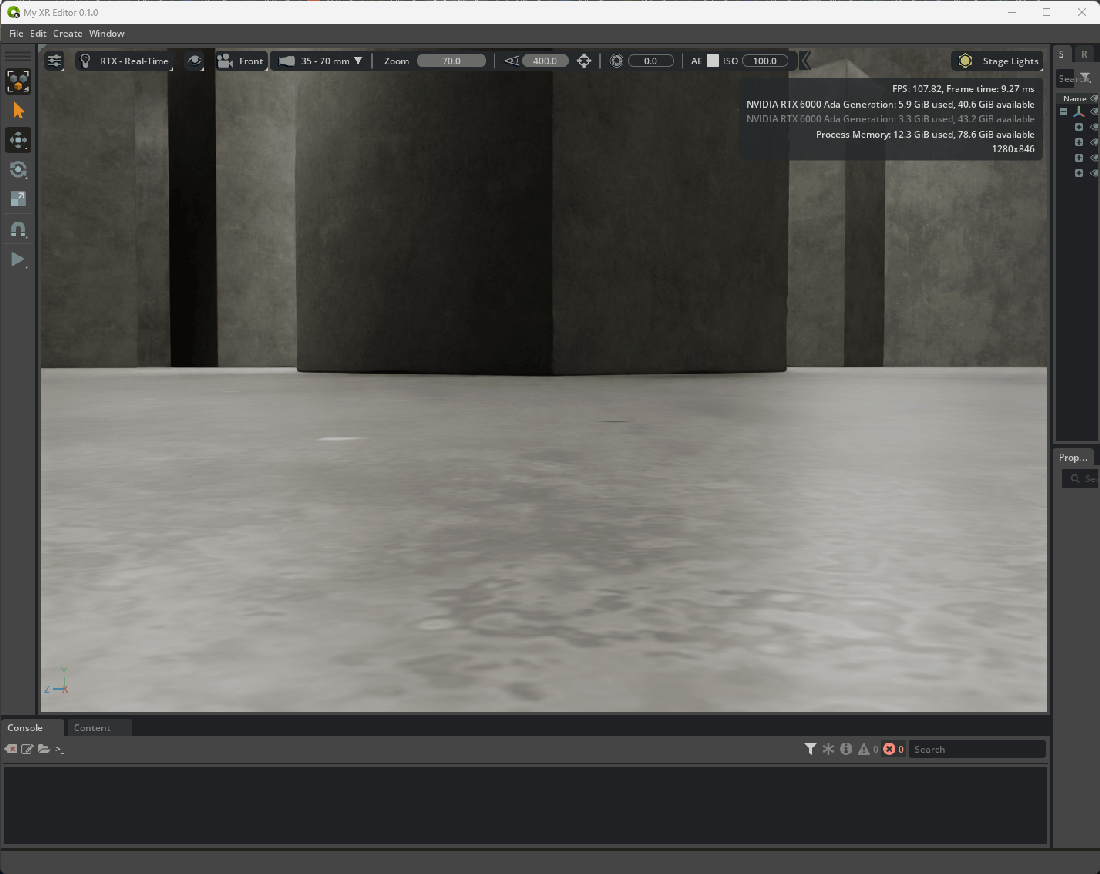
As a final step, we set our cameras to be on the “ground” of the environment we’re presenting. On the client, we can automatically infer the distance from our users head to the ground in their physical space. We then apply this same offset to the cameras in the USD stage - the effect of this setup causes the ground in our USD stage to appear at the same height as the ground in the user’s physical space, lending additional realism to the content inside the portal.
You can author this “ground” height as an opinion on your cameras so that you can artistically place them and later apply a “ground’ offset with an opinion on a reference or layer. Additionally, if you do not want to align the ground between the USD Stage and the user’s physical ground, you can ignore this setup.
Because we cannot predict the head pose a user will have upon connecting, it’s important to remember that the “default” state of your stage should be one in which the camera is located on the ground of your stage. Once the head pose is detected from an active connection, we compose that coordinate system on top of the camera in the stage. For example, if your camera is at 0,15,20 x,y,z and the initial headpose once a client connects is at 0,100,200 x,y,z, then the asset will appear to be 0,115,220 x,y,z away from the users’ head.
Before grounding the camera:

After grounding the camera:

In ActionGraph, we change cameras with the cameraController graph. First, we listen for a camera change event from the client with a script node. The client sends the full path of the camera prims in the message. If needed, we can pass a y_offset from the client.
# Set the CameraPath output if it exists in the parsed message
if "cameraPath" in state:
    db.outputs.cameraPath = state["cameraPath"]

# Initialize y_offset output to 0
db.outputs.y_offset = 0

# Set y_offset output if it exists in the parsed message
if "y_offset" in state:
    db.outputs.y_offset = state["y_offset"]
Next, we’ll use another script node to get the camera transforms and apply them to our XR teleport function: profile.teleport
# Import necessary modules for XR functionality
from omni.kit.xr.core import XRCore, XRUtils

# Check if XR is enabled, return if it is not
if not XRCore.get_singleton().is_xr_enabled():
    return True

# Get the current XR profile
profile = XRCore.get_singleton().get_current_profile()

# Get the world transform matrix of the camera
camera_mat = XRUtils.get_singleton().get_world_transform_matrix(db.inputs.cameraPath)

# Extract the translation component of the camera matrix
t = camera_mat.ExtractTranslation()

# Adjust the Y component of the translation by the input offset
t[1] += db.inputs.y_offset

# Apply the updated translation back to the camera matrix
camera_mat.SetTranslateOnly(t)

# Log the new camera matrix position for teleportation
print(f"XR Teleport to: {camera_mat}")

# Teleport the XR profile to the updated camera matrix position
profile.teleport(camera_mat)

return True  # Return True to indicate successful execution
Adjusting Camers in Omniverse Viewport#
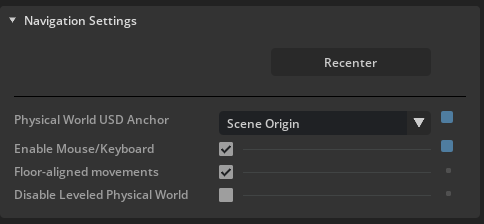
To adjust the camera using the Omniverse viewport controls, you may need to adjust the settings located in the AR Panel under Advanced Settings -> Navigation Settings:

Physical World USD Anchor can be set to: - Scene Origin - Places the user at 0,0,0 in world coordinates. - Custom USD Anchor - Places the user at the center of the bounds of a specified prim in the stage. - Active Camera - Uses the currently active viewport camera to position the user, changing the camera in the viewport will move the user in AR.
Additionally, you can enable Mouse/Keyboard and use the normal Viewport controls to move a user around.
Variant Change#
To change variants, we use graph logic to listen for incoming variantSet names. For example when changing the environment, we have a node to catch any messages transmitting the “environment” message. We then route this to a script node with some python inside to update the variant on the specified prim.
Variants are powerful composition systems native to OpenUSD. You can learn more about creating and leveraging variants here.
When creating immersive experiences, it’s important to remember the performance implications of variants - loading and unloading large amounts of data from disk can cause your experience to slow down, consider keeping much of your variant composition loaded inside the stage and leverage mechanisms like visibility to turn prims on and off instead of composition mechanisms like prepending payloads and references.
With ActionGraph, it’s easy to create conditional graphs that can trigger multiple variants. For example, if we wanted the lighting variant to change when we change the environment variant, we could add additional Switch On Token nodes.
Toggle Viewing Mode Portal/Volume Mode:#
We change between Portal and Volumes with the contextModeController graph.
Omniverse has two output modes for XR: AR and VR. AR mode enables specific settings for compositing an asset in a mixed reality context, whereas VR mode disables these compositing settings for a fully immersive render. When changing between Portal and Volume, we toggle between VR and AR mode.
First we listen for a setMode message from the client, and then we branch depending on if we send portal or tabletop. We then change the variant on our context prim, /World/Background/context. This variantSet hides and unhides prims that are specific for these modes. For portals, we show the environments, for volumes we hide the environments and show the HDRI. We then use a script node to turn ar_mode on and off:
def setup(db: og.Database):
    pass

def cleanup(db: og.Database):
    pass

def compute(db: og.Database):
    import carb
    from omni.kit.xr.core import XRCore, XRUtils
    profile = XRCore.get_singleton().get_current_profile()

    if hasattr(profile, "set_ar_mode"):
        print(f"Portal setting ar mode to: {db.inputs.ar_mode}")
        profile.set_ar_mode(db.inputs.ar_mode)

    else:
        carb.log_error("XRProfile missing function set_ar_mode")
    return True
Next, we use a script node to change some render settings based on the context mode, and finally send an ack event to signal the script has finished. We detail the render settings in the Performance section.
Additional Examples#
Similarly to how we execute variant changes, we can also listen for and execute other graph logic, such as animations, visibility changes and lighting adjustments. The Graphs folder contains examples that include AnimationController, PurseVisibilityController & LightSliderController.
Client Messaging with Swift#
Let’s take a look at how the client communicates with the above ActionGraph using Swift.
State Management#
Asset state: On the client side, asset states such as color and style are stored in AssetModel (For an example of how to define and use a state, refer to the PurseColor in PurseAsset), with OmniverseStateManager, a class variable within it, ensuring synchronization of all states between the client and server. Asset state synchronization between the server and client occurs when a connection to the server is established and when the subscript operator [] in OmniverseStateManager is called. Additionally, synchronization can be manually triggered using OmniverseStateManager.sync() or OmniverseStateManager.resync(). Calling resync forces the client to update all state variables, ensuring synchronization between the server and client.
Note
CloudXR 6.0 uses MessageChannels for client-server communication. The OmniverseStateManager and ServerMessageDispatcher handle channel management automatically, so application code typically doesn’t need to interact with channels directly.
Portal/Volume Mode: The ViewingModeSystem manages switching between portal and volume mode, also relying on the subscript operator to trigger OmniverseStateManager sync() , ensuring synchronization between the server and client. When switching modes, we use serverNotifiesCompletion: true to hide the UI while we wait for Omniverse to load and unload so much scene data. The portal is created using RealityKit portal API.
Portal Camera Setup (visionOS Only)#
To switch between cameras, we define messages encoding camera prim paths in PurseAsset. When the client clicks cameraButton, it sends a JSON message with the desired prim path to the server, triggering the camera switch.
In Common/PurseAsset.swift
public class PurseAsset: AssetModel {
    let exteriorPurseCameras: [AssetCamera] = [
        PurseCamera("Front"),
        PurseCamera("Front_Left_Quarter")
    ]
...
}

class PurseCamera: AssetCamera {
    init(_ ovName: String = "") {
        super.init(
            ovName: ovName,
            description: ovName.replacingOccurrences(of: "_", with: " "),
            encodable: PurseCameraClientInputEvent(ovName)
        )
    }
}

public struct PurseCameraClientInputEvent: MessageDictionary {
    // Note that we're setting an explicit prim path for cameras
    static let cameraPrefix = "/World/Cameras/cameraViews/RIG_Main/RIG_Cameras/"
    static let setActiveCameraEventType = "set_active_camera"

    public let message: Dictionary<String, String>
    public let type = Self.setActiveCameraEventType

    public init(_ cameraName: String) {
        message = ["cameraPath": "\(Self.cameraPrefix)\(camera.rawValue)"]
    }
}
We created cameraButtons for each cameras in visionOS/CameraSheet.swift, using exteriorCameras defined in AssetModel
var body: some View {
        List {
            Section(header: Text("Exterior")) {
                ForEach(appModel.asset.exteriorCameras) { cam in
                    cameraButton(cam, reset: false)
                }
            }
        }
...
}

func cameraButton(_ camera: AssetCamera, reset: Bool) -> some View {
        Button {
            appModel.asset.stateManager.send(camera)
        }
}
Variant Change#
To change Variants, we first define color messages in PurseAsset in Common/PurseAsset.swift.
public enum PurseColor: String, AssetStyle {
    public var id: String { rawValue }
    case Beige
    case Black
    case BlackEmboss
    case Orange
    case Tan
    case White

    public var description: String {
        switch self {
        case .Beige:
            "Beige"
        case .Black:
            "Black"
        case .BlackEmboss:
            "Black Emboss"
        case .Orange:
            "Orange"
        case .Tan:
            "Tan"
        case .White:
            "White"
        }
    }

    public var encodable: any MessageDictionary { PurseColorClientInputEvent(self) }
}

public struct PurseColorClientInputEvent: MessageDictionary {
    public let message: [String: String]
    public let type = setVariantEventType

    public init(_ color: PurseColor) {
        message = [
            // These are the messages we send to Omniverse
            "variantSetName": "color",
            "variantName": color.rawValue
        ]
    }
}
We then initialize the default color in PurseAsset, which in this case is Beige.
public class PurseAsset: AssetModel {
    ...
    init() {
        super.init(
            styleList: PurseColor.allCases,
            style: PurseColor.Beige,
       ...
       stateDict: [
                "color": .init(PurseColor.Beige),
                "style": .init(PurseClasps.Style01),
                ...                ],
For Vision OS, we then we add styleAsset buttons for each variant in ConfigureView.swift
var colorList: some View {
     HStack {
         ScrollView(.horizontal, showsIndicators: false) {
             HStack(alignment: .center, spacing: UIConstants.margin/2) {
                 ForEach(appModel.asset.styleList) { color in
                     styleAsset(key: "color", item: color)
                 }
             }
         }
     }
 }
 func styleAsset(key: String, item: any AssetStyle, size: CGFloat = UIConstants.assetWidth) -> some View {
     Button {
         appModel.asset[key] = item
     } label: {
         VStack {
             // Item image
             Image(String(item.rawValue))
                 .resizable()
                 .aspectRatio(contentMode: .fit)
                 .font(.system(size: 128, weight: .medium))
                 .cornerRadius(UIConstants.margin)
                 .frame(width: size)
             // Item name
             HStack {
                 Text(String(item.description))
                     .font(UIConstants.itemFont)
                 Spacer()
             }
         }.frame(width: size)
     }
     .buttonStyle(CustomButtonStyle())
 }
For iPad OS, the buttons are added in StreamingView+extensions+iOS.
var colorList: some View {
     VStack(alignment: .leading) {
        ...
             ScrollView(showsIndicators: false) {
                 HStack {
                    ...
                     ) {
                         ForEach (appModel.asset.styleList) { style in
                             styleAsset(key: "color", item: style, size: UIConstants.assetWidth * 0.5)
                                 .padding(5)
                         }
                     }
                 }
         ...
 }
Gesture Change#
To see how we’re using native visionOS gestures. Open visionOS/ImmersiveView.swift
.gesture(
     SimultaneousGesture(
         gestureHelper.rotationGesture,
         gestureHelper.magnifyGesture
     )
 )
The rotationGesure and magnifyGesture are defined in visionOS/GestureHelper+visionOS.swift
We can see they leverage the native MagnifyGesture and RotateGesture3D
@MainActor
 var magnifyGesture: some Gesture {
     MagnifyGesture(minimumScaleDelta: minimumScale)
         .onChanged { [self] value in
             guard magnifyEnabled else { return }
             viewModel.currentGesture = .scaling
             scaleRemoteWorldOrigin(by: Float(value.magnification))
         }
         .onEnded { [self] value in
             guard magnifyEnabled else { return }
             scaleRemoteWorldOrigin(by: Float(value.magnification))
             cleanUpOnScaleGestureEnd()
         }
 }

 @MainActor
 var rotationGesture: some Gesture {
     RotateGesture3D(constrainedToAxis: .z, minimumAngleDelta: minimumRotation)
         .onChanged { [self] value in
             guard rotateEnabled else { return }
             viewModel.currentGesture = .rotating
             // Rotation direction is indicated by the Z axis direction (+/-)
             let radians = value.rotation.angle.radians * -sign(value.rotation.axis.z)
             rotateRemoteWorldOrigin(by: rotateGestureCorrection(to: Float(radians)))
         }
         .onEnded { [self] value in
             guard rotateEnabled else { return }
             // Rotation direction is indicated by the Z axis direction (+/-)
             let radians = value.rotation.angle.radians * -sign(value.rotation.axis.z)
             rotateRemoteWorldOrigin(by: rotateGestureCorrection(to: Float(radians)))
             cleanUpOnRotationGestureEnd()
         }
 }
For Scale, we use the standard RealityKit Entity methods by setting the sessionEntity.scale, as shown in the code below from in visionOS/GestureHelper+visionOS.swift, and communicate directly to Omniverse Kit to modify scale and rotation.
@MainActor
func scaleRemoteWorldOrigin(by factor: Float) {
    guard let sessionEntity = viewModel.sessionEntity else { return }
    let correctedScale = snapScale(by: factor)
    sessionEntity.scale = .one * correctedScale
}
Note that there is no RotateGesture3D in iPad OS, so we use RotateGesture in iOS/GestureHelper+iOS.swift
@MainActor
 var rotationGesture: some Gesture {
     RotateGesture(minimumAngleDelta: minimumRotation)
         .onChanged { [self] value in
             guard rotateEnabled(value) else {
                 Self.logger.info("Gesture: rotation is not allowed")
                 return
             }
             viewModel.currentGesture = .rotating
             let correctedRadians = rotateGestureCorrection(to: Float(-value.rotation.radians))
             rotateRemoteWorldOrigin(by: correctedRadians)
         }
         .onEnded { [self] value in
             guard rotateEnabled(value) else {
                 Self.logger.info("Gesture: rotation is not allowed")
                 return
             }
             let correctedRadians = rotateGestureCorrection(to: Float(-value.rotation.radians))
             rotateRemoteWorldOrigin(by: correctedRadians)
             cleanUpOnRotationGestureEnd()
         }
 }
In the future, we’ll provide deeper access to how these gestures communicate with Omniverse.
Example Swift Code for Placement Tool - visionOS/ImmersiveView.swift or iOS/StreamingView+iOS.swift#
PlacementManager State#
The PlacementManager handles the logic for positioning, moving, and anchoring virtual objects within the AR environment, making sure they interact correctly with the user’s surroundings and inputs.
@State private var placementManager = PlacementManager()
RealityView#
The RealityView in visionOS/ImmersiveView.swift is configured to work with the PlacementManager, ensuring the placement puck appears and tracks the user’s head movements.
var body: some View {
    RealityView { content, attachments in
        placementManager.placeable = viewModel
    } update: { content, attachments in
        if let session = appModel.session {
            placementManager.update(session: session, content: content, attachments: attachments)
        }
    } attachments: {
        if viewModel.isPlacing {
            placementManager.attachments()
        }
    }
    .placing(with: placementManager, sceneEntity: sceneEntity, placeable: viewModel)
}
UI and User Interaction:#
The visionOS/ImmersiveView.swift file manages UI elements, including the placement puck, and handles user interactions related to the placement process.
Its equivalent in iOS is iOS/StreamingView+iOS.swift, as there is no ImmersiveView in iOS.
Connection to the Rest of the System#
visionOS/ImmersiveView.swift interacts with visionOS/ViewModel+visionOS.swift, visionOS/ConfigureView.swift, visionOS/ViewSelector.swift and the PlacementManager ensuring the Placement Tool functions correctly in the AR environment. The majority of the Place code is located within the visionOS/Placement Folder within the Configurator project.
Similarly, iOS/StreamingView+iOS.swift interacts with iOS/ViewModel+iOS.swift and iOS/StreamingView+extensions+iOS.swift (which is the equivalent of visionOS/ConfigureView.swift in iOS), we do not have ViewSelector.swift for iOS because iOS does not have the .ornament() API. iOS has its own PlacementManager defined in iOS/Placement+iOS.swift. Note that the PlacementManger in iOS can only detect floors due to the limitation of Apple’s API, and it is in a single Swift file instead of a Placement Folder like in visionOS.