Adding New Functionality To Our Experience#
Now that you understand how the client and server are set up and communicate, let’s go through an example of adding a new button. We will add a new action in the PurseAsset for visionOS. For iPad OS, we will need to implement this functionality in StreamingView+extensions+iOS and add it to the UI in StreamingView+iOS.
Note
The code examples in this guide use the OmniverseStateManager abstraction layer which works with both CloudXR 5.0 and 6.0. The underlying messaging implementation changed in CloudXR 6.0 to use MessageChannels, but the application-level API remains the same.
Client#
On the client-side, we will develop a new button in the SwiftUI panel to trigger the randomize function. This button will send a message to the server, initiating the randomization process for variant colors and styles. This function will work once we’ve added the needed code to the following components:
PurseAsset.swift
StreamingView+extensions+iOS.swift (for iPad OS)
StreamingView+iOS.swift (for iPad OS)
PurseAsset#
In PurseAsset.swift,add a new action class RandomizeAction next to PurseRotateAction.
...
public class PurseRotateAction: AssetAction {
    ...
}

// Represents an input event for a randomize action
public struct RandomizeClientInputEvent: MessageDictionary {
  // Message data indicating the type of action
  public let message: Dictionary<String, String>
  // Type of event, always set to "executeAction"
  public let type = "executeAction"
  // Initializes the event with a message indicating a randomize action
  public init(_ randomize: String) {
    message = [
        "actionType": randomize
    ]
  }
}

// Represents different types of randomize actions
public enum Randomize: String, MessageProtocol {
  case randomize = "randomize"
  // Provides an encodable representation of the randomize action
  public var encodable: any MessageDictionary {
      return RandomizeClientInputEvent(self.rawValue)
  }
}

public class RandomizeAction: AssetAction {
    init(viewModel: ViewModel, asset: AssetModel) {
        super.init(
            asset: asset,
            viewModel: viewModel,
            label: "Rand",
            onText: nil,
            offText: nil,
            shouldToggleView: false,
            isOn: nil
        )
    }

    override func toggle(_ isOn: Bool) {
        // Sends a request to randomize the purse
        asset.stateManager.send(Randomize.randomize)
    }
}
Then inside the PurseAsset class in PurseAsset.swift, add RandomizeAction into the function onViewModel.
override func onViewModel() {
     if let viewModel {
         actions = [
             PurseVisibleAction(viewModel: viewModel, asset: self),
             PurseRotateAction(viewModel: viewModel, asset: self),
             PursePlacement(viewModel: viewModel, asset: self),
             RandomizeAction(viewModel: viewModel, asset: self)
         ]
   ...
You can now build and run your application in the simulator. You should see the “Rand” button (we use “Rand” instead of “random” to prevent oversized text, though this can be easily fixed by re-layouting the buttons in the UI if desired; we’ve skipped this step in this implementation for simplicity) added to the bottom right of the panel. After modifying the action graph as shown below, clicking the button will shuffle the color and style of the purse.

For iPad OS#
For iPad OS we implement this button inside StreamingView in StreamingView+extensions+iOS.swift.
...
internal var styleAndColorButton: some View {
    ...
}
 private var randomStyleAndColorImage: String {
    "shuffle"  // Using SF Symbol "shuffle" icon for randomize
}

internal var randomStyleAndColorButton: some View {
    customButton(
        image: randomStyleAndColorImage,
        text: "Random",
        action: {
            // Sends a request to randomize the purse
       appModel.asset.stateManager.send(Randomize.randomize)
        },
        isDisabled: placementManager.state != .placed
    )
}
And then we add this button to the UI inside StreamingView in StreamingView+iOS.swift.
...
var body: some View {
   ZStack(alignment: .bottom) {
       ...
    if appModel.session?.state == .connected {
            VStack {
            Spacer()
            // Button to enable randomize color and style.
            HStack {
                randomStyleAndColorButton
                    .padding(.leading, modifyColorAndStyle ? sidebarWidth : 0)
                Spacer()
            }
            // Button to enable modify color and style.
            HStack {
                styleAndColorButton
                   .padding(.leading, modifyColorAndStyle ? sidebarWidth : 0)
                Spacer()
                placementButton
            }
   ...
You can now build your application and run it. In this screenshot from iPad, we can see the “Random” button on the top icon on the left. After modifying the action graph as shown below, clicking the button will shuffle the color and style of the purse.

Omniverse#
In Omniverse, we now need to add the ActionGraph logic associated with this function. We’ll add a graph to our stage, insert some python code to randomize the variants, and listen for a message event from the client to trigger the script.
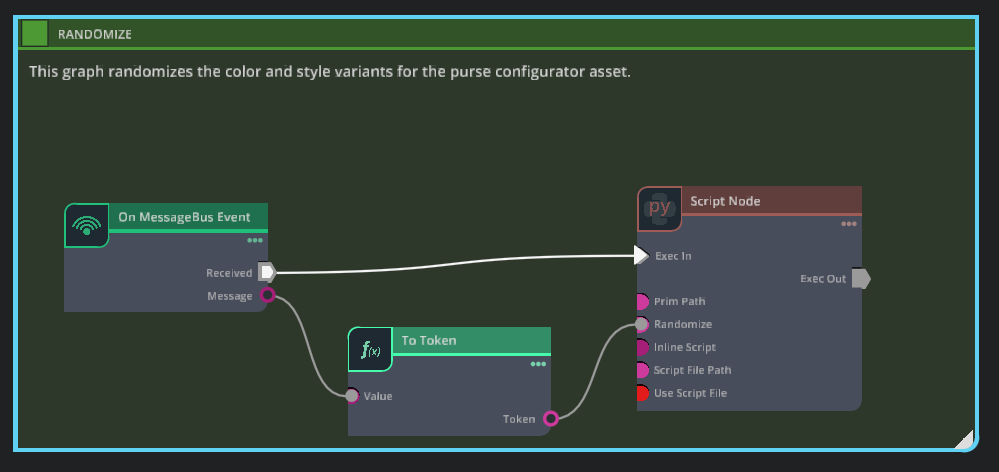
Action Graph Logic Setup#
Open the Purse dataset USD in Omniverse Kit Editor.
Create a new action graph using one of the following methods:
Right-click (RMB) within the stage panel,
Create>Visual Scripting>Action GraphTraverse to
Window>Visual Scripting>Action Graph> New Action Graph
Rename the new action graph by Right-clicking (RMB) on the new action graph and selecting
renamefrom the drop down menu. Rename it “randomizeController”.Using the Nodes column to the right of the Graph, create the following actionGraph nodes within this graph that will define the randomize logic.
On MessageBus Event:Add+ an Attribute from the Property Panel:
Attribute Name:
messageAttribute Type:
string
Event name =
executeActionUncheck
Only Simulate On Play
Script Node:Add Attribute… from the Property Panel:
Name:
primPathPort Type:
inputData Type:
token
Add the prim path to the new primPath Attribute:
/World/SM_LuxuryBag_A01_01Add Attribute… from the Property Panel:
Name:
randomizePort Type:
inputData Type:
tokenAfter selecting Randomize from the client, you should see this populate to say:
{ “actionType”:“randomize”}
Connect the Received event from On MessageBus Event to Exec In on the Script Node.
To Token:Connect
on_messagebus:messagetoinput:valueConnect
tokentoscript_node:input:randomize
Insert the following code block into the script node created in step 4b:
def setup(db: og.Database):
    pass

def cleanup(db: og.Database):
    pass

def compute(db: og.Database):
    import carb
    from omni.usd import get_context
    import random

    # Check if the randomize input is triggered
    if not db.inputs.randomize:
        return False

    # Get the USD stage
    stage = get_context().get_stage()

    # Retrieve the prim path input
    primPath = db.inputs.primPath  # primPath as string

    # Define the variant sets and variants
    variantOptions = {
        "Gold": ["Yellow", "White", "Pink"],
        "Locker": ["Triangle", "Ring"],
        "KeyRing": ["ON", "OFF"],
        "Handle": ["Round", "Square"],
        "Leather": ["Beige", "Black", "BlackEmboss", "Orange", "Tan", "White"]
    }

    # Get the prim using the prim path
    prim = stage.GetPrimAtPath(primPath)
    if not prim:
        carb.log_error(f"Not valid prim: {primPath}")
        return False

    # Get the variant sets from the prim
    variantSets = prim.GetVariantSets()
    if not variantSets:
        carb.log_error(f"Prim does not have Variant Sets: {primPath}")
        return False

    # Randomly select a variant for each variant set and set it
    for variantSetName, variants in variantOptions.items():
        variantSet = variantSets.GetVariantSet(variantSetName)
        if not variantSet:
            carb.log_error(
                f"Prim `{primPath}` does not have"
                + f" variant set: {variantSetName}"
            )
            continue

        # Randomly select a variant
        selectedVariant = random.choice(variants)
        variantSet.SetVariantSelection(selectedVariant)
        print(f"Set {variantSetName} to {selectedVariant}")

    return True
For brevity, we won’t add any ack logic to this setup, but you can if you’d like to notify the client or another event that randomize has completed.
Test#
Now we’re ready to test! You can Start AR with your modified stage in Omniverse, and you can launch your client from Xcode into the Simulator or deploy to the Vision Pro or iPad Pro. Connect to your Omniverse server and try the Randomize button.