Performance & Content Best Practices#
Optimization#
Performance is critical to a great-looking, comfortable experience. Our SDKs take advantage of reprojection to ensure a comfortable immersive experience when latency is introduced. However we’re not immune to latency, and need to try and keep a full round trip of a frame from client to server under 80ms when possible. In this section, we’ll take a look at how we diagnose the three common areas we need to extract performance from:
Omniverse RTX Performance#
This section provides notes on using the profiler and adjusting common settings to maximize performance.
Profiler#
Kit includes a general purpose profiler tool that measures the CPU and GPU performance of your stage. Profiler extension documentation for details.
To open the profiler:
Navigate to the Window menu, or press F8.
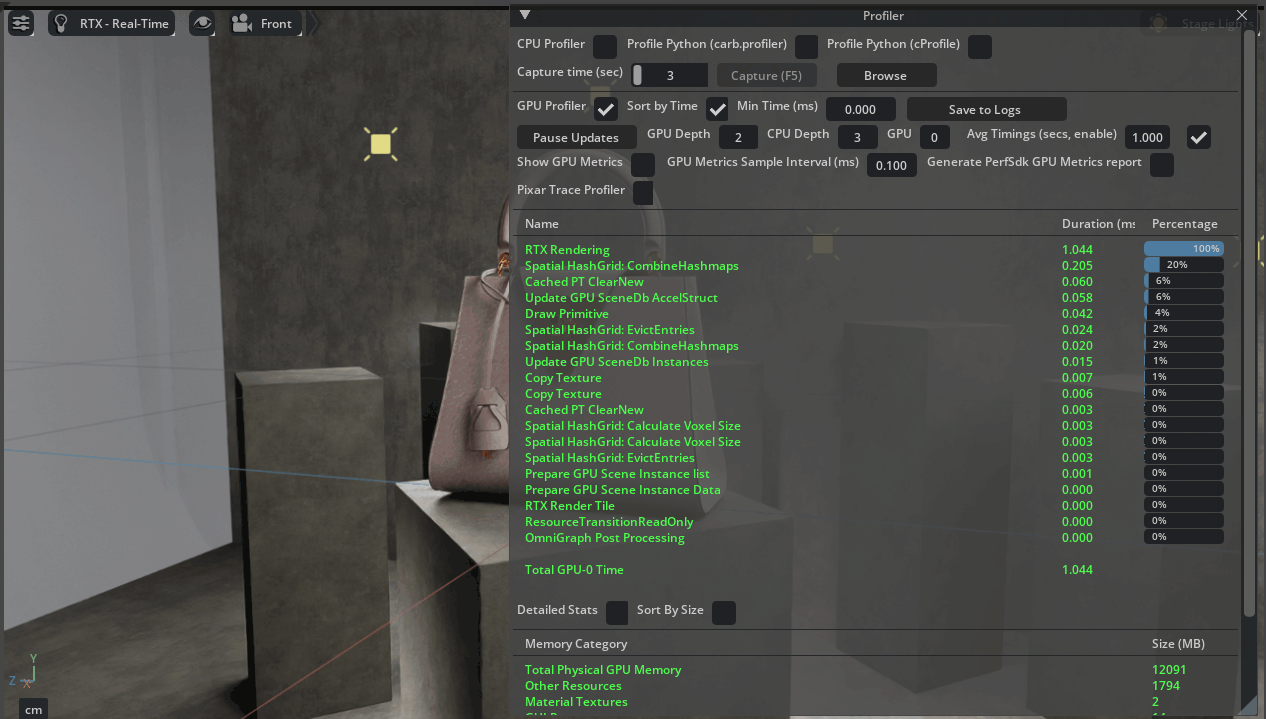
Enable the GPU Profiler
Sort by Time to see the GPU time of your scene render is being spent.
Looking at the profiler can give you an indication of whether or not tasks on the CPU or the GPU are costing you the most time, things like animation will consume CPU resources.
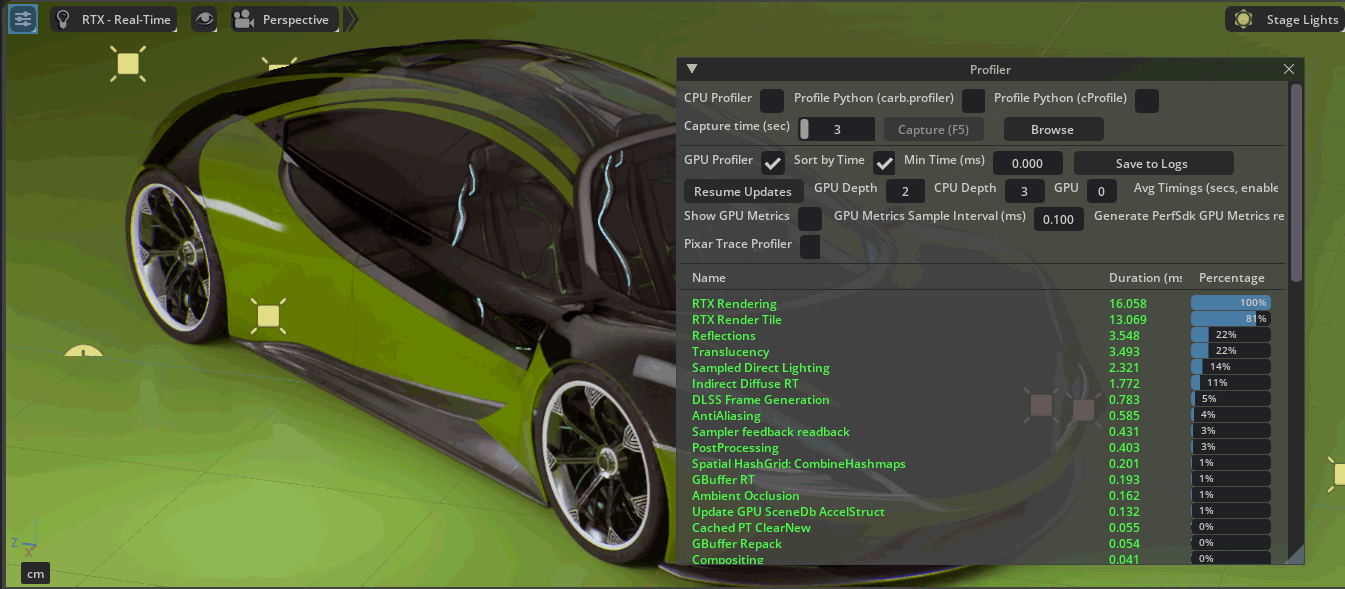
On a more complex scene, the profiler can give you insight into what areas of the renderer have the highest cost, such as reflections, translucency, and lighting.
RT2.0#
With Kit SDK 107.3 we’re offering our initial support of the improved RT2.0 renderer that brings the RTX Real Time renderer closer to rendering capabilities of the RTX Interactive renderer. To leverage RT2.0 for spatial streaming, we need to enable XRDepth. You can set your Kit app to use RT2 and XRDepth with the following flags:
--/xr/depth/aov="XRDepth" --/persistent/rtx/modes/rt2/enabled=true
    --/rtx/rendermode='RealTimePathTracing'
To switch back to RT1.0:
--/xr/depth/aov="XRDepth" --/persistent/rtx/modes/rt2/enabled=false
    --/rtx/rendermode='RaytracedLighting'
XRDepth#
Beginning with Kit 107.3 we offer XRDepth as an option for spatial streaming. XRDepth is a new AOV that enables better handling of depth information behind transparent objects, and replaces the older GbufferDepth AOV.
To enable XRDepth, you can launch your Kit app with the following flag:
--/xr/depth/aov="XRDepth"
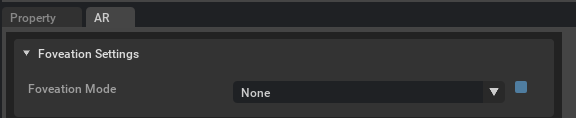
Alternatively, you can enable XRDepth in the Advanced Settings of the AR panel, where you can switch between GbufferDepth and XRDepth to examine how the depth information is handled in your scene.
Adjusting Render Settings#
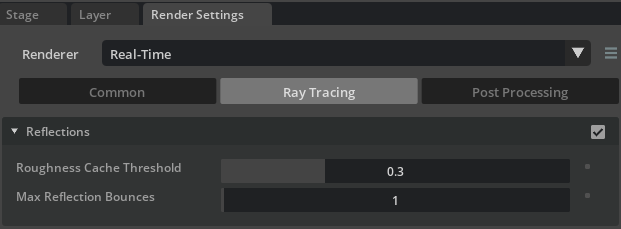
We can adjust the quality and thus performance of our scene by adjusting settings for reflections, translucency, and lighting.
Reflections can be tuned by increasing or decreasing the number of bounces, and the roughness threshold for when to kick on the reflection cache. Tune these settings for the desired quality of reflections you require, but try to avoid using too many unnecessary bounces.
Translucency can be tuned by reducing the refraction depth to the minimum number needed for your assets to work as intended, for example, see through a windshield and out the back of a car, you may need 3 refraction bounces if the glass is single sided, and 5 if it is double sided.
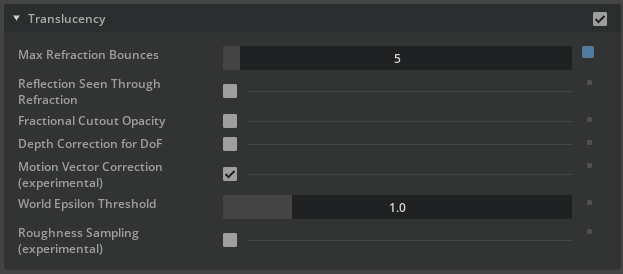
Additional settings like fractional cutout opacity and rough translucency sampling may add additional cost to your render time, use them only when needed.
For lighting, we recommend sticking to a single sample, and only using indirect diffuse lighting when needed.
Sometimes you’ll want different render settings between Portal and Volume contexts , for example you may need indirect lighting in portal mode, but not in volume mode. You can use ActionGraph and the Session State to adjust specific render settings with Python using any logic you wish, such as context mode, or even a variant.
Here is an example of how we are setting render settings via Python in an ActionGraph Script node.
def compute(db: og.Database):
    import carb
    carb.settings.get_settings().set("/rtx/matteObject/enabled", True)
    carb.settings.get_settings().set("/rtx/post/matteObject/enableShadowCatcher", 1)
    carb.settings.get_settings().set("/rtx/post/histogram/enabled", 0)
    carb.settings.get_settings().set("/rtx/post/backgroundZeroAlpha/enabled", 1)
    carb.settings.get_settings().set("/rtx/material/translucencyAsOpacity", 1)
    carb.settings.get_settings().set("/rtx/raytracing/fractionalCutoutOpacity", 1)
    return True
Here’s how to format these settings:
Identify the setting from the list of RTX Real-Time parameters.
Grab the setting, for example: /rtx/indirectDiffuse/maxBounces
Format it into a carb.setting like so, referencing the value type from the above guide.
carb.settings.get_settings().set("/rtx/indirectDiffuse/maxBounces", 2)
visionOS Client Performance#
If the client is not running smoothly (gestures are not smooth, 3D-model appears jittery), it could be due to SwiftUI updates, which can affect client performance.
The primary indicator of a client performance issue is the pose rate being lower than the device’s refresh rate (90Hz/100Hz depending on location).
We have typically observed this when performing frequent SwiftUI updates, UI updates should only happen on user interaction events, and any UI update logic must be quiescent when just viewing the content.
Animation Performance#
If playing back animation in Omniverse, you should add these flags and extensions to get the best possible playback experience.
--/app/player/useFixedTimeStepping=False --/app/player/useFastMode=True --enable
    omni.anim.window.timeline
Additionally, ensure that the Fabric Scene Delegate is enabled.
Content Best Practices#
USD Structure & Organization#
USD compositions like variants, payloads and references can help you make your application more extensible and repeatable. Having client code that relies on USD prims to have specific names and locations can easily create a situation where clients are too specific to the data. In the Purse USD stage there are some examples of this:
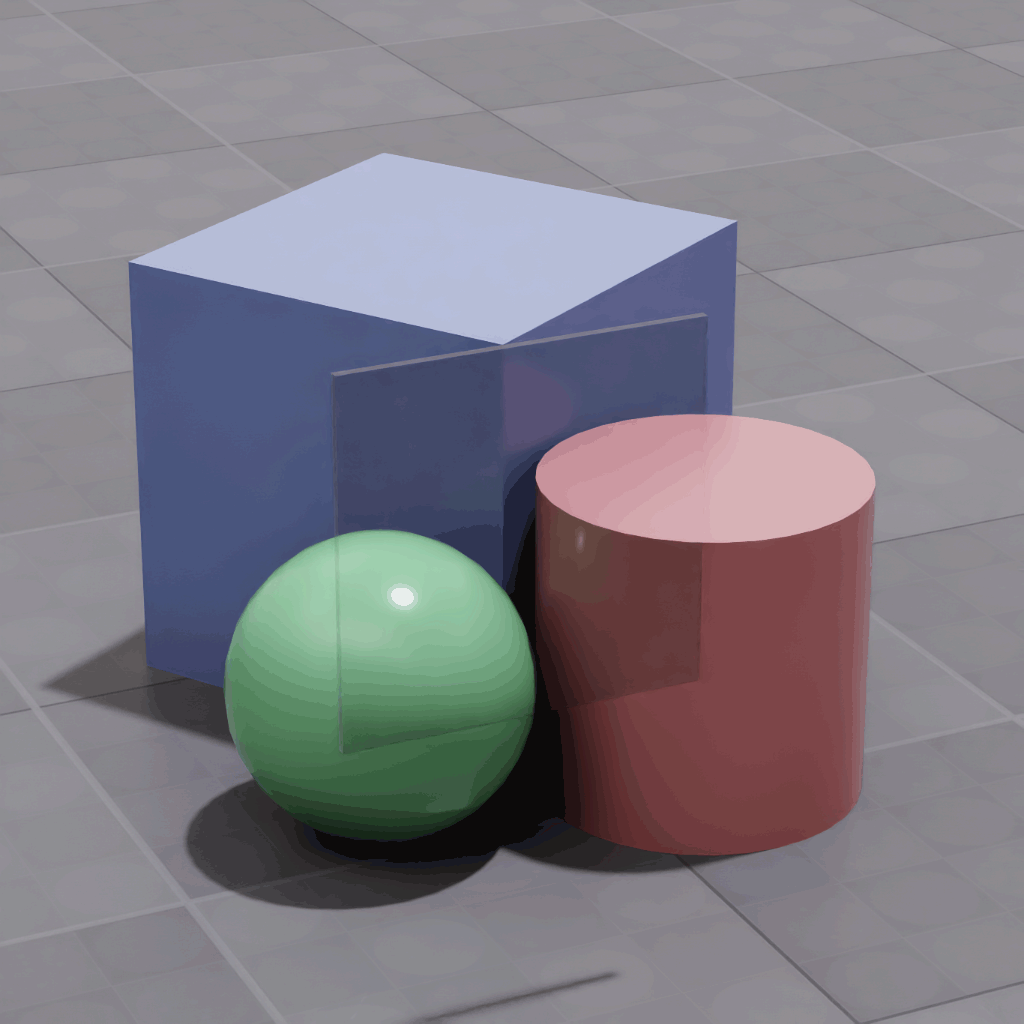
Context:#
We have everything we need for the portal and tabletop context modes added to the stage as references:
We then have a variantSet on the context prim that toggles the visibility between the context_portal and context_tabletop prims. These prims are references to other USD stages, allowing us to compose all the different assets for each context separately from our root stage. What’s useful about this structure is that we can change out the reference to either context, or to context_portal or context_tabletop, and our scene logic will still function when changing between tabletop and portal mode.
Placement Guidelines#
When we view an object in tabletop mode on the device, we create an anchor on the device first, and then spawn the view from the stream. In Omniverse the coordinate systems are aligned to the origin, meaning 0,0,0 of the anchor is 0,0,0 of Omniverse. Any object you want to view in tabletop mode should be placed in the stage, either by hand or programmatically at 0,0,0 in order for it to appear in the correct location.
Lighting & Environment#
Shadow Catcher#
RTX supports multiple ways to render and composite a shadow catcher - providing varying levels of realistic shadows and reflections under your object that can improve believability of a mixed reality experience.

Any object with Matte Object enabled on its properties will only render reflections and shadows when composited. By default the material properties will be taken into account, for example if your matte object is a scuffed shiny material then the shadows and reflections will exhibit the reflective properties of that scuffed material.
Shadow Catcher will override your Matte Object prim materials to only capture shadows - removing those material characteristics and reflections.
Ambient Shadow Catcher will go one step further and only utilize ambient occlusion for generating a shadow in your Matte Object. This is useful if you want to remove shadowing casting by lights in your scene. It also comes with the benefit of being able to adjust the softness and contrast of your shadow, giving you more artist controls for how your scene looks in mixed reality.
HDRI Setup & Usage#
Digital Twins in Volume mode look best when they have accurate lighting of the space they’re in. Apple does not provide the environment map generated from the Vision Pro for use in Omniverse. Sébastien Lagarde has a definitive guide for capturing high quality HDRIs. Alternatively, a device like a Ricoh Theta Z1 with their HDRI Capture Plugin can also allow you to quickly capture HDRIs for your experience.
We recommend tuning the intensity and color of your HDRI while wearing the device to ensure the asset looks believable.
If you view an asset in volume mode in a space that is not similar to the HDRI provided, you may create a high amount of contrast between the passthrough video feed and the HDRI. For example, if the floor of your HDRI is black, but you’re viewing the asset in a room with a white floor. This contrast can appear as an edge, or a matte line, around your asset due to the nature of alpha compositing. We recommend having a wide variety of generic HDRIs with varying amounts of contrast so that you can achieve great visuals in a variety of environments.
Material Optimization#
Glass Materials#
Compositing glass in a mixed reality context is a difficult computer graphics problem. We send depth, alpha and color to the device and attempt to allow glass to maintain its reflective and refractive properties while maintaining its sense of depth. Multiple layers of glass compound these difficulties, and can result in streaking artifacts on the device. We want you to take full advantage of raytracings’ ability to refract complex objects, so here are some suggestions for optimizing glass assets.
Thick Glass#
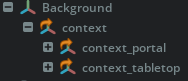
Thick glass denotes geometry that has multiple sides, a front pane and a rear pane. This is how glass is physically modeled in the real world, and so commonly CAD data will represent glass surfaces in this way. Thick glass involves a ray entering, passing through, and exiting the geometry to reveal what is behind the glass, three bounces in total.
Keep this in mind when addressing performance, the maximum number of refractive bounces in your render settings can greatly alter the performance of your stage, with fewer bounces increasing performance.
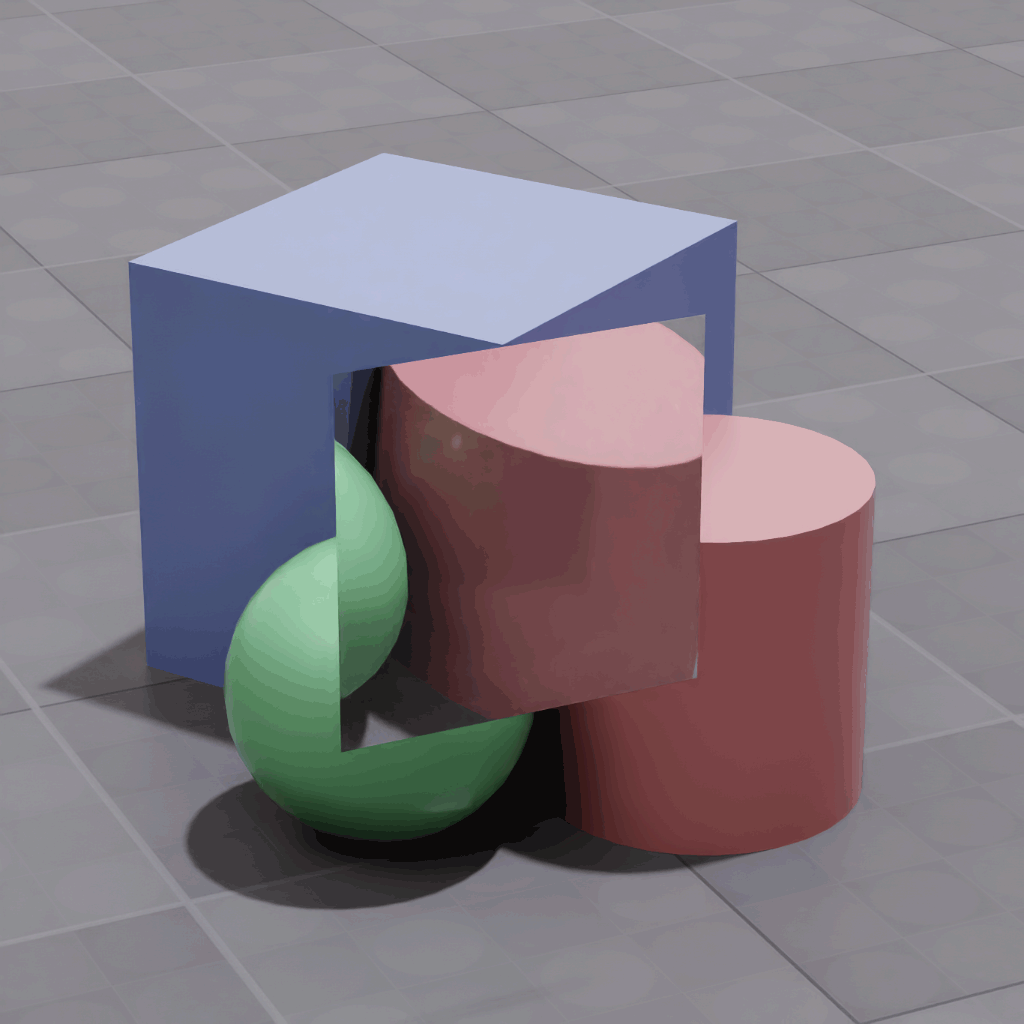
If you have thick glass, but not enough bounces, the glass may render black, or if there aren’t enough bounces for the ray to exit the glass, you’ll see an unexpected amount of distortion like the image below:
Thin Walled Glass#
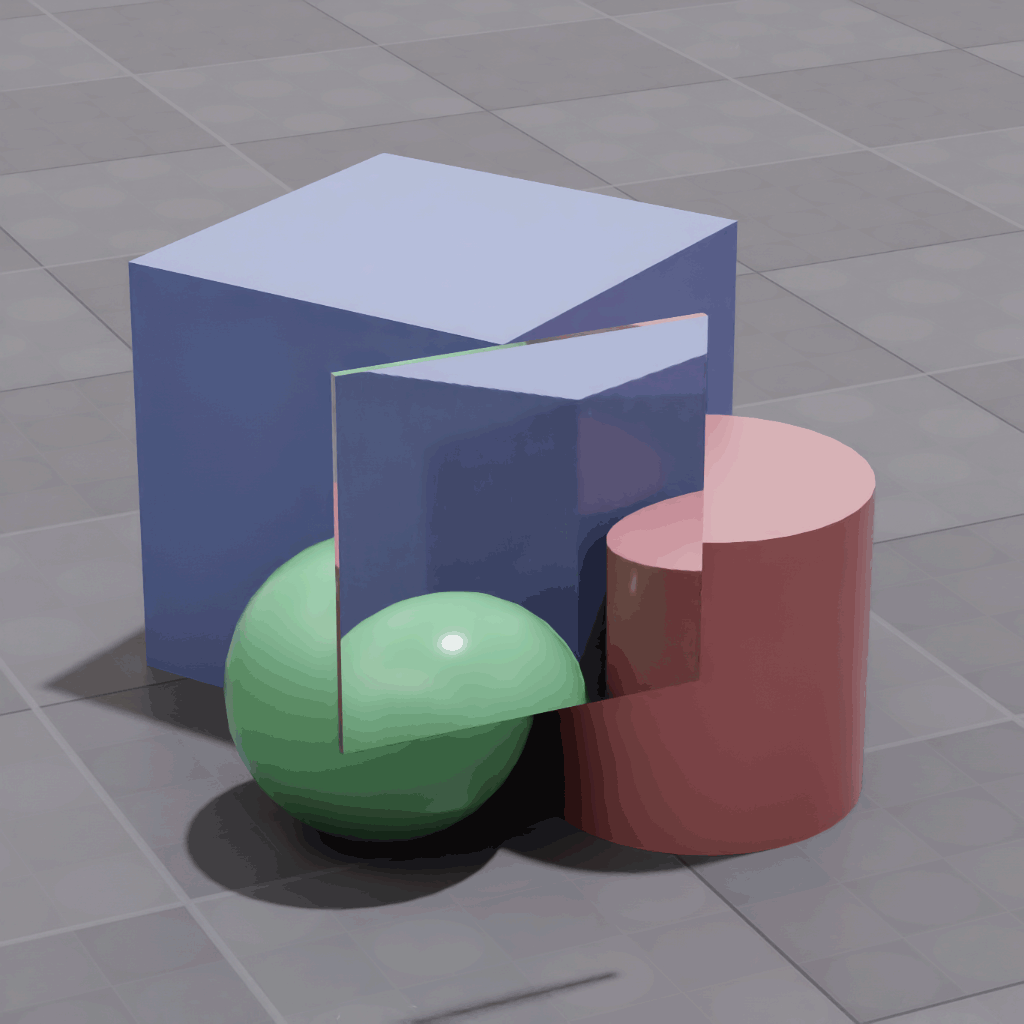
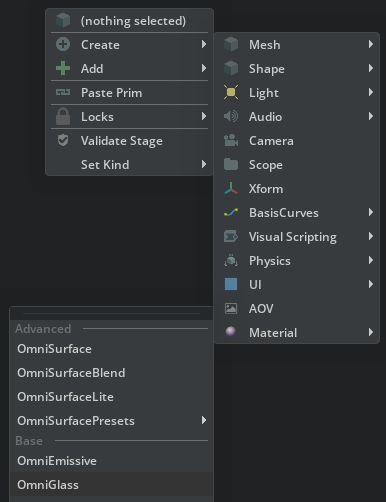
One way to reduce the rendering cost of thick and thin glass objects is to use Thin Walled, on our OmniGlass material it’s in the Refraction section.

This treats the prim as only being single sided, and has no refractive properties: rays pass straight through. For thick glass this will remove some interesting internal refractive visual qualities at the gain of more performance and requiring fewer refraction bounces.
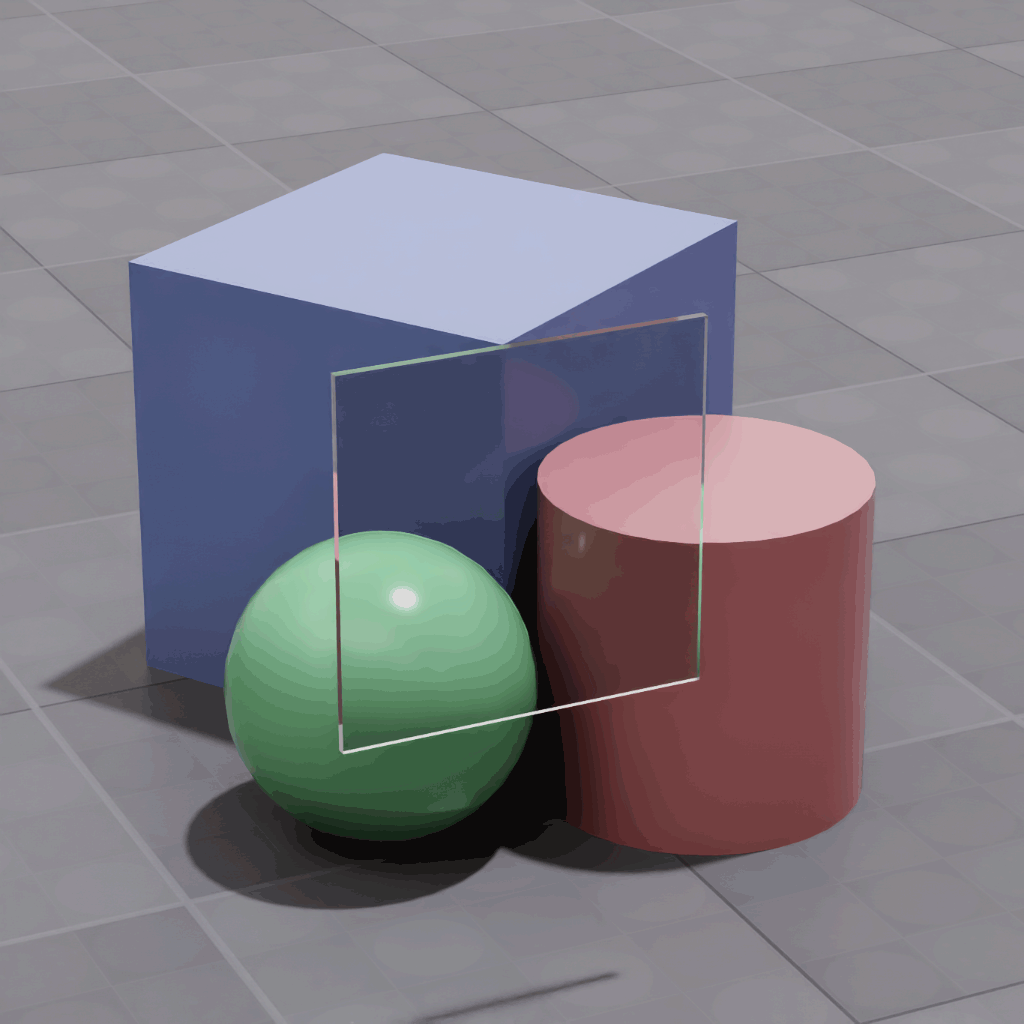
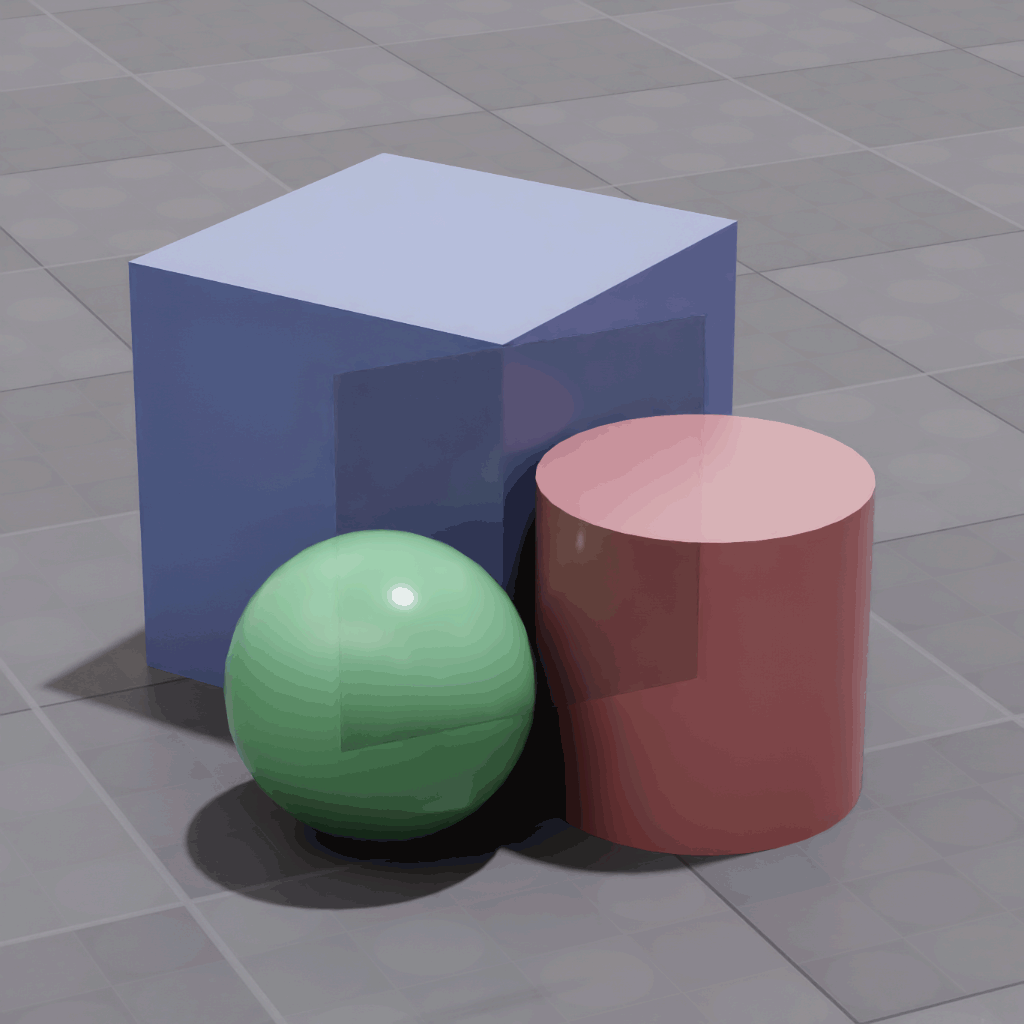
For single sided glass, this setting is required, as the more physically correct expectation is to have another surface for the ray to pass through. If left unchecked you’ll see an unexpected amount of distortion in the glass.
Distorted:
Correct:
OmniGlass Material#
While any PBR material can be used to create glass, we recommend the OmniGlass material when possible as it contains the minimum amount of material layers required for glass.
Recording & Capture#
High Quality Recording Setup#
Apple Vision Pro#
There are multiple ways to capture what the Vision Pro user is seeing:
They start a Recording from the Control Center.
They can Airplay/Share View their view to a Mac and capture that screen.
They can use Reality Composer Pro to perform a Developer Capture.
Developer Capture is the only way to get a high quality 4k capture of your experience, and there are some unique complexities of our SDK that require some setup to perform these captures. Developer Capture turns off foveation on the device locally, but we must also turn off foveation on the server in Omniverse. In our sample, we present this in the connect window under Resolution Preset as 4K Recording Mode in our visionOS app:
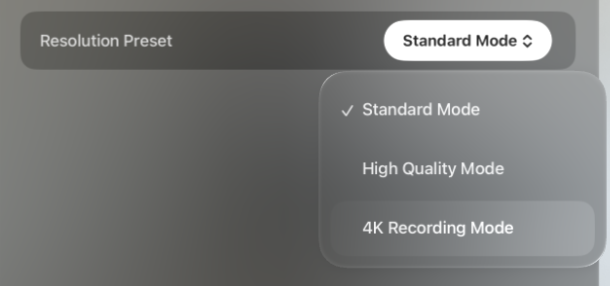
Enabling this tells Omniverse to turn off foveation in the XR settings:
Note: You may not want to ship this mode in your final app, but only use it or enable it when capturing recordings for promotional purposes.
When we turn off foveation, we introduce latency in three places:
We increase the amount of full resolution pixels Omniverse must create
We increase the load on the encoder and decoder of the stream
We increase the bandwidth used to deliver those pixels to the device.
This will reveal itself by creating a visible delay in the view updating in the portal and volume modes, usually with black pixels being shown outside the frustum as the camera attempts to update. To mitigate this latency, we recommend tethering the Vision Pro by way of the Developer Strap and a USB-C connection to a MacBook sharing its ethernet connection. Here is a basic diagram of how we set up for our shoots:
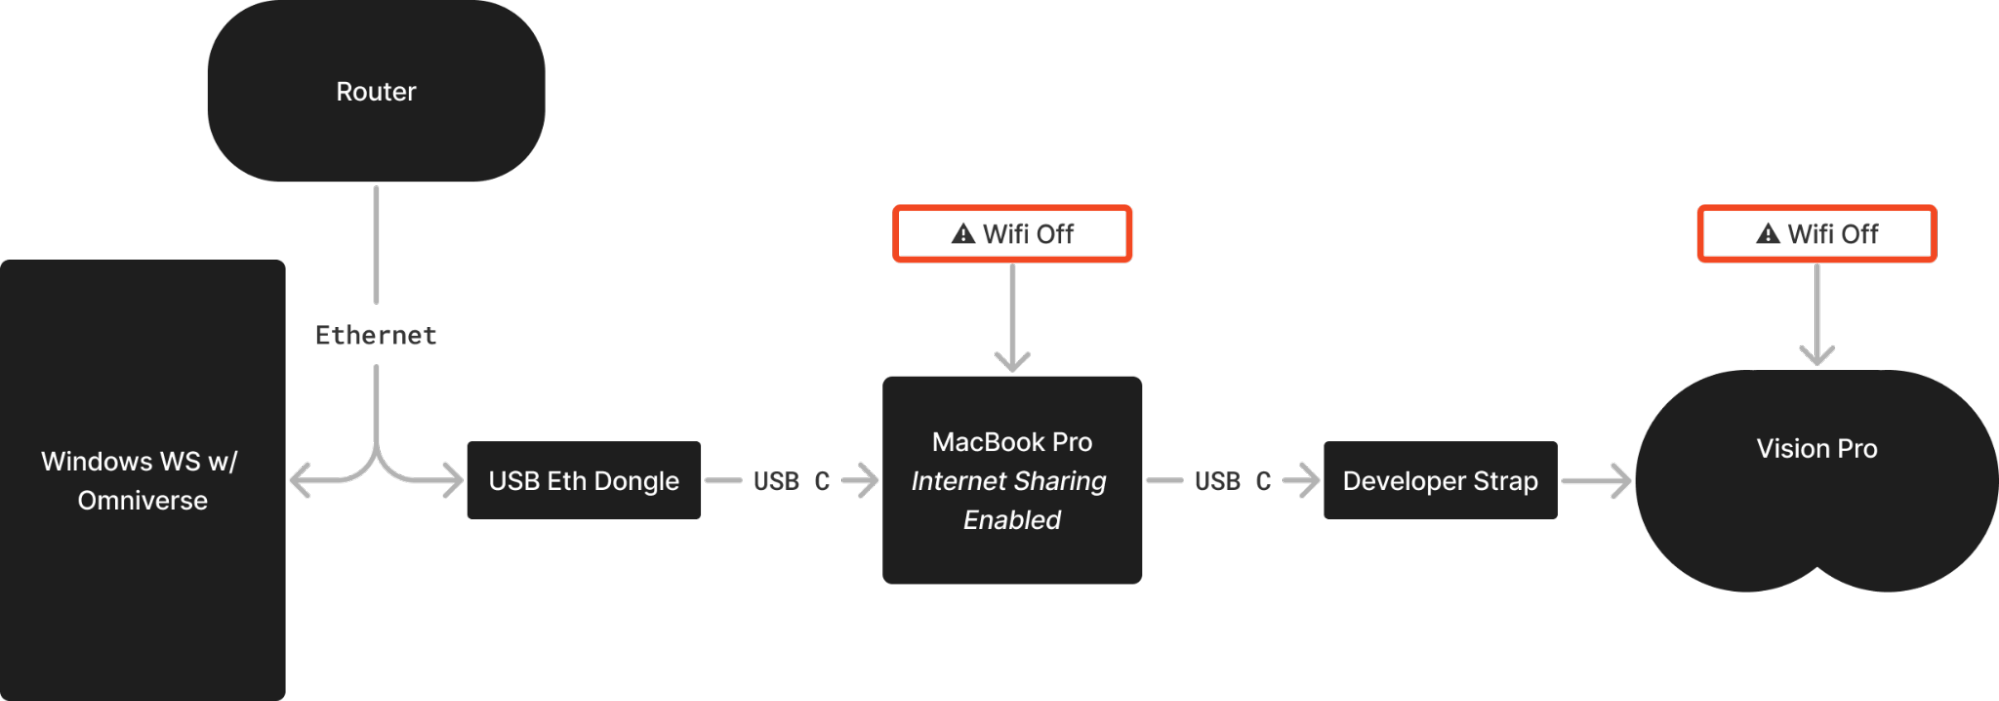
Note that this setup will not remove all latency, you will need to consider the speed of your head and body movements, and consider some amount of cropping of your frame in post production. Keeping your assets in a “title safe” region of your view can help. Be prepared for the Vision Pro to need a break between captures as it is prone to overheating depending on the ambient temperature.
iPad#
To capture your session on an iPad, use the record screen functionality built into iPad OS. You can follow Apple’s instructions for enabling screen recording from this support article.