9.3. Extension Workflow for RL
Introduced in Isaac Sim 2023.1.0 release, the extension workflow provides a new experience for running reinforcement learning environments in Isaac Sim. In contrast to the existing python workflow, the extension workflow requires launching the Isaac Sim app and interacting with the UI to run RL environments. This workflow is designed to improve iteration cycles when designing and implementing new RL environments.
The extension workflow provides an user interface that can be used to select tasks, load scenes, and start/stop training runs. The workflow introduces a concept of separation between scene creation and launching a training run. During the environment design process, the UI allows re-creating a scene on the existing stage without starting simulation. The UI also supports launching and re-launching training runs without re-creating the environment for each run. This eliminates additional overhead in the iteration process.
Updating task code and configuration parameters while running the extension workflow will allow new changes to be picked up by the extension through hot reloading. The changes will be reflected in the stage and training once the Load or Train buttons are triggered. The app does not need to be closed and re-opened to perform multiple runs.
The extension workflow uses the multi-threaded VecEnv base environment for running RL training and inferencing. Since the UI requires having its own control loop, the RL policy runs on a separate thread that maintains its own execution loop. The two threads communicated via multi-threaded queueus in the VecEnv class for passing actions and states.
9.3.1. Learning Objectives
In this tutorial, we will explore the extension workflow for reinforcement learning in Isaac Sim. We will
Launch Isaac Sim with the extension workflow
Navigate the user interface
Run examples from the user interface
Understand workflow implementations
10-15 Minute Tutorial
9.3.2. Launching Isaac Sim
To use the extension workflow, an Isaac Sim app instance must be launched first. A dedicated kit app file is provided for the purpose of the extension workflow. However, the path to the OmniIsaacGymEnvs repo must be provided as a command line argument in order for the Isaac Sim app to find the OIGE extension. This path should be the parent directory of where the OIGE extension is cloned at. For example, if OIGE is cloned to /home/user/OmniIsaacGymEnvs, then the required argument will be –ext-folder /home/user.
Below is an example command for launching Isaac Sim:
./<isaac_sim_root>/isaac-sim.gym.sh --ext-folder </parent/directory/to/OIGE>
Note that Isaac Sim is generally installed at the below paths:
For Linux: ~/.local/share/ov/pkg/isaac_sim-*
For Windows: C:\Users\user\AppData\Local\ov\pkg\isaac_sim-*
For IsaacSim Docker: /isaac-sim
9.3.3. User Interface
Once the Isaac Sim app is launched, the OIGE extension UI can be opened from the top menu bar by navigating to Isaac Examples > RL Examples. The below UI window should appear.
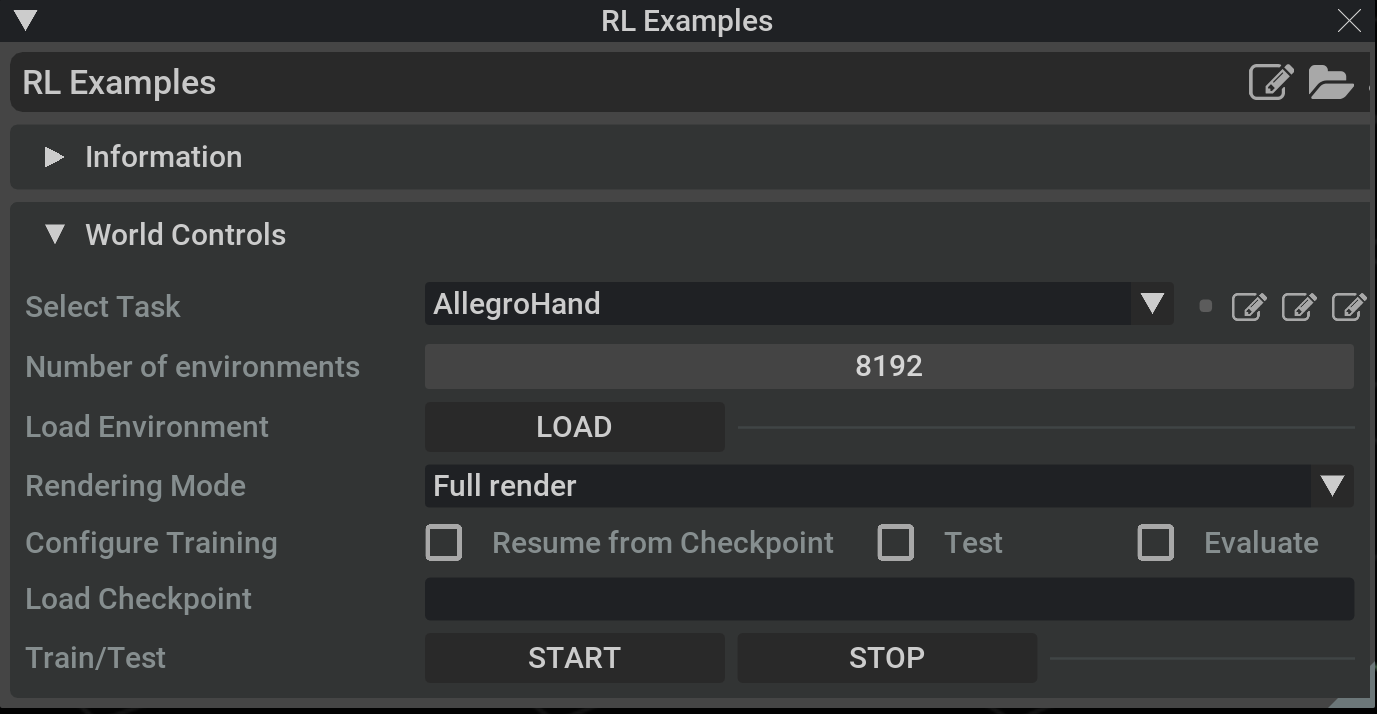
Under the World Control section of the UI, the Select Task dropdown contains a list of tasks that are currently supported. Additional tasks can be added to this list by registering the task in task_util.py.
On the right hand side of the task dropdown, a few quick access buttons are available for opening the task implementation script, task config file, and training config file for the seletect task in VSCode. Note that these features are only available if VSCode is already installed on the system.
Below the task dropdown, a slider is provided for selecting the number of environments. Changes to this value will only take effect once the LOAD button is clicked.
The LOAD button triggers an event to clear out the current stage and reload the stage with assets from the selected task.
Next, the Rendering Mode dropdown provides a menu with 3 selections. By default, Full render mode performs full physics simulation, viewport rendering, and app UI updates for every step call for the task. This enables rendering and visualization of the task during training or inferencing. However, this mode will also be the slowest in terms of FPS performance. The UI only mode disables rendering of the viewport. Once this mode is selected, the viewport will no longer be displayed and visualizations of the task will not be shown. However, the physics simulation and app/UI will continue to be updated each step. This is similar to training in headless mode, but generates additional overhead in updating the app and UI at every step. The third mode None will throttle the UI update, but continue to update the physics simulation at each step. This mode provides the closest performance to running headlessly, but comes at the cost of slightly reduced responsiveness of the UI. However, the UI thread will be updated once every 10 steps, preventing the UI from being completely frozen. Physics simulation in this mode will continue to be updated at every step. The rendering mode can be updated dynamically at run time by switching between selections in the dropdown menu.
In the Configure Training menu, a selection of checkboxes are provided: * Resume from Checkpoint will use the checkpoint path provided in the Load Checkpoint textbox below to resume training from the provided checkpoint. * Test will enable the test/inference mode for the RL policy. No training will be performed when this box is checked. * Evaluate can be used to view the progress of training while another training process is running. This option will automatically look for new checkpoints in the directory of the provided checkpoint path. When new checkpoints are found, it will be automatically loaded and evaluated in the run.
The Load Checkpoint text box should contain the path to the checkpoint. Local paths will be parsed relative to the directory where the Isaac Sim app is running from. If empty, the text box will automatically populate with a local path pointing to the default checkpoint path for the task selected.
Finally, START and STOP buttons are provided to start and stop a training/inference run. These buttons will control the launch and termination of the RL thread. New runs cannot be started until the previous run is stopped.
9.3.4. Running an Example
To run an example through the user interface, the following workflow can be used:
Select a task from the Select Task dropdown, for this example, we will select Cartpole.
Click on the LOAD button, which will load the Cartpole scene.
Once the scene is loaded, click on START, which will start a training.
Once training completes, we can run inference with the following steps.
Lower the number of environments by setting the Number of environments slider to 25.
Click on LOAD to re-load the scene with 25 environments.
Tick the Test checkbox, make sure the values populated in the Load Checkpoint text box is correct.
Click on START to start inferencing on the previously trained checkpoints.
Click on STOP to stop the simulation.
9.3.5. Workflow Implementation
To enforce the concept of separation between environment creation and training, the extension workflow requires implementation of a few more APIs in the task class:
update_config(self, sim_config: SimConfig) - this API will be called each time the environment is loaded or a training/inferencing run is triggered. The purpose of this API is to update the values in the tasks that are parsed from the config files. When values in the config files are modified across training runs, this API allows the task to pick up changes from the config files.
initialize_views(self, scene: Scene) - this API will be called when training runs are executed without re-creating the environment. This API allows the task to intialize views used in the task using existing assets in the current stage. When implementing this API, make sure any existing views registered to the current Scene are removed before re-adding views with the same names.
9.3.6. Summary
This tutorial covered the following topics:
Overview of the extension workflow
Launching Isaac Sim with the extension workflow
Navigating the UI for launching training and inferencing runs
Implementation required for the extension workflow
9.3.6.1. Next Steps
Continue on to the next tutorial in our Reinforcement Learning Tutorials series, Domain Randomization for RL, to learn about domain randomization for reinforcement learning.
9.3.6.2. Further Learning
For more details on the extension, please refer to the Extension Workflow page page in OmniIsaacGymEnvs.