Rendering with Subframes Examples#
Getting great looking, realistic renders is an important part of SDG. Below we’ll cover some of the ways to improve and control quality vs. performance.
Rendering Subframes#
Using the Replicator subframes feature can drastically improve the quality of rendered frames. Subframes are not necessarily needed to get high quality rendering, but the option is available to assist in controlling quality, especially for Path Tracing and temporal effects like Global Illumination (GI).
Subframes are a way to accumulate frames over time for a higher quality result for less noise, artifacts, or achieve more accurate lighting.
Below, is an interior scene using the Path Tracer, with heavy use of global illumination, large single color areas and strong contrast and reflections. Subframe counts of 1, 10, 25 and 50 show the quality differences.
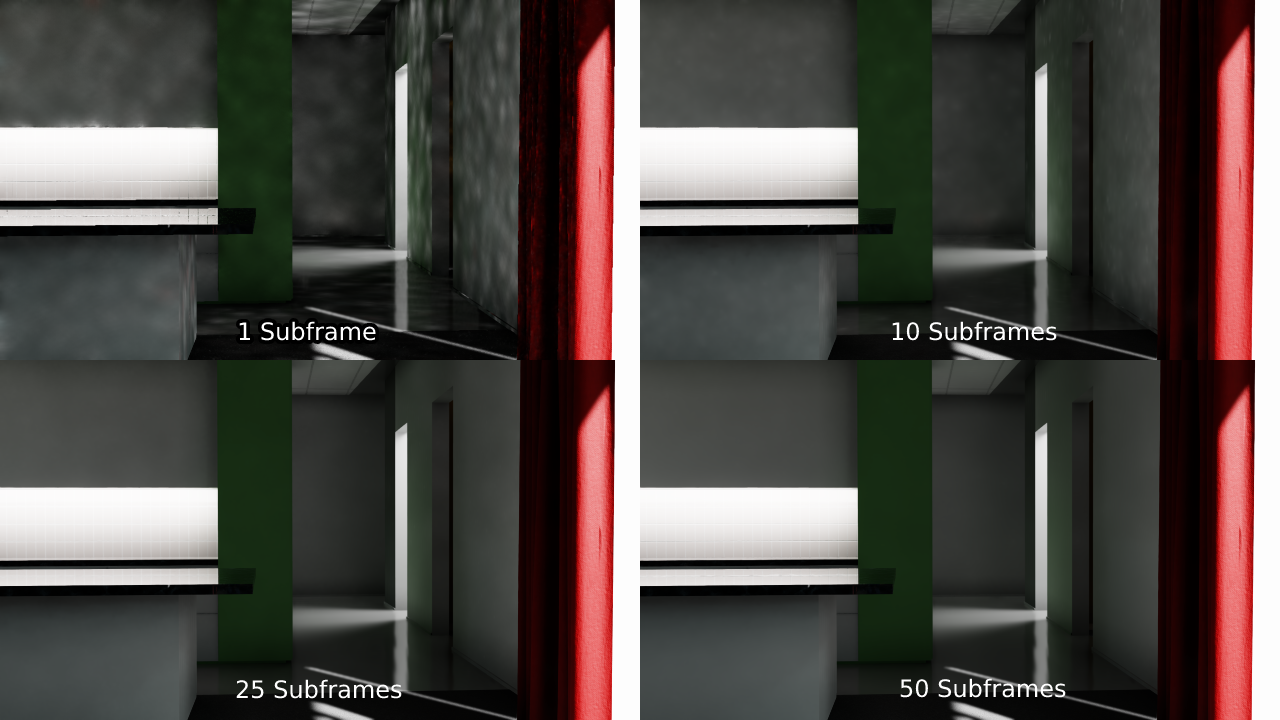
The above example illustrates a highly challenging scene, with a lot of smooth bounce light and surfaces with little textural detail. It was built specifically to show how subframes can increase the quality when needed. That said, quality vs. speed is a tradeoff that should be considered by you for your use case. Scenes may not need any subframes, or only a few.
Note
The default ‘onframe’ subframe count is 1. If your scene requires more quality, we recommend trying a subframe count of 32, and tweaking up or down depending on your use case.
Prerequisites#
Set up the lighting in your scene as you’d like it. Place the lights and environments, their intensities as you’d wish.
Set the renderer to RTX - Real-Time 2.0 or RTX – Interactive (Path Tracing) mode. You can also determine this in your replicator script, please see the example script below.
Take special care to the render settings! For Path Tracing in Code, you will need to set the Path Tracing “Total Samples per Pixel, to something smaller, like 16, instead of 512. Or replicator may take a very long time because its oversampling each frame in addition to using subframes.
Examples#
The example scripts below generate three images using the path tracer. The result should appear similar to these.

Trigger On Frame or Time
You can set the subframes within rep.trigger.on_frame(), or rep.trigger.on_time(), shown below in the example.
import omni.replicator.core as rep

# Remove the default light
default_light = rep.get.prims(path_pattern="/Environment/defaultLight")
with default_light:
    rep.modify.visibility(False)

camera_positions = [(1347,825,1440), (0, 825, 1440),(1440,825,0)]

# Create the lights
distance_light = rep.create.light(rotation=(400,-23,-94), intensity=10000, temperature=6500, light_type="distant")
cylinder_light = rep.create.light(position=(0,0,0),rotation=(0,-180,-180),light_type="disk")

# Create the environment
cone = rep.create.cone(position=(0,100,0), scale=2)
floor = rep.create.cube(position=(0,0,0), scale=(10,0.1,10))
wall1 = rep.create.cube(position=(-450,250,0), scale=(1,5,10))
wall2 = rep.create.cube(position=(0,250,-450), scale=(10,5,1))

#Create the replicator camera
camera = rep.create.camera(position=(1347,825,1440), look_at=(0,100,0), focus_distance=200,f_stop=8)

# Set the renderer to Path Traced
rep.settings.set_render_pathtraced(samples_per_pixel=64)

# Create the render product
render_product  = rep.create.render_product(camera, (1920, 1080))

# Initialize and attach writer
writer = rep.WriterRegistry.get("BasicWriter")
writer.initialize(output_dir="_subframes_pt_example", rgb=True)
writer.attach([render_product])


# Render 3 frames, with 50 subframes
with rep.trigger.on_frame(num_frames=3, rt_subframes=50):
    with camera:
        rep.modify.pose(position=rep.distribution.sequence(camera_positions), look_at=(0,100,0))
Step Async
You can also set the subframes using rep.orchestrator.step_async(), shown below in the example.
import asyncio
import omni.replicator.core as rep

async def run():

    # Remove the default light
    default_light = rep.get.prims(path_pattern="/Environment/defaultLight")
    with default_light:
        rep.modify.visibility(False)

    # Create the lights
    distance_light = rep.create.light(rotation=(400,-23,-94), intensity=10000, temperature=6500, light_type="distant")
    cylinder_light = rep.create.light(position=(0,0,0),rotation=(0,-180,-180),light_type="disk")

    camera_positions = [(1347,825,1440), (0, 825, 1440),(1440,825,0)]

    # Create the environment
    cone = rep.create.cone(position=(0,100,0), scale=2)
    floor = rep.create.cube(position=(0,0,0), scale=(10,0.1,10))
    wall1 = rep.create.cube(position=(-450,250,0), scale=(1,5,10))
    wall2 = rep.create.cube(position=(0,250,-450), scale=(10,5,1))

    #Create the replicator camera
    camera = rep.create.camera(position=(1347,825,1440), look_at=(0,100,0), focus_distance=200,f_stop=8)
    camera_positions = [(1347,825,1440), (0, 825, 1440),(1440,825,0)]

    # Set the renderer to Path Traced
    rep.settings.set_render_pathtraced(samples_per_pixel=64)

    render_product  = rep.create.render_product(camera, (1920, 1080))

    rgb = rep.AnnotatorRegistry.get_annotator("rgb")
    rgb.attach(render_product)
    backend = rep.BackendDispatch({"paths": {"out_dir": "_subframes_example"}})

    for frame_id in range(3):
        with camera:
            rep.modify.pose(camera_positions[frame_id], look_at=(0,100,0))

        await rep.orchestrator.step_async(rt_subframes=50)

        rgb_data = rgb.get_data()
        backend.write_image("image_" + str(frame_id) + ".png", rgb_data)

        backend.wait_until_done()

    rep.orchestrator.stop()

asyncio.ensure_future(run())